Enable Root Account and Password Access
In the GCP documentation setting up ssh keys which shows how to set up your own ssh key to access all your virtual machines in GCP. here's the summary of steps:
- Generate your keys using ssh-keygen or PuTTYgen for Windows, if you haven't already.
- Copy the contents of your public key. If you just generated this key, it can probably be found in a file named
id_rsa.pub.- Log in to the Developers Console.
- In the navigation, Compute->Compute Engine->Metadata.
- Click the SSH Keys tab.
- Click the Edit button.
- In the empty input box at the bottom of the list, enter the corresponding public key, in the following format:
<protocol> <public-key> [email protected]
This makes your public key automatically available to all of your instances in that project. To add multiple keys, list each key on a new line.- Click Done to save your changes.
It can take several minutes before the key is inserted into the instance. Try connecting with ssh to your instance. If it is successful, your key has been propagated to the instance.
gcloud compute instances ssh or even clicking on the "SSH" button on the Developers Console next to the instance, you should be able to use the sudo command. Note that you shouldn't be using the su command to become root, just run:sudo [command]
sudo, run:sudo su -Sometimes, you might need to have directly root ssh access with username/password authentication. Here is how we can do it:
1. As the root user, edit the sshd_config file found in /etc/ssh/sshd_config:
vim /etc/ssh/sshd_config2. PermitRootLogin and PasswordAuthentication
Add the following line to the file, you can add it anywhere but it’s good practice to find the block about authentication and add it there.
PermitRootLogin yes
PasswordAuthentication yes
systemctl restart sshdOr:service sshd restart4. Disable public key authentication:
vim /etc/ssh/sshd_configPubkeyAuthentication no
YouTube Video:
Script to enable cloud VPS root account access:
- echo root:123456789 |sudo chpasswd root
- sudo sed -i 's/PermitRootLogin no/PermitRootLogin yes/g' /etc/ssh/sshd_config;
- sudo sed -i 's/PasswordAuthentication no/PasswordAuthentication yes/g' /etc/ssh/sshd_config;
- sudo service sshd restart
Measure Your Latency to GCP Regions
gcping - http://www.gcping.com/


DD GCP From Ubuntu Cloud VM
# Change X.X.X.X to your Script's configuration # --ip-addr :IP Address # --ip-mask :Netmask # --ip-gate :Gateway wget --no-check-certificate -qO InstallNET.sh 'https://moeclub.org/attachment/LinuxShell/InstallNET.sh' && bash InstallNET.sh --ip-addr X.X.X.X --ip-mask X.X.X.X --ip-gate X.X.X.X -dd 'DD Image'
Wait about 30 minutes then use RDP to connect. Make sure RDP port has been opened from your security group firewall rule.
wget --no-check-certificate -qO InstallNET.sh 'https://moeclub.org/attachment/LinuxShell/InstallNET.sh' && bash InstallNET.sh --ip-addr X.X.X.X --ip-mask 255.255.255.0 --ip-gate 10.x.0.1 -dd 'https://api.moeclub.org/GoogleDrive/1DTps9WwC6RZ8szflais8YazpkCVdqdI7'wget --no-check-certificate -qO InstallNET.sh 'https://moeclub.org/attachment/LinuxShell/InstallNET.sh' && bash InstallNET.sh --ip-addr X.X.X.X --ip-mask 255.255.255.0 --ip-gate 10.x.0.1 -dd 'https://api.moeclub.org/GoogleDrive/1KA9PDH4T2ODbxS97T6MtTk5TwifQQoIp'
DD GCP Alpine
- wget --no-check-certificate https://donghaiair.com.cn/alpine.sh && chmod +x alpine.sh && sed -i "s|^mask|mask=255.255.255.0\n#mask|" alpine.sh && ./alpine.sh
or
- wget --no-check-certificate https://haoduck.com/DEMO/sh/alpine.sh && chmod +x alpine.sh && sed -i "s|^mask|mask=255.255.255.0\n#mask|" alpine.sh && ./alpine.sh
DD GCP Windows
Debian/Ubuntu
CentOS
- wget --no-check-certificate -qO InstallNET.sh 'https://moeclub.org/attachment/LinuxShell/InstallNET.sh'
- chmod +x InstallNET.sh
- bash InstallNET.sh --ip-addr 10.168.0.7 --ip-gate 10.168.0.1 --ip-mask 255.255.255.0 -dd 'https://moeclub.org/onedrive/IMAGE/Windows/win10ltsc_x64.tar.gz'
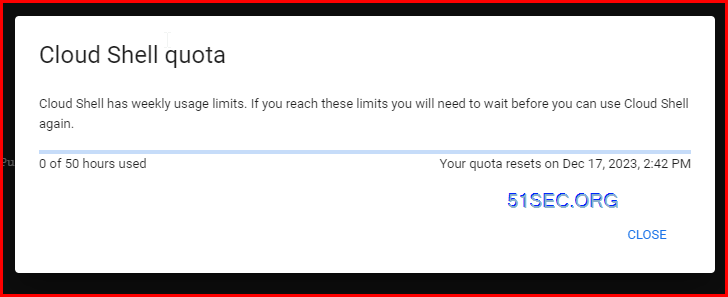
Run Docker Containers Free VPS From GCP Cloud Shell

Welcome to Cloud Shell! Type "help" to get started.
Your Cloud Platform project in this session is set to sec-2-213000.
Use “gcloud config set project [PROJECT_ID]” to change to a different project.
jon_netsec@cloudshell:~ (sec-2-213000)$ curl cip.cc
IP      : 34.139.137.247
地址    : 美国  美国

数据二  : 美国 | 得克萨斯州

数据三  : 美国德克萨斯休斯顿

URL     : http://www.cip.cc/34.139.137.247
jon_netsec@cloudshell:~ (sec-2-213000)$ docker version
Client: Docker Engine - Community
 Version:           20.10.8
 API version:       1.41
 Go version:        go1.16.6
 Git commit:        3967b7d
 Built:             Fri Jul 30 19:54:02 2021
 OS/Arch:           linux/amd64
 Context:           default
 Experimental:      true

Server: Docker Engine - Community
 Engine:
  Version:          20.10.8
  API version:      1.41 (minimum version 1.12)
  Go version:       go1.16.6
  Git commit:       75249d8
  Built:            Fri Jul 30 19:52:10 2021
  OS/Arch:          linux/amd64
  Experimental:     false
 containerd:
  Version:          1.4.9
  GitCommit:        e25210fe30a0a703442421b0f60afac609f950a3
 runc:
  Version:          1.0.1
  GitCommit:        v1.0.1-0-g4144b63
 docker-init:
  Version:          0.19.0
  GitCommit:        de40ad0
jon_netsec@cloudshell:~ (sec-2-213000)$ docker-compose version
docker-compose version 1.24.0, build 0aa59064
docker-py version: 3.7.2
CPython version: 3.6.8
OpenSSL version: OpenSSL 1.1.0j  20 Nov 2018
jon_netsec@cloudshell:~ (sec-2-213000)$
- dorowu/ubuntu-desktop-lxde-vnc from DockerHub
- Github page: https://github.com/fcwu/docker-ubuntu-vnc-desktop
- docker run -p 8080:80 dorowu/ubuntu-desktop-lxde-vnc
docker run -p 6080:80 -v /dev/shm:/dev/shm dorowu/ubuntu-desktop-lxde-vnc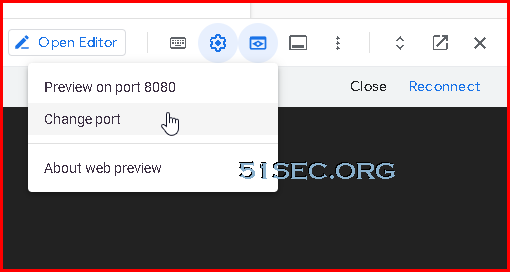
docker run -p 8080:80 dorowu/ubuntu-desktop-lxde-vncroot@79869323e3bb:~# free
total used free shared buff/cache available
Mem: 16393552 1807564 11491980 121544 3094008 14154252
Swap: 0 0 0
root@79869323e3bb:~# cat /proc/cpuinfo
processor : 0
vendor_id : GenuineIntel
cpu family : 6
model : 79
model name : Intel(R) Xeon(R) CPU @ 2.20GHz
stepping : 0
microcode : 0x1
cpu MHz : 2200.156
cache size : 56320 KB
physical id : 0
siblings : 4
core id : 0
cpu cores : 2
apicid : 0
initial apicid : 0
fpu : yes
fpu_exception : yes
cpuid level : 13
wp : yes
flags : fpu vme de pse tsc msr pae mce cx8 apic sep mtrr pge mca cmov pat pse36 clflush mmx fxsr sse sse2 ss ht syscall nx pdpe1gb rdtscp lm constant_tsc rep_good nopl xtopology nonstop_tsc cpuid tsc_known_freq pni pclmulqdq ssse3 fma cx16 pcid sse4_1 sse4_2 x2apic movbe popcnt aes xsave avx f16c rdrand hypervisor lahf_lm abm 3dnowprefetch invpcid_single pti ssbd ibrs ibpb stibp fsgsbase tsc_adjust bmi1 hle avx2 smep bmi2 erms invpcid rtm rdseed adx smap xsaveopt arat md_clear arch_capabilities
bugs : cpu_meltdown spectre_v1 spectre_v2 spec_store_bypass l1tf mds swapgs taa
bogomips : 4400.31
clflush size : 64
cache_alignment : 64
address sizes : 46 bits physical, 48 bits virtual
power management:
processor : 1
vendor_id : GenuineIntel
cpu family : 6
model : 79
model name : Intel(R) Xeon(R) CPU @ 2.20GHz
stepping : 0
microcode : 0x1
cpu MHz : 2200.156
cache size : 56320 KB
physical id : 0
siblings : 4
core id : 1
cpu cores : 2
apicid : 2
initial apicid : 2
fpu : yes
fpu_exception : yes
cpuid level : 13
wp : yes
flags : fpu vme de pse tsc msr pae mce cx8 apic sep mtrr pge mca cmov pat pse36 clflush mmx fxsr sse sse2 ss ht syscall nx pdpe1gb rdtscp lm constant_tsc rep_good nopl xtopology nonstop_tsc cpuid tsc_known_freq pni pclmulqdq ssse3 fma cx16 pcid sse4_1 sse4_2 x2apic movbe popcnt aes xsave avx f16c rdrand hypervisor lahf_lm abm 3dnowprefetch invpcid_single pti ssbd ibrs ibpb stibp fsgsbase tsc_adjust bmi1 hle avx2 smep bmi2 erms invpcid rtm rdseed adx smap xsaveopt arat md_clear arch_capabilities
bugs : cpu_meltdown spectre_v1 spectre_v2 spec_store_bypass l1tf mds swapgs taa
bogomips : 4400.31
clflush size : 64
cache_alignment : 64
address sizes : 46 bits physical, 48 bits virtual
power management:
processor : 2
vendor_id : GenuineIntel
cpu family : 6
model : 79
model name : Intel(R) Xeon(R) CPU @ 2.20GHz
stepping : 0
microcode : 0x1
cpu MHz : 2200.156
cache size : 56320 KB
physical id : 0
siblings : 4
core id : 0
cpu cores : 2
apicid : 1
initial apicid : 1
fpu : yes
fpu_exception : yes
cpuid level : 13
wp : yes
flags : fpu vme de pse tsc msr pae mce cx8 apic sep mtrr pge mca cmov pat pse36 clflush mmx fxsr sse sse2 ss ht syscall nx pdpe1gb rdtscp lm constant_tsc rep_good nopl xtopology nonstop_tsc cpuid tsc_known_freq pni pclmulqdq ssse3 fma cx16 pcid sse4_1 sse4_2 x2apic movbe popcnt aes xsave avx f16c rdrand hypervisor lahf_lm abm 3dnowprefetch invpcid_single pti ssbd ibrs ibpb stibp fsgsbase tsc_adjust bmi1 hle avx2 smep bmi2 erms invpcid rtm rdseed adx smap xsaveopt arat md_clear arch_capabilities
bugs : cpu_meltdown spectre_v1 spectre_v2 spec_store_bypass l1tf mds swapgs taa
bogomips : 4400.31
clflush size : 64
cache_alignment : 64
address sizes : 46 bits physical, 48 bits virtual
power management:
processor : 3
vendor_id : GenuineIntel
cpu family : 6
model : 79
model name : Intel(R) Xeon(R) CPU @ 2.20GHz
stepping : 0
microcode : 0x1
cpu MHz : 2200.156
cache size : 56320 KB
physical id : 0
siblings : 4
core id : 1
cpu cores : 2
apicid : 3
initial apicid : 3
fpu : yes
fpu_exception : yes
cpuid level : 13
wp : yes
flags : fpu vme de pse tsc msr pae mce cx8 apic sep mtrr pge mca cmov pat pse36 clflush mmx fxsr sse sse2 ss ht syscall nx pdpe1gb rdtscp lm constant_tsc rep_good nopl xtopology nonstop_tsc cpuid tsc_known_freq pni pclmulqdq ssse3 fma cx16 pcid sse4_1 sse4_2 x2apic movbe popcnt aes xsave avx f16c rdrand hypervisor lahf_lm abm 3dnowprefetch invpcid_single pti ssbd ibrs ibpb stibp fsgsbase tsc_adjust bmi1 hle avx2 smep bmi2 erms invpcid rtm rdseed adx smap xsaveopt arat md_clear arch_capabilities
bugs : cpu_meltdown spectre_v1 spectre_v2 spec_store_bypass l1tf mds swapgs taa
bogomips : 4400.31
clflush size : 64
cache_alignment : 64
address sizes : 46 bits physical, 48 bits virtual
power management:
root@79869323e3bb:~# cat /proc/meminfo
MemTotal: 16393552 kB
MemFree: 11619288 kB
MemAvailable: 14293272 kB
Buffers: 136724 kB
Cached: 2728068 kB
SwapCached: 0 kB
Active: 634300 kB
Inactive: 3715948 kB
Active(anon): 1804 kB
Inactive(anon): 1581748 kB
Active(file): 632496 kB
Inactive(file): 2134200 kB
Unevictable: 0 kB
Mlocked: 0 kB
SwapTotal: 0 kB
SwapFree: 0 kB
Dirty: 1932 kB
Writeback: 0 kB
AnonPages: 1485560 kB
Mapped: 796400 kB
Shmem: 126016 kB
KReclaimable: 245328 kB
Slab: 299336 kB
SReclaimable: 245328 kB
SUnreclaim: 54008 kB
KernelStack: 13168 kB
PageTables: 25456 kB
NFS_Unstable: 0 kB
Bounce: 0 kB
WritebackTmp: 0 kB
CommitLimit: 8196776 kB
Committed_AS: 7919788 kB
VmallocTotal: 34359738367 kB
VmallocUsed: 16972 kB
VmallocChunk: 0 kB
Percpu: 2528 kB
HardwareCorrupted: 0 kB
AnonHugePages: 0 kB
ShmemHugePages: 0 kB
ShmemPmdMapped: 0 kB
FileHugePages: 0 kB
FilePmdMapped: 0 kB
CmaTotal: 0 kB
CmaFree: 0 kB
HugePages_Total: 0
HugePages_Free: 0
HugePages_Rsvd: 0
HugePages_Surp: 0
Hugepagesize: 2048 kB
Hugetlb: 0 kB
DirectMap4k: 226112 kB
DirectMap2M: 9207808 kB
DirectMap1G: 9437184 kB
root@79869323e3bb:~#
Create a new docker-compose.yml file and copy contents from https://hub.docker.com/_/nextcloud. Make sure enter a new password for your MYSQL root account and MYSQL DB.
jon_netsec@cloudshell:~ (sec-2-213000)$nano docker-compose.yml

version: '2'

volumes:
  nextcloud:
  db:

services:
  db:
    image: mariadb
    restart: always
    command: --transaction-isolation=READ-COMMITTED --binlog-format=ROW
    volumes:
      - db:/var/lib/mysql
    environment:
      - MYSQL_ROOT_PASSWORD=Password1234!
      - MYSQL_PASSWORD=Password1234!
      - MYSQL_DATABASE=nextcloud
      - MYSQL_USER=nextcloud

  app:
    image: nextcloud
    restart: always
    ports:
      - 8080:80
    links:
      - db
    volumes:
      - nextcloud:/var/www/html
    environment:
      - MYSQL_PASSWORD=Password1234!
      - MYSQL_DATABASE=nextcloud
      - MYSQL_USER=nextcloud
      - MYSQL_HOST=db


This comment has been removed by a blog administrator.
ReplyDelete