Diagram
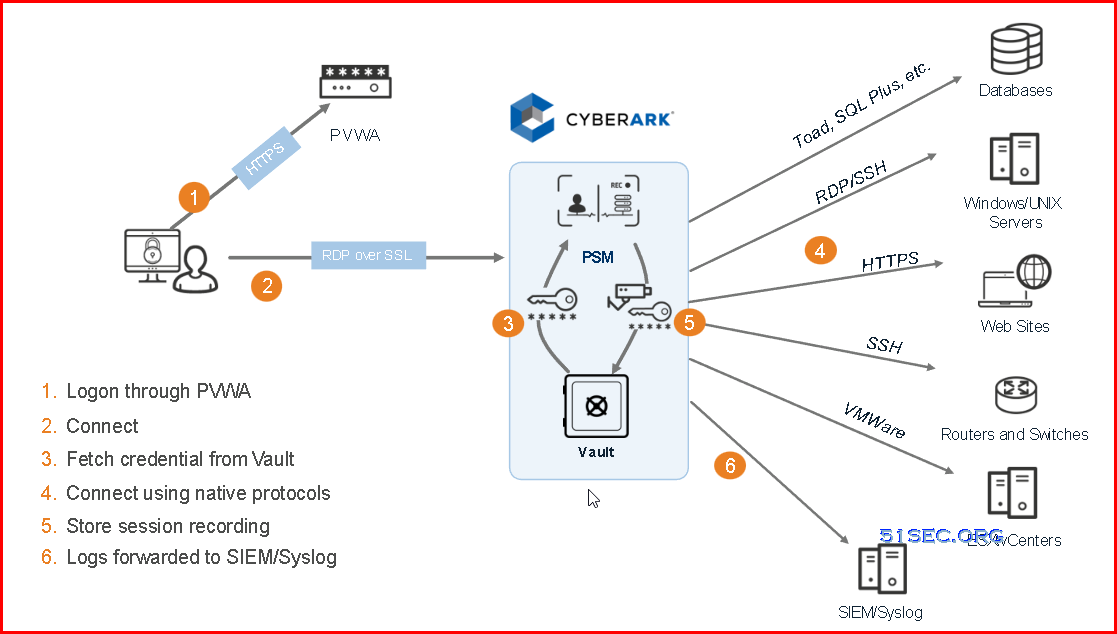
Architecture
- size of session recordings
- activity in your enterprise
- recordings retention period
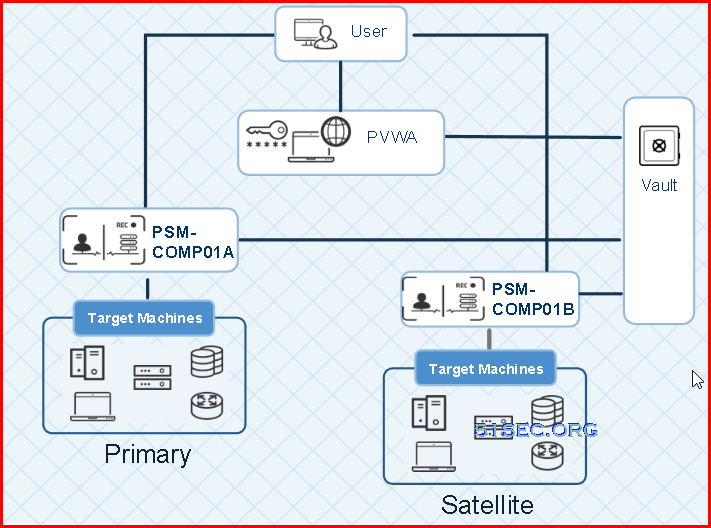
- Disaster Recovery deployment

- Distributed (Multiple sites, fault tolerance)
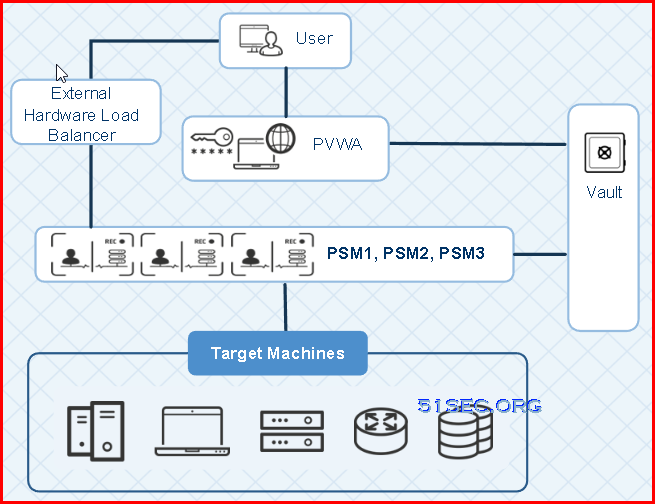
- Performance in a load balanced configuration
System Requirements
- OS: 2019. 2016 (Preferred by installation guide), 2012 (Special requirements)
- .Net Framework 4.8
- Microsoft RDS Session Host
- minimum hardware requirements
Installation Overview
The PSM automatic installation enables a silent and automatic deployment of the product. This facilitates a fast deployment of the product eliminating human mistakes during installation and configuration.
The automatic installation is divided into several configurable stages: setup, installation, post-installation, hardening and registration.
Each step in a stage can be configured to run automatically as part of the automatic installation, or, the step can be configured to be done manually for troubleshooting or user preferences. The recommended steps are enabled by default and you can disable them in the configuration file.
In addition, the installation and registration stages can be done manually using the installation wizard.
Method 1 - Automatic Installation all in one
PSMAutoInstallation.exe runs all the PSM installation stages: setup, installation, post-installation, hardening, and registration. Doc.- This tool DOES NOT support upgrade.
- SM installation runs the hardening steps, including PSMConfigureApplocker, with a default configuration.
- The hardening stage blocks all administrators from navigating in the PSM server file system.
- The Registration stage creates the relevant PSM objects in the Vault each time it runs. When you run the tool, this stage is only run if it has not yet run or if the connection to the Vault failed. If registration started and was cancelled, you must run the repair via the installation Wizard.
Run the installation tool
From the installation CD, copy the PSM folder to the component server and unzip.
Open CMD and run
CD <PSM CD-Image Path>\PSMAutoInstallationTool
PSMAutoInstallationTool /vaultip <Vault IP address> /vaultuser <Vault username for installation> /accepteula yes
Restart - The tool runs the PSM installation stages. When a restart is required, the user is prompted to press Enter, restarting the machine. When the user logs in to the machine again, the tool continues from the relevant step.
Vault user credentials - If you are using a Vault username and password, after the last restart you are prompted to enter a password. Enter the password and click Enter. You can use the cred file to avoid entering the password interactively.
Method 2 - Automatic Installation in Five Stages
Detailed explanation on this doc:Set Up Stage:
From the installation CD, copy the PSM folder to the component server and unzip.
Open InstallationAutomation\Prerequisites\PrerequisitesConfig.XML. Review the options and select the steps to enable by setting Enable = "Yes".
Run the set up stage
To run the script in standard mode, open a PowerShell window and run the following command:
CD “<CD-Image Path>\InstallationAutomation”
.\Execute-Stage.ps1 “<CD-Image Path>\InstallationAutomation\Prerequisites\PrerequisitesConfig.XML”
Installation Stage:
CD “<CD-Image Path>\InstallationAutomation”
.\Execute-Stage.ps1 “<CD-Image Path>\
InstallationAutomation\Installation\InstallationConfig.XML”
Post-installation Stage:
Configure the post-installation stage
From the CD image, open InstallationAutomation\PostInstallation\PostInstallationConfig.XML. and select the steps you want to enable by setting Enable = "Yes"
CD “<CD-Image Path>\InstallationAutomation”
.\Execute-Stage.ps1 “<CD-Image Path>\Installation automation\PostInstallation\PostInstallationConfig.XML
Harden Stage:
CD “<CD-Image Path>\InstallationAutomation”
.\Execute-Stage.ps1 “<CD-Image Path>\Installation automation\Hardening\HardeningConfig.XML
Registration Stage:
Run the registration stage with a password. Open a PowerShell window and run one of the following commands:
Interactively run the script with the -spwd parameter to securely pass the password to the script. After running the script, enter the Vault user password and press Enter.
CD “<installation package Path>InstallationAutomation” .\Execute-Stage.ps1 “<installation package Path>\InstallationAutomation\Registration\RegistrationConfig.XML”-spwd Automatically run the script with the -spwdObj parameter to securely pass the password to the script. First create a secure string that holds the Vault user password. For example:
$sp = Read-Host -AsSecureString
Enter the Vault user password, press Enter, and run the script.
CD “<installation package Path>InstallationAutomation” .\Execute-Stage.ps1 “<installation package Path>\InstallationAutomation\Registration\RegistrationConfig.XML”-spwdObj $sp Interactively run the script with the -pwd parameter:
CD “<installation package Path>InstallationAutomation” .\Execute-Stage.ps1 “<installation package Path>\InstallationAutomation\Registration\RegistrationConfig.XML”-pwd <vaultpassword> This method is not recommended, as it runs with the password in clear text.
If you use a credfile, open a PowerShell window and run the following command:
CD “<installation package Path>InstallationAutomation” .\Execute-Stage.ps1 “<installation package Path>\InstallationAutomation\Registration\RegistrationConfig.XML” When you use the registration tool, the PSM server is assigned a unique identifier, PSM-<identifier>.
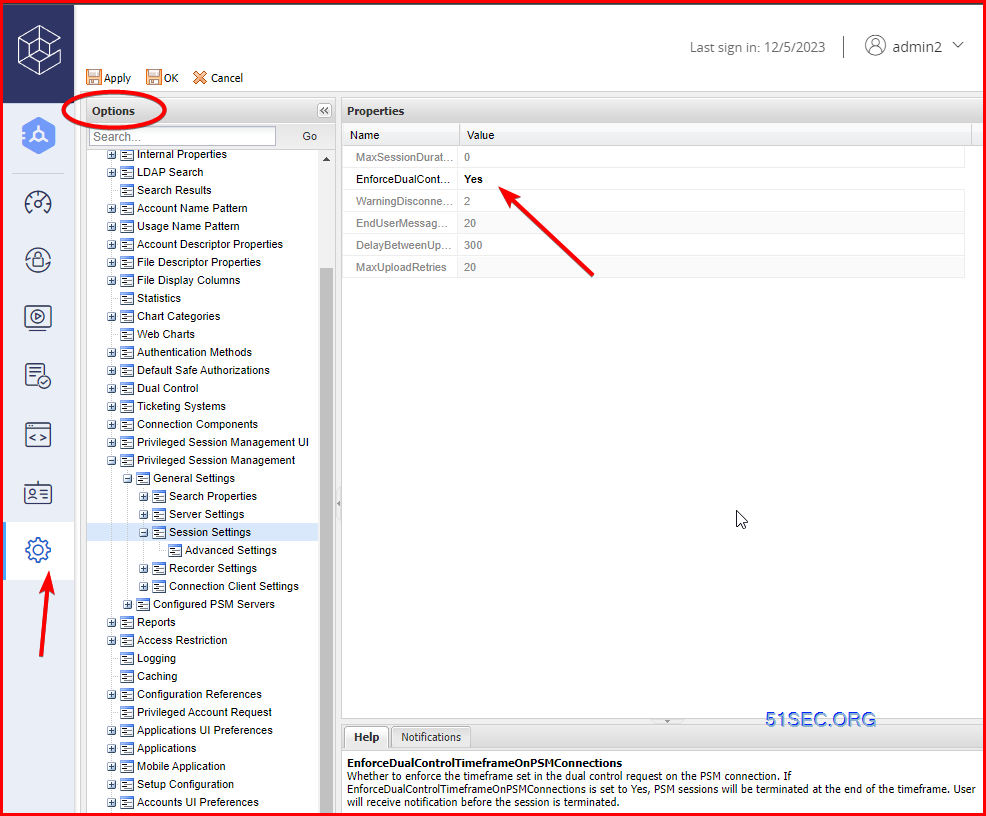
To view the ID assigned to each of PSM servers in your environment, go to PVWA > ADMINISTRATION > Systems Configuration > Options > Privileged Session Management > Configured PSM Servers.
When you use the registration tool on an existing vault environment, every platform's PSM in this vault environment is set to the unique identifier described in the previous step.
To edit a PSM Server ID on an individual platform, go to Platform Management, select the platform and reset the PSM server ID.
To edit multiple PSM Server IDs, you can do a bulk change. Go to Vault > PVWAConfiguration Safe > Policies.XML, and edit the PSM server IDs.
Method 3 - Wizard Installation all in one
PSM installation all in one runs the hardening steps by default, including PSMConfigureApplocker. Ensure that the PSMConfigureApplocker.xml file is updated before you continue. You can always re-run the PSMConfigureApplocker script at a later stage. For details, see Hardening. |
Log on as a domain user who is a member of the local administrators group.
Create a new folder on the PSM server machine. From the installation CD, copy the contents of the Privileged Session Manager folder to your new folder .
Display the contents of the Privileged Session Manager folder.
Start the installation procedure:
Double-click Setup.exe or,
On systems that are UAC-enabled, right-click Setup.exethen select Run as Administrator.
The PSM installation wizard appears and displays a list of prerequisites that are installed before the PSM installation continues.

Click Install to begin the installation process; the installation process begins and the Setup window appears.

You can exit installation at any time by clicking Cancel. You can return to the previous installation window by clicking Back, where applicable.
Click Next to view the CyberArk license and accept the terms of the License Agreement.

Read the license agreement, then click Yes to accept its terms.
On the Customer Information window, enter your name and your Company name in the appropriate fields, then click Next.

On the Destination Location window, click Next to accept the default location provided by the installation

On the Recordings Folder window, click Next to accept the default recordings folder provided by the installation
- The Recordings Folder may require a large amount of disk space, depending on the number of recordings that are stored there before being uploaded into the Vault.
- Take into consideration that, by default, the recordings folder is on the System disk under Program Files and you may want to change it to a different location.

If you install multiple PSMs in the same Vault environment, verify that each PSM has the same path to the Recordings folder.
On the Password Vault Web Access Environment window, click Next to accept the default name of the PVWA Configuration Safe provided by the installation

Click Next; the installation automatically installs the Oracle Instant Client, then displays the Vault's Connection Details window.
Skip this step if you want to register the Vault later or if the PSM is already registered. For details, see Install the PSM server in stages.


- It is recommended to use the Vault administrator user for this installation as this user has the appropriate Vault authorizations and is created in the appropriate location in the Vault hierarchy.
- If you install multiple PSMs in the same Vault environment, you must install all PSMs with the same Vault user
If a previous PSM has been installed on this machine and a PSM was created, the following message will appear:

This is an informative message. Click OK to continue installation.
On the API Gateway Connection Details window, enter the protocol and hostname of the PVWA where the PSM connects to the API Gateway, then click Next. This information is used to generate an endpoint for API calls (<protocol>://<Host>/passwordvault/api).

This window is for use in a Distributed Vaults environment and to automatically unlock accounts.
The PSM machine must have trusted communication to the PVWA machine.
Port 443 between the PSM the PVWA machines must be open.
On the PKI authentication configuration window, select the checkbox to enable smart card authentication, then click Next.

- Do not enable this setting if PKI Authentication is not used in your organization.
- If you do not enable this setting during installation and want to enable PKI authentication for PSM, follow the instructions in During PSM installation.
On the Hardening window, click Advanced to customize the post installation and hardening processes, or click Next to perform the standard post installation and hardening processes and display the Setup Complete window.

If you clicked Advanced, select the post installation and hardening processes that the installation will run, then click Next to display the Setup Complete window.

Click Finish to complete the Privileged Session Manager installation.

- Restart the PSM server.
On the PVWA machine, run iisreset,
or
Wait for the PVWA refresh configuration interval to pass.


Method 4 - Wizard Installation in Three Stages
- Follow the Method 3 (Wizard Installation all in one) procedure. Skip steps 10 - 12, these steps to register the PSM server to the Vault.
- Use the Registration tool to register the PSM server to the Vault.
- Finally, Activate the Privileged Session Manager server
Hardening PSM Server with a GPO in Domain Environment
From DC, open Group Policy Management Console, import PSM Hardening GPO and link it to PSM OU.
This step also applies to other PVWA/CPM servers. You can find out those GPOs from installation folders.
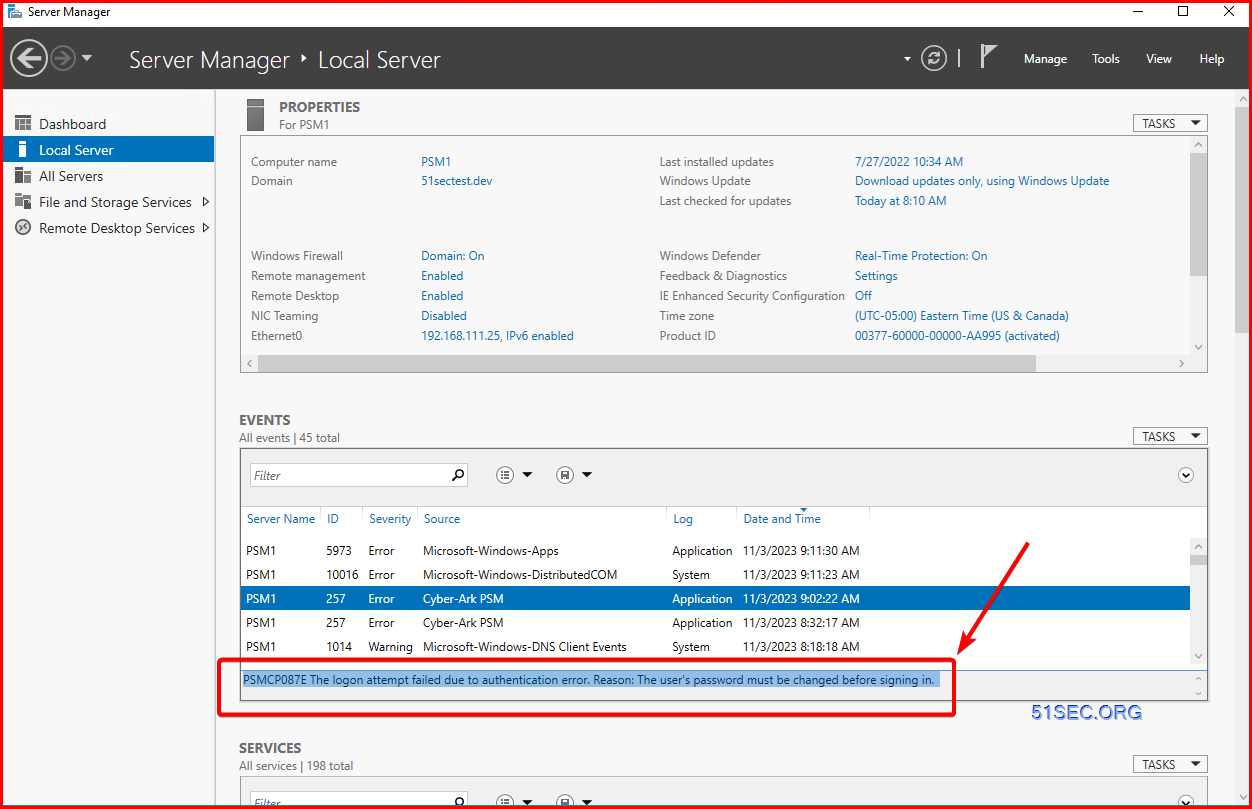
Testing and Validation
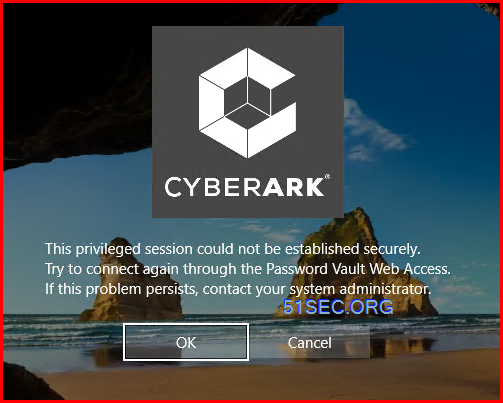
Issue 1: PSM , this privileged session could not be established securely
https://cyberark.my.site.com/s/article/PSM-Error-The-privileged-session-could-not-be-established-securely-Contact-your-system-administrator#:~:text=Restart%20the%20CyberArk%20Privileged%20Session,to%20restart%20the%20RDS%20service.
Load Balancing
External Load Balancing

Advanced PSM Implementations
- Install PSM HTML5 Gateway
- Install PSM in a Load-Balancing Environment
- Configure PSM to connect to Web applications
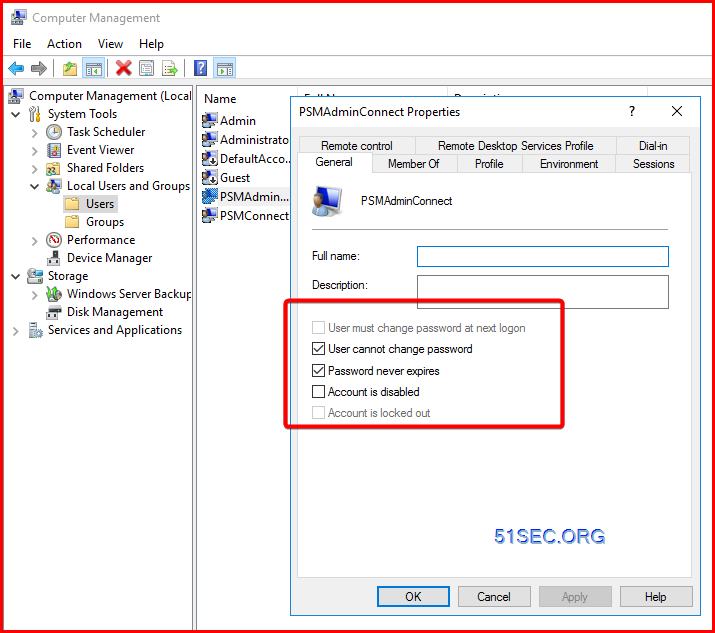
- PSMConnect and PSMAdminConnect Domain Users
- Internal PSM Users
- Installing Multiple PSM Servers
- Change the PSM Server ID
- PSM in a Vault Disaster Recovery Site
- Enable Users to Print PSM Sessions
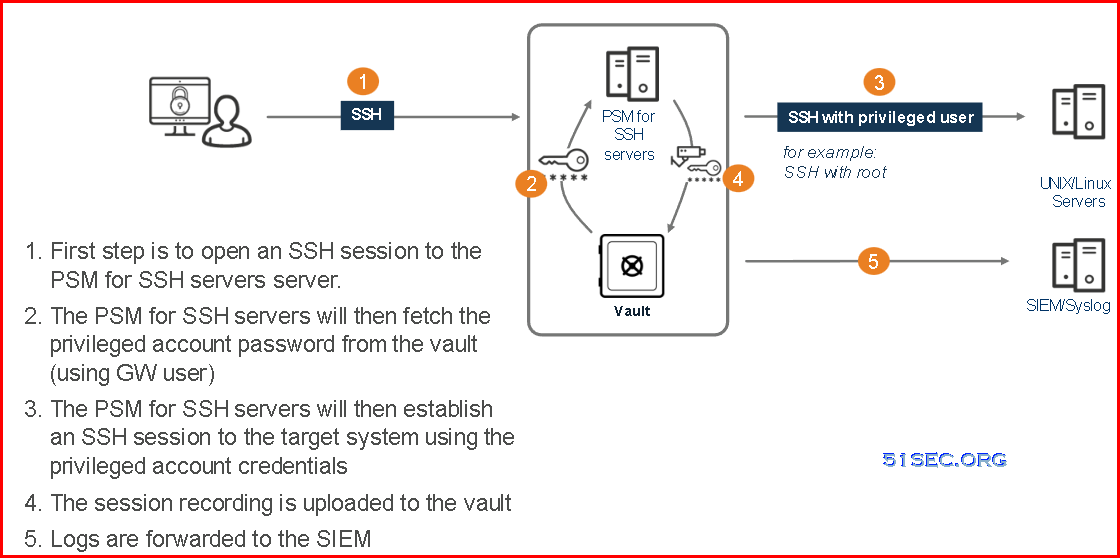
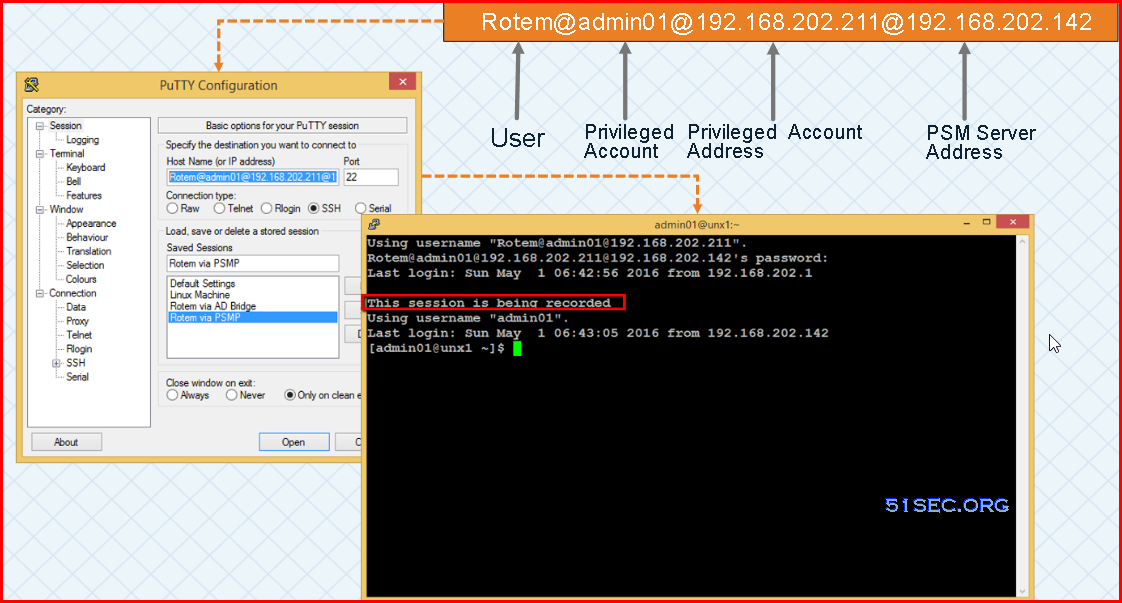
PSM for SSH Servers
Tips and Tricks


No comments:
Post a Comment