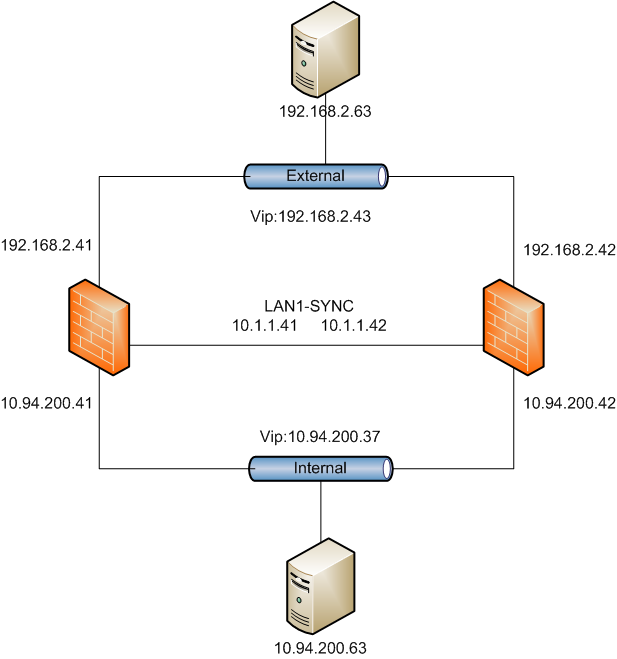
Here I will use my LAB to present all steps with more screenshots. First two steps are mostly coming from SK60443 document.
Topologies
1. Initial Connection
- Connect a crossover cable from a PC workstation t o the Internal NIC of the Appliance.
- Set the IP of the workstation at: 192.168.1.x / 24. use any IP except ".1", which is the default for the Checkpoint appliance.
- Open a web browser and connect to https://192.168.1.1:4434
- If you have a pop up blocker, you’ll need to disable it or add an exception for 192.168.1.1.
- If presented with a dialog similar to the following, choose the option to "Continue to this website...":
- Log in with the default account information: user admin, password admin .
- Follow the prompts to change the default password.
2. First Time Configuration Wizard on Primary Firewall
- Follow the prompts to work through the First Time Configuration Wizard. Review the Welcome screen, and click Next
- Set the Date and Time manually or configure an NTP server, then click Apply, then click Next
- Remember to set the Time and Time Zone accurately.
- Configure your network connections: Click on an interface name to set the IP address, netmask, and Link Speed/Duplex properties for that interface: When set, click Apply , which returns you to the previous screen. Repeat for each NIC, then click Next
- Configure your routing table.Click New , enter the route, and click Apply , which returns you to the previous screen. When all routes are entered, click Next
- Enter the firewall’s host name, domain name, and DNS servers, then click Next
- Configure the management type. For both Primary and Secondary firewalls, choose "Locally Managed"
- Configure clustering. Mark the checkbox to indicate the appliance is part of a cluster, and then select theappropriate optionbutton indicating if it is the primary or secondary member:
- Configure allowed SSH and GUI client IP addresses, then click Next
- If needed, click Start Download to download the SmartConsole application to the workstation, then click Next
- The wizard presents a summary of the installation and offers the options to go back to make any changes, quit, or finish the configuration wizard. If there are any changes necessary, use Back/Next to navigate to the page where you need to make the change, and return to the summary screen. Once all parameters are correct, click Finish
3. First Time Configuration Wizard Secondary Firewall
- Only difference from Primary Firewall is to choose secondary cluster member when configuring UTM-1 Cluster:
4. Configuring the Cluster in SmartDashboard
- Log in to SmartDashboard, approve the First Time Fingerprint Verification. The UTM-1 Cluster Wizardwill run, presenting an introductory page. Click Next
- Provide a name for the cluster object, then click Next
- Provide the information requested about the secondary cluster member: this includes the Activation Key recorded when installing the secondary cluster member.Click Next
- Configure Sync Interface
- Configure Internal Interface
- Configure External Interface
- Finish the Cluster configuration in the Smartdashboard. Check property of Cluster object.
5. Completing the Procedure
- Click Management High Availability from Policy Menu
- 'No Peers' Error came up.
- No Server shows in the status window because of no policy installed.
- Push Firewall Policy to the cluster with a minimum two rules policy.
- Wait Probably 5 minutes, Click Management High Availability you will see both server are showing in the status window which CP-1 is Primary Management Server and Active Secure Gateway. CP-2 is Secondary Management Server and Standby Secure Gateway.
6. Verifying
- Log into CP-2 Secondary Management Server. In my test LAB, CP-1 is using 192.168.2.41. CP-2 is with 192.168.2.42.
- After password verified, Secondary Server Login window pops up to ask you if Change to active or Login as Read Only.
- Click Change to Active button then you will be able to log into SmartConsole. Check status again you will find CP-2 is secondary Management Server but now it is active. Management failover is successful.
Regarding how to upgrade Gaia Full HA Checkpoint Implementation, the steps are listed at CP_R77_Gaia_Installation_and_Upgrade_Guide.pdf. It is at Page 75 Upgrading Standalone Full High Availability.
I am summarizing them in the following:
1. Backup
- Snapshot
- Backup
- Export DB
- Show configuration
2. Mostly Upgrading with Minimal Downtime method will be used.
- Make sure the primary cluster member is active and the secondary is standby: check the status of the members.
- Start failover to the second cluster member.
The secondary cluster member processes all the traffic. - Log in with SmartDashboard to the management server of the secondary cluster member.Click Change to Active.
- Configure the secondary cluster member to be the active management server.
Note - We recommend to export the database using the Upgrade tools (on page 65). - Upgrade the primary cluster member to the appropriate version.
- Log in with SmartDashboard to the management server of the primary cluster member.
Make sure version of the SmartDashboard is the same as the server. - Upgrade the version of the object to the new version.
- Install the policy on the cluster object.
The primary cluster member processes all the traffic.
Note - Make sure that the For Gateway Clusters install on all the members option is cleared. Selecting this option causes the installation to fail. - Upgrade the secondary cluster member to the appropriate version.
- Synchronize for management High Availability.


No comments:
Post a Comment