 |
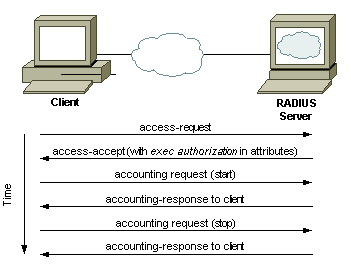
RADIUS Traffic |
1. Configuration on Cisco Switches and Routers
Table 1. AAA Configuration for RADIUS
Command
|
Description
|
aaa new-model
|
Enable Authentication Authorization and Accounting (AAA)
|
aaa authentication login default group radius local
|
activate authentication for logins to the router and specify that RADIUS is the preferred method but we’ll include the local user database as a fall back if RADIUS becomes unavailable. Note that users in the local database cannot be used if the user doesn’t exist in RADIUS, it will only fall back if the RADIUS server is offline.
|
aaa authorization exec default group radius if-authenticated
|
This command is optional but will automatically take RADIUS authenticated users to privileged Exec (15) mode without requiring them to type “enable”.
|
aaa authentication enable default enable group radius
|
issue authentication to get to enable mode (privilege 15).. Only the password will be requested, the username is $enab15$. Hence the username $enab15$ must be defined on the AAA server. If the Radius server doesn't reply, the enable password configured locally on the router will have to be entered
|
aaa authentication login CONSOLE local
|
To have console access authenticated by a local username and password,
|
Table 2. RADIUS Server Configuration
Command
|
Description
|
radius server <name>
|
Specifies the name for the RADIUS server configuration and enters RADIUS server configuration mode.
|
address ipv4 X.X.X.X auth-port
<0-65535> acct-port <0-65535>
|
Configures the IPv4 address for the RADIUS server accounting and authentication parameters.
|
key <shared-secret>
|
The shared secret key that’s configured on the RADIUS server must be defined for secure RADIUS communications.
|
ip radius source-interface <interface>
|
To force RADIUS to use the IP address of a specified interface for all outgoing RADIUS packets, use the ip radius source-interface command in global configuration mode. The source IP address of the RADIUS packets must match the NAS IP address configured on the RADIUS server. A mismatch leads to RADIUS packet timeout and the server gets marked “DEAD”.
|
!!! Traditional way to configure a radius server on a cisco IOS device: aaa authentication login default local group radius group tacacs+ aaa authentication enable default enable group radius group tacacs+ aaa authorization exec default local group radius group tacacs+ aaa authorization console radius-server host 10.9.2.14 auth-port 1812 acct-port 1646 key cisco1234 !!!================================================================== !!! Group configuration aaa group server radius GrpRadius server-private 10.9.1.91 key cisco1234 aaa authentication login default local group GrpRadius aaa authentication enable default enable group GrpRadius aaa authorization exec default local group GrpRadius aaa authorization console !!!=================================================================== ip radius source-interface Vlan254 line vty 0 15 authorization exec default login authentication default line con 0 authorization exec default login authentication default |
Note: RADIUS has been officially assigned UDP ports 1812 for RADIUS authentication and 1813 for RADIUS accounting by the Internet Assigned Numbers Authority (IANA). However, prior to IANA allocation of ports 1812 and 1813, ports 1645 and 1646 (authentication and accounting, respectively) were used unofficially, and became the default ports assigned by many RADIUS client/server implementations at that time. The tradition of using 1645 and 1646 for backwards compatibility continues to this day. For this reason, many RADIUS server implementations monitor both sets of UDP ports for RADIUS requests.
2. NPS Configuration
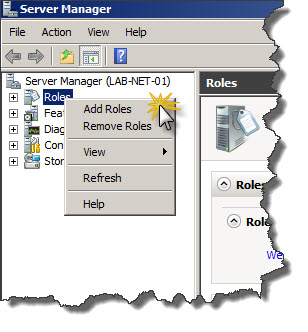
First step is to install NPS on Windows Server 2008 or 2012 R2. In order to do that Server Manager has to be used. In Server Manager right-click on Roles and choose Add Roles from context menu.

- Create a new Windows Server 2008 R2 or Windows Server 2012 machine
- Add the machine to the domain
- Give the machine a static IP: (I’ll use 10.10.10.15 throughout this document as a reference to this server)
- Open up Server Manager, click Add Roles, click Next on the Before You Begin screen, check Network Policy and Access Services and click Next, click Next on the Introduction screen, check Network Policy Server (leave the rest unchecked) and click Next, clickInstall.
- Once Network Policy Server is installed, launch the Network Policy Server snap-in (via MMC or Administrative Tools)
More installation steps detail you can get it from this post.
2.1 Create Radius Clients for all of your switches and routers which will use your Radius NPS authentication.
The users' login access is controlled on the NPS.
The Vendor specific attribute controls that part.
shell:priv-lvl=15 gives the Level 15
- privilege level 1 = non-privileged (prompt is router>), the default level for logging in
- privilege level 15 = privileged (prompt is router#), the level after going into enable mode
- privilege level 0 = seldom used, but includes 5 commands: disable, enable, exit, help, and logout
Reference:
- 1. Install Windows 2008 R2 NPS for RADIUS Authentication for Cisco Router Logins
- 2. NPS Server R2 2008 for Radius on Cisco Devices
- 3. Authenticate the Cisco Devices using Active Directory
- 4. Demystifying RADIUS Server Configurations


No comments:
Post a Comment