- Administrator on a Windows server
- Root on a UNIX server
- Cisco Enable on a Cisco device
- Embedded passwords found in applications and scripts
Related Posts:
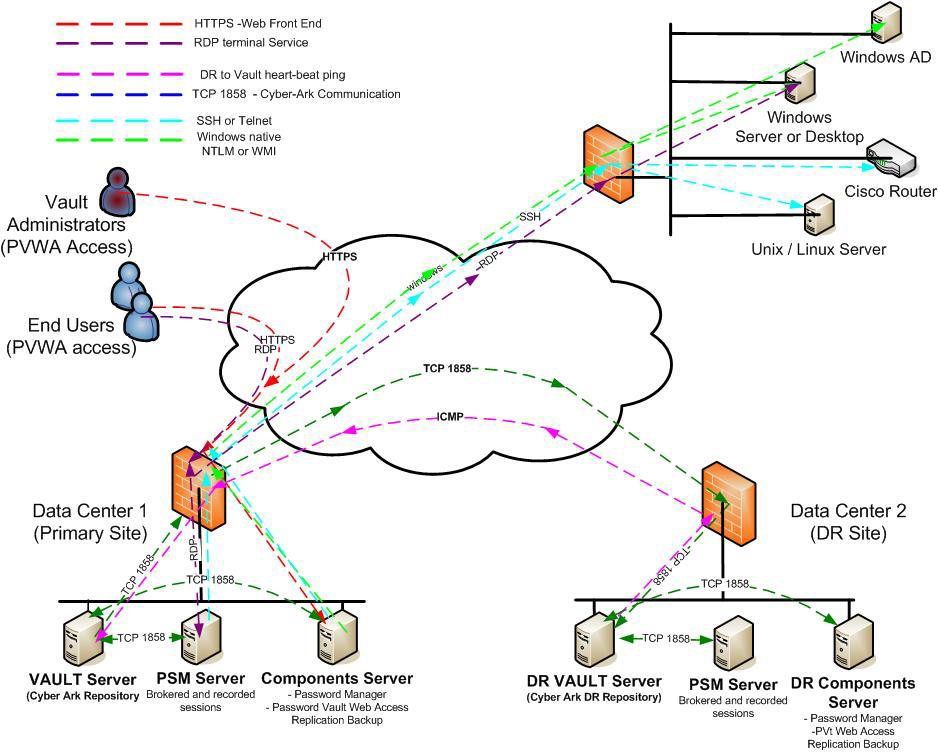
- CyberArk Vault Disaster Recovery Service Installation
- CyberArk PAS DR, HA, Backup, Failover and Failback Process
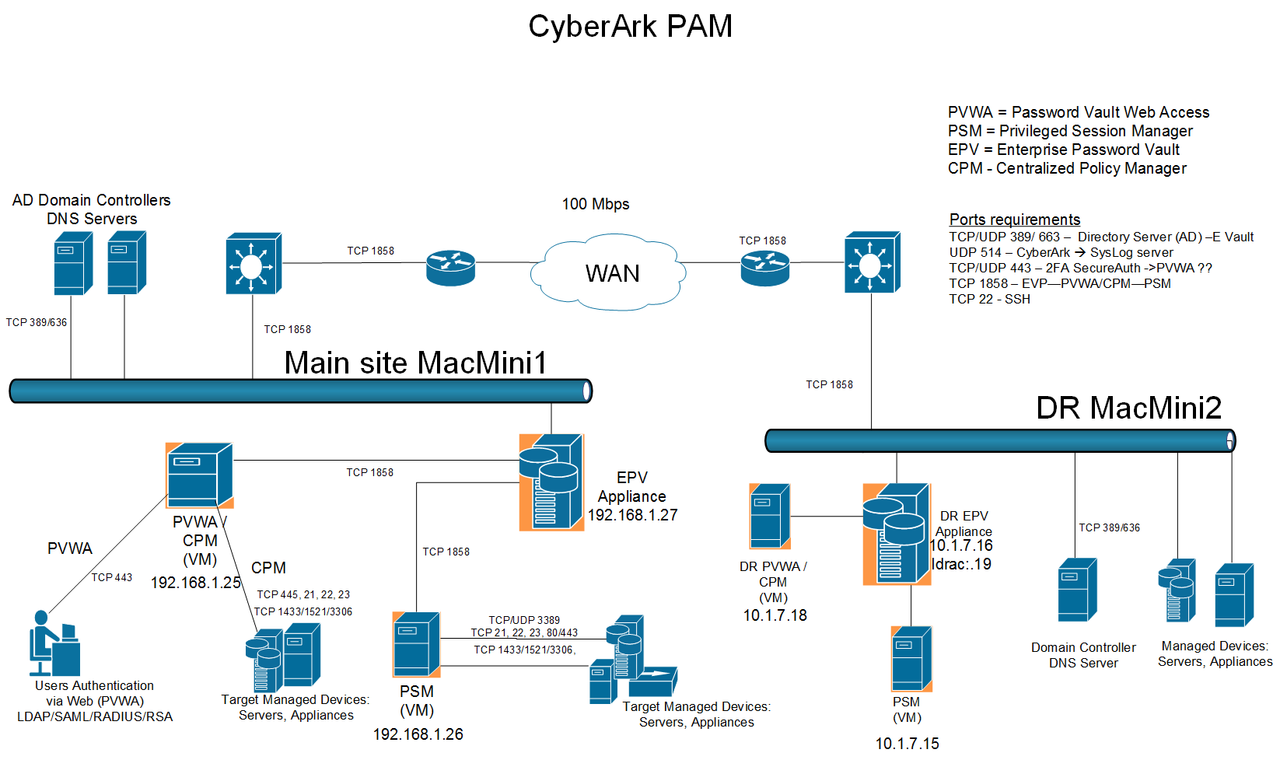
Lab Topology
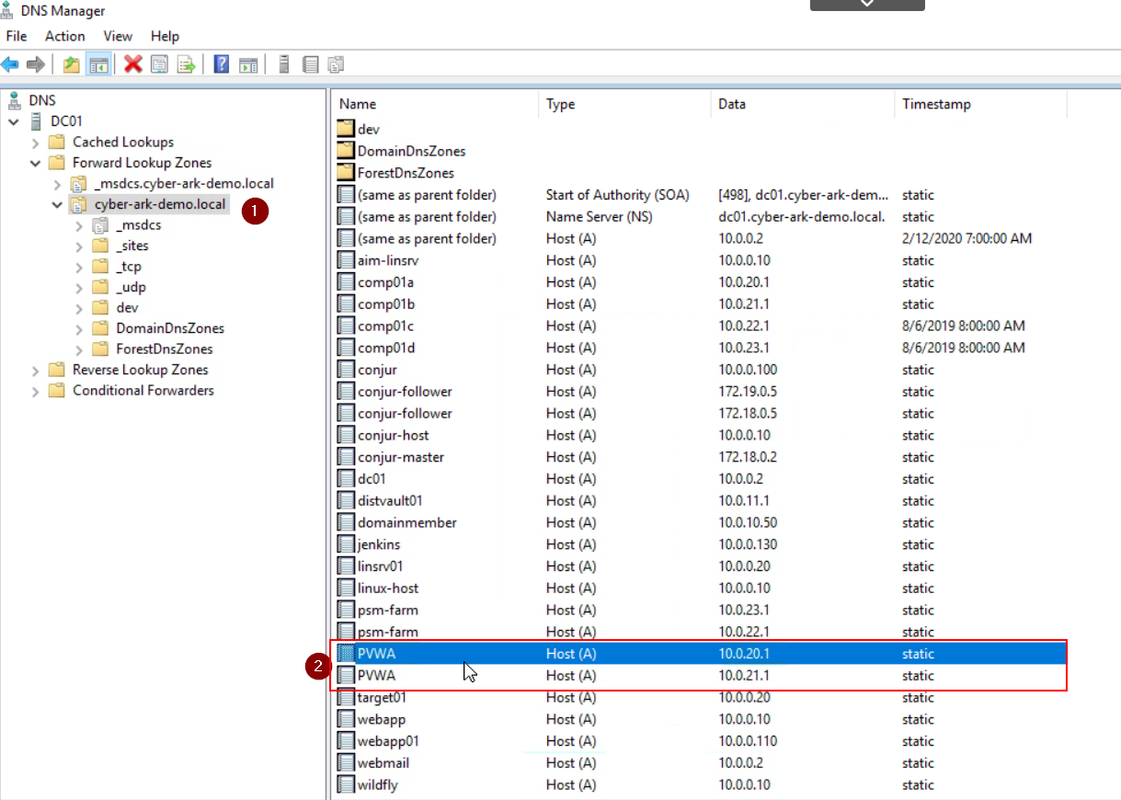
High Availability or Load Balancing
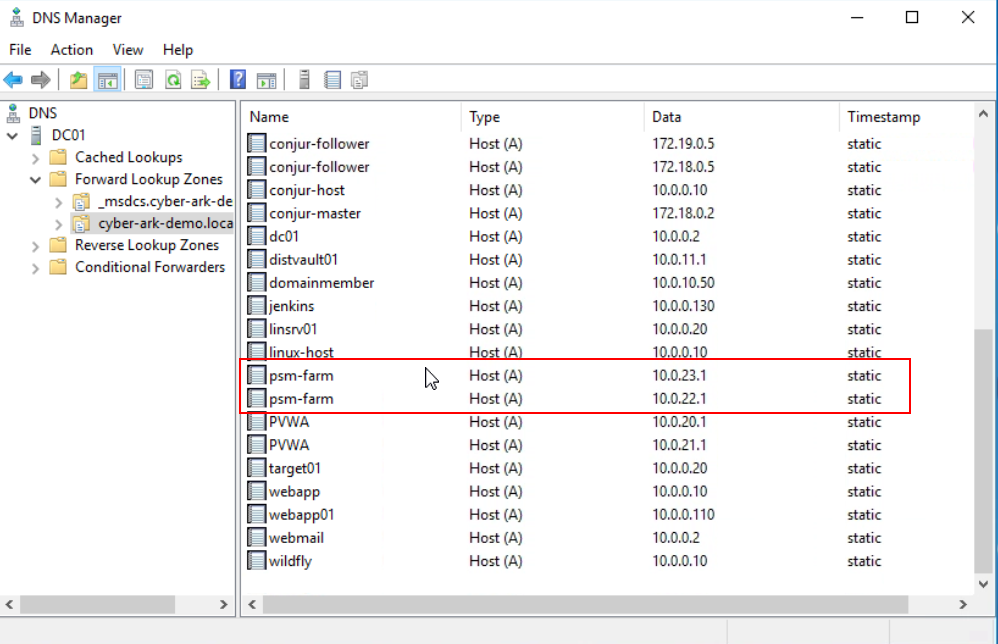
If you donot have load balancer in your environment, the easiest way to do load balancing for PVWA is using DNS round robin method as show in following screenshot:
VAULT = "51sec Vault"
Address=192.168.2.21,172.17.2.21
Port=1858
[Main]
PSMVaultFile="C:\Program Files (x86)\CyberArk\PSM\Vault\Vault.ini"
PSMAppCredFile="C:\Program Files (x86)\CyberArk\PSM\Vault\psmapp.cred"
PSMGWCredFile="C:\Program Files (x86)\CyberArk\PSM\Vault\psmgw.cred"
LogsFolder="C:\Program Files (x86)\CyberArk\PSM\Logs"
TempFolder="C:\Program Files (x86)\CyberArk\PSM\Temp"
PSMServerId="PSM-BCP-PSMP01"
PSMServerAdminId="PSMA-BCP-PSMP01"
ConfigurationSafe="PVWAConfig"
ConfigurationFolder=Root
PVConfigurationFileName=PVConfiguration.xml
PoliciesConfigurationFileName=Policies.xml
2. Open Server Manager and select Remote Desktop Services in the left navigation pane.
3. In Deployment Overview select Tasks > Edit Deployment Properties. In the Configure the deployment window, select Certificates > Select existing certificates > Choose a different certificate. Browse to C:\CyberArkInstallationFiles.
4. Select the pre-generated cert file with the .pfx extension and click Open. In the Password: field, enter Cyberark1, select the box to “Allow the certificate to be added to the Trusted Root Certification Authorities…” and select OK to close the Deployment Properties window.
1. Make sure your active vault server DR user is enabled and password has been changed, for example, changed to Cyberark1
2. Install PADR software on secondary (DR) vault server. Before this, Vault Server and Vault Client should has been installed. DR vault server has been manually stopped.
3. During installing PADR, it will ask active vault server's ip, username (DR) and password to be used to do replication.
4. Stop active vault server to simulate a failure to enable automatically failover. It will take 5 minutes for DR server PADR service to detect this failure (5 times).
5. DR vault server should launch it by PADR service.
====================================================================
Failback from DR vault server to primary vault server:
1. Make sure your active DR vault server's DR user is enabled and password has been reset to Cyberark1.
2. If there is no PADR installed before on Primary vault server, install PADR software first. Primary vault server should be still in the stopped status. It will create user.ini for DR account during PADR installation. Reboot Primary vault server.
Note: If PADR installed, before start the service, use createcredfile.exe reset user.ini DR password to Cyberark1.
3. Start PADR service, verify padr.log file to check all changes have been replicated over. Your primary vault PADR service will use DR account to verify the connectivity to DR site. If it is successful, it will replicate DR database to primary vault. If it failed, it will try five times in five minutes, after that, it will start failover process to start Vault server. We do not want this happen. We want PADR service replicate database from DR vault. In this case, since DR vault server is up and running, it must be DR user account password issue. You will need to reset DR user password on DR Vault and recreate user.ini file on Primary Vault using CreateCredFile.exe.
4. Once verified all replication succeed, Edit PADR.ini. At this moment, Primary Vault Server is still stopped.
a. Set EnableFailover=No
b. Add the following line: ActivateManualFailover=Yes . Save and exit the file.
6. At this moment, both Primary Vault and DR vault server services are up.
7. Log into DR server to edit PADR.ini file
a. Change Failover mode from Yes to No. This will stop Vault Server to start.
b. Delete the last two lines (log number and timestamp of the last successful replication) in the file.
c. Save and exit the file.
Note: Powershell command to monitor/tail padr.log: “Get-Content .\logs\padr.log –wait”
CyberArk recently published new enablement resources to accompany the existing resources designed to help you run a successful disaster recovery (DR) exercise for CyberArk Privileged Access Manager (PAM) Self-Hosted.
Help us understand the value these kinds of resources provide for your organization. Access the new course and other materials below before replying to this post to share your feedback.
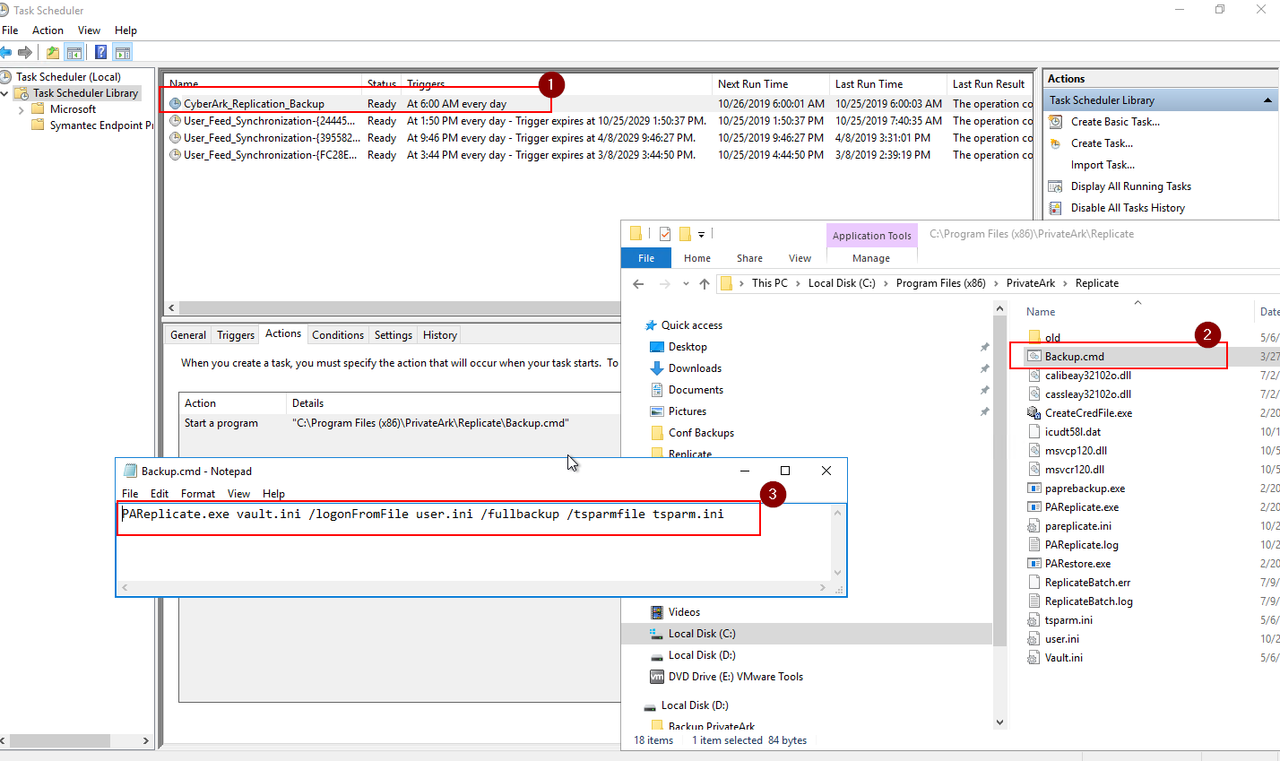
Backup - PAReplicate
DR Failover
Scenario:
- PROD Vault is down
- DR Vault has started
Pre-configuration:
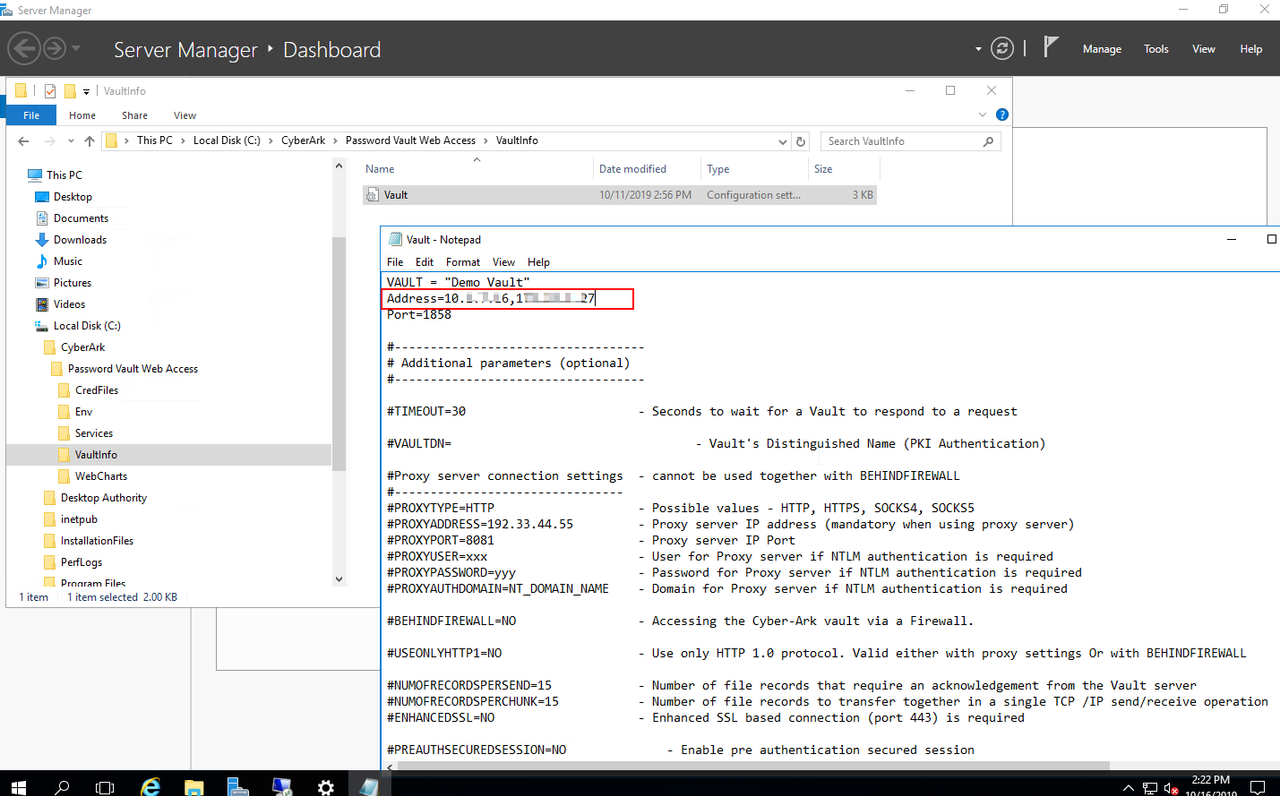
Both PVWA has configured to use PROD Vault and DR Vault. It will automatically to detect alive vault by record order and make a connection to it.
On DR PVWA, first record for valut is DR vault. On Prod PVWA, first record is PROD vault.
Make sure CPM and PSM, vault.ini file has been changed as well.
Failover procedure:
1. Navigate to DR PVWA UI - 10.1.7.18/PasswordVault
2. Login as Admin2 (ie.)
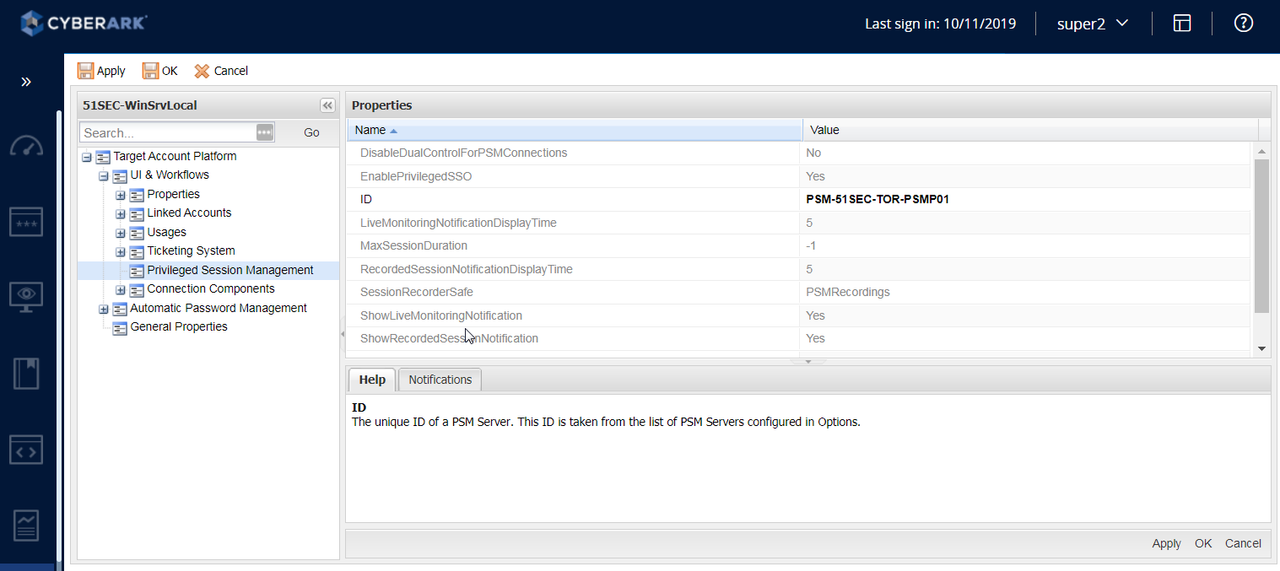
3. Browse to System Configuration -> Platform Management -> Platform Name -> Edit
- Edit UI& Workflows -> Privileged Session Management:
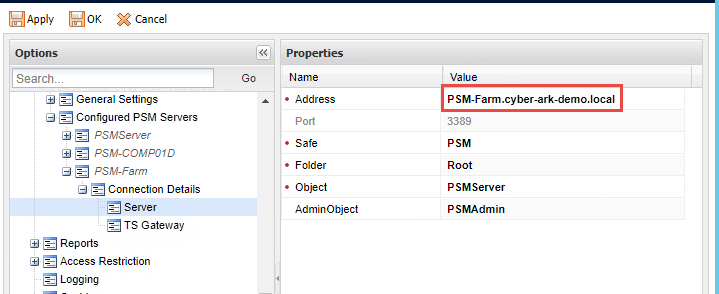
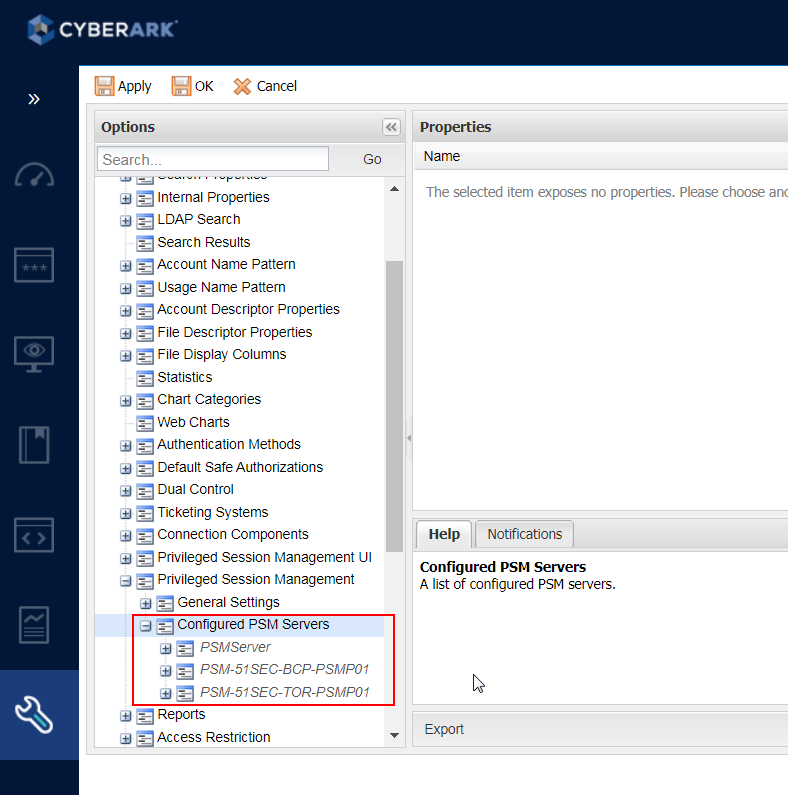
Change ID to PSMServer object name (As defined in Options -> Privileged Session Management -> Configured PSM Servers
Prod Failback
Please refer to following CyberArk article:How to perform a manual DR Failover (Backup Link)
Failback to prod PVWA and PSM procedures:
There are two situations. One is your PROD (main) installed PADR service. Second situation is no installation of PADR service on your PROD (main) vault. There are some different steps for each situation. Here is the list for without PADR service installed on main vault, which means the changes on DR Vault server will not synced back to PROD (main) vault.
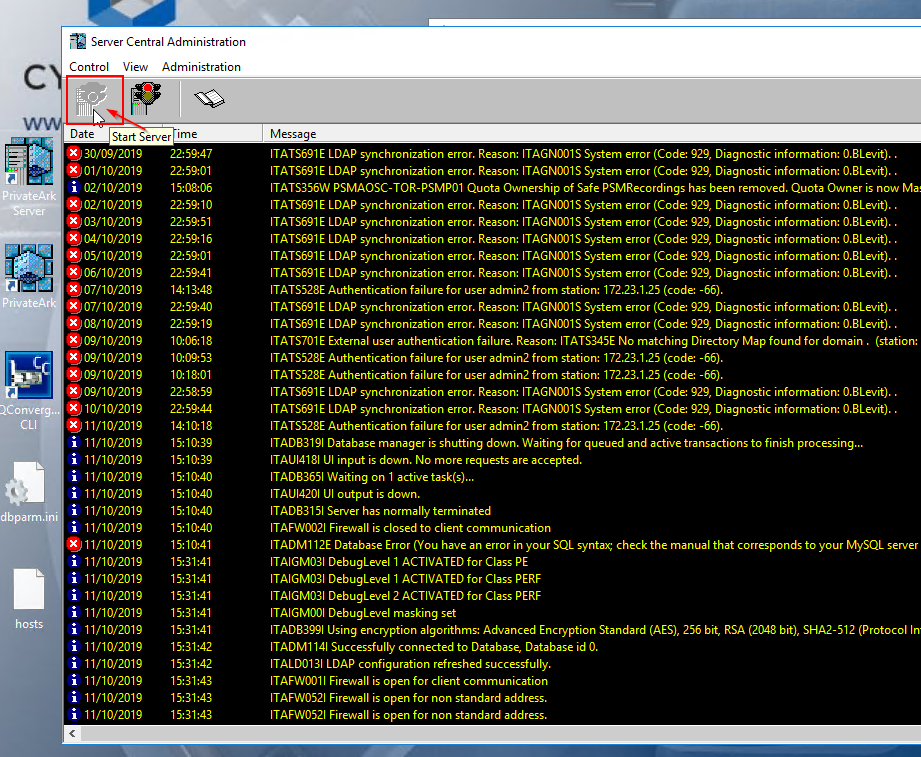
1. Start the PROD Vault using PrivateArkServer Console on the desktop of the Vault
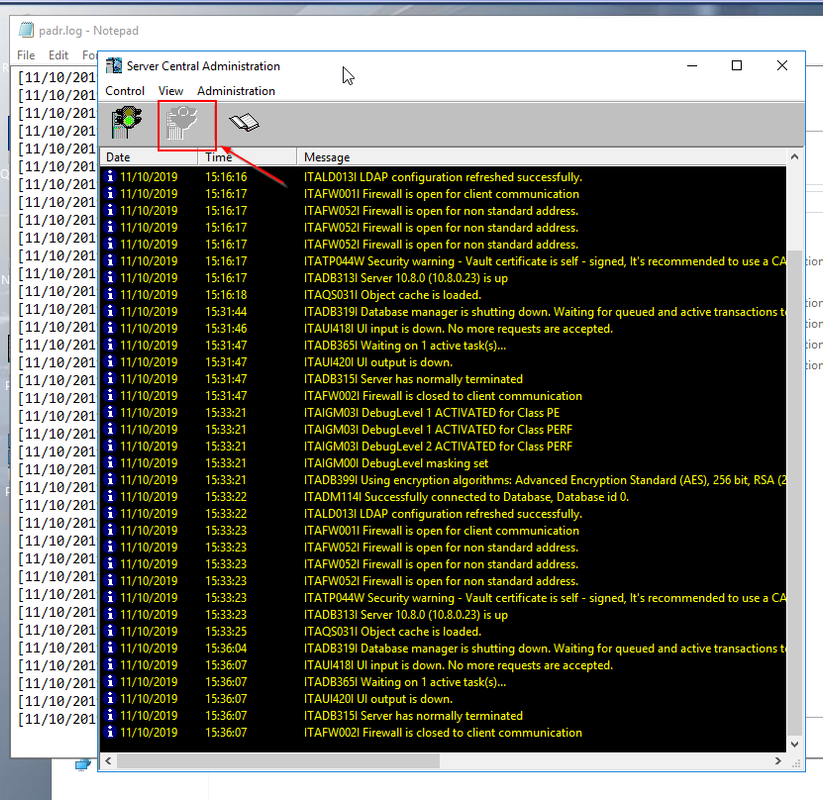
2. Stop the DR VAult server using PrivateArkServer Console on the desktop of the DR VAult
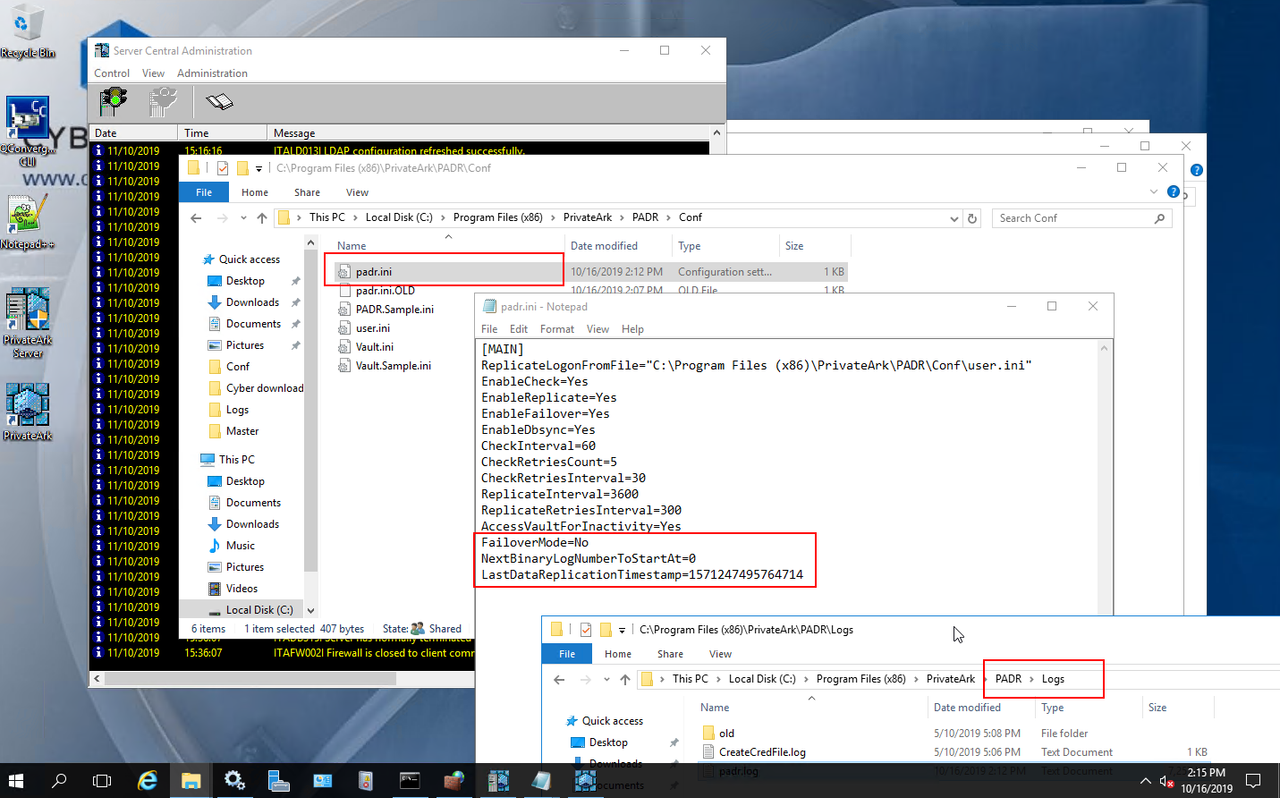
3. Open c:\Program files(x86)\PrivateArk\PADR\conf\padr.ini and edit the file:
FailoverMode=Yes -> Change Yes to No
NextBinaryLogNumberToStartAt=0 - Remove this line
LastDataReplicationTimestamp=1570820901835879 -> remove this line
Save the file.
3. Start the Cyberark Disaster Recovery Service on the DR VAult.
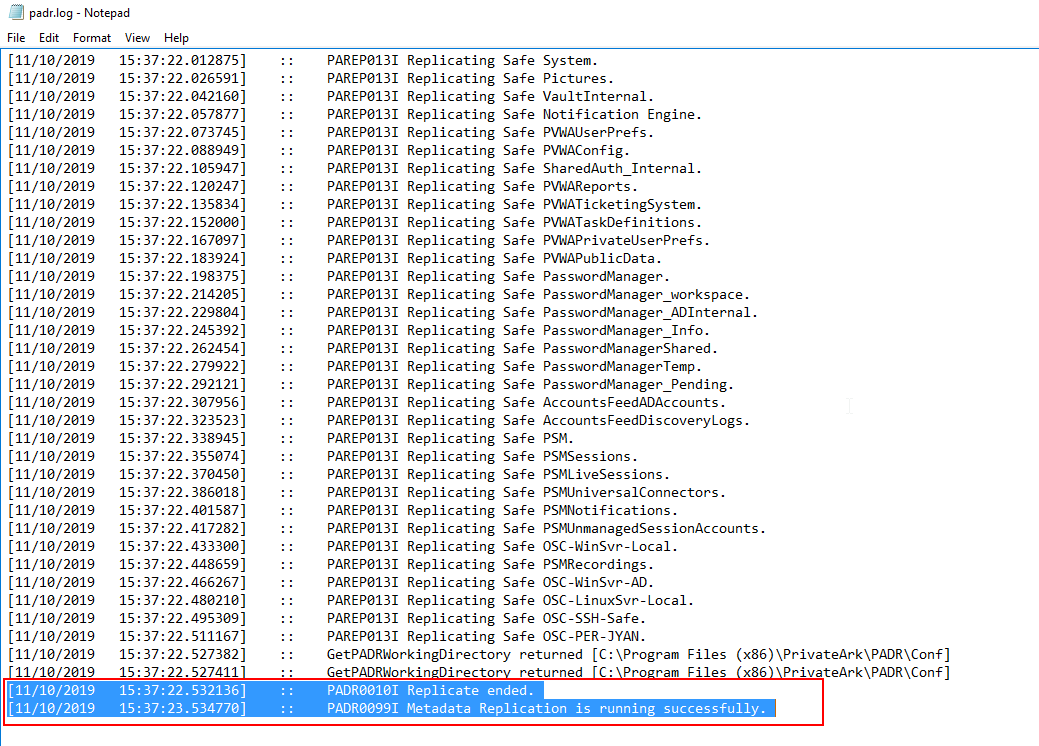
4. Confirm replication by navigating to c:\Program files(x86)\PrivateArk\PADR\logs\padr.log. Open this file to confirm:
[11/10/2019 15:37:22.532136] :: PADR0010I Replicate ended.
[11/10/2019 15:37:23.534770] :: PADR0099I Metadata Replication is running successfully.
Above two lines appears at the end of the padr.log file
5. log into primary pvwa UI and edit the platforms to change the UI & Workflows-> Privileged Session Management ID to the PROD PSM server (PSMServer)
| Normal
Mode (Prod Vault is UP and Active) |
Failover
Mode (Prod Vault is Down) |
|
| DR Vault Services | CyberArk Vault Disaster Recovery - Running Cyber-Ark ENE - Stopped Cyber-Ark Hardened Windows Firewall -Running CyberArk Logic Container - Running PrivateArk Database - Running PrivateArk Remote Control Agent - Running PrivateArk Server - stopped |
CyberArk Vault Disaster Recovery - Stopped Cyber-Ark ENE - Running Cyber-Ark Hardened Windows Firewall -Running CyberArk Logic Container - Running PrivateArk Database - Running PrivateArk Remote Control Agent - Running PrivateArk Server - Running |
| DR Vault PADR.ini | FailoverMode = No | FailoverMode = Yes |
| Prod Vault Services | CyberArk
Vault Disaster Recovery - Stopped Cyber-Ark ENE - Running Cyber-Ark Hardened Windows Firewall -Running CyberArk Logic Container - Running PrivateArk Database - Running PrivateArk Remote Control Agent - Running PrivateArk Server - Running |
CyberArk
Vault Disaster Recovery - Running Cyber-Ark ENE - Stopped Cyber-Ark Hardened Windows Firewall -Running CyberArk Logic Container - Running PrivateArk Database - Running PrivateArk Remote Control Agent - Running PrivateArk Server - stopped |
| Prod Vault PADR.ini | FailoverMode = Yes | FailoverMode = No |
11.4 Vault DR Service Installation:
Troubleshooting
Go into the private Ark client and unlock the user
1: Once in Private ark go to tools>administrative tools> user and groups
2: Find the user in the list click trusted net areas and click activate.
If the user account gets locked out again I would recommend recreating the user.ini file for that user.
References




No comments:
Post a Comment