1. Confirm SSL-VPN License Installed
You can review another post regarding how to add Cisco license into a router.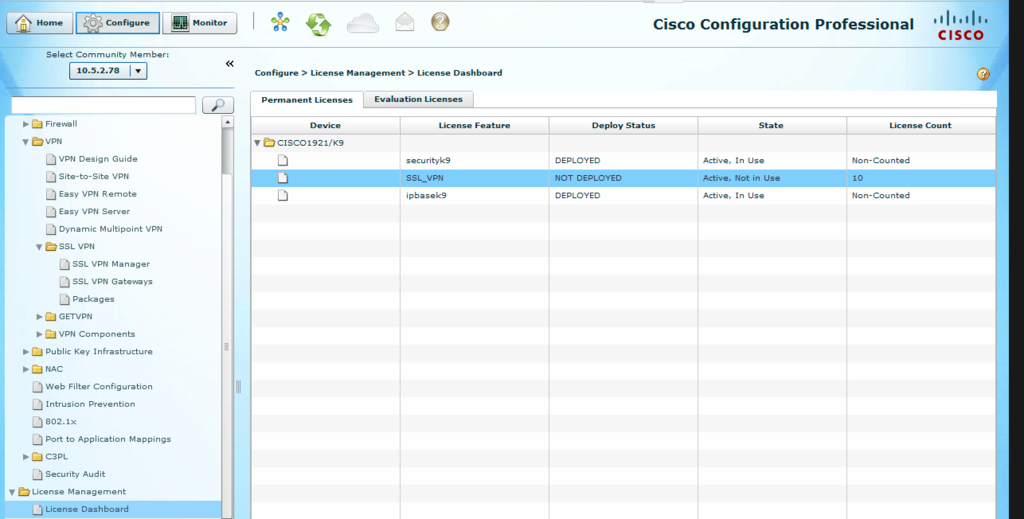
From Command Line:
VPN-1#show license detail
Index: 1        Feature: NtwkEssSuitek9                    Version: 1.0
        License Type: EvalRightToUse
        License State: Active, Not in Use, EULA not accepted
            Evaluation total period: 8  weeks 4  days
            Evaluation period left: 8  weeks 4  days
            Period used: 0  minute  0  second
        License Count: Non-Counted
        License Priority: None
        Store Index: 2
        Store Name: Built-In License Storage
Index: 2        Feature: SSL_VPN                           Version: 1.0
        License Type: Permanent
        License State: Active, Not in Use
        License Count: 10/0/0  (Active/In-use/Violation)
        License Priority: Medium
        Store Index: 1
        Store Name: Primary License Storage
Index: 3        Feature: datak9                            Version: 1.0
        License Type: EvalRightToUse
        License State: Active, Not in Use, EULA not accepted
            Evaluation total period: 8  weeks 4  days
            Evaluation period left: 8  weeks 4  days
            Period used: 0  minute  0  second
        License Count: Non-Counted
        License Priority: None
        Store Index: 1
        Store Name: Built-In License Storage
Index: 4        Feature: ios-ips-update                    Version: 1.0
        License Type: EvalRightToUse
        License State: Active, Not in Use, EULA not accepted
            Evaluation total period: 8  weeks 4  days
            Evaluation period left: 8  weeks 4  days
            Period used: 0  minute  0  second
        License Count: Non-Counted
        License Priority: None
        Store Index: 3
        Store Name: Built-In License Storage
Index: 5        Feature: ipbasek9                          Version: 1.0
        License Type: Permanent
        License State: Active, In Use
        License Count: Non-Counted
        License Priority: Medium
        Store Index: 0
        Store Name: Primary License Storage
Index: 6        Feature: securityk9                        Version: 1.0
        License Type: Permanent
        License State: Active, In Use
        License Count: Non-Counted
        License Priority: Medium
        Store Index: 2
        Store Name: Primary License Storage
Index: 7        Feature: securityk9                        Version: 1.0
        License Type: EvalRightToUse
        License State: Inactive
            Evaluation total period: 8  weeks 4  days
            Evaluation period left: 8  weeks 4  days
            Period used: 0  minute  0  second
        License Count: Non-Counted
        License Priority: None
        Store Index: 0
        Store Name: Built-In License Storage
2. Launch SSL-VPN Configuration Wizard

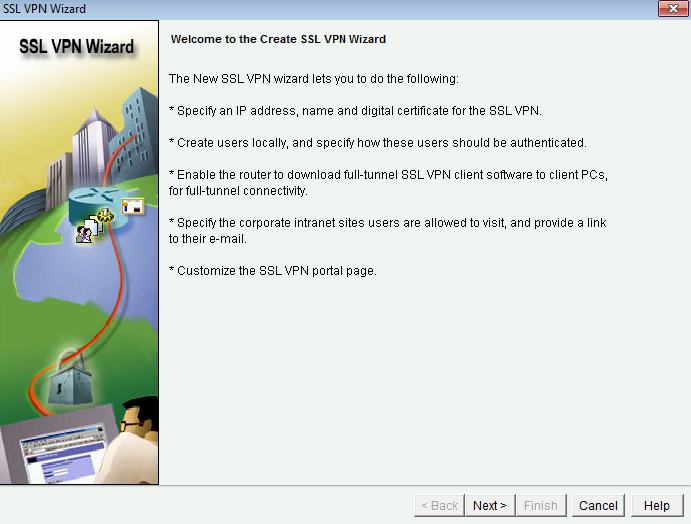
3. Configuration Wizard:
3.1 Configure IP Address and Name
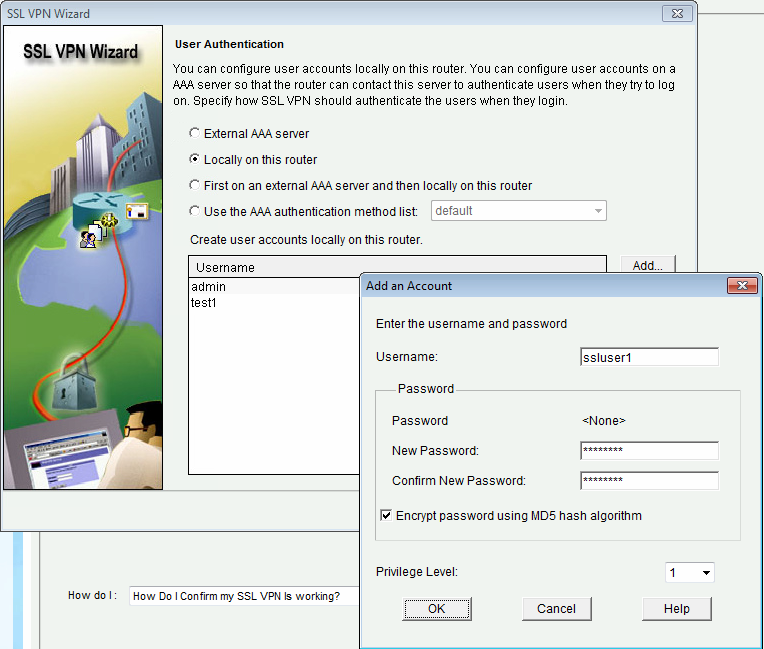
3.2 Configure User Authentication Methods
3. Configure IP Address Pool

3.4 SSL VPN Tunnel Interface

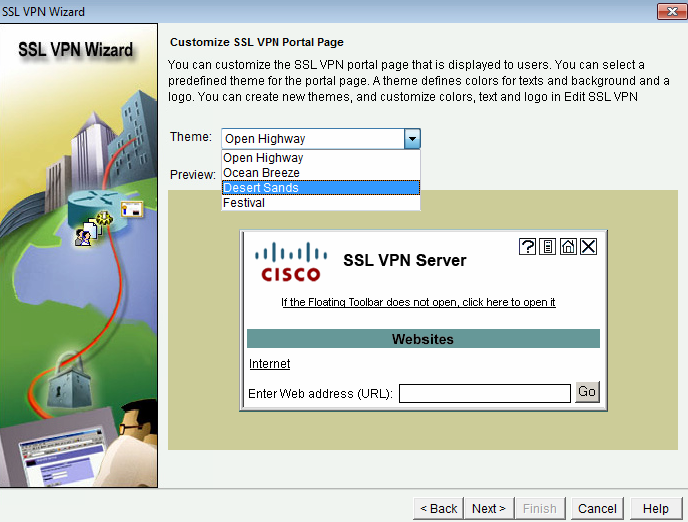
3.5 SSL VPN Portal Page
3.6 Summary of the Configuraiton

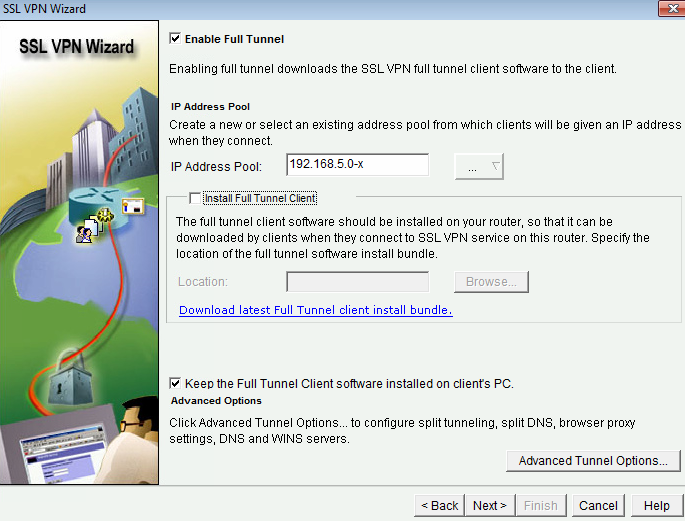
SSL VPN Service Name : Rogers-SSL-1
SSL VPN Policy Name : policy_1
SSL VPN Gateway Name : gateway_1

Virtual Template IP Address: Un-numbered to GigabitEthernet0/0

User Authentication Method List :  Local

Intranet websites:  Disabled

Full Tunnel Configuration
 SVC Status : Yes
 IP Address Pool : 192.168.5.0-x
 Split Tunneling : Disabled
 Split DNS : Disabled
 Install Full Tunnel Client : Disabled
Configuration which sent to the router:
aaa authentication login ciscocp_vpn_xauth_ml_1 local
ip local pool 192.168.5.0-x 192.168.5.50 192.168.5.200
interface Virtual-Template1
 exit
default interface Virtual-Template1
interface Virtual-Template1
 no shutdown
 ip unnumbered GigabitEthernet0/0
 exit
webvpn gateway gateway_1
 ip address 158.106.98.166 port 443
 http-redirect port 80
 inservice
 ssl trustpoint TP-self-signed-3017776587
 exit
webvpn context Rogers-SSL-1
 aaa authentication list ciscocp_vpn_xauth_ml_1
 gateway gateway_1
 virtual-template 1
 max-users 75
 inservice
 secondary-color white
 title-color #669999
 text-color black
 policy group policy_1
  svc keep-client-installed
  functions svc-enabled
  svc address-pool 192.168.5.0-x netmask 255.255.255.255
  exit
 default-group-policy policy_1
 exit
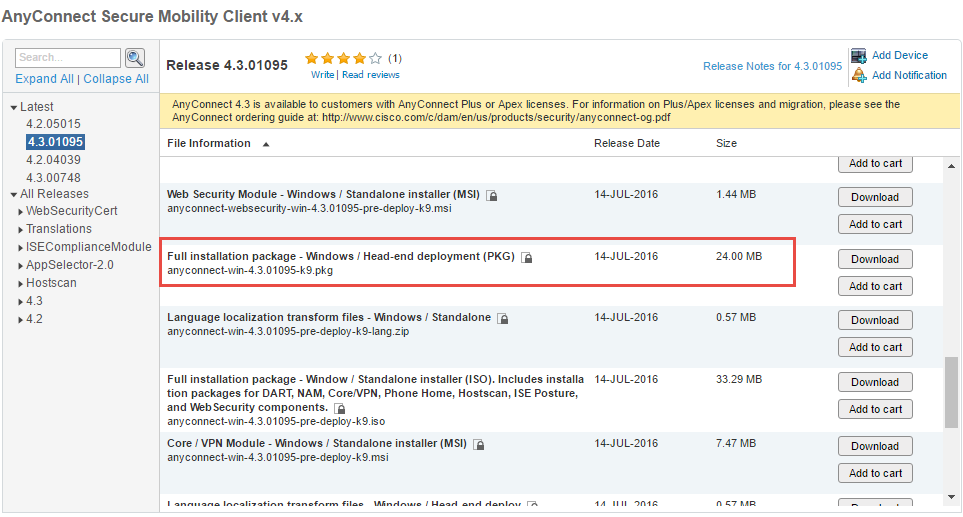
4. Upload AnyConnect 4.x Package
Latest version is 4.3.01095. It can be downloaded from Cisco Website.
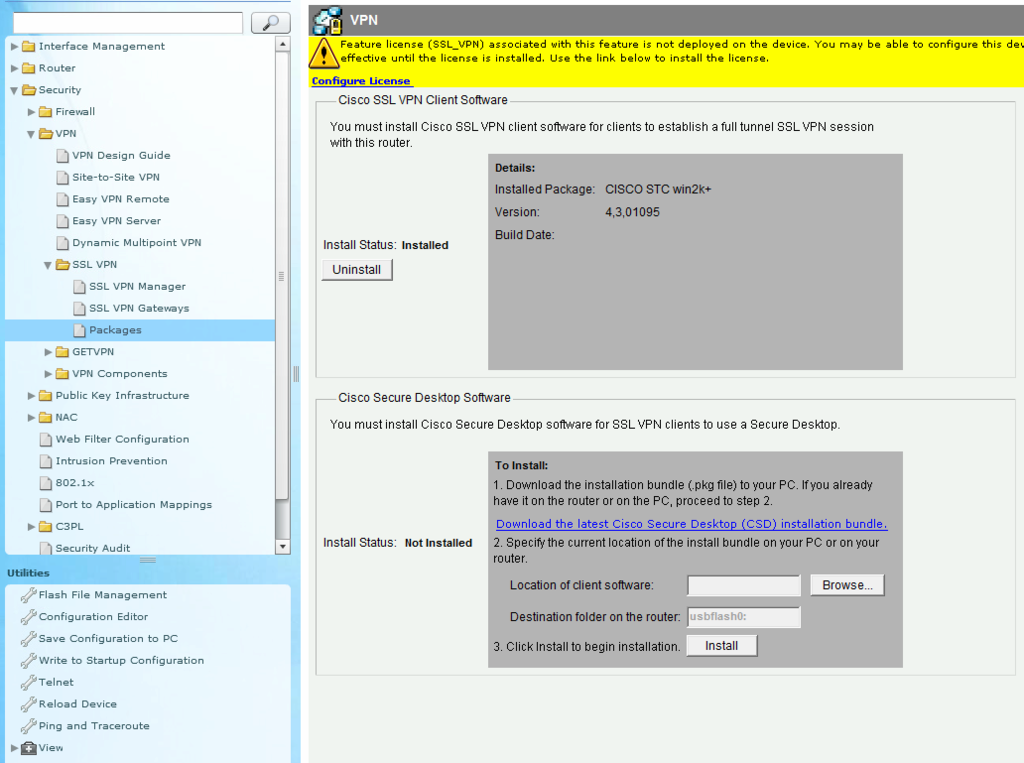
The downloaded package can be imported into Router from CCP Configuration - Security - VPN - SSL-VPN - Package:
Check the package from command line:
VPN-1#dir flash:
Directory of usbflash0:/

    1  -rw-    75608148   Jun 3 2016 14:13:10 -04:00  c1900-universalk9-mz.SPA.154-3.M3.bin
    2  -rw-        3066   Jun 3 2016 14:24:04 -04:00  cpconfig-19xx.cfg
    3  -rw-        1160  Jul 24 2016 10:58:00 -04:00  1.lic.txt
    4  drw-           0   Jun 3 2016 14:24:34 -04:00  ccpexp
  374  -rw-       22737   Jun 3 2016 14:27:22 -04:00  home.html
  382  -rw-        1154   Aug 1 2016 10:34:22 -04:00  2.lic
  388  drw-           0   Aug 1 2016 14:56:12 -04:00  webvpn
  395  -rw-    25162392   Aug 1 2016 15:07:34 -04:00  anyconnect-win-4.3.01095-k9.pkg

251371520 bytes total (113504256 bytes free)
Note: There is a issue when choosing my computer's locale file as location of client software. It always says "You have entered an invalid full tunnel client package. Please specify a valid file". It obviously is a bug on CPE. The option way is to upload pkg directly to the router's flash memory card. Then choose the file in router's flash memory and install it.
Or following following process to install it from command line:
a.- Copy the .pkg into the ROOT flash directory:
#copy ftp: flash:
b.- Make sure there's enough room to accommodate the installation package. At least same amount of free space as the actual size of the .pkg file copied over at the previous step. Reason is that the IOS copies the file to the flash:/webvpn directory when issuing the below command.
c.- Install the .pkg (run it from config mode, type the full command to run it although the command is not present)
#webvpn install svc flash:anyconnect-win-3.1.05160-k9.pkg seq 1
(wait for a couple of seconds...)
SSLVPN Package SSL-VPN-Client (seq:1): installed successfully
R1(config)#webvpn install svc flash:anyconnect-macosx-i386-4.3.02039-k9.pkg seq 2
SSLVPN Package SSL-VPN-Client (seq:2): installed successfully
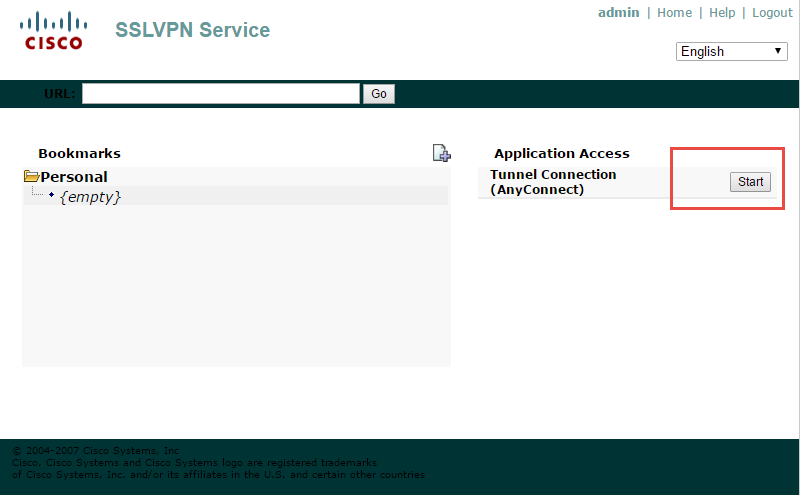
5. Verify
Lauch web page from broswer:

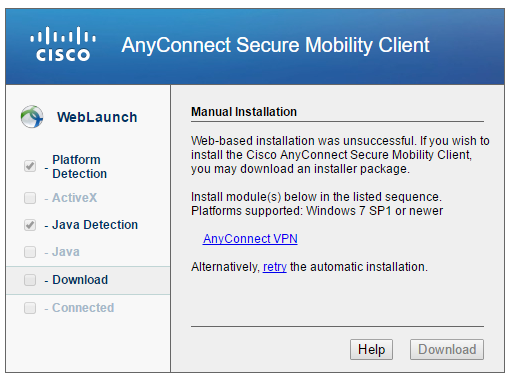
Another Web page will be opened to try to load AnyConnect Secure Mobility Client. It also provide link to manual Installation for AnyConnect VPN client which has been uploaded into Router at step 4.
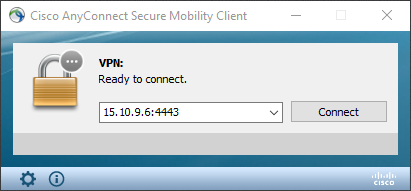
Cisco AnyConnect Secure Mobility Client launched:
Reference:
- AnyConnect VPN (SSL) Client on IOS Router with CCP Configuration Example
- CONFIGURING CISCO SSL VPN ANYCONNECT (WEBVPN) ON CISCO IOS ROUTERS


No comments:
Post a Comment