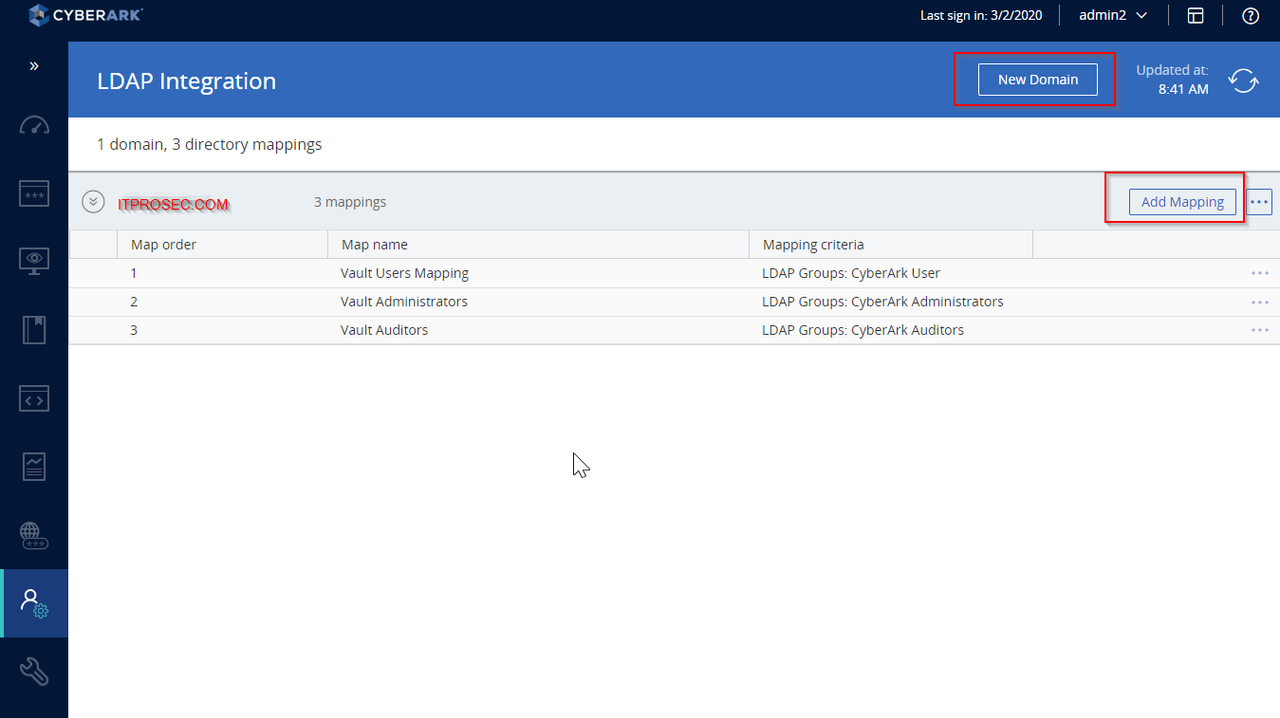
LDAP Integration
Prerequisites
- (Optional) Windows Domain Controller Firewall Rule to allow CyberArk Servers to query AD database. (LDAP 389 and LDAPS 636)
- LDAP Bind Account
- LDAP Groups
- Enable LDAP/S
LDAPS Integration
Configured through PVWA
LDAP Login for PVWA
LDAP Login for Vault
- import CA root cert
- configure DNS record in hosts file
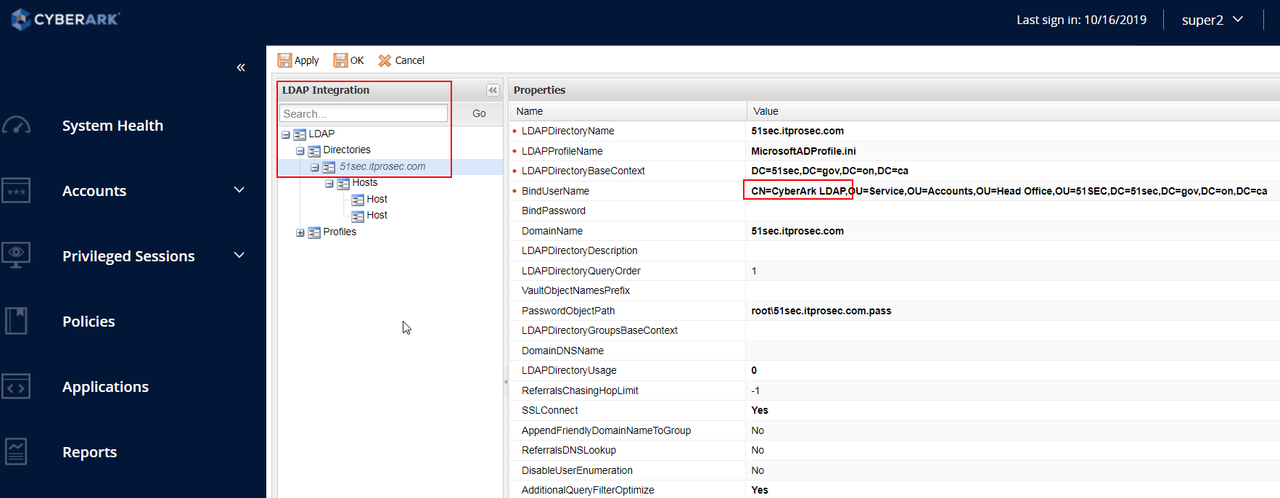
Bindusername and bindpassword is the one you entered when you integrated CyberArk with your LDAP. If for some reason, you are having trouble to create a new mapping , usually there is an issue with your binding account. You can modify username / password from following configuration location:
Note: once your CyberArk integrated with LDAP, the LDAP integration wizard will grey out. To re-activate LDAP integration wizard, you will need to delete Administration - LDAP integration - Server configuration (eg. 51sectest.com). Also delete LDAP directory mapping from PrivateArk client.
YouTube: CyberArk PAS 12 0 Lab - 2.1 LDAP Domain Integration
Error: (Reason: No SSL Host is defined in directory 51sectest.dev).
While Login PVWA with LDAP authentication, it asks for password change at first logon and while doing so, getting error : No SSL host is defined in directory.
Windows doesn't allow to change password in Active Directory over plain ldap. It requires to have SSL connection in order to change unicodePwd attribute where AD stores password.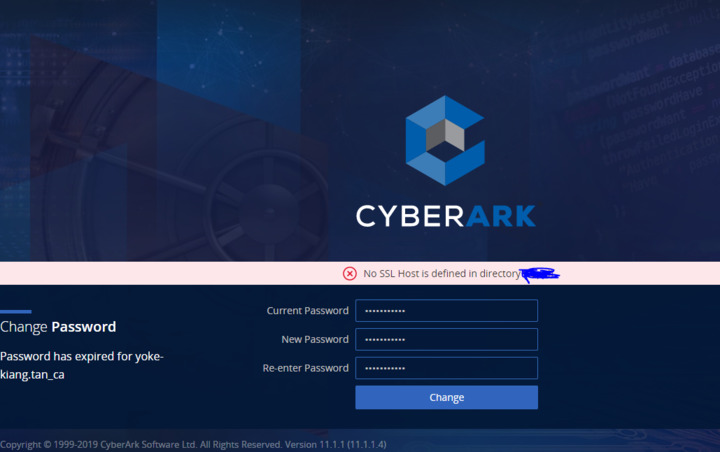
1. Logon as Administrator to the passive node of the cluster.
a. Using Windows File Explorer navigate to ‘C:\Program Files(x86)\PrivateArk\Server\Conf’.
2. Edit the dbparm.ini file adding the following line to the end of the file. This will create inbound and outbound firewall rules that will allow the vault to communicate to the NTP server.
[NTP]
AllowNonStandardFWAddresses=[10.0.0.2],Yes,123:outbound/udp,123:inbound/udp
3. Enable the Windows Time service using the Windows Services applet .
4. Double click “Windows Time” to display the service properties.
5. Update the Startup type to Automatic (Delayed Start) and click OK.
6. Start the Windows Time service.
7. Repeat the above procedures on the active node of the cluster before proceeding.
8. To commit the changes made to the DBParm.ini file, we must restart the PrivateArk Server service.
Note: In an HA Cluster Vault implementation, you can no longer start and stop CyberArk services through the normal interface. Services must be restarted using the ClusterVault Management or CVM interface. To restart the services, we will simply failover to the passive node to commit the changes.
9. Ensure that you are logged into the active node of the cluster. Open the CVM to determine the active and passive node. Only the active node is capable of manually executing the failover procedure.
10. Open the CVM on the active node and click the center icon with the opposing arrows to initiate the failover procedure.
11. Click Continue to confirm the switch
a. Observe the failover progress in the CVM or alternatively monitor “C:\Program Files (x86)\PrivateArk\Server\ClusterVault\ClusterVaultConsole.log”
b. The log will display the failover sequence.
12. Next, we need to set a special time skew so that, if the clock is very far off, the vault will not make too large of a system time change at once. This will force the NTP service to change every 30 minutes for the first 3 checks and then every 8 hours. This prevents triggering anti-tampering protections in the vault that could be activated by creating new audit entries that occur before existing audit entries.
13. Ensure you are working on the active node.
14. Open regedit. Browse to HKLM\System\CurrentControlSet\Services\W32Time\Parameters.
15. Add a new DWORD and name it “Period”.
a. Double click it and change the Base to decimal and make the Value data “65532”.
b. Close the Registry Editor.
16. Open an Administrative Command prompt and run the following command:
W32tm /config /manualpeerlist:10.0.0.2 /syncfromflags:manual /reliable:YES /update
17. Failover to the passive node. When failover is complete, login to the active node.
Complete steps 13 – 17 on the active node of the Cluster Vault.
18. Both nodes of the Vault Cluster are now sync’ed to an external NTP time source.
• Translator files translate CyberArk logging format into the SIEM logging format
• These five files will cover the most commonly deployed SIEM systems
• The Arcsight translator file works with Splunk and others
Add SYSLOG configuration to dbparm.ini
C:\Program Files (x86)\PrivateArk\Server\Conf\dbparm.ini
[MAIN]
TasksCount=20
DateFormat=DD.MM.YY
TimeFormat=HH:MM:SS
ResidentDelay=10
BasePort=1858
LogRetention=7
LockTimeOut=30
DaysForAutoClear=30
DaysForPicturesDistribution=Never
ClockSyncTolerance=600
TraceArchiveMaxSize=5120
VaultEventNotifications=NotifyOnNewRequest,NotifyOnRejectRequest,NotifyOnConfirmRequestByAll,NotifyOnDeleteRequest
RecoveryPubKey=C:\keys\operator\RecPub.key
ServerKey=C:\keys\operator\Server.key
StagingAreaDirectory=C:\PrivateArk\StagingArea
EntropyFile=C:\PrivateArk\Safes\entropy.rnd
DatabaseConnectionPasswordFile=C:\keys\operator\VaultUser.pass
ServerCertificateFile=C:\keys\operator\Server.pem
ServerPrivateKey=C:\keys\operator\Server.pvk
*AllowedVirusSafeFileTypes=DOC,DOT,XLS,XLT,EPS,BMP,GIF,TGA,TIF,TIFF,LOG,TXT,PAL,,
AutoClearSafeHistory=Yes,1,1,2
AutoClearUserHistory=Yes,1,3,4
AutoSyncExternalObjects=Yes,1,23,24
DebugLevel=PE(1),PERF(1,2)
VaultId=3efd1eb0-7012-11e9-8329-63fd6b776400
DefaultTimeout=30
PooledSocketTimeout=600
RecoveryPrvKey=D:\RecPrv.key
EnablePreDefinedUsers=ALL
AutomaticallyAddBuiltInGroups="Backup Users,DR Users,Operators,Auditors,Notification Engines"
LicenseUsageAlertLevel=85,90,99
MaxTasksAllocation=8(CPM,AIMApp,AppPrv):7-23,16(CPM,AIMApp,AppPrv):23-7,1(PTAApp)
AllowNonStandardFWAddresses=[17.23.1.5],Yes,3389:outbound/udp,3389:inbound/udp
AllowNonStandardFWAddresses=[17.23.1.5],Yes,3389:outbound/tcp,3389:inbound/tcp
AllowNonStandardFWAddresses=[17.23.1.2],Yes,514:outbound/udp,514:inbound/udp
AllowNonStandardFWAddresses=[17.23.1.4],Yes,514:outbound/udp,514:inbound/udp
AllowNonStandardFWAddresses=[17.21.1.6],Yes,25:outbound/tcp
AllowNonStandardFWAddresses=[10.1.4.1],Yes,25:outbound/tcp
ComponentNotificationThreshold=PIMProvider,Yes,30,1440;AppProvider,Yes,30,1440;OPMProvider,Yes,30,1440;CPM,Yes,720,1440;PVWA,Yes,90,1440;PSM,Yes,30,1440;DCAUser,Yes,60,2880;SFE,Yes,10,2880;FTP,Yes,60,2880;ENE,Yes,60,360
UserLockoutPeriodInMinutes=-1
MaskUserIsSuspendedMessage=No
TerminateOnDBErrorCodes=2003
[BACKUP]
BackupKey=C:\keys\operator\Backup.key
[CRYPTO]
SymCipherAlg=AES-256
ASymCipherAlg=RSA-2048
[SYSLOG]
SyslogTranslatorFile=Syslog\ArcSight.xsl
SyslogServerPort=514
*SyslogTranslatorFile=Syslog\ArcSight.xsl,Syslog\PTA.xsl
*SyslogServerPort=514,11514
SyslogServerIP=172.23.1.22,172.23.1.34
*SyslogServerProtocol=TCP,UDP
SyslogServerProtocol=UDP
SyslogMessageCodeFilter=0-999
SyslogSendBOMPrefix=No
UseLegacySyslogFormat=No
SendMonitoringMessage=No
• Restart the PrivateArk Server Service.
• Use the Windows Services applet to restart, to ensure that service dependencies restart successfully.
12.1 Lab - LDAP & SMTP Integration
LDAP to LDAPS
Error: (Reason: No SSL Host is defined in directory 51sectest.dev).
While Login PVWA with LDAP authentication, it asks for password change at first logon and while doing so, getting error : No SSL host is defined in directory.
Windows doesn't allow to change password in Active Directory over plain ldap. It requires to have SSL connection in order to change unicodePwd attribute where AD stores password.
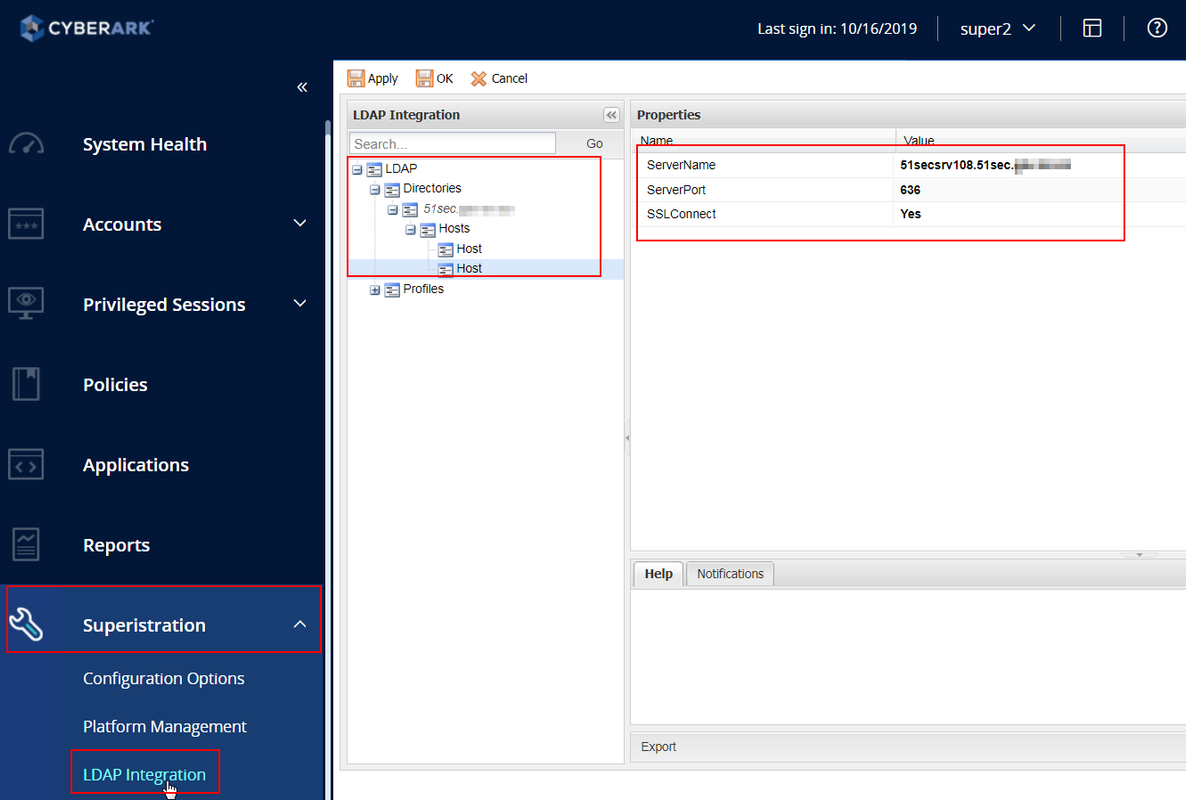
Probably your LDAP integration is configured without SSL. You may check your LDAP integration settings in :
- Adminstration > LDAP Integration > Directories > "your domain name" > Hosts > Host, verify that ServerPort parameter is set to 636 and SSLConnect is set to Yes. - this configuration is working per Active Directory LDAP or Domain Controller server.
- Adminstration > LDAP Integration > Directories > "your domain name", SSLConnect parameter is set to Yes. - this setting is used to enforce on the top level that all hosts in a previous setting use SSL.
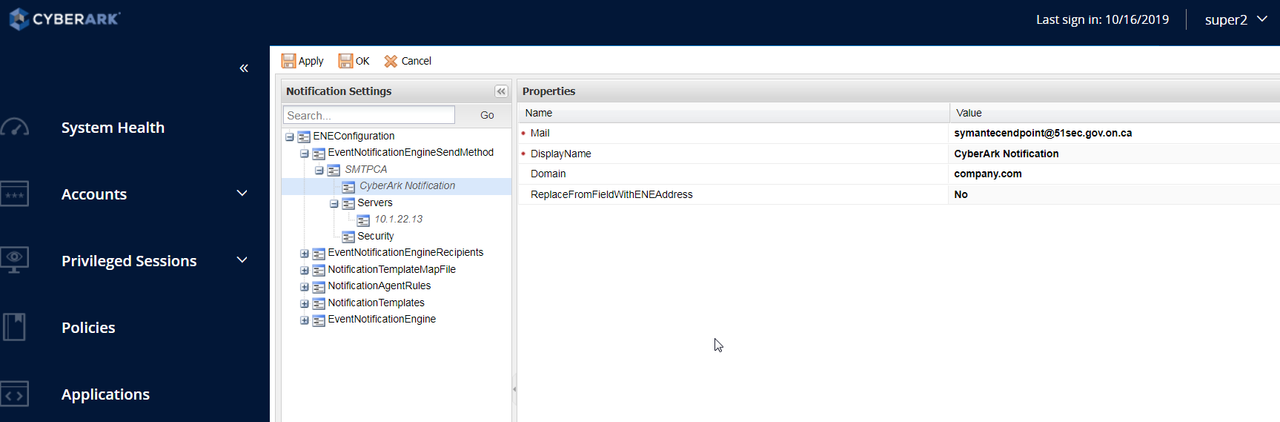
SMTP Notification
There are a couple of steps you will need to make sure first before you integrated with SMTP server. First thing is to make sure ENE service is up and running. Second thing is to make sure your built-in administrator user has business email address associate with it.
- Log onto the PrivateArk Administrative Client as an administrator user.
- Make sure that the business email address of the user who will issue ENE notifications is specified in their user properties. This user must belong to the Vault Admins group. By default, this is the Administrator user.
Note: If you need to run the wizard again, you can change the IP address of the SMTP server to 1.1.1.1 and save. Also ensure that the Event Notification Engine service is running on the Vault Server.
Issue: PAM Administrators not receive ENE Test email.
Make sure PAM administrators accounts have been configured a business email address.
NTP
Note: Time synchronization is critically important in CyberArk PAS architecture. Even more so when implementing the CyberArk Cluster Vault Management solution. In the following exercise we will integrate both nodes of the cluster vault with an external time source.1. Logon as Administrator to the passive node of the cluster.
a. Using Windows File Explorer navigate to ‘C:\Program Files(x86)\PrivateArk\Server\Conf’.
2. Edit the dbparm.ini file adding the following line to the end of the file. This will create inbound and outbound firewall rules that will allow the vault to communicate to the NTP server.
[NTP]
AllowNonStandardFWAddresses=[10.0.0.2],Yes,123:outbound/udp,123:inbound/udp
3. Enable the Windows Time service using the Windows Services applet .
4. Double click “Windows Time” to display the service properties.
5. Update the Startup type to Automatic (Delayed Start) and click OK.
6. Start the Windows Time service.
7. Repeat the above procedures on the active node of the cluster before proceeding.
8. To commit the changes made to the DBParm.ini file, we must restart the PrivateArk Server service.
Note: In an HA Cluster Vault implementation, you can no longer start and stop CyberArk services through the normal interface. Services must be restarted using the ClusterVault Management or CVM interface. To restart the services, we will simply failover to the passive node to commit the changes.
9. Ensure that you are logged into the active node of the cluster. Open the CVM to determine the active and passive node. Only the active node is capable of manually executing the failover procedure.
10. Open the CVM on the active node and click the center icon with the opposing arrows to initiate the failover procedure.
11. Click Continue to confirm the switch
a. Observe the failover progress in the CVM or alternatively monitor “C:\Program Files (x86)\PrivateArk\Server\ClusterVault\ClusterVaultConsole.log”
b. The log will display the failover sequence.
12. Next, we need to set a special time skew so that, if the clock is very far off, the vault will not make too large of a system time change at once. This will force the NTP service to change every 30 minutes for the first 3 checks and then every 8 hours. This prevents triggering anti-tampering protections in the vault that could be activated by creating new audit entries that occur before existing audit entries.
13. Ensure you are working on the active node.
14. Open regedit. Browse to HKLM\System\CurrentControlSet\Services\W32Time\Parameters.
15. Add a new DWORD and name it “Period”.
a. Double click it and change the Base to decimal and make the Value data “65532”.
b. Close the Registry Editor.
16. Open an Administrative Command prompt and run the following command:
W32tm /config /manualpeerlist:10.0.0.2 /syncfromflags:manual /reliable:YES /update
17. Failover to the passive node. When failover is complete, login to the active node.
Complete steps 13 – 17 on the active node of the Cluster Vault.
18. Both nodes of the Vault Cluster are now sync’ed to an external NTP time source.
For NTP Client Configuration on Vault:
Check: https://www.netbraintech.com/docs/ie80/help/configuring-ntp.htm
SIEM Integration / Syslog
Rename one of the sample translator files• Translator files translate CyberArk logging format into the SIEM logging format
• These five files will cover the most commonly deployed SIEM systems
• The Arcsight translator file works with Splunk and others
C:\Program Files (x86)\PrivateArk\Server\Conf\dbparm.ini
[MAIN]
TasksCount=20
DateFormat=DD.MM.YY
TimeFormat=HH:MM:SS
ResidentDelay=10
BasePort=1858
LogRetention=7
LockTimeOut=30
DaysForAutoClear=30
DaysForPicturesDistribution=Never
ClockSyncTolerance=600
TraceArchiveMaxSize=5120
VaultEventNotifications=NotifyOnNewRequest,NotifyOnRejectRequest,NotifyOnConfirmRequestByAll,NotifyOnDeleteRequest
RecoveryPubKey=C:\keys\operator\RecPub.key
ServerKey=C:\keys\operator\Server.key
StagingAreaDirectory=C:\PrivateArk\StagingArea
EntropyFile=C:\PrivateArk\Safes\entropy.rnd
DatabaseConnectionPasswordFile=C:\keys\operator\VaultUser.pass
ServerCertificateFile=C:\keys\operator\Server.pem
ServerPrivateKey=C:\keys\operator\Server.pvk
*AllowedVirusSafeFileTypes=DOC,DOT,XLS,XLT,EPS,BMP,GIF,TGA,TIF,TIFF,LOG,TXT,PAL,,
AutoClearSafeHistory=Yes,1,1,2
AutoClearUserHistory=Yes,1,3,4
AutoSyncExternalObjects=Yes,1,23,24
DebugLevel=PE(1),PERF(1,2)
VaultId=3efd1eb0-7012-11e9-8329-63fd6b776400
DefaultTimeout=30
PooledSocketTimeout=600
RecoveryPrvKey=D:\RecPrv.key
EnablePreDefinedUsers=ALL
AutomaticallyAddBuiltInGroups="Backup Users,DR Users,Operators,Auditors,Notification Engines"
LicenseUsageAlertLevel=85,90,99
MaxTasksAllocation=8(CPM,AIMApp,AppPrv):7-23,16(CPM,AIMApp,AppPrv):23-7,1(PTAApp)
AllowNonStandardFWAddresses=[17.23.1.5],Yes,3389:outbound/udp,3389:inbound/udp
AllowNonStandardFWAddresses=[17.23.1.5],Yes,3389:outbound/tcp,3389:inbound/tcp
AllowNonStandardFWAddresses=[17.23.1.2],Yes,514:outbound/udp,514:inbound/udp
AllowNonStandardFWAddresses=[17.23.1.4],Yes,514:outbound/udp,514:inbound/udp
AllowNonStandardFWAddresses=[17.21.1.6],Yes,25:outbound/tcp
AllowNonStandardFWAddresses=[10.1.4.1],Yes,25:outbound/tcp
ComponentNotificationThreshold=PIMProvider,Yes,30,1440;AppProvider,Yes,30,1440;OPMProvider,Yes,30,1440;CPM,Yes,720,1440;PVWA,Yes,90,1440;PSM,Yes,30,1440;DCAUser,Yes,60,2880;SFE,Yes,10,2880;FTP,Yes,60,2880;ENE,Yes,60,360
UserLockoutPeriodInMinutes=-1
MaskUserIsSuspendedMessage=No
TerminateOnDBErrorCodes=2003
[BACKUP]
BackupKey=C:\keys\operator\Backup.key
[CRYPTO]
SymCipherAlg=AES-256
ASymCipherAlg=RSA-2048
[SYSLOG]
SyslogTranslatorFile=Syslog\ArcSight.xsl
SyslogServerPort=514
*SyslogTranslatorFile=Syslog\ArcSight.xsl,Syslog\PTA.xsl
*SyslogServerPort=514,11514
SyslogServerIP=172.23.1.22,172.23.1.34
*SyslogServerProtocol=TCP,UDP
SyslogServerProtocol=UDP
SyslogMessageCodeFilter=0-999
SyslogSendBOMPrefix=No
UseLegacySyslogFormat=No
SendMonitoringMessage=No
• Use the Windows Services applet to restart, to ensure that service dependencies restart successfully.
SNMP
Configure paragent.ini with the following information:
• SNMPHostIP The IP address of the remote computer where SNMP traps will be sent.
• SNMPTrapPort The port through which SNMP traps will be sent to the remote computer.
• SNMPCommunity The name of location where the SNMP traps originated.

• Restart the PrivateArk Remote Control Agent service to read the changes made into memory.
• Check with the administrator of the SNMP console to ensure that the SNMP messages sent are
being received and are readable.
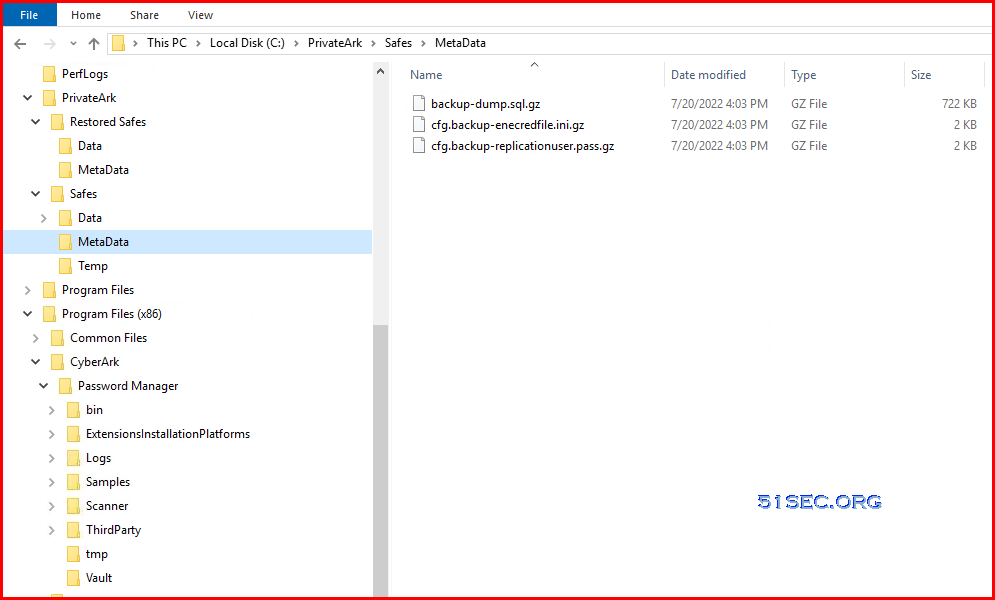
Vault Backup Steps

Step 1: The Vault Backup utility (PAReplicate.exe) generates a metadata backup in the Vault’s Metadata Backup folder, then exports the contents of the Data folder and the contents of the Metadata Backup folder to the computer on which the Backup utility is installed.
Step 2: After the replication process is complete, the external backup application copies all the files from the replicated Data folder and the Metadata folder.
Keep the replicated files on the Backup utility machine after the external backup application copies all the files. The next time you run the Backup utility to the same location, it will update only the modified files and reduce the time of the replication.
Backup folder:
C:\PrivateArk\Safes\MetaData

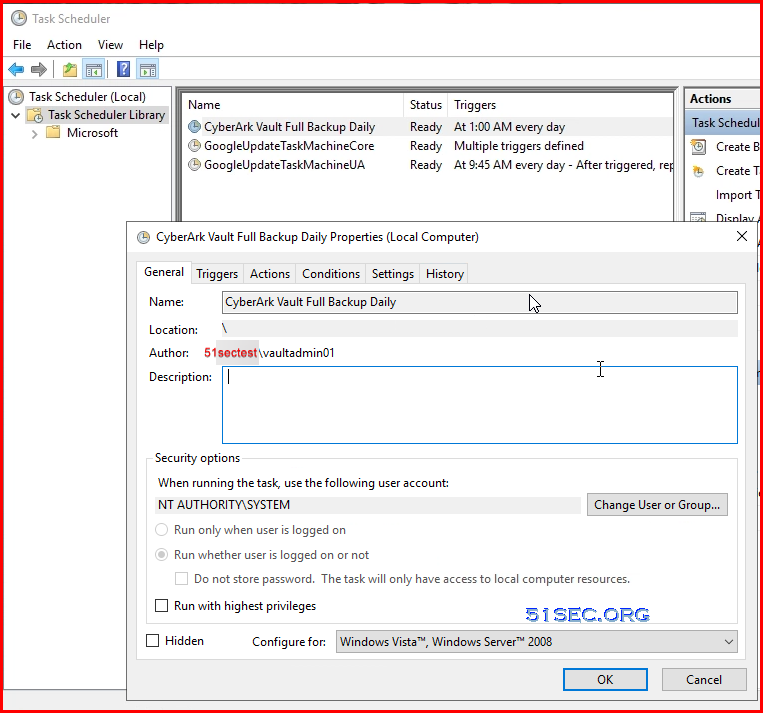
CMD Backup
Script:
@echo off
cd "c:\Program Files (x86)\PrivateArk\Replicate"
echo %date% %time% Start of task > ReplicateBatch.log
echo User=%UserName%, Path=%path% >> ReplicateBatch.log
PAReplicate.exe Vault.ini /logonfromfile user.ini /fullbackup 1>> ReplicateBatch.log 2>> ReplicateBatch.err
echo %date% %time% End of task >> ReplicateBatch.log
Scheduled Job:
- Runas Local System (run with highest privileges set)
- Program/script: "c:\Program Files (x86)\PrivateArk\Replicate\PAReplicate.exe"
- Add arguments: vault.ini /logonfromfile user.ini /fullbackup
- Start in: c:\Program Files (x86)\PrivateArk\Replicate
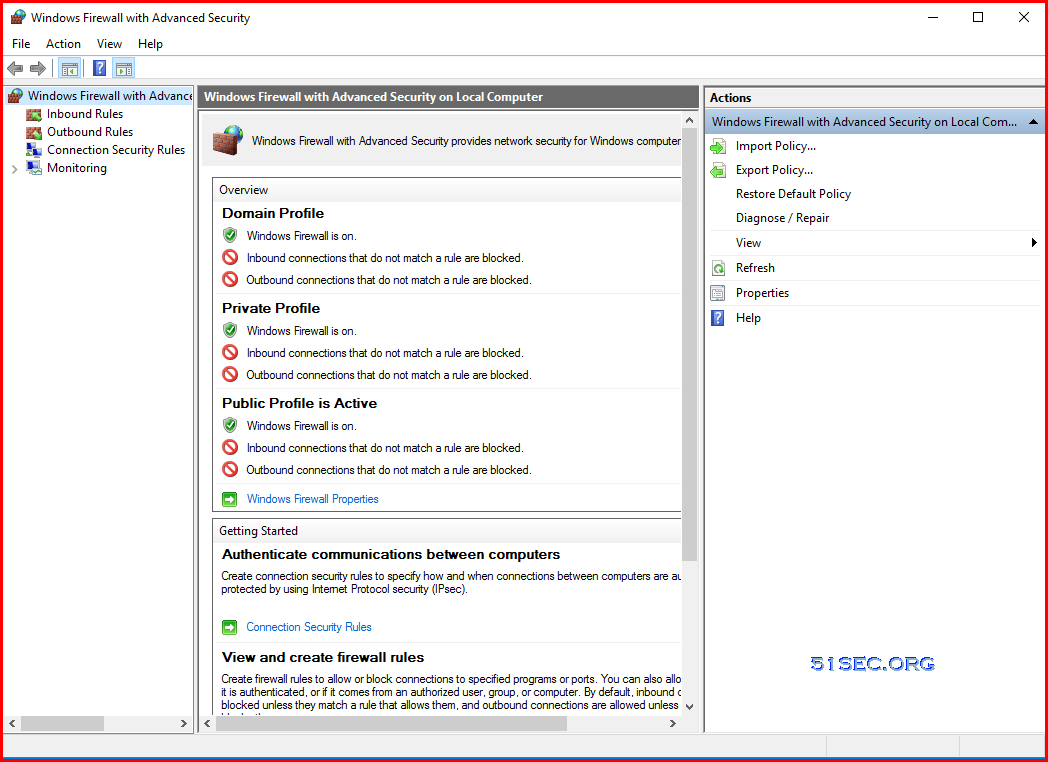
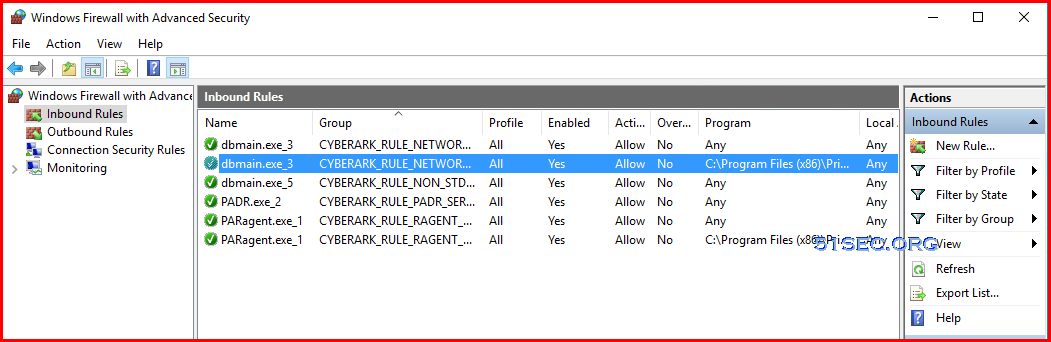
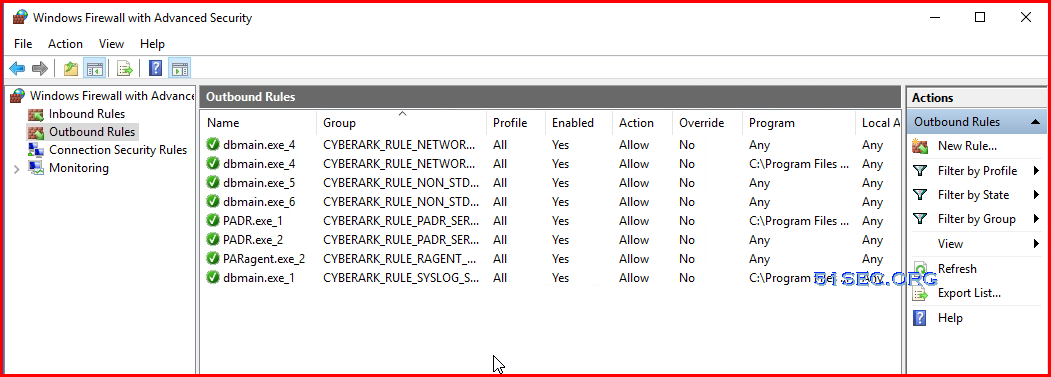
Firewall on Vault
After vault has been hardened, here is how Windows Firewall with Advanced Security looks like:
Wrong One

Right One
References
- Install AD & CS (Certification Service) on Windows Server 2016 to Deploy Enterprise PKI
- CyberArk LDAP Authentication on Active Directory


No comments:
Post a Comment