
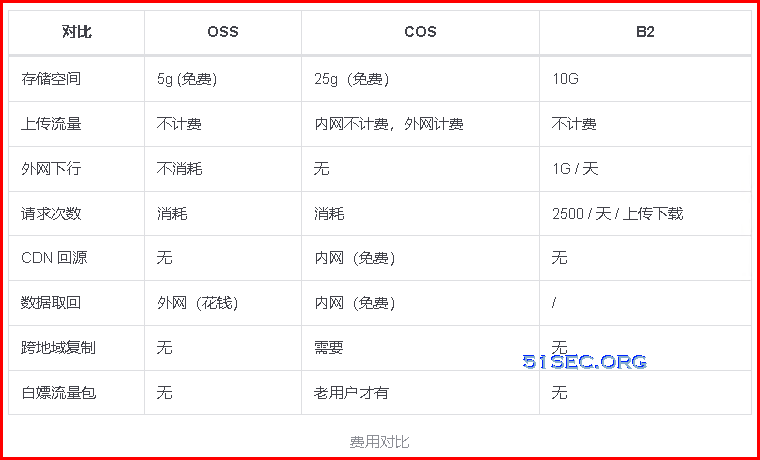
The free plan at BackBlaze is 10G and Cloudflare can be configured to work with it very well. Also ShareX screen capture software can auto-generate my own domain url for those photos. It sounds quite promising to use it as blog photo bed. There is cap limit for class b and class c transactions. But usually the limit is good for a small website like mine.
This post is a summary for all steps for installation and configuration.
Usually Daily Class B Transactions Caps will be quickly reached if you are having not integrated with Cloudflare or other bandwidth Alliance vendor.
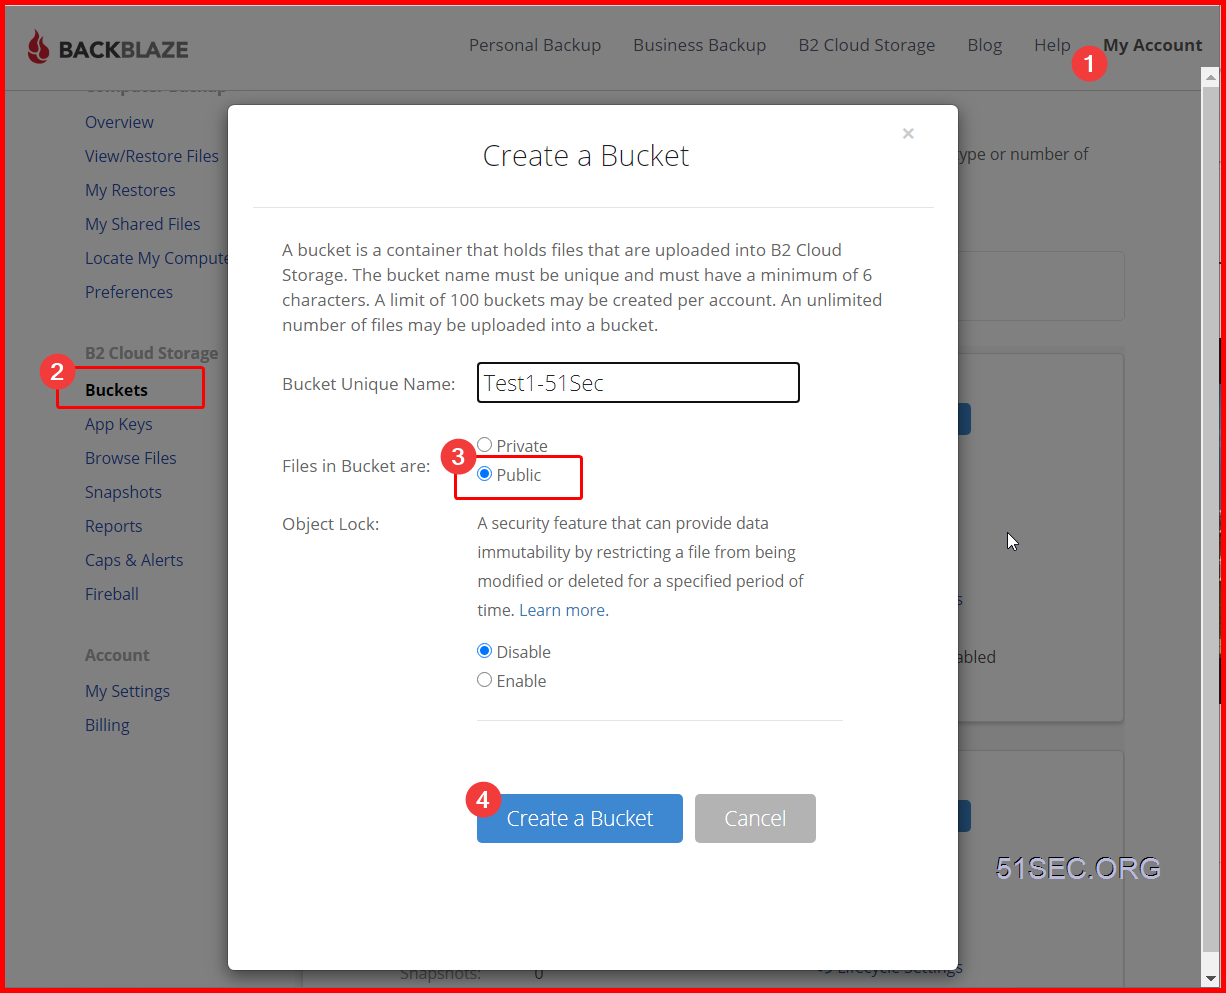
Create and Configure Your BackBlaze Account
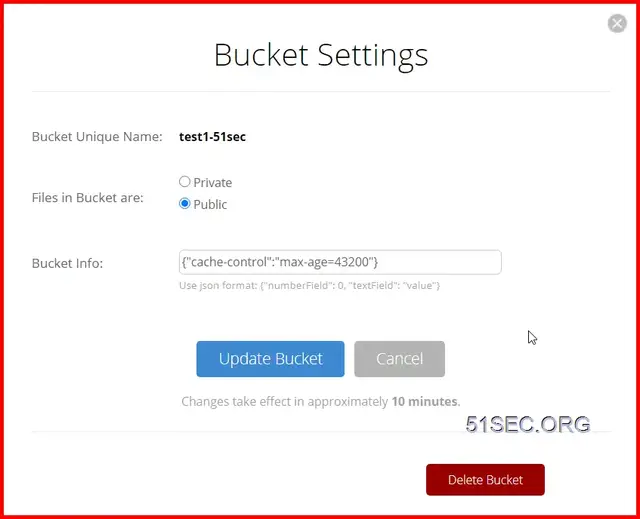
Here is an extra important step to set up your bucket. You will have to put one cache command into Bucket info: {"cache-control":"max-age=43200"}
43200 is seconds. This means Cloudflare will not re-fetch the resource from source (BackBlaze) in 43200 seconds
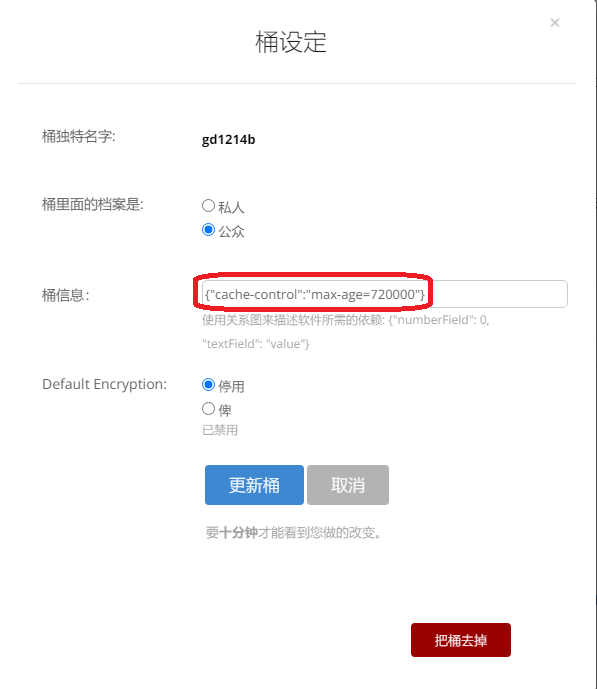
{"cache-control":"max-age=720000"}
3 Upload a file to get Friendly URL:
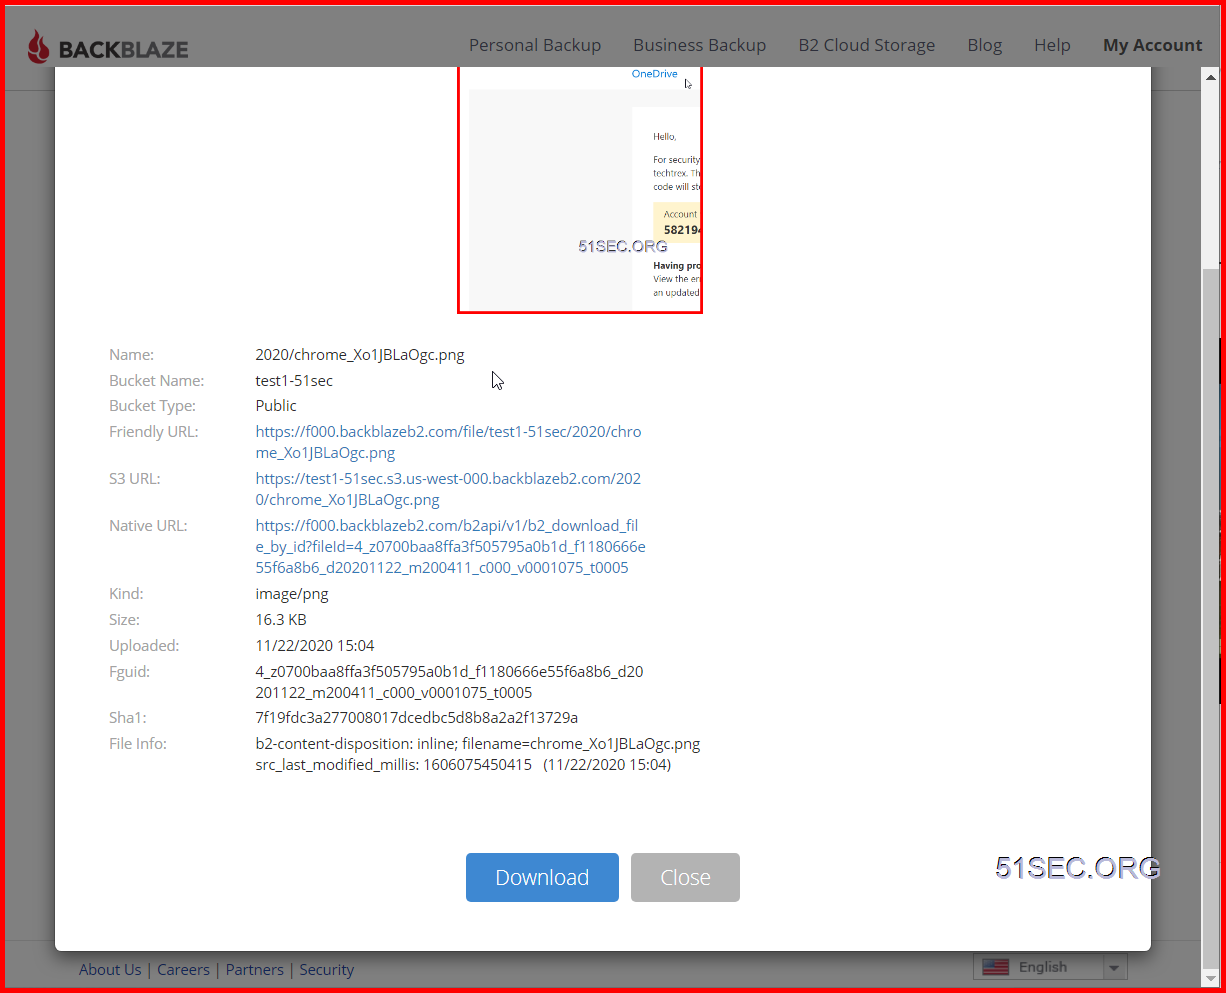
For example: I got following url starting with f000.backblazeb2.com/file. You will need this url to put it into ShareX and Cloudflare
Friendly URL:: https://f000.backblazeb2.com/file/test1-51sec/2020/chrome_Xo1JBLaOgc.png
test1-51sec is bucket name. 2020 is the folder I created in the bucket.
4 Add a New Application Key
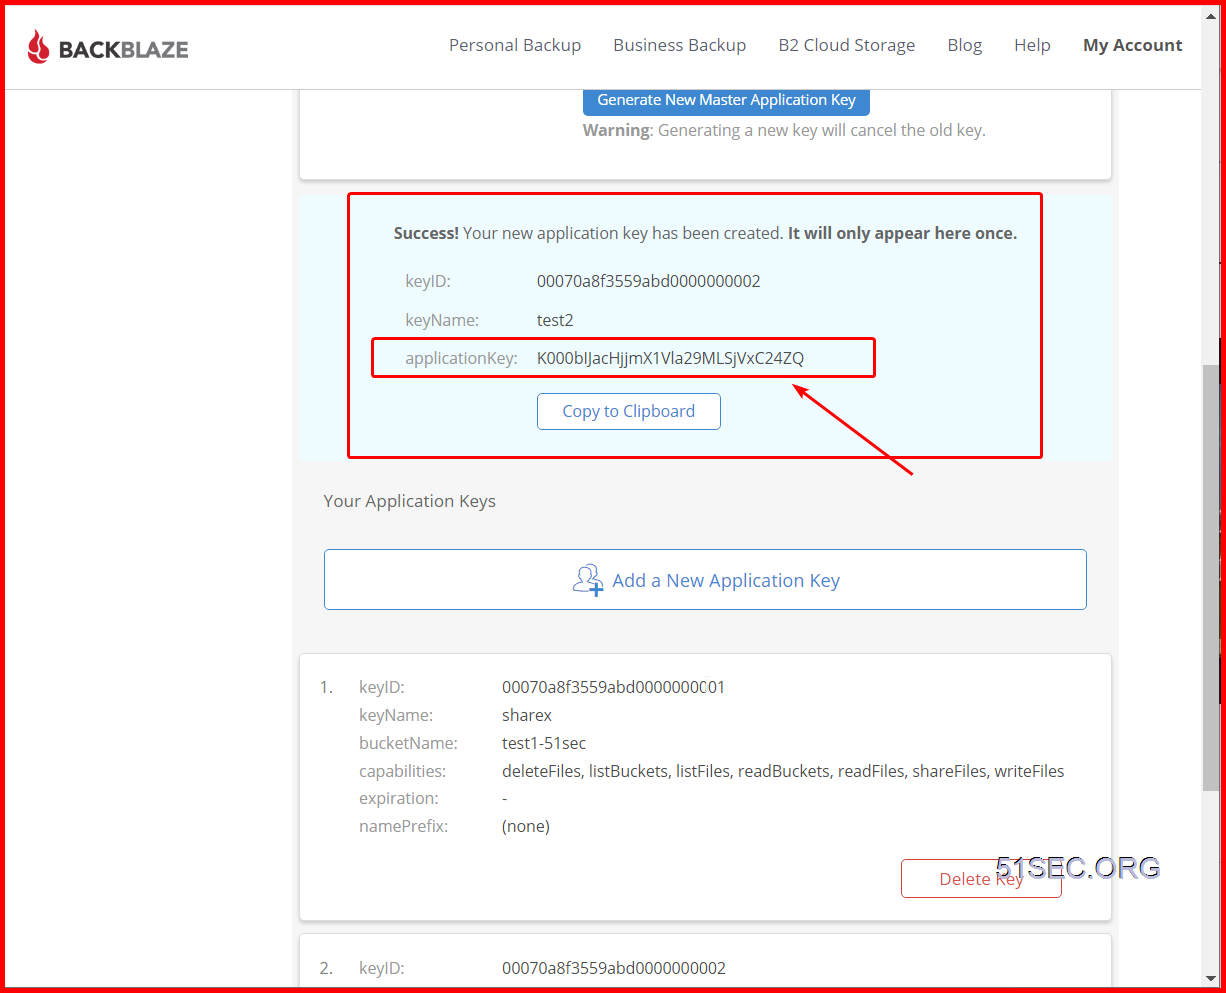
The application key will only show once, and you will need it to access your bucket. But you can create multiple keys later.
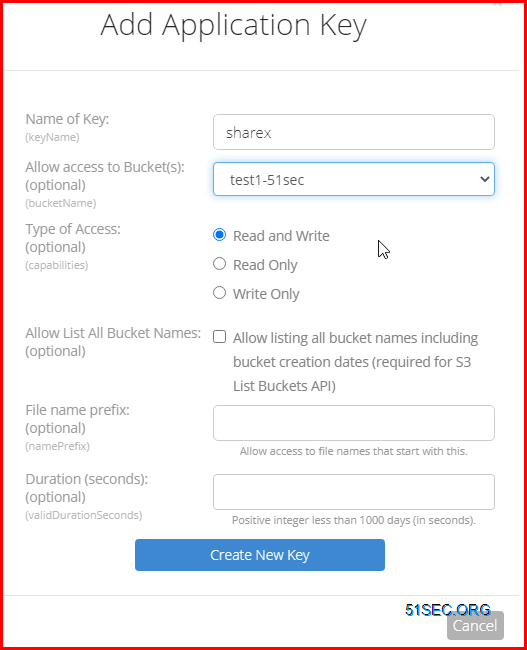
Important: make sure you created a key only for one bucket, not for all.
Both KeyID and Application Key will be needed to allow ShareX to upload the photos into this bucket.
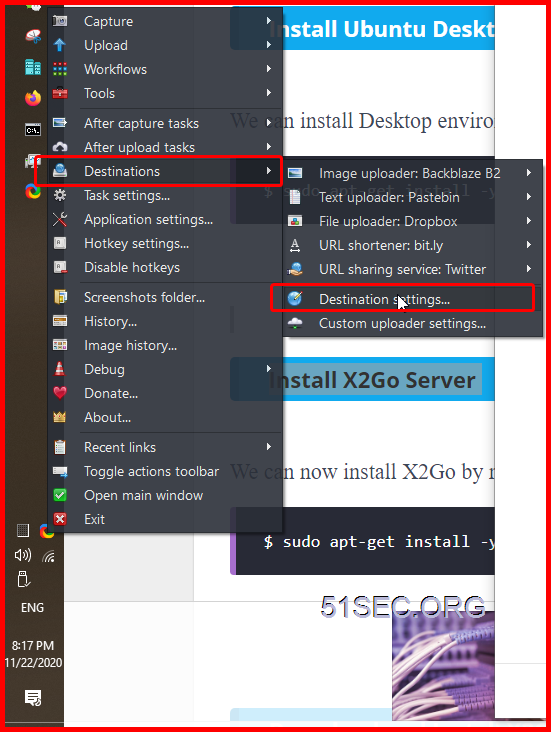
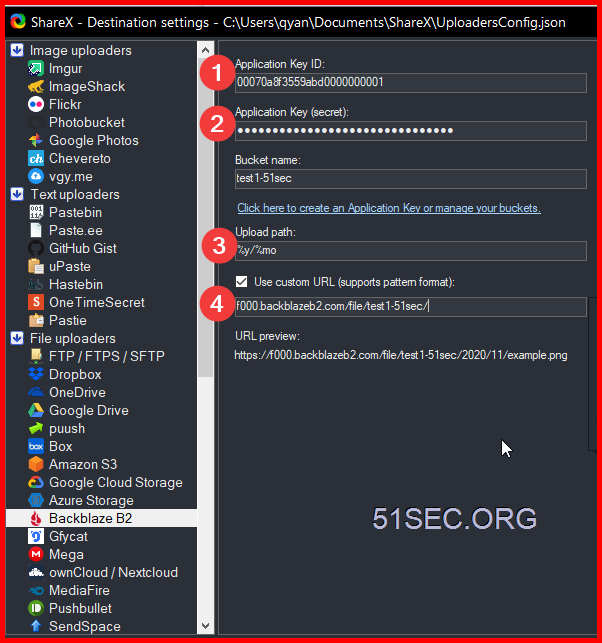
Configure ShareX
Configure Cloudflare : Using Page Rule
Important:
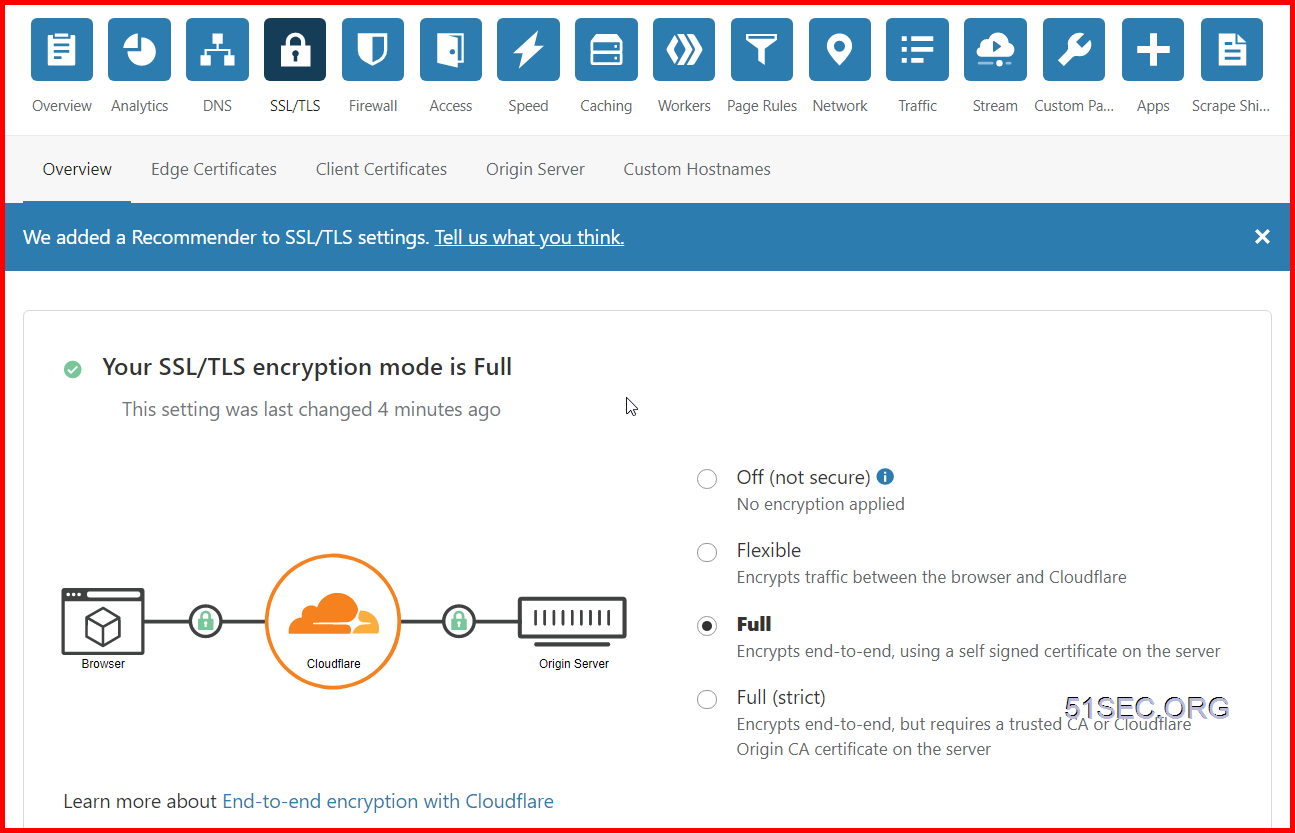
Ensure your SSL settings are set to Full. This is the default setting. Please note: Backblaze B2 only supports secure (HTTPS) connections.

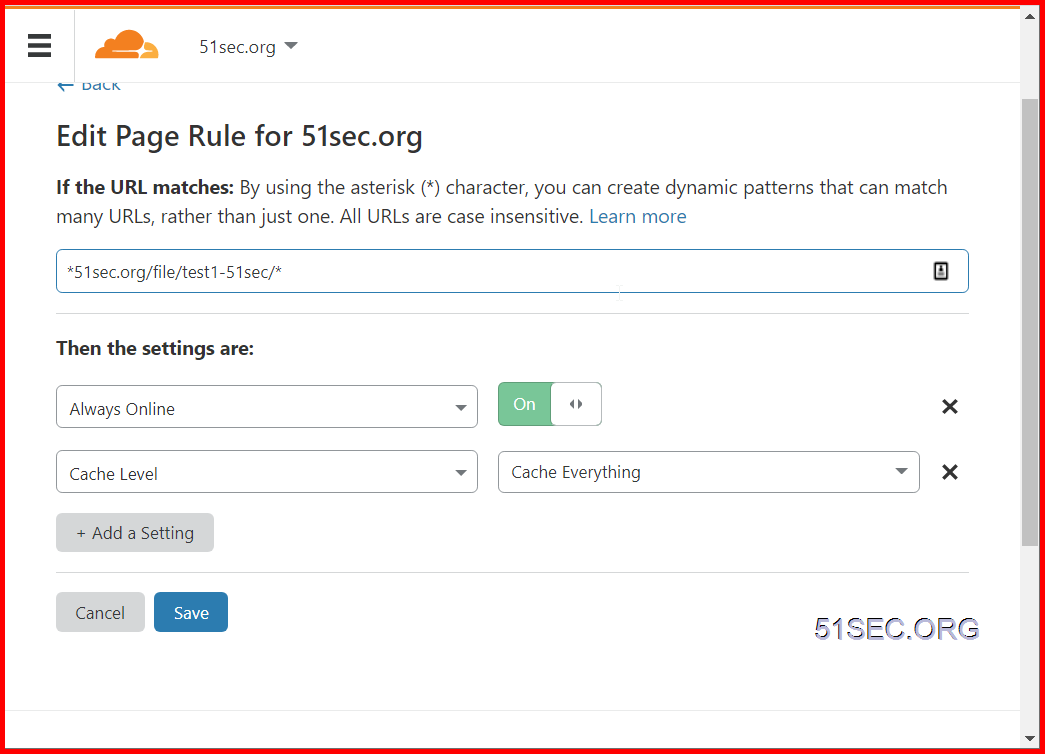
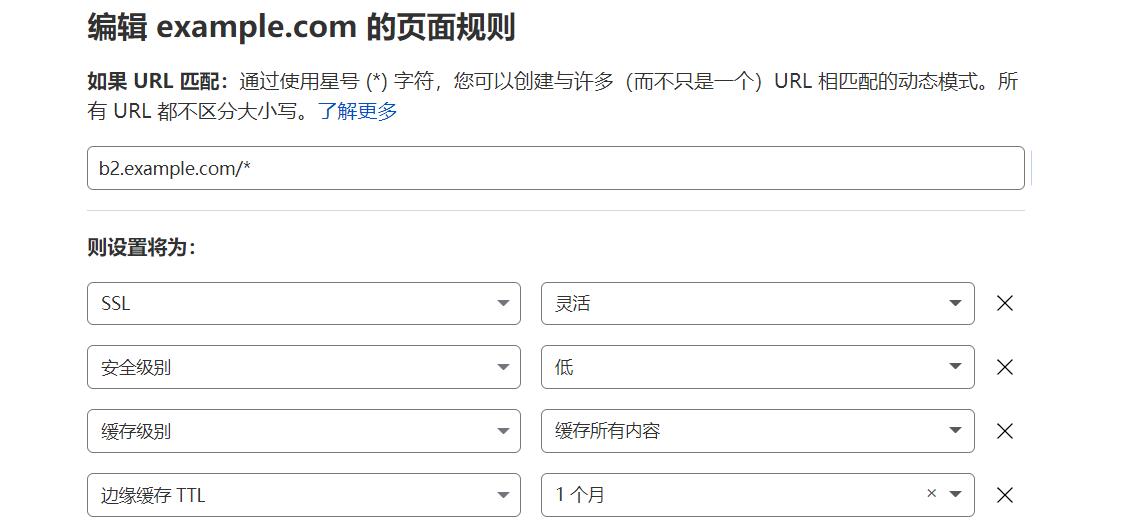
2 Create a page rule to cache this URL only when it is from 51sec.org.


Configure Cloudflare : Using Transform Rule
Note:
- https://techbits.io/free-s3-egress-backblaze-b2-cloudflare/
Basically, to remove /file/bucketname from our 'pretty'/nicer URL, we'll use Cloudflare Transform Rules - rewrite URL feature.
For anything that matches this rule we want to automatically add the '/file/bucketname' part, so under the 'then...' bit of the rule choose the 'Rewrite to...' radio option and set the drop-down to 'Dynamic', and set the rule to the line:
concat("/file/bucketname",http.request.uri.path)
This tells the rules engine to concatenate this with the trailing part of the request. We don't ever see this, it'll just happen in the background.
Before, we tested that the image at:
- https://f003.backblazeb2.com/file/bucketname/testfile.png
- https://sub.example.com/file/bucketname/testfile.png
- https://sub.example.com/testfile.png
There are more we will need to do to remove B2 HTTP response headers, which you can find out from the post: https://techbits.io/free-s3-egress-backblaze-b2-cloudflare/
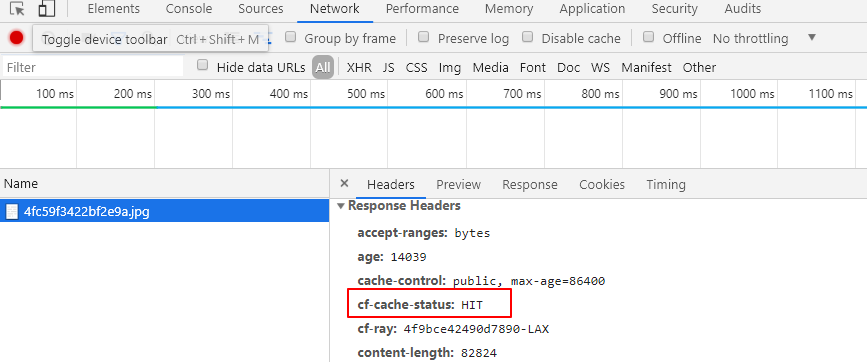
Verify if using CloudFlare Cache
Using browser Chrome F12 to check headers
- curl --head https://p.51sec.org/file/netsec/2023/01/chrome_GkBk1AoDaL.png
- curl -svo /dev/null https://p.51sec.org/file/netsec/2023/01/chrome_GkBk1AoDaL.png
netsec@hpthin:~$ curl -svo /dev/null https://p.51sec.org/file/netsec/2023/01/chrome_GkBk1AoDaL.png
* Trying 172.64.80.1:443...
* TCP_NODELAY set
* Connected to p.51sec.org (172.64.80.1) port 443 (#0)
* ALPN, offering h2
* ALPN, offering http/1.1
* successfully set certificate verify locations:
* CAfile: /etc/ssl/certs/ca-certificates.crt
CApath: /etc/ssl/certs
} [5 bytes data]
* TLSv1.3 (OUT), TLS handshake, Client hello (1):
} [512 bytes data]
* TLSv1.3 (IN), TLS handshake, Server hello (2):
{ [122 bytes data]
* TLSv1.3 (IN), TLS handshake, Encrypted Extensions (8):
{ [19 bytes data]
* TLSv1.3 (IN), TLS handshake, Certificate (11):
{ [2330 bytes data]
* TLSv1.3 (IN), TLS handshake, CERT verify (15):
{ [79 bytes data]
* TLSv1.3 (IN), TLS handshake, Finished (20):
{ [52 bytes data]
* TLSv1.3 (OUT), TLS change cipher, Change cipher spec (1):
} [1 bytes data]
* TLSv1.3 (OUT), TLS handshake, Finished (20):
} [52 bytes data]
* SSL connection using TLSv1.3 / TLS_AES_256_GCM_SHA384
* ALPN, server accepted to use h2
* Server certificate:
* subject: C=US; ST=California; L=San Francisco; O=Cloudflare, Inc.; CN=sni.cloudflaressl.com
* start date: Jun 6 00:00:00 2022 GMT
* expire date: Jun 5 23:59:59 2023 GMT
* subjectAltName: host "p.51sec.org" matched cert's "*.51sec.org"
* issuer: C=US; O=Cloudflare, Inc.; CN=Cloudflare Inc ECC CA-3
* SSL certificate verify ok.
* Using HTTP2, server supports multi-use
* Connection state changed (HTTP/2 confirmed)
* Copying HTTP/2 data in stream buffer to connection buffer after upgrade: len=0
} [5 bytes data]
* Using Stream ID: 1 (easy handle 0x56103d2d9f00)
} [5 bytes data]
> GET /file/netsec/2023/01/chrome_GkBk1AoDaL.png HTTP/2
> Host: p.51sec.org
> user-agent: curl/7.68.0
> accept: */*
>
{ [5 bytes data]
* TLSv1.3 (IN), TLS handshake, Newsession Ticket (4):
{ [238 bytes data]
* TLSv1.3 (IN), TLS handshake, Newsession Ticket (4):
{ [238 bytes data]
* old SSL session ID is stale, removing
{ [5 bytes data]
* Connection state changed (MAX_CONCURRENT_STREAMS == 256)!
} [5 bytes data]
< HTTP/2 200
< date: Mon, 30 Jan 2023 22:03:31 GMT
< content-type: image/png
< content-length: 73641
< x-bz-file-name: 2023/01/chrome_GkBk1AoDaL.png
< x-bz-file-id: 4_z1ffd0e4783a5d79a7cea0c15_f11011ae48f340b0c_d20230130_m171133_c004_v0402013_t0052_u01675098693590
< x-bz-content-sha1: 31ea82aa3a9d0dd9e496fd2ab2cba6131f865339
< x-bz-upload-timestamp: 1675098693590
< cache-control: max-age=31536000
< content-disposition: inline; filename=chrome_GkBk1AoDaL.png
< x-bz-info-src_last_modified_millis: 1675098694039
< last-modified: Mon, 30 Jan 2023 17:11:56 GMT
< cf-cache-status: HIT
< age: 17288
< accept-ranges: bytes
< server-timing: cf-q-config;dur=7.0000005507609e-06
< report-to: {"endpoints":[{"url":"https:\/\/a.nel.cloudflare.com\/report\/v3?s=OtQzo%2F7UZfScoGin1exNkZteB%2Fi4T1Max1llUHG8VAQo%2FU4dp2g8ZNkDrOxi%2Fa0%2B6yKRNdI0guoimWIB0Bt6G0iyvCnOdblAPZvWcYHXNdZas%2BH9AIk4P3lz1g%2B7Cg%3D%3D"}],"group":"cf-nel","max_age":604800}
< nel: {"success_fraction":0,"report_to":"cf-nel","max_age":604800}
< server: cloudflare
< cf-ray: 791d7f82cba7380c-IAD
< alt-svc: h3=":443"; ma=86400, h3-29=":443"; ma=86400
<
{ [601 bytes data]
* Connection #0 to host p.51sec.org left intact
netsec@hpthin:~$
'HIT' (which means you've accessed a cached file) or 'MISS' (it had to be retrieved from the origin server)
Create Hotlink Protection
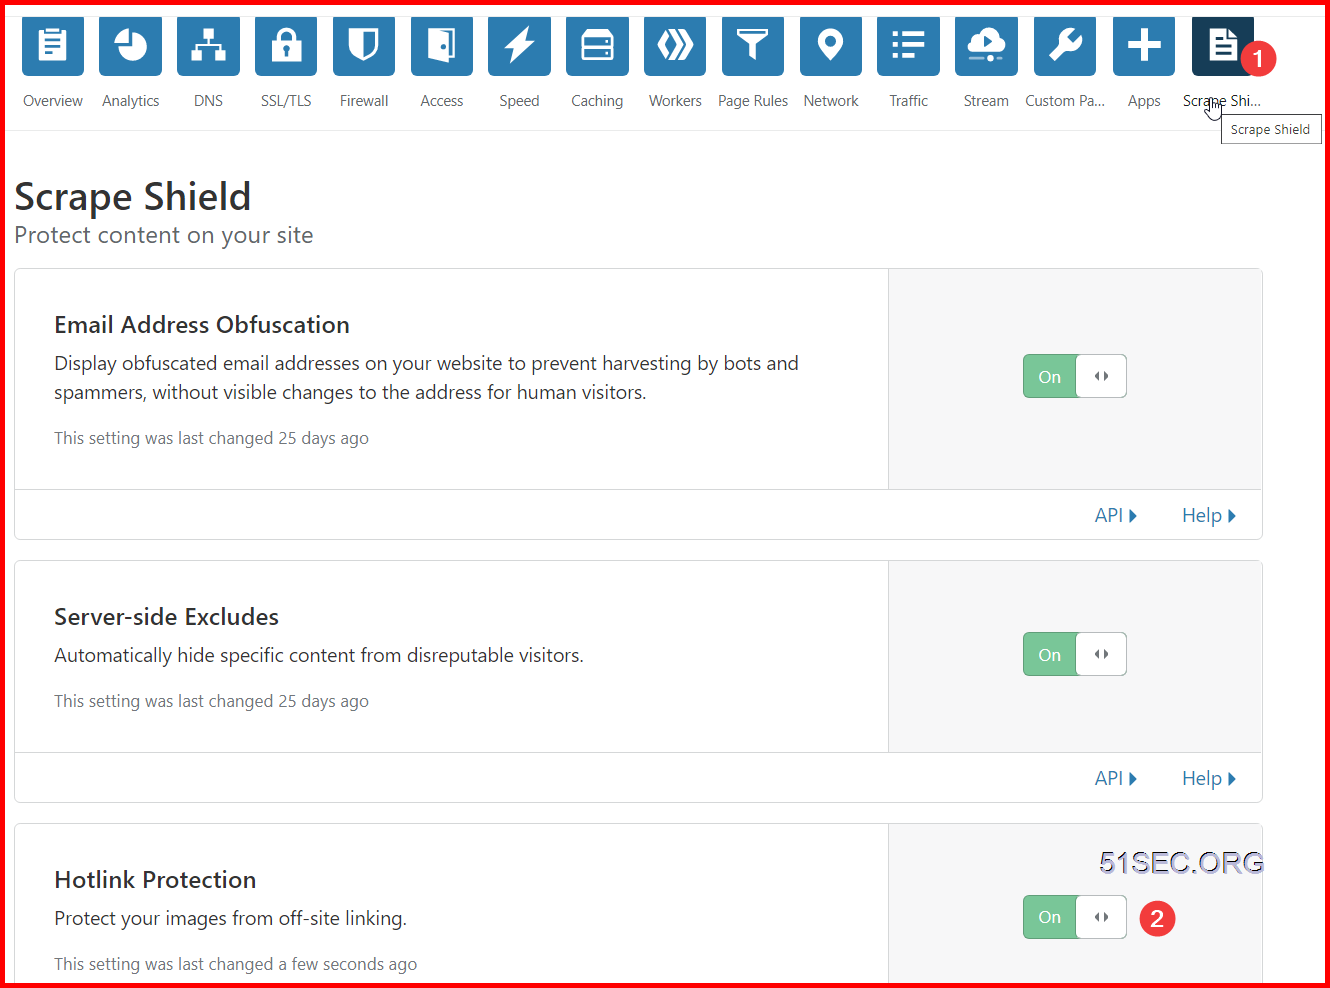
Using Cloudflare Workers
Based on the discussion on https://gist.github.com/charlesroper/f2da6152d6789fa6f25e9d194a42b889, it seems using page rule / transform rule will be still violating https://www.cloudflare.com/en-ca/terms/ 's 2.8 Limitation on Serving Non-HTML Content, But using Workers, it is fine.
You also can use Workers to replace the page rules as show below:
'use strict';
const b2Domain = 'img.domain.com'; // configure this as per instructions above
const b2Bucket = 'bucket-name'; // configure this as per instructions above
const b2UrlPath = `/file/${b2Bucket}/`;
addEventListener('fetch', event => {
return event.respondWith(fileReq(event));
});
// define the file extensions we wish to add basic access control headers to
const corsFileTypes = ['png', 'jpg', 'gif', 'jpeg', 'webp'];
// backblaze returns some additional headers that are useful for debugging, but unnecessary in production. We can remove these to save some size
const removeHeaders = [
'x-bz-content-sha1',
'x-bz-file-id',
'x-bz-file-name',
'x-bz-info-src_last_modified_millis',
'X-Bz-Upload-Timestamp',
'Expires'
];
const expiration = 31536000; // override browser cache for images - 1 year
// define a function we can re-use to fix headers
const fixHeaders = function(url, status, headers){
let newHdrs = new Headers(headers);
// add basic cors headers for images
if(corsFileTypes.includes(url.pathname.split('.').pop())){
newHdrs.set('Access-Control-Allow-Origin', '*');
}
// override browser cache for files when 200
if(status === 200){
newHdrs.set('Cache-Control', "public, max-age=" + expiration);
}else{
// only cache other things for 5 minutes
newHdrs.set('Cache-Control', 'public, max-age=300');
}
// set ETag for efficient caching where possible
const ETag = newHdrs.get('x-bz-content-sha1') || newHdrs.get('x-bz-info-src_last_modified_millis') || newHdrs.get('x-bz-file-id');
if(ETag){
newHdrs.set('ETag', ETag);
}
// remove unnecessary headers
removeHeaders.forEach(header => {
newHdrs.delete(header);
});
return newHdrs;
};
async function fileReq(event){
const cache = caches.default; // Cloudflare edge caching
const url = new URL(event.request.url);
if(url.host === b2Domain && !url.pathname.startsWith(b2UrlPath)){
url.pathname = b2UrlPath + url.pathname;
}
let response = await cache.match(url); // try to find match for this request in the edge cache
if(response){
// use cache found on Cloudflare edge. Set X-Worker-Cache header for helpful debug
let newHdrs = fixHeaders(url, response.status, response.headers);
newHdrs.set('X-Worker-Cache', "true");
return new Response(response.body, {
status: response.status,
statusText: response.statusText,
headers: newHdrs
});
}
// no cache, fetch image, apply Cloudflare lossless compression
response = await fetch(url, {cf: {polish: "lossless"}});
let newHdrs = fixHeaders(url, response.status, response.headers);
if(response.status === 200){
response = new Response(response.body, {
status: response.status,
statusText: response.statusText,
headers: newHdrs
});
}else{
response = new Response('File not found!', { status: 404 })
}
event.waitUntil(cache.put(url, response.clone()));
return response;
}
- https://f000.backblazeb2.com/file/backblaze1489498/wallhaven-md2x8m.jpg
- https://dlcu.cf/wallhaven-md2x8m.jpg
Troubleshooting
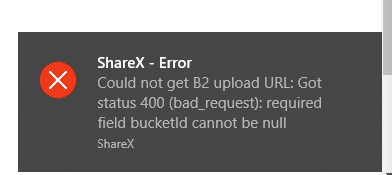
That is because you are allowing your key access to all buckets. Please create a new key to allow only one bucket.


No comments:
Post a Comment