Pi-hole or Pihole is a Linux network-level advertisement and Internet tracker blocking application[2][3][4][5] which acts as a DNS sinkhole[6] and optionally a DHCP server, intended for use on a private network.[1] It is designed for low-power embedded devices with network capability, such as the Raspberry Pi,[3][7] but supports any Linux machines.[6][8][9][10]
Pi-hole has the ability to block traditional website advertisements as well as advertisements in unconventional places, such as smart TVs and mobile operating system advertisements.[
- from Wikipedia
Install Ubuntu, Config Static IP and Update System
Set up Static IP :
root@hpthin:~# cat /etc/netplan/00-installer-config.yaml
# This is the network config written by 'subiquity'
network:
  ethernets:
    enp5s0:
      addresses: [192.168.2.8/24]
      gateway4: 192.168.2.1
      nameservers:
         addresses: [8.8.8.8, 1.1.1.1]
  version: 2
root@hpthin:~#
When editing Yaml files, make sure you follow the YAML code indent standards. If the syntax is not correct, the changes will not be applied.
Once done, save the file and apply the changes by running the following command:
- sudo netplan apply
Update Ubuntu 20.04 8system to latest:
[root@OCP1-Ubuntu ~]# apt update -y && apt upgrdate -y
Install Docker, Docker-Compose and Portainer
Install Docker on Ubuntu 20.04:
#Ubuntu 20.04
sudo apt install docker.io#Ubuntu 20.04
sudo apt install docker-compose[root@ubuntu20 ~]# docker volume create portainer_data
portainer_data
[root@ubuntu20 ~]# docker run -d -p 9000:9000 --name portainer --restart always -v /var/run/docker.sock:/var/run/docker.sock -v portainer_data:/data portainer/portainer-ce:latest
Unable to find image 'portainer/portainer-ce:latest' locally
latest: Pulling from portainer/portainer-ce
94cfa856b2b1: Pull complete
49d59ee0881a: Pull complete
f220caeff793: Pull complete
Digest: sha256:67e3edef02ba465d18663cd273cc24ec2764b27686ea5afbe8f392317a70ed72
Status: Downloaded newer image for portainer/portainer-ce:latest
d0ff883b063156b5929a8999593d38837501e6c16ffcefcbefb221ebe0301a32
[root@ubuntu20 ~]#
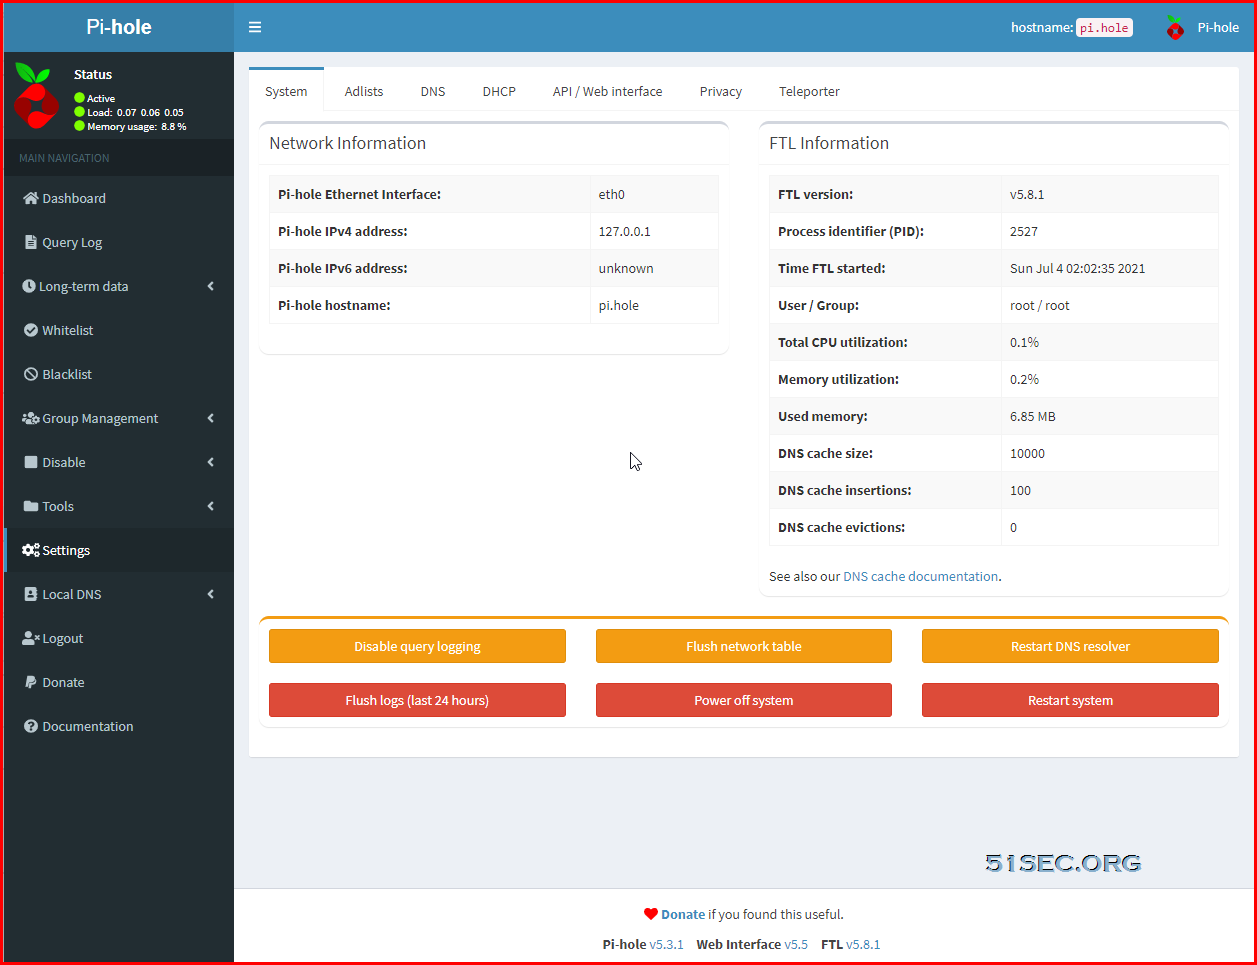
Free Up Port 53, Used By systemd-resolved
$ sudo lsof -i :53

COMMAND   PID            USER   FD   TYPE DEVICE SIZE/OFF NODE NAME
systemd-r 610 systemd-resolve   12u  IPv4  19377      0t0  UDP localhost:domain
systemd-r 610 systemd-resolve   13u  IPv4  19378      0t0  TCP localhost:domain (LISTEN)
1. Edit
/etc/systemd/resolved.conf with a text editor (as root), e.g. open it with Nano console text editor:sudo nano /etc/systemd/resolved.conf[Resolve]
DNS=
#FallbackDNS=
#Domains=
#LLMNR=no
#MulticastDNS=no
#DNSSEC=no
#DNSOverTLS=no
#Cache=no
DNSStubListener=no
#ReadEtcHosts=yes/run/systemd/resolve/resolv.conf with /etc/resolv.conf as the destination:sudo ln -sf /run/systemd/resolve/resolv.conf /etc/resolv.confHere, -s is for creating a symbolic and not hard link, and -f is for removing any existing destination files (so it removes /etc/resolv.conf if it exists).3. Reboot your system.
Port 53 should now be free on your Ubuntu system, and you shouldn't be getting errors like "listen tcp 127.0.0.1:53: bind: address already in use" anymore.
You can check to see if port 53 is in use or not by running sudo lsof -i :53 - if port 53 is not in use, this command shouldn't show any output.
Install Docker, Docker-Compose and Portainer
- Install Docker, Docker-Compose, Portainer & Nginx on CentOS 8 & Ubuntu 20.04
- Run Free Arm-based Oracle Linux with 1 oCPU and 6G Ram (Install Docker/Docker Compose/Portainer/Ubuntu Virtual Desktop)
Method 1: Quick Start using Docker-compose.yml
From Dockerhub : https://hub.docker.com/r/pihole/pihole
- Copy docker-compose.yml.example to docker-compose.yml and update as needed. See example below: Docker-compose example:
version: "3"

# More info at https://github.com/pi-hole/docker-pi-hole/ and https://docs.pi-hole.net/
services:
  pihole:
    container_name: pihole
    image: pihole/pihole:latest
    ports:
      - "53:53/tcp"
      - "53:53/udp"
      - "67:67/udp"
      - "80:80/tcp"
    environment:
      TZ: 'America/Chicago'
      # WEBPASSWORD: 'set a secure password here or it will be random'
    # Volumes store your data between container upgrades
    volumes:
      - './etc-pihole/:/etc/pihole/'
      - './etc-dnsmasq.d/:/etc/dnsmasq.d/'
    # Recommended but not required (DHCP needs NET_ADMIN)
    #   https://github.com/pi-hole/docker-pi-hole#note-on-capabilities
    cap_add:
      - NET_ADMIN
restart: unless-stopped- Run
docker-compose up --detachto build and start pi-hole - Reset Password:
root@754f4e9fbbc5:/# sudo pihole -a -p
Method 2: using docker_run.sh from Github
Github project: pi-hole/docker-pi-hole
Create docker_run.sh file based on https://github.com/pi-hole/docker-pi-hole/blob/master/docker_run.sh
No need to change anything here.
#!/bin/bash

# https://github.com/pi-hole/docker-pi-hole/blob/master/README.md

PIHOLE_BASE="${PIHOLE_BASE:-$(pwd)}"
[[ -d "$PIHOLE_BASE" ]] || mkdir -p "$PIHOLE_BASE" || { echo "Couldn't create storage directory: $PIHOLE_BASE"; exit 1; }

# Note: ServerIP should be replaced with your external ip.
docker run -d \
    --name pihole \
    -p 53:53/tcp -p 53:53/udp \
    -p 80:80 \
    -e TZ="America/Chicago" \
    -v "${PIHOLE_BASE}/etc-pihole/:/etc/pihole/" \
    -v "${PIHOLE_BASE}/etc-dnsmasq.d/:/etc/dnsmasq.d/" \
    --dns=127.0.0.1 --dns=1.1.1.1 \
    --restart=unless-stopped \
    --hostname pi.hole \
    -e VIRTUAL_HOST="pi.hole" \
    -e PROXY_LOCATION="pi.hole" \
    -e ServerIP="127.0.0.1" \
    pihole/pihole:latest

printf 'Starting up pihole container '
for i in $(seq 1 20); do
    if [ "$(docker inspect -f "{{.State.Health.Status}}" pihole)" == "healthy" ] ; then
        printf ' OK'
        echo -e "\n$(docker logs pihole 2> /dev/null | grep 'password:') for your pi-hole: https://${IP}/admin/"
        exit 0
    else
        sleep 3
        printf '.'
    fi

    if [ $i -eq 20 ] ; then
        echo -e "\nTimed out waiting for Pi-hole start, consult your container logs for more info (\`docker logs pihole\`)"
        exit 1
    fi
done;
Make it executable: chmod u+x docker_run.sh
root@hpthin:~# chmod u+x docker-run.sh
root@hpthin:~# ls
docker-compose.yml  docker-run.sh  etc-dnsmasq.d  etc-pihole  snap  var-log
root@hpthin:~# ./docker-run.sh
WARNING: Localhost DNS setting (--dns=127.0.0.1) may fail in containers.
37c58da567dc7a8164ca12d47e354c516d728dbd7985e0d9ad591f1492b48e5b
Starting up pihole container .......... OK
Assigning random password: uGPzx5JW for your pi-hole: https:///admin/
root@hpthin:~#
Upgrade Pi-hole Docker
Normal updating command "pihole -up" will not work inside of docker. We will have to update whole docker image then create a new docker based on the new download images.
Here are all commands
- Check if a newer image is available
docker pull docker.io/pihole/pihole:latest
- Stop and remove the container
$ docker ps
CONTAINER ID IMAGE COMMAND CREATED STATUS PORTS NAMES
73528d5ca4e8 docker.io/pihole/pihole:latest 14 hours ago Up 14 hours ago 53/tcp pihole
docker stop pihole
docker rm pihole
- Create a new container
docker-compose up -d
- Remove old image(s)
docker image prune
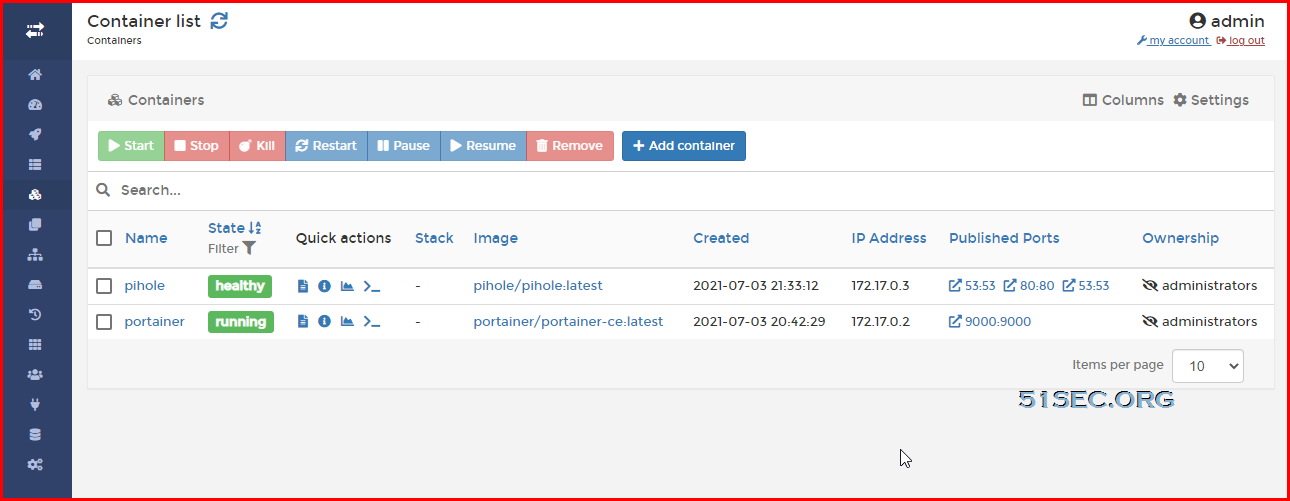
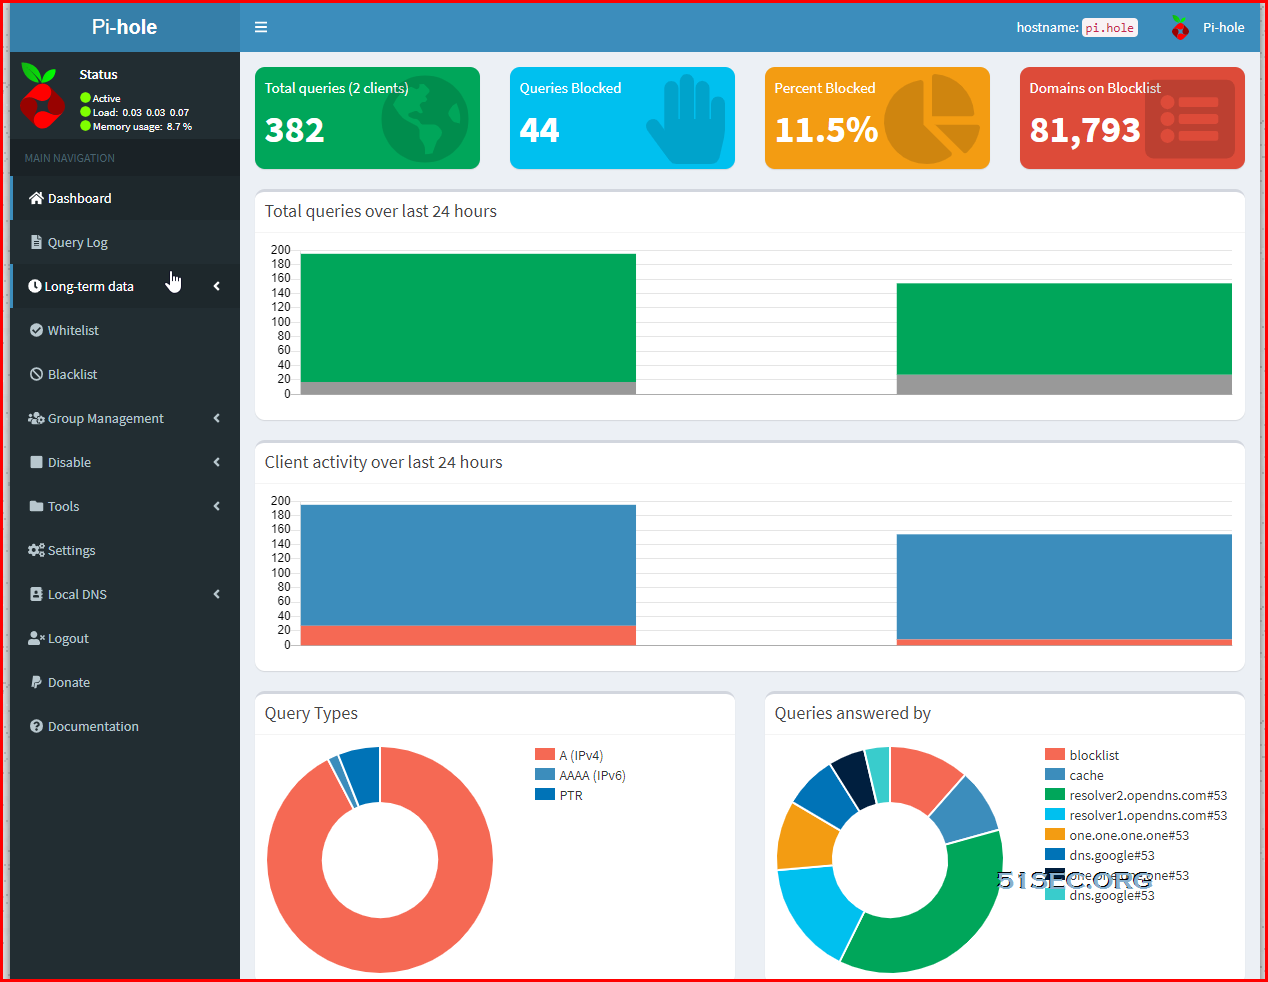
Log in Pi-hole Dashboard
Default URL: https://<ip>/admin
Pi-hole DNS Configuration for Family Safe
208.67. 222.123 and 208.67. 220.123 are OpenDNS's FamilyShield DNS servers. They are configured at the server level to block 4 categories (Pornography, Tasteless, Proxy/Anonymizer, and Sexuality).


ping: google.com: Temporary failure in name resolution
ReplyDelete