In this post, I am showing a way to mount Cloud VM's File Share folder even in a situation which tcp port 445 has been blocked by your ISP.
Basically we will do NAT on both ends, and using custom port, for example tcp port 4455, to cross the Internet.
On home computer side, we will use "netsh interface portproxy" command to forward 445 traffic to remote server's port 4455.
On Azure cloud, we will use Load Balancer to translate Port 4455 traffic back to port 445 to reach our destination, Azure Virtual Machine.
Diagram - TCP Port 445 Blocked
Home machine does not have access to tcp port 445 over Internet because of blocked by ISP.
Diagram - Using Other Port (4455)for Connection
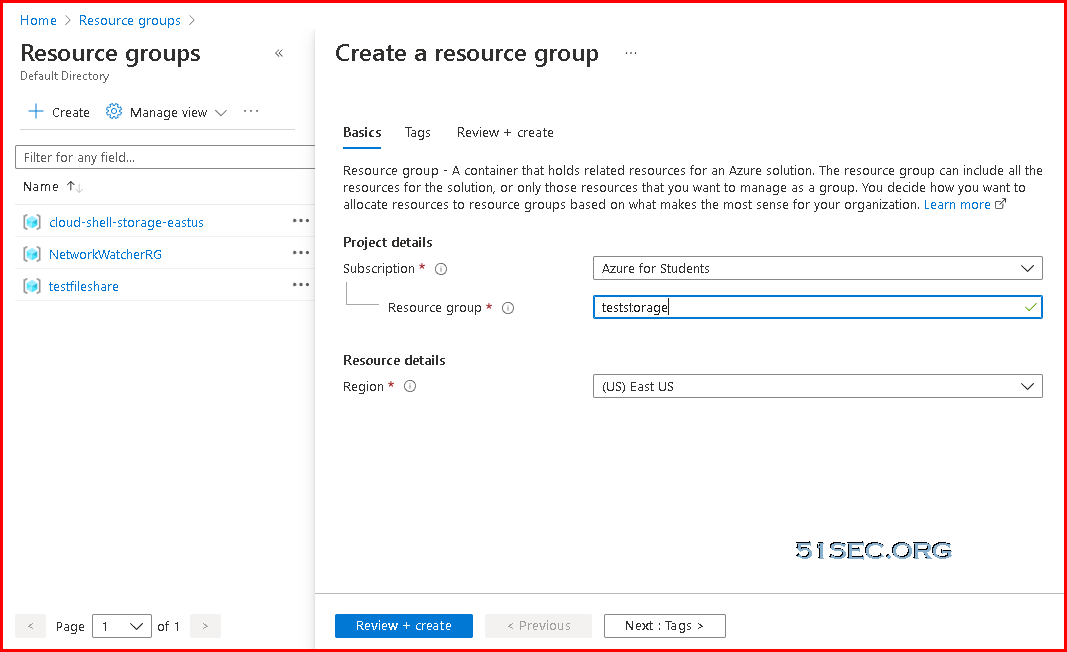
Azure Cloud - 1. Create a New Resource Group
We will create a resource group, which all of our resources will be put in it.
Azure Cloud - 2. Create VM
Create a virtual machine which will be used to create a share folder to the Internet
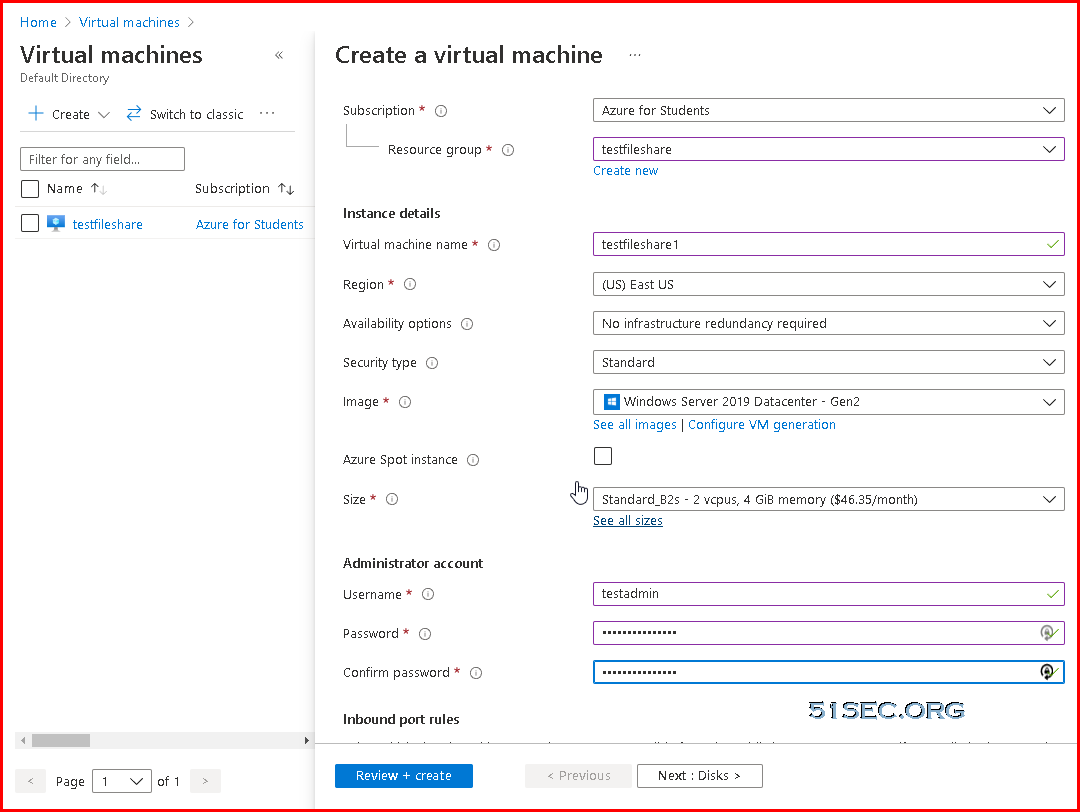
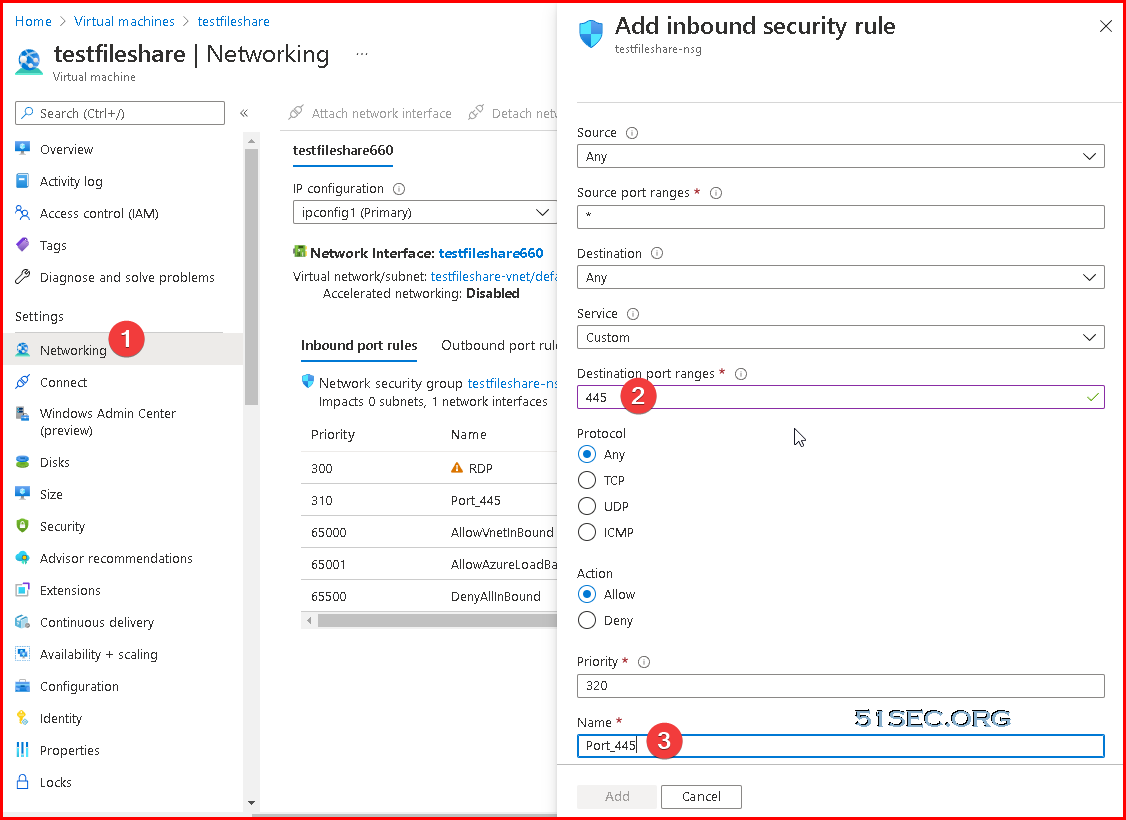
Don't forgot to open tcp port 445.
Azure Cloud - 3. Test and Verify Port 445 Blocked from Local Home Machine
It might need 2 minutes for the firewall rules to take it into effect.
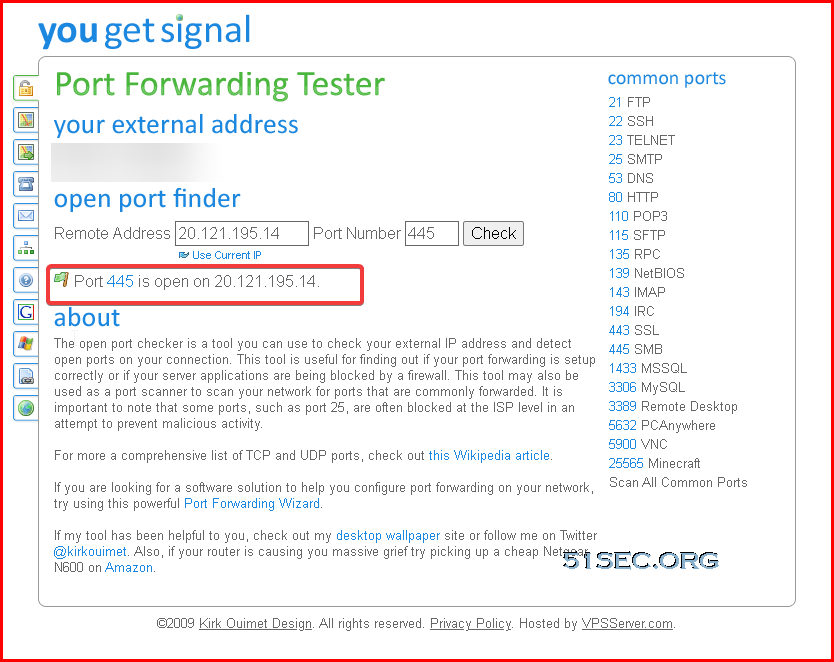
From local windows machine, we can use following command to do tcp port 445 test:
Test-NetConnection -ComputerName 20.121.195.14 -Port 445
Failed for port 445 testing although it has been opened on Azure cloud's firewall. That is because my home ISP blocked port 445.
PS C:\Users\test> Test-NetConnection -ComputerName 20.121.195.14 -Port 445Test-NetConnection -ComputerName 20.121.195.14 -Port 445                                                                                                              PS C:\Users\test> Test-NetConnection -ComputerName 20.121.195.14 -Port 445                                              WARNING: TCP connect to (20.121.195.14 : 445) failed
WARNING: Ping to 20.121.195.14 failed with status: TimedOut


ComputerName           : 20.121.195.14
RemoteAddress          : 20.121.195.14
RemotePort             : 445
InterfaceAlias         : Ethernet0
SourceAddress          : 192.168.2.141
PingSucceeded          : False
PingReplyDetails (RTT) : 0 ms
TcpTestSucceeded       : False
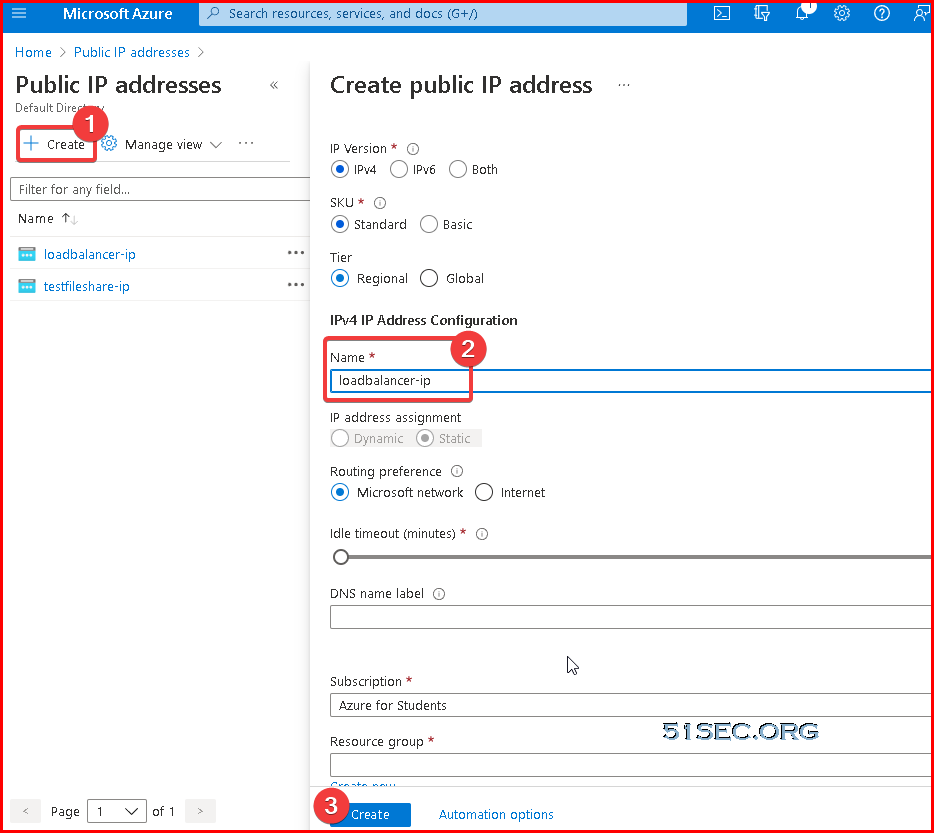
Azure Cloud - 4. Create a New Public IP and Load Balancer
We are going to use Load Balancer to do port forwarding on Azure cloud.
First, we will need a public ip address for Load Balancer's frontend ip.
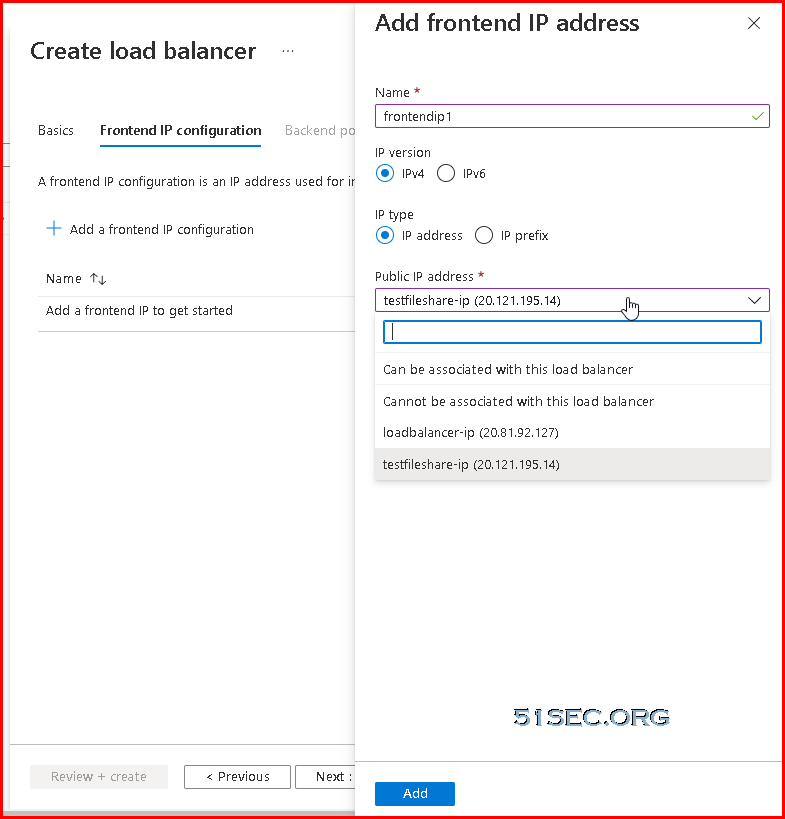
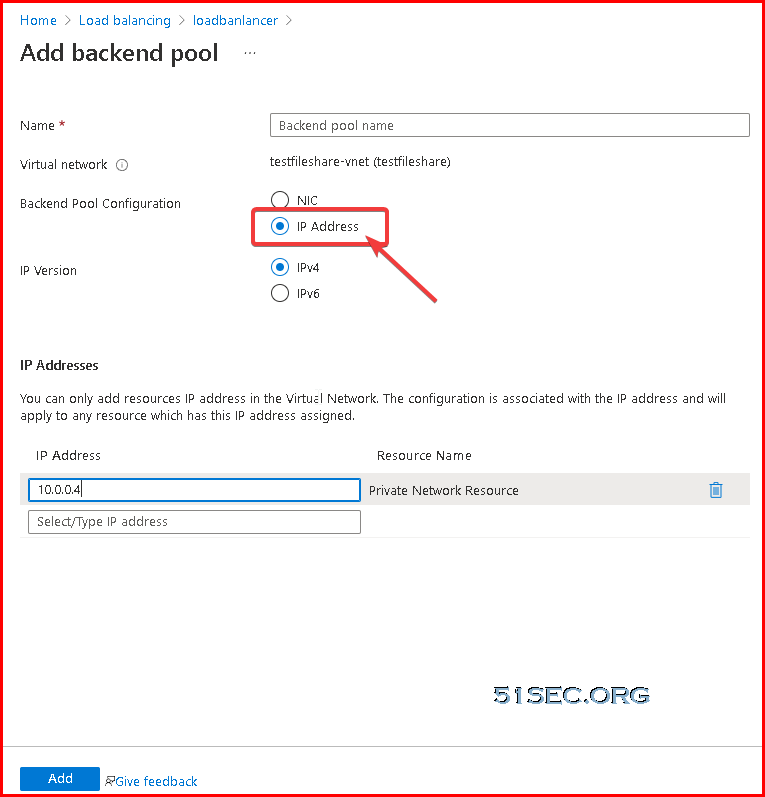
Create load balancer:

Most important part is load balancing rule:
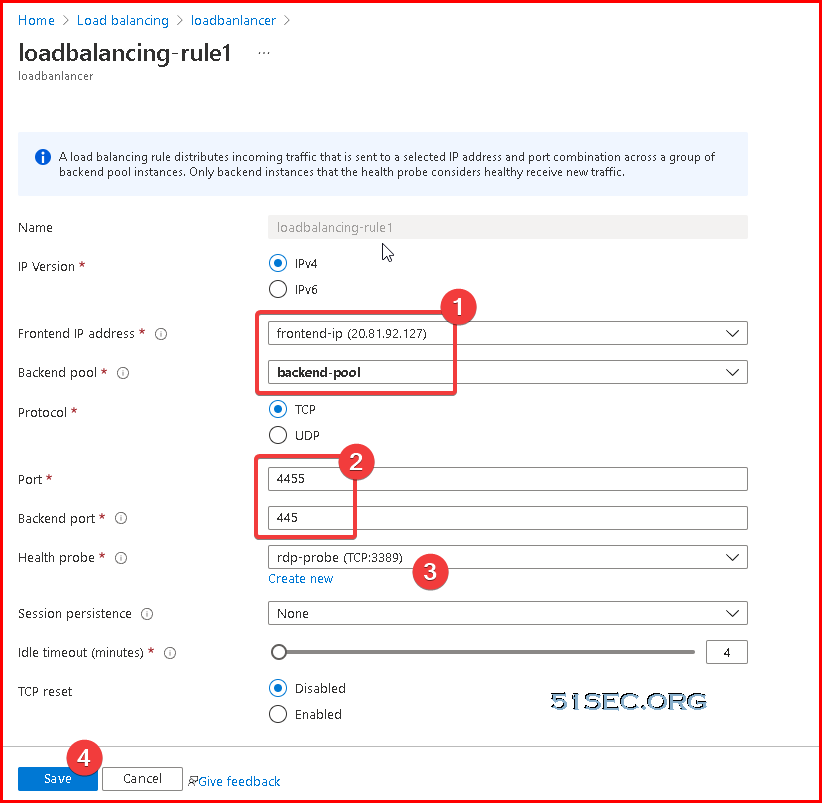
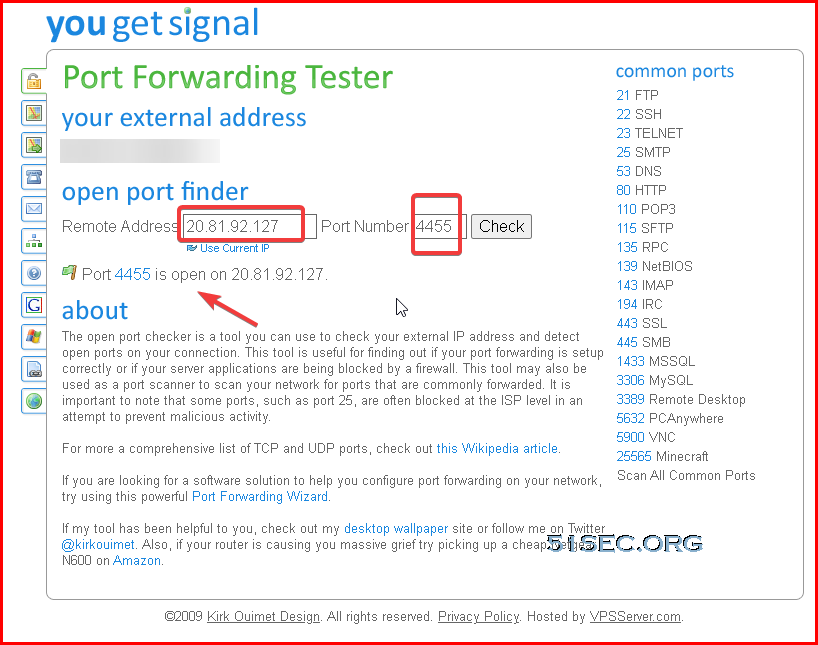
Test Loadbalancer's public ip's port 4455, which will be redirect to VM's 445 port. That proves Loadbalancer is functional.
Note: Following steps regarding client machine setup are mostly copied from Mounting your Nikhef home directory using SSH for Windows 10 (built-in OpenSSH client). I have modified a bit based on my environment.
Home Test Machine - 1. Install the Loopback Adapter
To install the Loopback adapter follow these steps:
- Start the Add Hardware Wizard by either going Start->Settings->Control Panel->Add Hardware or by starting a console window with elevated (Administrator) privileges. In the console window type
hdwwiz.exeThe Hardware Wizard will come up:
- Click Next to continue:

Select Install the hardware that I manually select from a list and click Next. - Now you'll see:

Select the entry Network adapters and click Next. - In the next screen

first select Microsoft from the list of Manufacturers and then select Microsoft KM-TEST Loopback Adapter from the list of Network Adapters. Finally, click Next once more. - Almost finished:

This is your last chance to abort, otherwise, click Next. - After a while you should see:

Click Finish to exit the Hardware Wizard.
Home Test Machine - 2. Configuring the Loopback Adapter
Now that your newly installed loopback adapter is up and running we must configure it properly:
- Go to the Network Connections Center:

- Choose the loopback adapter (usually it is named something like "Local Area Connection #3") and right-click on it:

- Choose Properties, after which a new window will appear

Make sure that- the entry Client for Microsoft Networks is NOT enabled, i.e. does not have a checkmark in front of it.
- the entry File and Printer sharing for Microsoft Networks is NOT enabled, i.e. does not have a checkmark in front of it.
- the entry Internet Protocol (TCP/IP) is enabled, and it is only needed.
- The easiest action is to remove all items but Tcp/ipv4.
- Select the entry Internet Protocol (TCP/IP), then click on Properties.
- A new window will appear:

- Select Use the following IP address and fill in the 'IP address' and 'Subnet mask' as above.
It is not necessary to fill in the 'Default gateway' or a 'DNS server'. - Click on Advanced to make the following window appear:

Deselect Automatic metric and fill in the value of 9999 as the 'Interface metric' as shown above. - Click on the WINS tab:

and select Disable NetBIOS over TCP/IP. - Click on OK, OK and Close the window.
Home Test Machine - 3. Disabling the 'SMB 1.0' Windows feature
Starting with Windows 10 update 1903 we need to disable the Windows feature
SMB 1.0:- Go to the Control Panel->Programs->Programs and Features and select Turn Windows features on or off
- A list of features pops up:

Scroll down and deselect the feature SMB 1.0/CIFS File Sharing support - Now close this control panel item.
Home Test Machine - 4. Tweaking the 'LanmanServer' service
We need to tweak a Windows system service to overcome the thing that Microsoft broke. The root cause of the problem is that we need to access the file share using TCP port 445. However, when Windows boots, this port is grabbed by the system
NOTES:
After netsh command completed, you can verify this portproxy entry using following command:
lanmanserver service (Server service) for all interfaces. If we can insert a portproxy rule to grab port 445 for the loopback interface before the lanmanserver service starts, we can circumvent this. Be aware that portproxy rules are executed by the iphlpsvc service. By adding a dependency to the lanmanserver service we ensure that the iphlpsvc service is always launched before the lanmanserver service. This section explains how to do this:- Start a console window with elevated (Administrator) privileges.
- Get the list of service dependencies by typing:
sc qc lanmanserver
You should see output similar to this:C:\Users\test>sc qc lanmanserver [SC] QueryServiceConfig SUCCESS SERVICE_NAME: lanmanserver TYPE : 20 WIN32_SHARE_PROCESS START_TYPE : 2 AUTO_START ERROR_CONTROL : 1 NORMAL BINARY_PATH_NAME : C:\WINDOWS\system32\svchost.exe -k netsvcs -p LOAD_ORDER_GROUP : TAG : 0 DISPLAY_NAME : Server DEPENDENCIES : samss : srv2 SERVICE_START_NAME : LocalSystem C:\Users\test>
Alternatively, you can use thePowershellcommandGet-Service -DisplayName server -RequiredServices
PS C:\Users\test> Get-Service -DisplayName server -RequiredServices

Status   Name               DisplayName
------   ----               -----------
Running  samss              Security Accounts Manager
Running  iphlpsvc           IP Helper
Running  srv2               Server SMB 2.xxx Driver


PS C:\Users\test>
- Note down the names of the services on which the
Serverservice (also known aslanmanserver) depends. In this case, these services aresamssandsrv2(the service names are case independent). - Change the list of services on which the
lanmanserverservices depends by adding theiphlpsvcservice to the list of required services found in the previous step:sc config lanmanserver depend= samss/srv2/iphlpsvc
NOTES: - The space after the
"depend= "is required! - Dependencies are separated using slashes ("/").
C:\Users\test>sc qc lanmanserver
[SC] QueryServiceConfig SUCCESS

SERVICE_NAME: lanmanserver
        TYPE               : 20  WIN32_SHARE_PROCESS
        START_TYPE         : 2   AUTO_START
        ERROR_CONTROL      : 1   NORMAL
        BINARY_PATH_NAME   : C:\WINDOWS\system32\svchost.exe -k netsvcs -p
        LOAD_ORDER_GROUP   :
        TAG                : 0
        DISPLAY_NAME       : Server
        DEPENDENCIES       : samss
                           : srv2
                           : iphlpsvc
        SERVICE_START_NAME : LocalSystem

C:\Users\test>
- Next we add a
portproxyrule to reroute TCP port 445 to a port of our choosing. For this tutorial, I choose 4455:netsh interface portproxy add v4tov4 listenaddress=10.255.255.1 listenport=445 connectaddress=<Remote Azure Load Balancer's Public IP> connectport=4455
netsh interface portproxy add v4tov4 listenaddress=10.255.255.1 listenport=445 connectaddress=20.81.92.127 connectport=4455
- The
listenaddressis the address of the Loopback adapter configured in the section earlier
After netsh command completed, you can verify this portproxy entry using following command:
C:\Users\test>netsh interface portproxy show all

Listen on ipv4:             Connect to ipv4:

Address         Port        Address         Port
--------------- ----------  --------------- ----------
10.255.255.1    445         20.81.92.127    4455


C:\Users\test>
The
portproxy rule is persistent, so there should be no need to repeat this step after a reboot.Home Test Machine - 5. Check Service
Of course, now that we have made modifications to the 'Required Services' dependency of the 'LanmanServer' service we have to reboot Windows before proceeding.
If you see only '
- Reboot Windows.
- Verify that the
portproxywas applied successfully by checking the open ports on the system. Type in a command consolenetstat -an | find ":445 "
You should see something like:
C:\Users\test>netstat -nat | find "445"
  TCP    0.0.0.0:445            0.0.0.0:0              LISTENING       InHost
  TCP    10.255.255.1:445       0.0.0.0:0              LISTENING       InHost
  TCP    [::]:445               [::]:0                 LISTENING       InHost

C:\Users\test>
If you see only '
0.0.0.0:445' instead then the 'portproxy' rule was not applied correctly. Verify that the right 'portproxy' rule was usednetsh interface portproxy show v4tov4
and verify that theIpHlpSvcservice is running at Windows startup usingsc query iphlpsvc
Another reason for the 'port grabbing' to fail could be theLanmanWorkstationservice running at Windows startup. If so, try giving it the same treatment asLanmanServer. However, on the Windows 10 installations I tested this service was running at system startup without causing any problems.- After Windows comes up and you have logged in, check the status of the 'lanmanserver' service. Open a command console (no privilege elevation is required) and type
sc query lanmanserver
The 'LanmanServer' service should be in the state Running. If it is not, then follow these steps to create a task using the Task Schedule to start it at system startup.
10.255.255.1:445 in the 'netstat` output) then try the Old driver tweak instructions to see if that works better for you.Home Test Machine - 6. Test Azure File Share Access
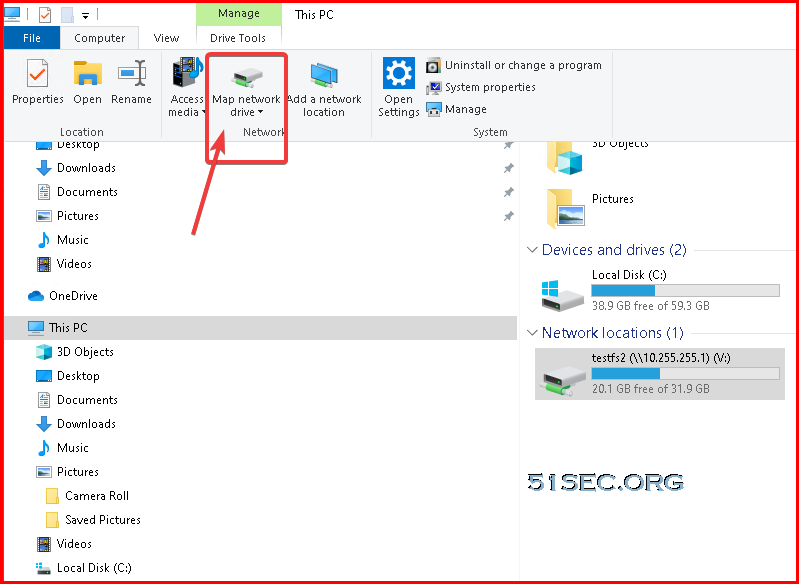
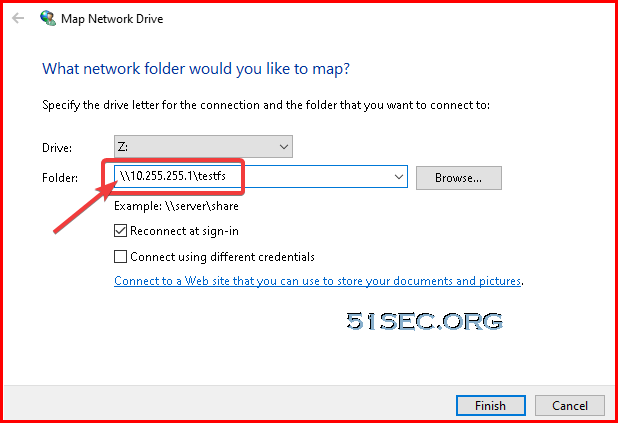
Enter your loopback ip address which will forward traffic to Cloud VM's public ip. You will be able to browse the remote file server's share folders and map them to local. You might need to enter username and password to access this file share.


No comments:
Post a Comment