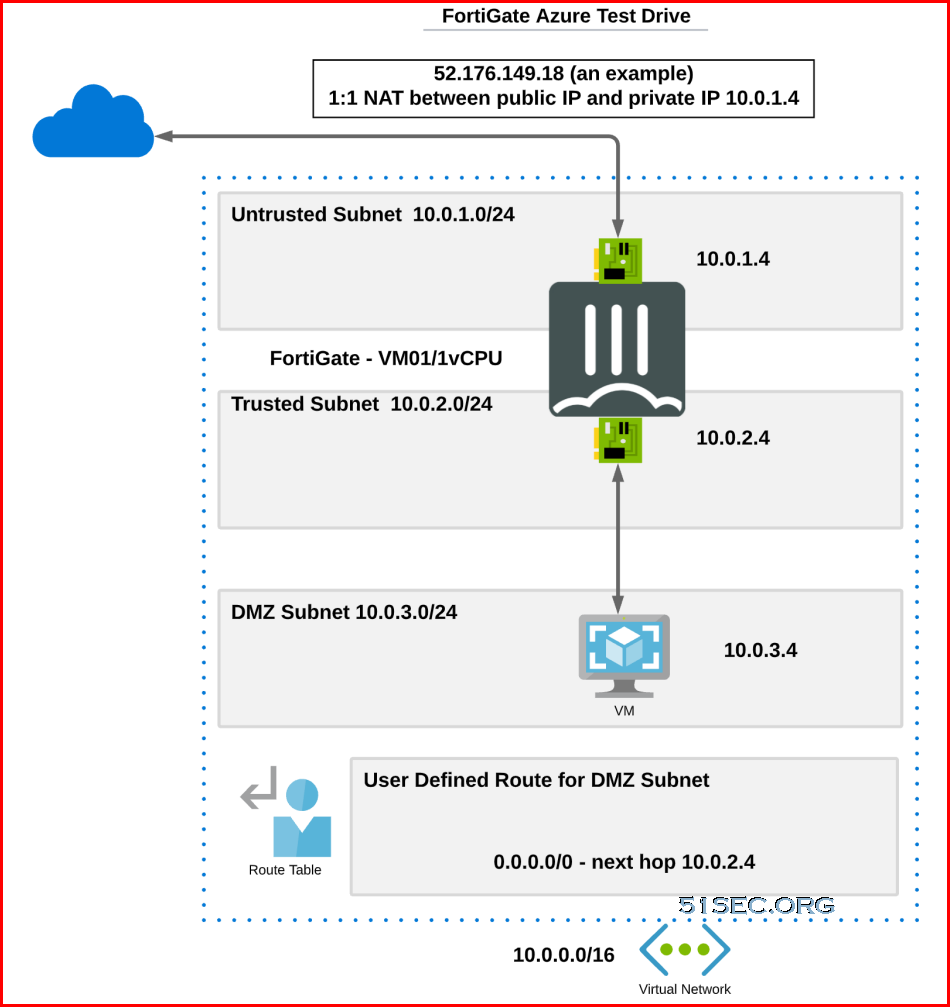
This Azure FortiGate Test Drive has a simple use case that enables hosts in a protected subnet the ability to access the Internet via the FortiGate and allow external clients access to resources in a protected subnet via the FortiGate. It is easy, free, and this hands-on test driving experience will help you know more about the product you are interesting to.
It is a good practice if you would like to learn how Fortigate firewall working in the cloud. It has two interfaces configured by default. DMZ network is on the same network as LAN network but using Azure routing table to send traffic to Fortigate LAN port.
In this post, all steps recorded with more explanation how this lab is working, especially on routing table part, and logging part.
Start Azure Fortigate Test Drive
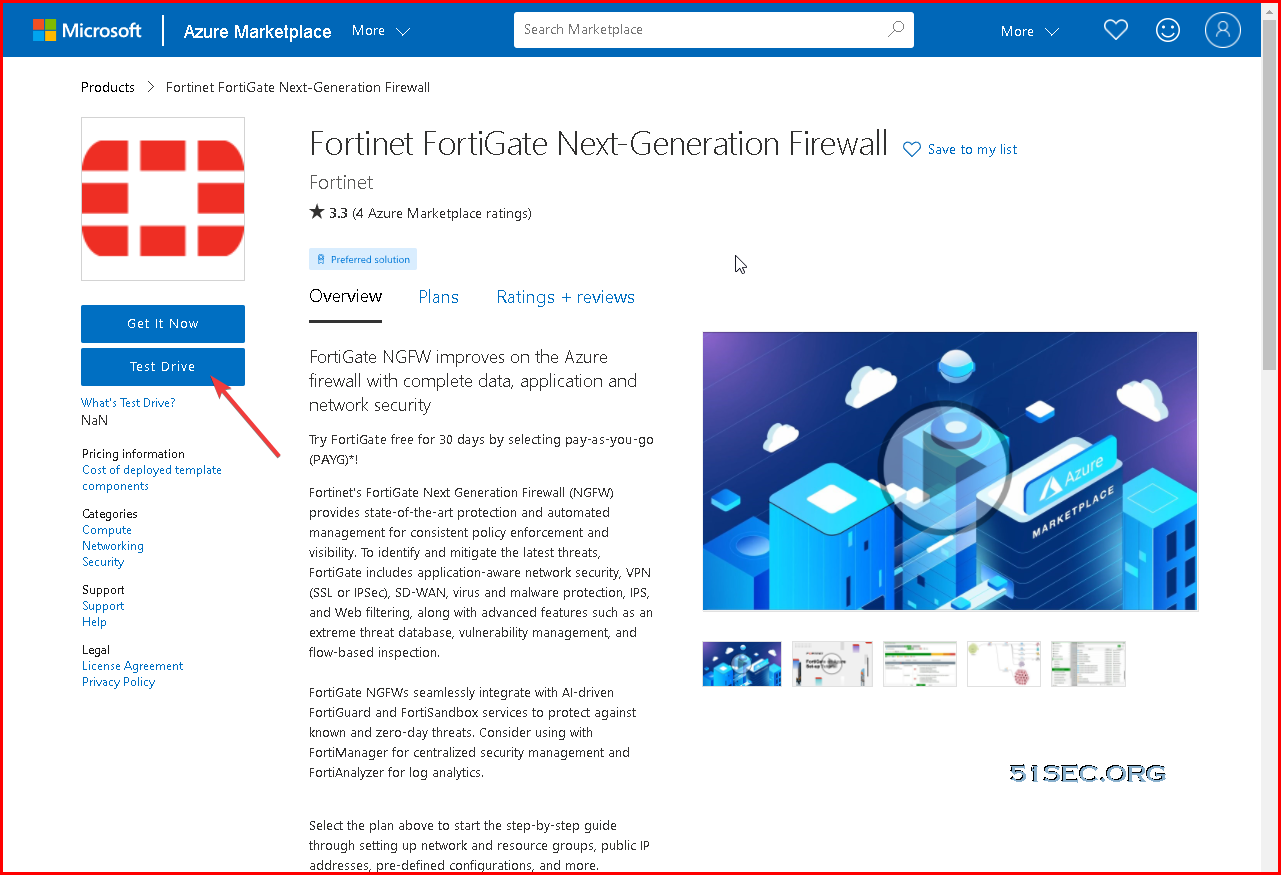
1 Go to https://azuremarketplace.microsoft.com/en-us/marketplace/apps/fortinet.fortinet-fortigate?ocid=FortiGate_202105_landingpage_en-us or https://www.fortigate-azure.com/. Choose a Test Drive, sign in and agree to the terms of use.
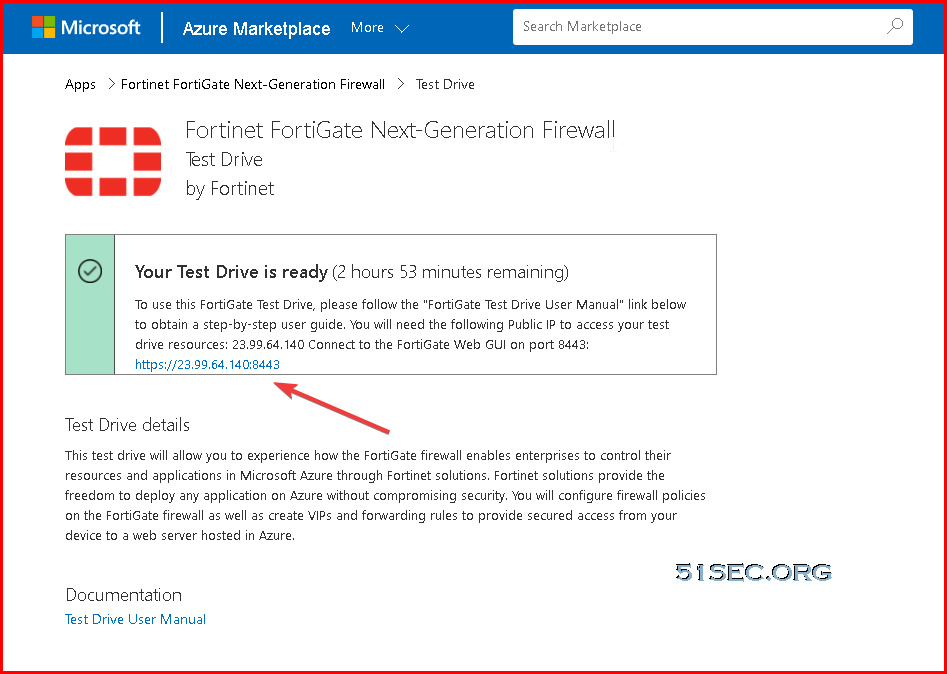
2 After system complete the provisioning, you will get a page to tell you Your Test Drive is ready. The testdrive lab will last for three hours.
Once you complete the form, your Test Drive will start deploying. In addition to the webpage information, in a few minutes you will also get an email notification that the environment is ready. Just follow instructions in the webpage or in the email, and you will be able to access a fully provisioned and ready to use environment.
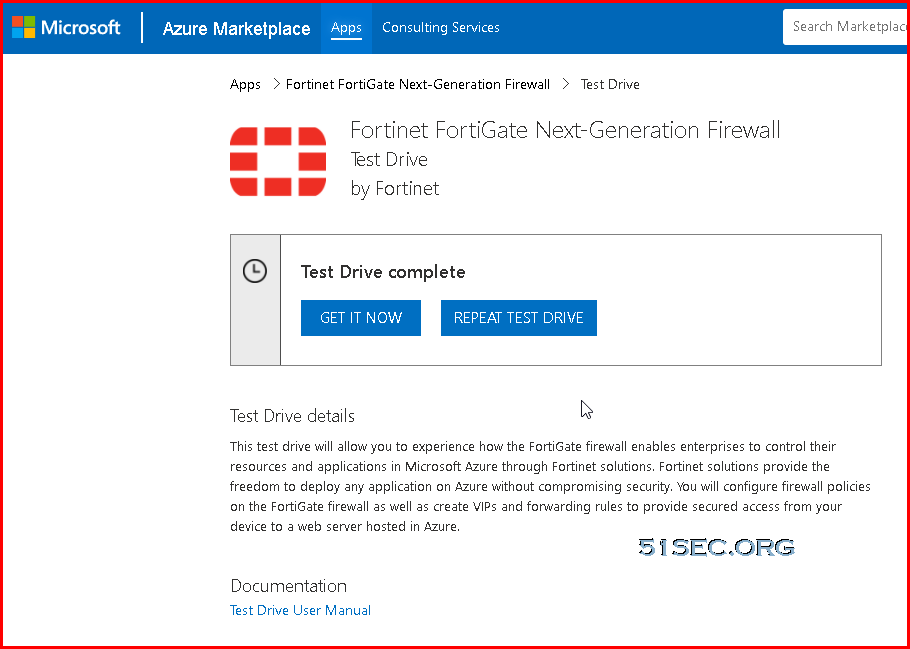
3 After three hours if you have not completed the test drive use case, you still have a chance to repeat test drive to try it again.
4 When the Test Drive is ready click on the FortiGate link to open the GUI.
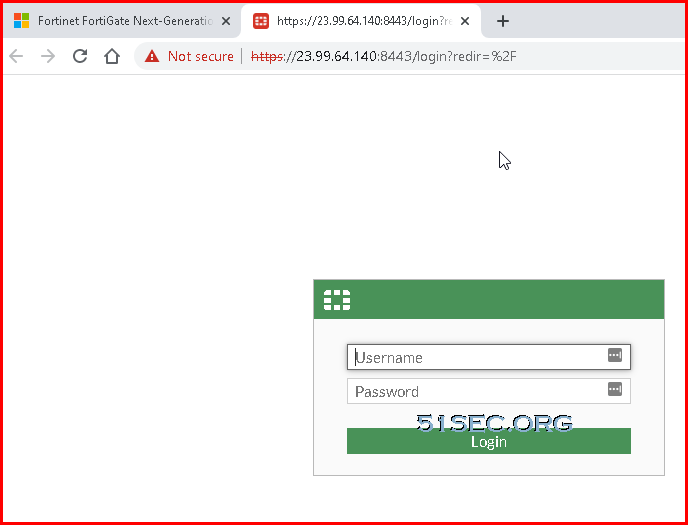
- username: ftnt-testdrive
- password: Fortinet@123

Diagram
Log Into Ubuntu Apache Server @10.0.3.4
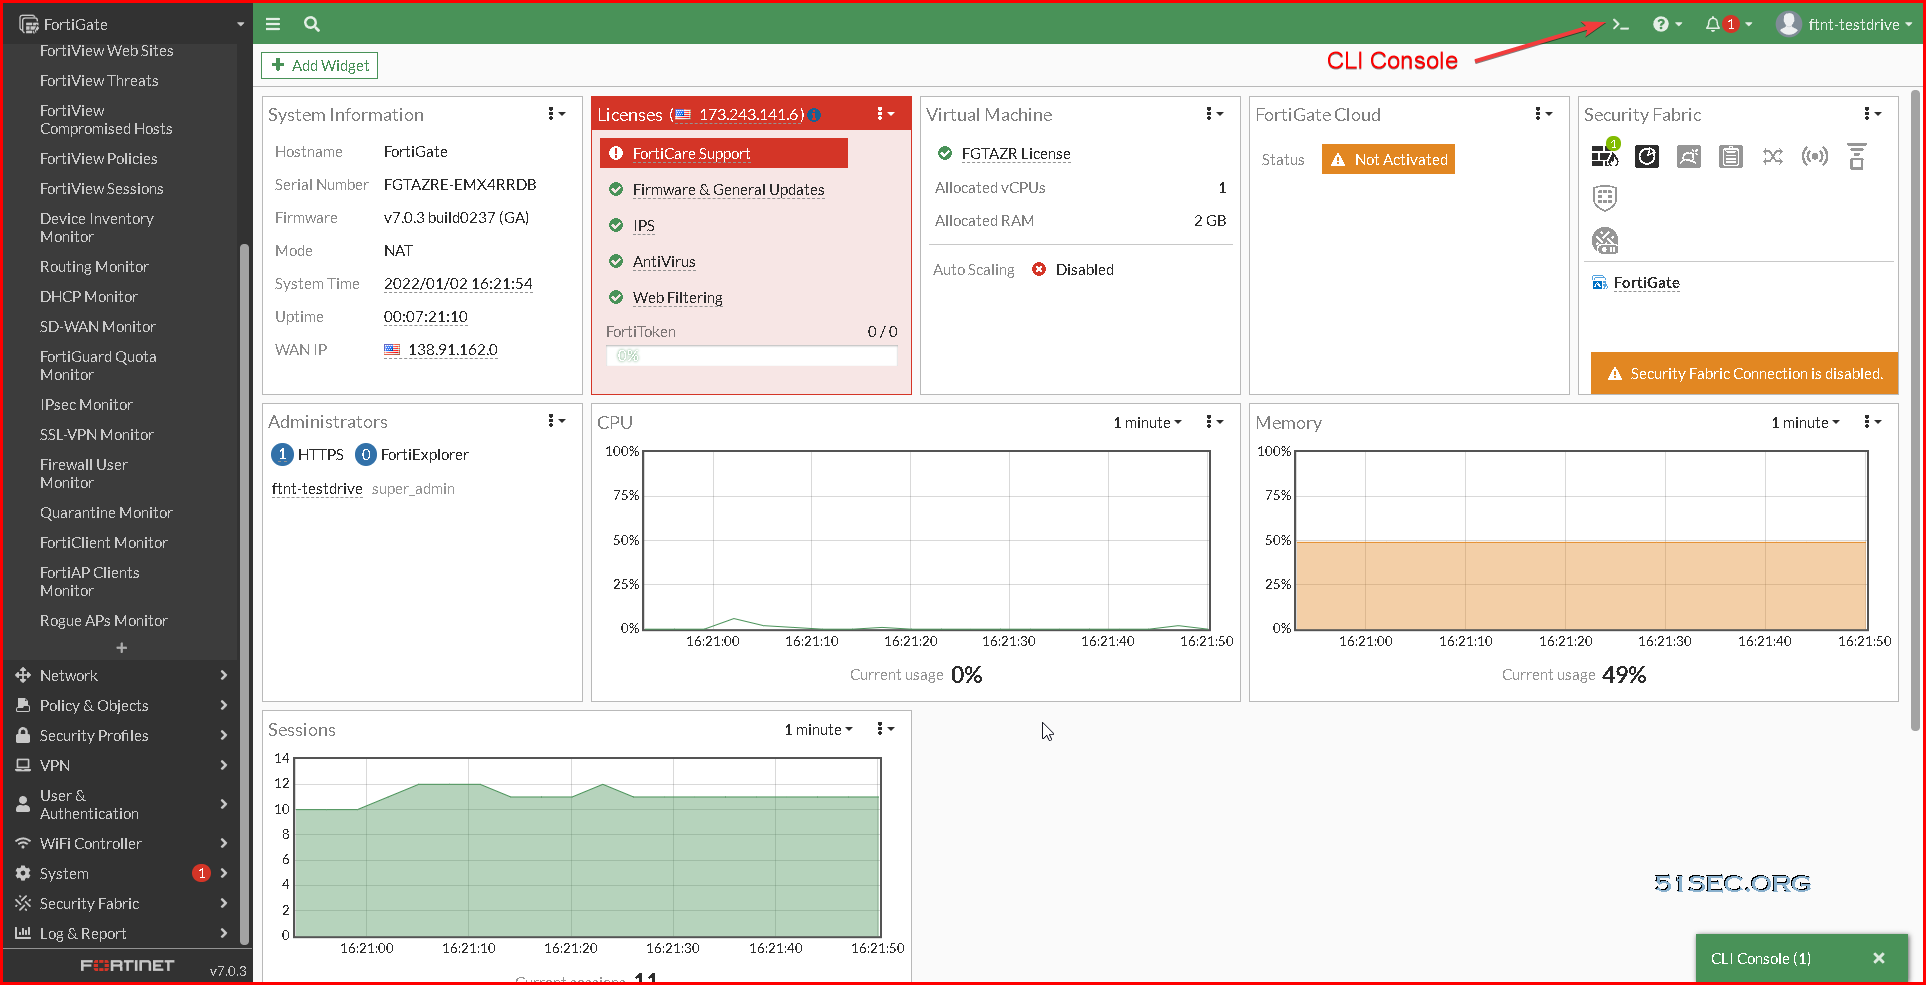
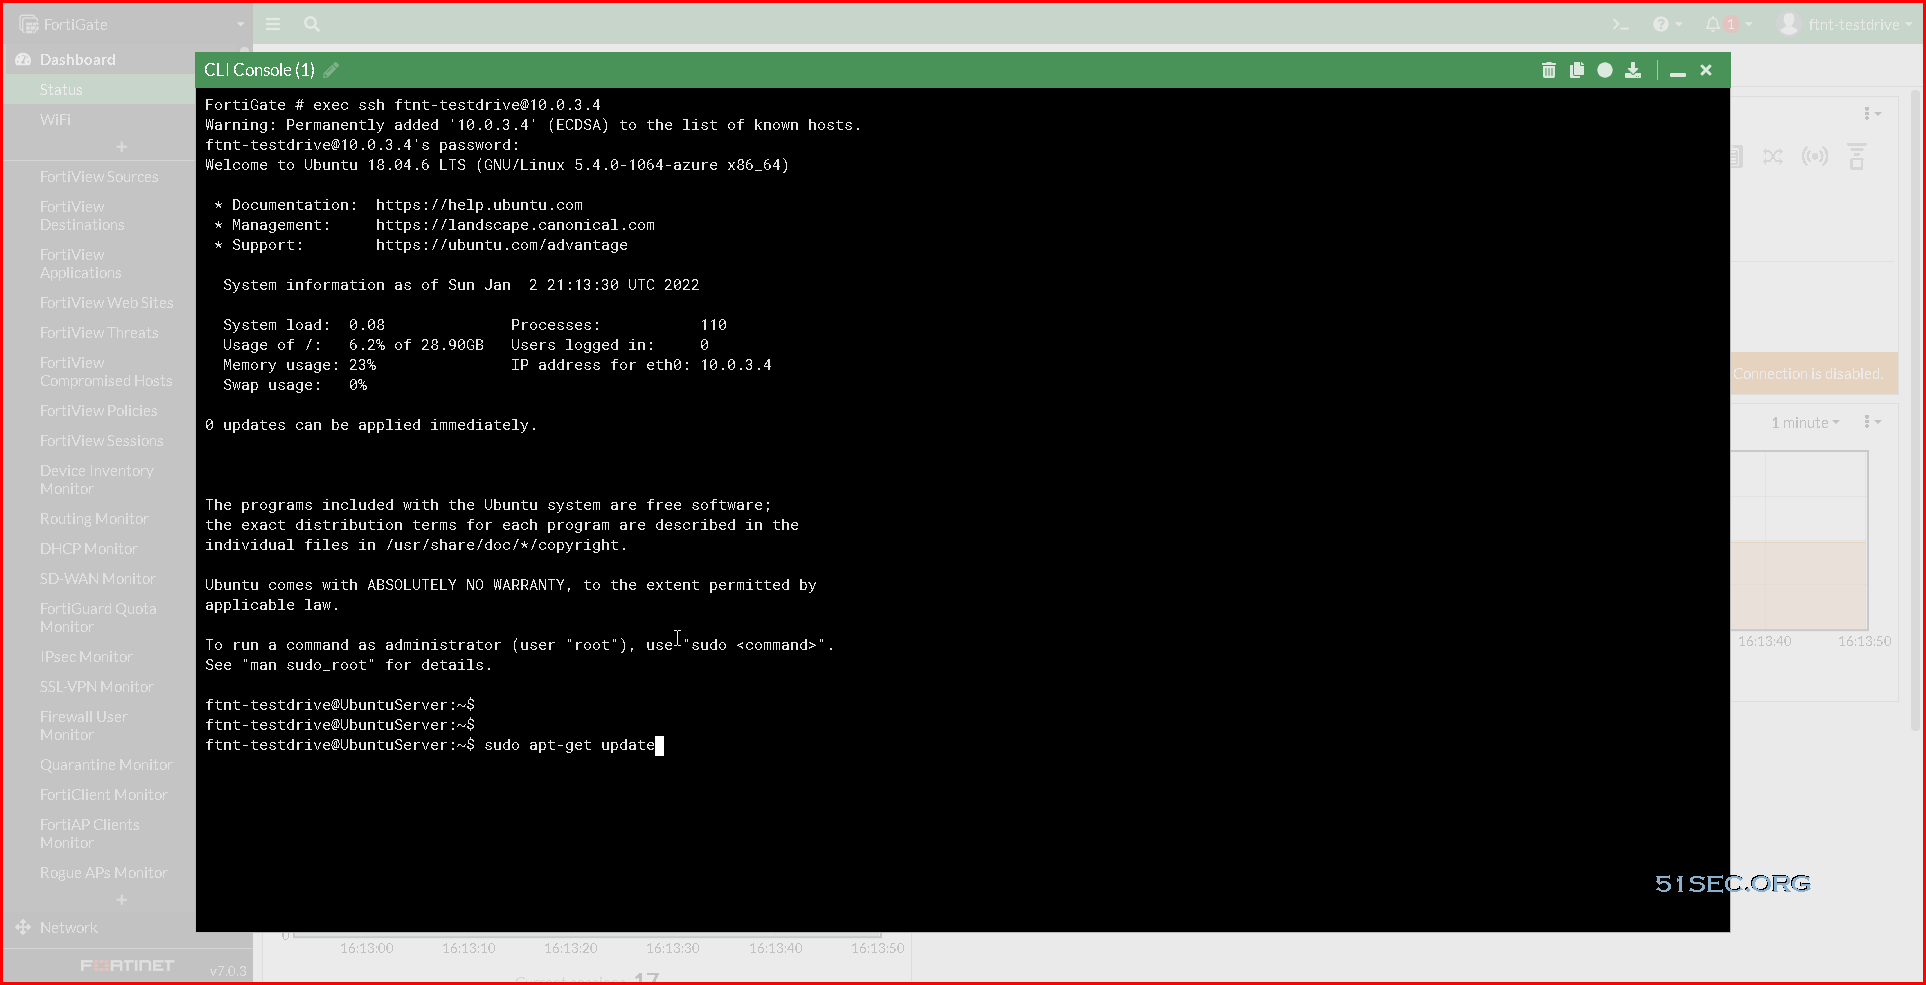
Start CLI console from the right top corner of FortiGate Dashboard Status page, then execute following command to enter into Ubuntu Apache Server @ ip address 10.0.3.4.
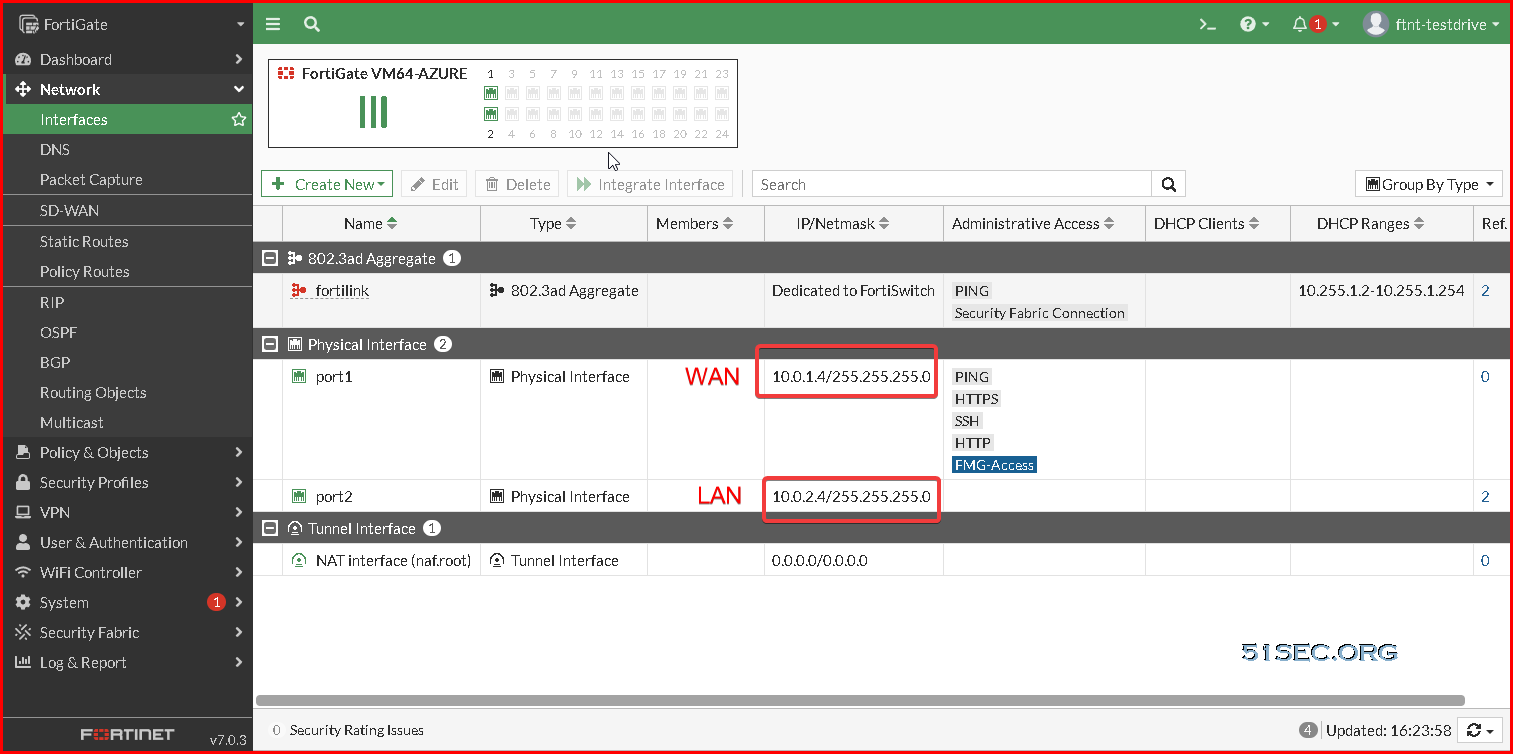
It is running in different network from Fortigate LAN interface 10.0.2.x/24 network. With Azure routing table, it is reachable from 10.0.2.4 ip,
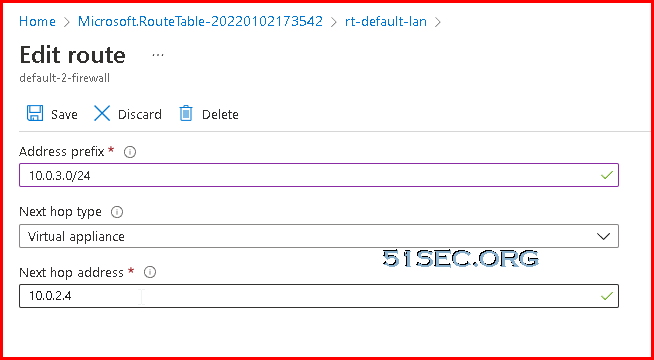
In Azure Routing table, it should has two similar route table created for network 10.0.3.0/24 and 10.0.2.0/24.
Following is for network 10.0.3.0/24. There should have another similar one for 10.0.2.0/24 with same next hop.
exec ssh [email protected]
password: Fortinet@123
FortiGate # exec ssh [email protected]
[email protected]'s password:
Welcome to Ubuntu 18.04.6 LTS (GNU/Linux 5.4.0-1064-azure x86_64)

 * Documentation:  https://help.ubuntu.com
 * Management:     https://landscape.canonical.com
 * Support:        https://ubuntu.com/advantage

  System information as of Sun Jan  2 21:33:27 UTC 2022

  System load:  0.0               Processes:           113
  Usage of /:   6.2% of 28.90GB   Users logged in:     1
  Memory usage: 24%               IP address for eth0: 10.0.3.4
  Swap usage:   0%


0 updates can be applied immediately.

Failed to connect to https://changelogs.ubuntu.com/meta-release-lts. Check your Internet connection or proxy settings


Last login: Sun Jan  2 21:13:31 2022 from 10.0.2.4

ftnt-testdrive@UbuntuServer:~$ ping 8.8.8.8
PING 8.8.8.8 (8.8.8.8) 56(84) bytes of data.
^C
--- 8.8.8.8 ping statistics ---
4 packets transmitted, 0 received, 100% packet loss, time 3064ms

ftnt-testdrive@UbuntuServer:~$ sudo -i
root@UbuntuServer:~# apt update
Err:1 http://azure.archive.ubuntu.com/ubuntu bionic InRelease
  Could not connect to azure.archive.ubuntu.com:80 (40.81.13.82), connection timed out
Err:2 http://azure.archive.ubuntu.com/ubuntu bionic-updates InRelease
  Unable to connect to azure.archive.ubuntu.com:http:
Err:3 http://azure.archive.ubuntu.com/ubuntu bionic-backports InRelease
  Unable to connect to azure.archive.ubuntu.com:http:
Err:4 http://security.ubuntu.com/ubuntu bionic-security InRelease
  Cannot initiate the connection to security.ubuntu.com:80 (2001:67c:1360:8001::24). - connect (101: Network is unreachable) Cannot initiate the connection to security.ubuntu.com:80 (2001:67c:1562::18). - connect (101: Network is unreachable) Cannot initiate the connection to security.ubuntu.com:80 (2001:67c:1360:8001::23). - connect (101: Network is unreachable) Cannot initiate the connection to security.ubuntu.com:80 (2001:67c:1562::15). - connect (101: Network is unreachable) Could not connect to security.ubuntu.com:80 (91.189.91.38), connection timed out Could not connect to security.ubuntu.com:80 (91.189.91.39), connection timed out Could not connect to security.ubuntu.com:80 (91.189.88.152), connection timed out Could not connect to security.ubuntu.com:80 (91.189.88.142), connection timed out
Reading package lists... Done
Building dependency tree
Reading state information... Done
All packages are up to date.
W: Failed to fetch http://azure.archive.ubuntu.com/ubuntu/dists/bionic/InRelease  Could not connect to azure.archive.ubuntu.com:80 (40.81.13.82), connection timed out
W: Failed to fetch http://azure.archive.ubuntu.com/ubuntu/dists/bionic-updates/InRelease  Unable to connect to azure.archive.ubuntu.com:http:
W: Failed to fetch http://azure.archive.ubuntu.com/ubuntu/dists/bionic-backports/InRelease  Unable to connect to azure.archive.ubuntu.com:http:
W: Failed to fetch http://security.ubuntu.com/ubuntu/dists/bionic-security/InRelease  Cannot initiate the connection to security.ubuntu.com:80 (2001:67c:1360:8001::24). - connect (101: Network is unreachable) Cannot initiate the connection to security.ubuntu.com:80 (2001:67c:1562::18). - connect (101: Network is unreachable) Cannot initiate the connection to security.ubuntu.com:80 (2001:67c:1360:8001::23). - connect (101: Network is unreachable) Cannot initiate the connection to security.ubuntu.com:80 (2001:67c:1562::15). - connect (101: Network is unreachable) Could not connect to security.ubuntu.com:80 (91.189.91.38), connection timed out Could not connect to security.ubuntu.com:80 (91.189.91.39), connection timed out Could not connect to security.ubuntu.com:80 (91.189.88.152), connection timed out Could not connect to security.ubuntu.com:80 (91.189.88.142), connection timed out
W: Some index files failed to download. They have been ignored, or old ones used instead.
root@UbuntuServer:~#
Checking routing table and ip address on the Ubuntu server.
ftnt-testdrive@UbuntuServer:~$ route -n
Kernel IP routing table
Destination     Gateway         Genmask         Flags Metric Ref    Use Iface
0.0.0.0         10.0.3.1        0.0.0.0         UG    100    0        0 eth0
10.0.3.0        0.0.0.0         255.255.255.0   U     0      0        0 eth0
168.63.129.16   10.0.3.1        255.255.255.255 UGH   100    0        0 eth0
169.254.169.254 10.0.3.1        255.255.255.255 UGH   100    0        0 eth0
ftnt-testdrive@UbuntuServer:~$ ifconfig
eth0: flags=4163<UP,BROADCAST,RUNNING,MULTICAST>  mtu 1500
        inet 10.0.3.4  netmask 255.255.255.0  broadcast 10.0.3.255
        inet6 fe80::222:48ff:fe08:702c  prefixlen 64  scopeid 0x20<link>
        ether 00:22:48:08:70:2c  txqueuelen 1000  (Ethernet)
        RX packets 1162004  bytes 399526773 (399.5 MB)
        RX errors 0  dropped 0  overruns 0  frame 0
        TX packets 1336114  bytes 489421711 (489.4 MB)
        TX errors 0  dropped 0 overruns 0  carrier 0  collisions 0

lo: flags=73<UP,LOOPBACK,RUNNING>  mtu 65536
        inet 127.0.0.1  netmask 255.0.0.0
        inet6 ::1  prefixlen 128  scopeid 0x10<host>
        loop  txqueuelen 1000  (Local Loopback)
        RX packets 974  bytes 97870 (97.8 KB)
        RX errors 0  dropped 0  overruns 0  frame 0
        TX packets 974  bytes 97870 (97.8 KB)
        TX errors 0  dropped 0 overruns 0  carrier 0  collisions 0
Enable Log and Check Log
Enable Logging:

Check Logs:
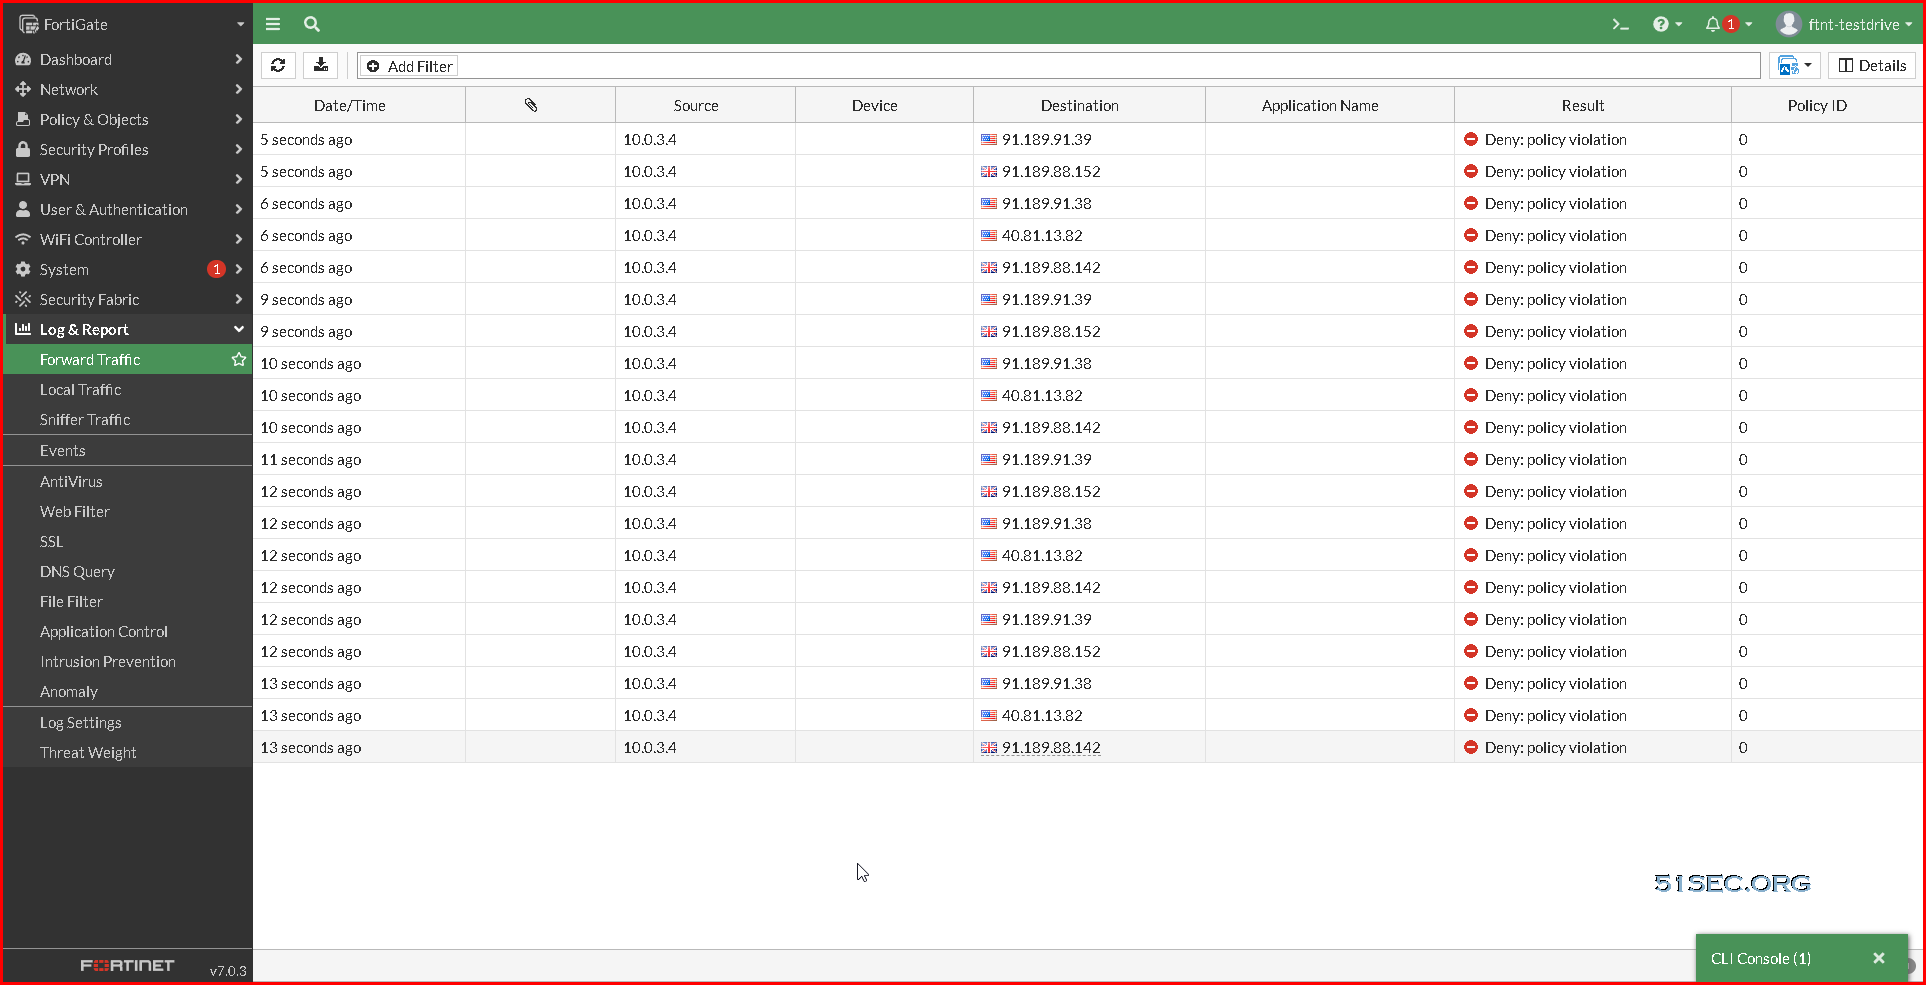
There are lots of deny logs from 10.0.3.4 to Internet ip addresses.
Create Outbout Rules from LAN to Internet
1 Select “Policy & Objects” -> “Firewall Policy”3 Configure the Policy

root@UbuntuServer:~# apt update
Hit:1 http://azure.archive.ubuntu.com/ubuntu bionic InRelease
Get:2 http://azure.archive.ubuntu.com/ubuntu bionic-updates InRelease [88.7 kB]
Get:3 http://azure.archive.ubuntu.com/ubuntu bionic-backports InRelease [74.6 kB]
Get:4 http://azure.archive.ubuntu.com/ubuntu bionic/universe amd64 Packages [8570 kB]
Get:5 http://security.ubuntu.com/ubuntu bionic-security InRelease [88.7 kB]
Get:6 http://azure.archive.ubuntu.com/ubuntu bionic/universe Translation-en [4941 kB]
Get:7 http://azure.archive.ubuntu.com/ubuntu bionic/multiverse amd64 Packages [151 kB]
Get:8 http://azure.archive.ubuntu.com/ubuntu bionic/multiverse Translation-en [108 kB]
Get:9 http://azure.archive.ubuntu.com/ubuntu bionic-updates/main amd64 Packages [2328 kB]
Get:10 http://azure.archive.ubuntu.com/ubuntu bionic-updates/restricted amd64 Packages [559 kB]
Get:11 http://azure.archive.ubuntu.com/ubuntu bionic-updates/universe amd64 Packages [1772 kB]
Get:12 http://azure.archive.ubuntu.com/ubuntu bionic-updates/universe Translation-en [384 kB]
Get:13 http://azure.archive.ubuntu.com/ubuntu bionic-updates/multiverse amd64 Packages [27.3 kB]
Get:14 http://azure.archive.ubuntu.com/ubuntu bionic-updates/multiverse Translation-en [6808 B]
Get:15 http://azure.archive.ubuntu.com/ubuntu bionic-backports/main amd64 Packages [10.3 kB]
Get:16 http://azure.archive.ubuntu.com/ubuntu bionic-backports/main Translation-en [4824 B]
Get:17 http://azure.archive.ubuntu.com/ubuntu bionic-backports/universe amd64 Packages [11.3 kB]
Get:18 http://azure.archive.ubuntu.com/ubuntu bionic-backports/universe Translation-en [5772 B]
Get:19 http://security.ubuntu.com/ubuntu bionic-security/main amd64 Packages [1983 kB]
Get:20 http://security.ubuntu.com/ubuntu bionic-security/main Translation-en [355 kB]
Get:21 http://security.ubuntu.com/ubuntu bionic-security/restricted amd64 Packages [535 kB]
Get:22 http://security.ubuntu.com/ubuntu bionic-security/restricted Translation-en [72.4 kB]
Get:23 http://security.ubuntu.com/ubuntu bionic-security/universe amd64 Packages [1158 kB]
Get:24 http://security.ubuntu.com/ubuntu bionic-security/universe Translation-en [266 kB]
Get:25 http://security.ubuntu.com/ubuntu bionic-security/multiverse amd64 Packages [20.9 kB]
Get:26 http://security.ubuntu.com/ubuntu bionic-security/multiverse Translation-en [4732 B]
Fetched 23.5 MB in 5s (4648 kB/s)
Reading package lists... Done
Building dependency tree
Reading state information... Done
18 packages can be upgraded. Run 'apt list --upgradable' to see them.
root@UbuntuServer:~#
Install the Apache2 webserver
sudo apt-get install apache2 -y
Configure Fortigate for DMZ Web Server's HTTP Traffic
1 In a new tab in your web browser, attempt to connect via http to the same public IP as the FortiGate.This will not be successful because the FortiGate is not configured to respond to port 80.
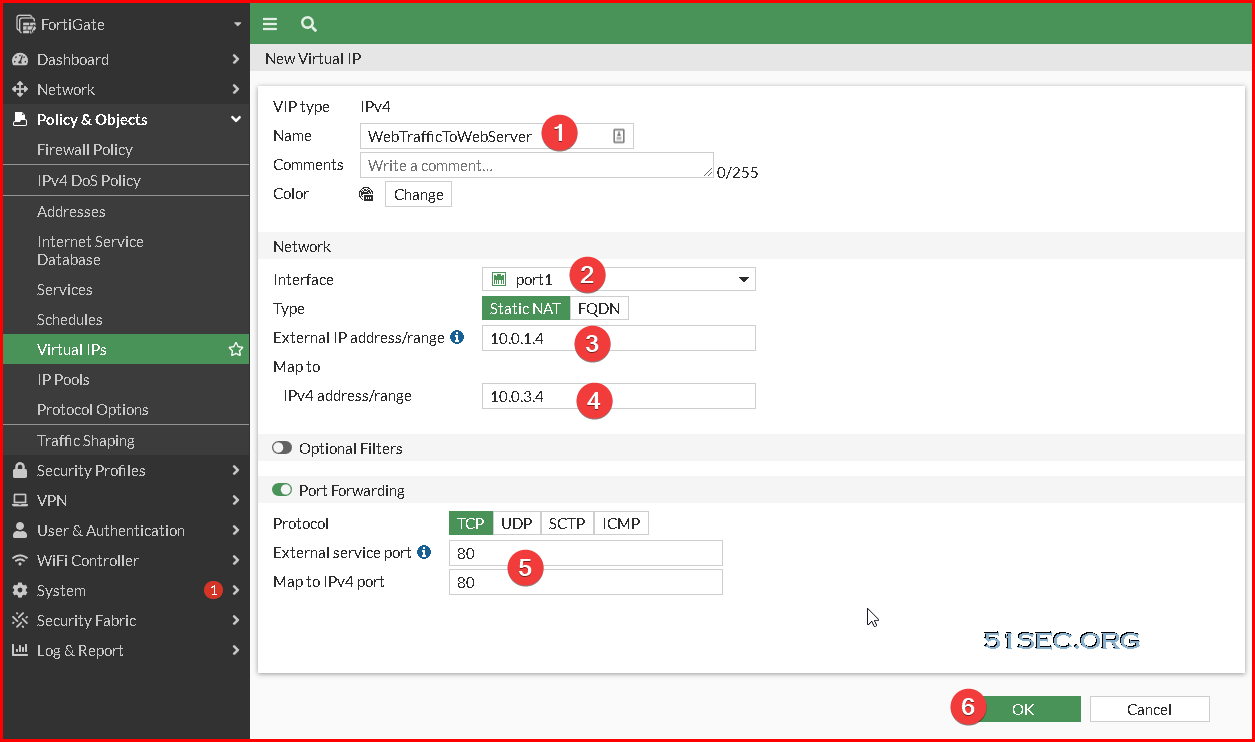
2 In the FortiGate GUI select “Policy & Objects” -> “Virtual IPs”
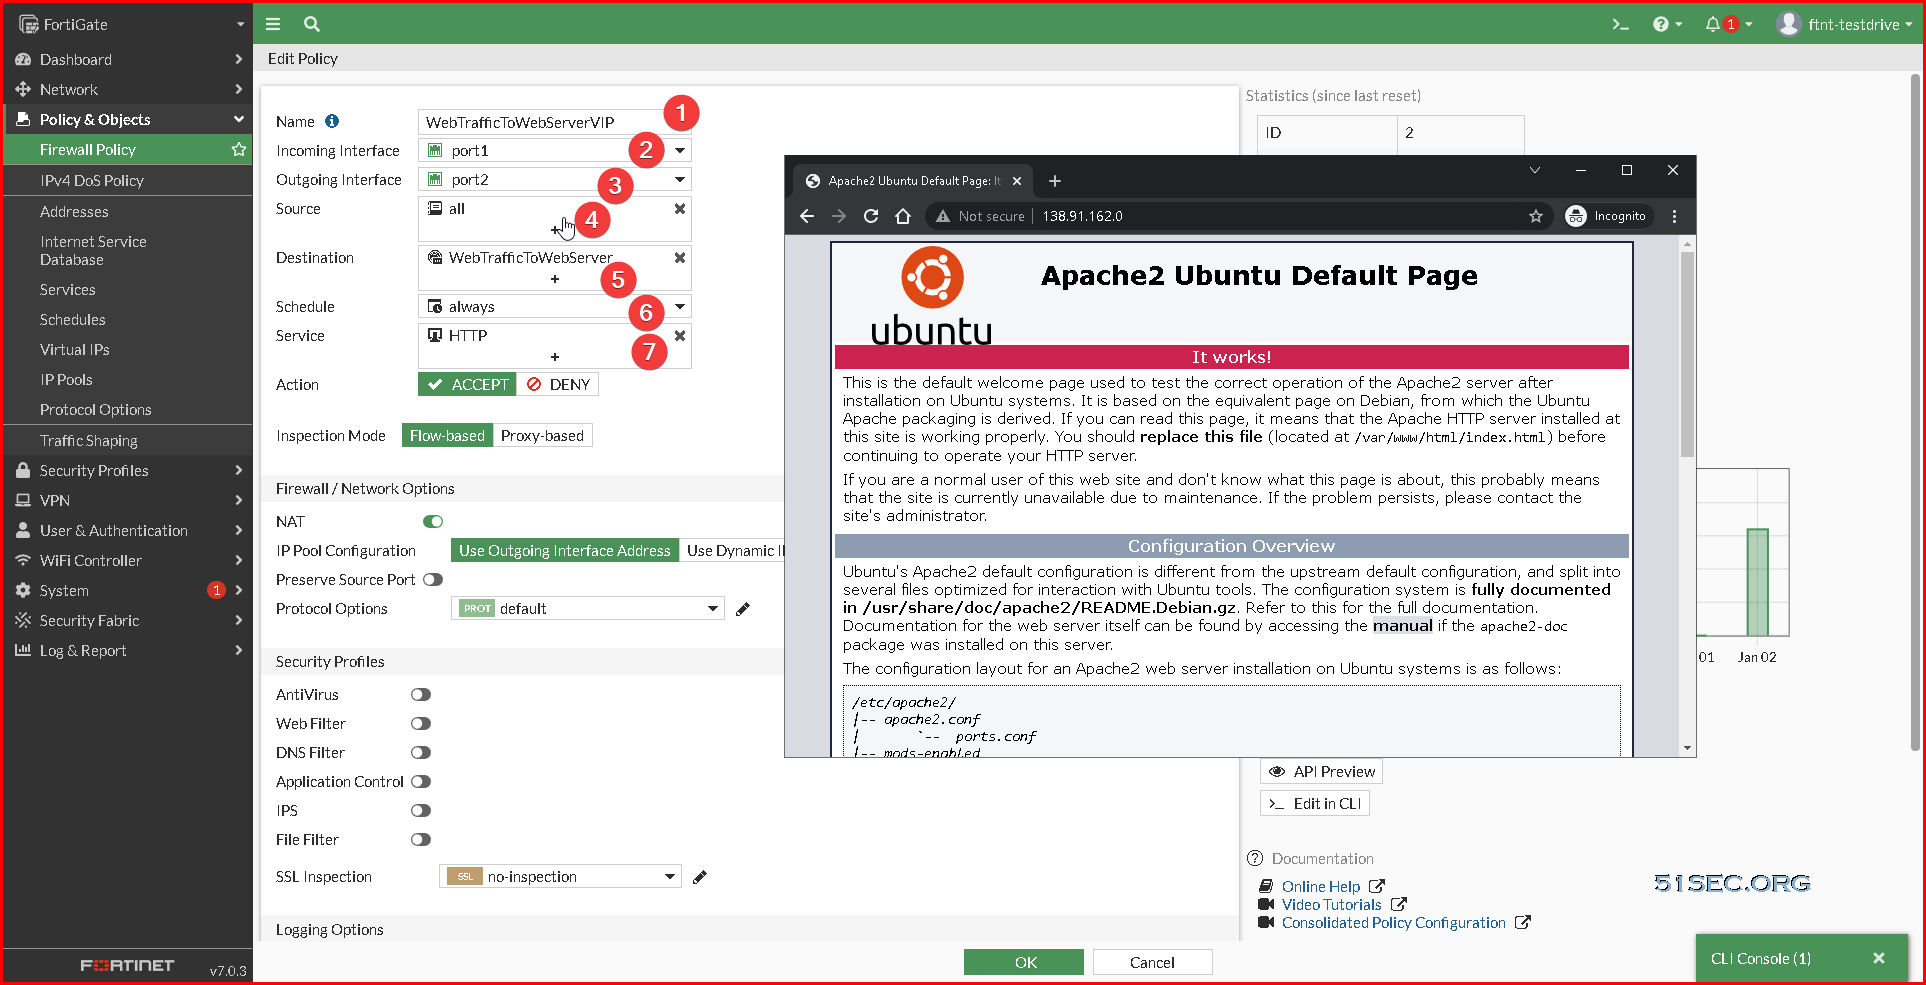
5 . Select “Policy & Objects” -> “Firewall Policy” You should see the
AllowOutBound policy that was previously created. Click the “+ Create New” button.
6 .The new policy will allow all traffic in port1 and out port2 (the reverse of the previous policy).
• Incoming Interface: port1
• Outgoing Interface: port2
• Source: all
• Destination: WebTrafficToWebserver
• Service: HTTP
• Click OK
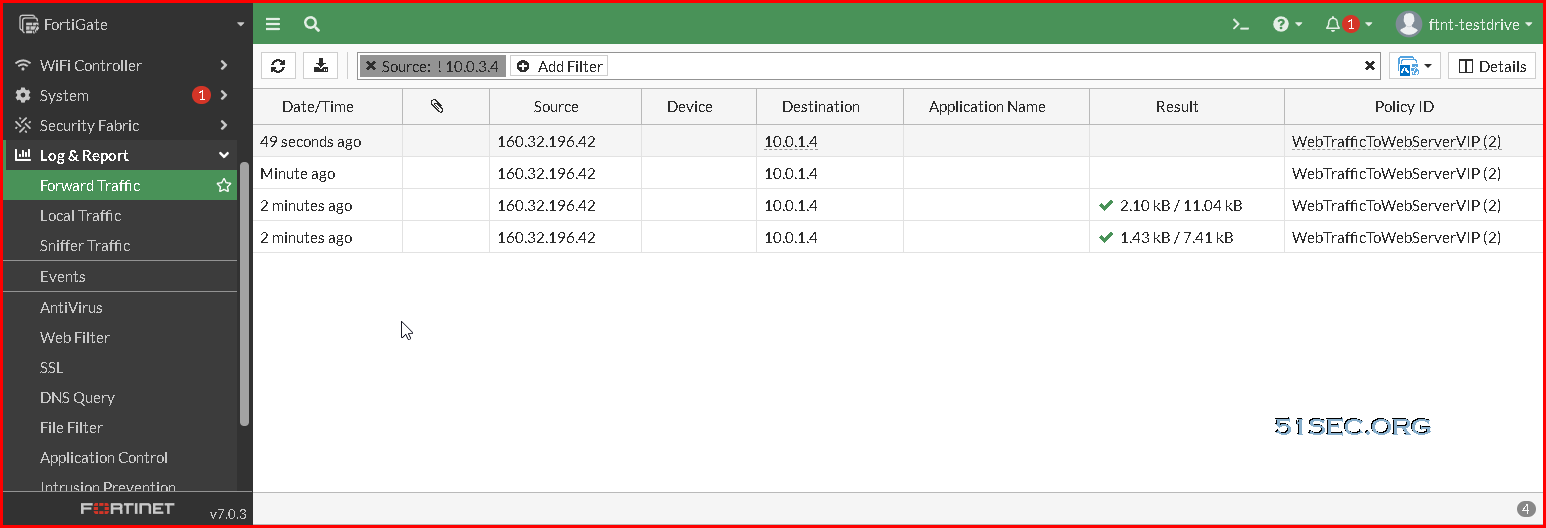
Check Logs
Enable Logging on Firewall Rules. It was only log UTM events.

Check logs for visiting Web Server 10.0.1.4's public ip address on http port 80:
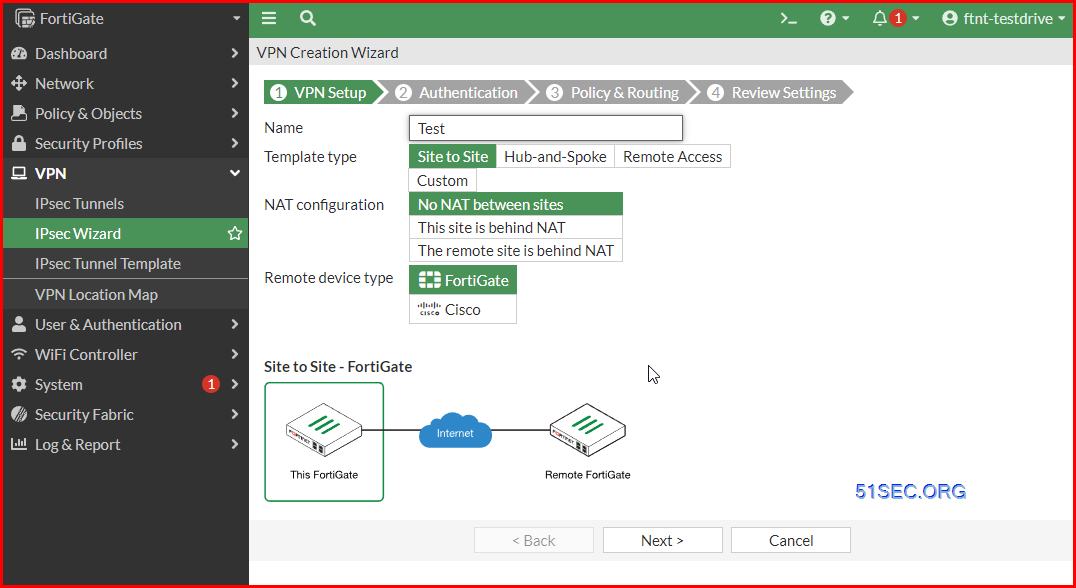
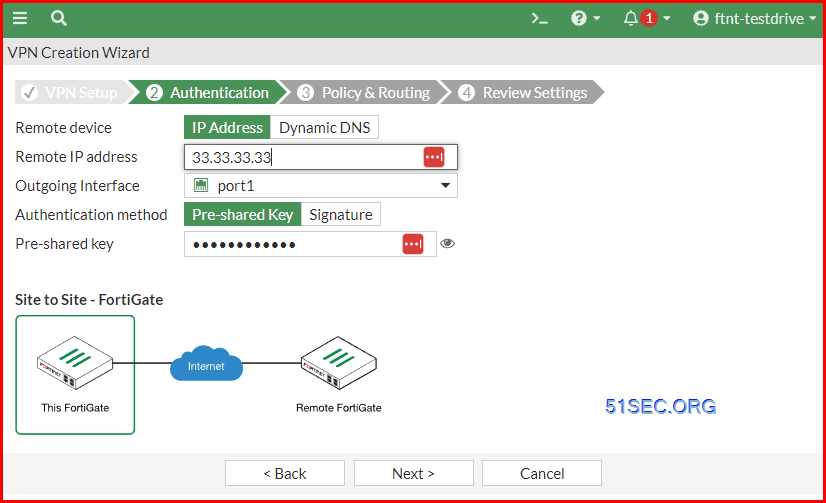
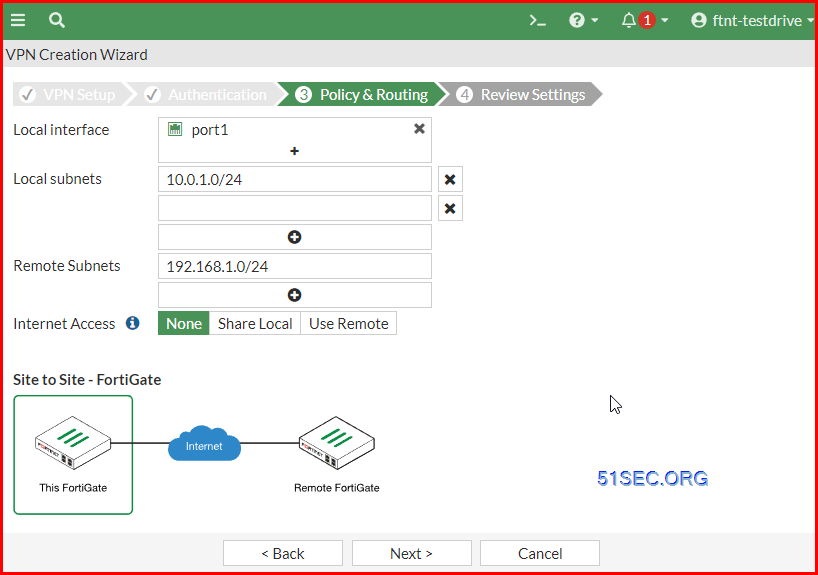
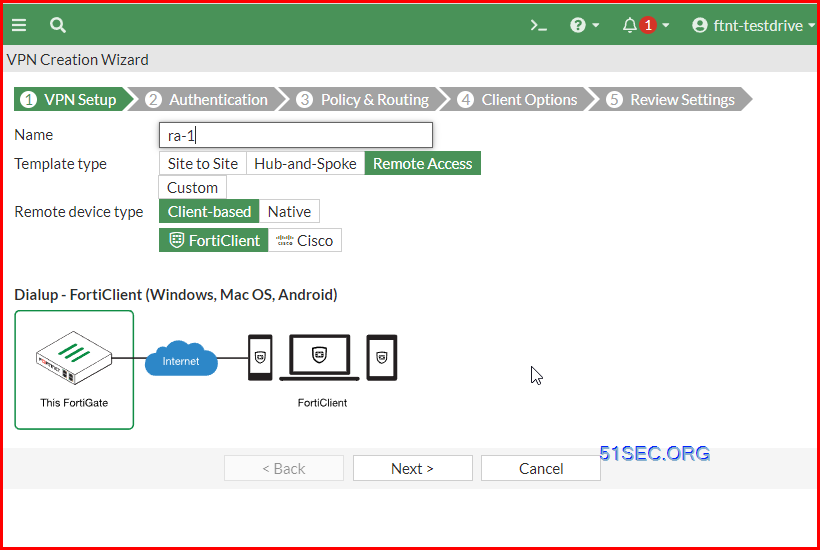
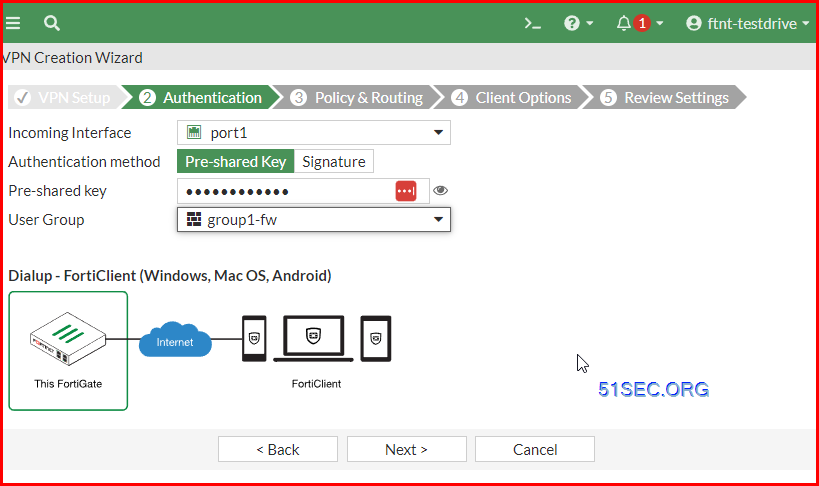
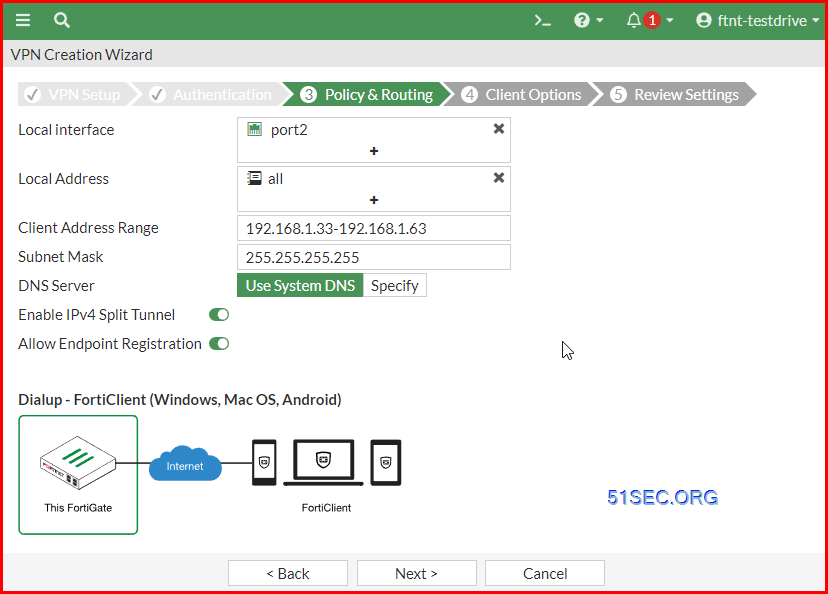
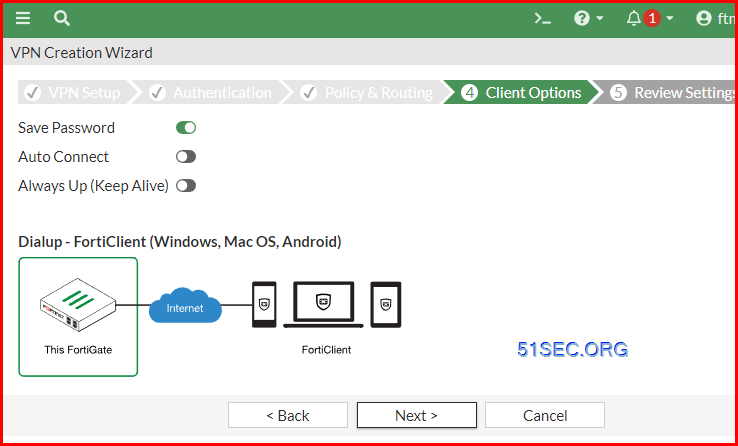
VPN
Videos
References
- Deployment Guide
- Datasheet - FortiGate Next Generation Firewall for Azure
- FortiOS Handbook
- ARM and Terraform template on GitHub
- Register your license
- FortiGate Next-Generation Firewall - A Single VM
- Azure Marketplace for Fortinet FortiGate Next-Generation Firewall


No comments:
Post a Comment