Azure Active Directory Domain Services (Azure AD DS) provides managed domain services such as domain join, group policy, LDAP, Kerberos/NTLM authentication that is fully compatible with Windows Server Active Directory. You consume these domain services without deploying, managing, and patching domain controllers yourself. Azure AD DS integrates with your existing Azure AD tenant. This integration lets users sign in using their corporate credentials, and you can use existing groups and user accounts to secure access to resources.
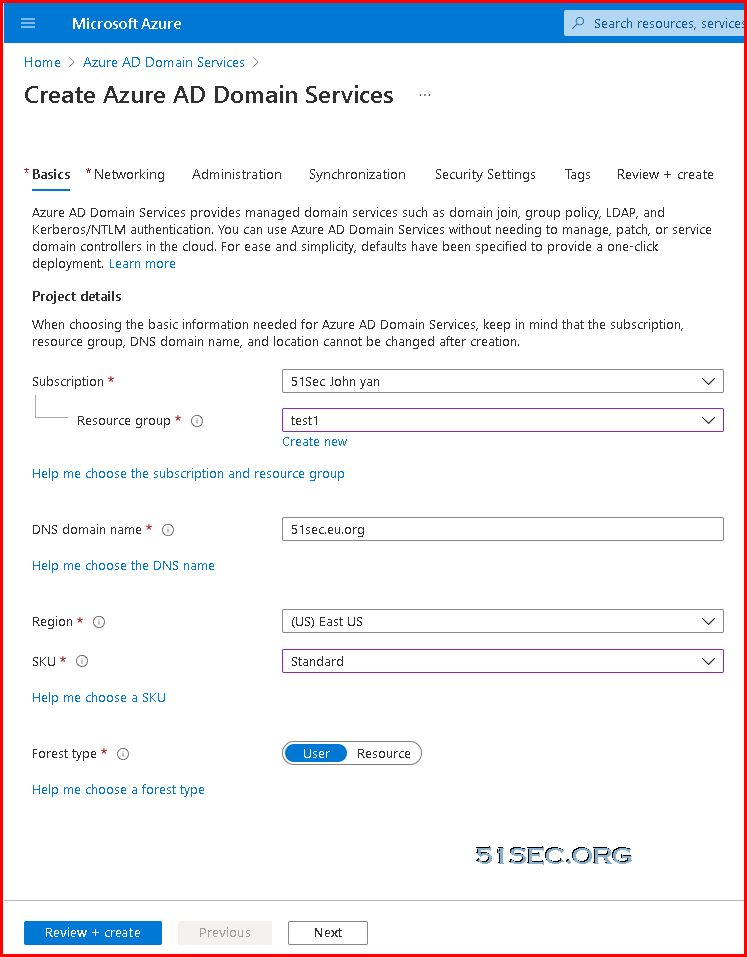
You can create a managed domain using default configuration options for networking and synchronization, or manually define these settings. This tutorial shows you how to use default options to create and configure an Azure AD DS managed domain using the Azure portal.
Azure Active Directory Domain Service
AADDS
- Microsoft Managed, support OUs and GPOs
- not connecting to AD, different site/forest
- You are not enterprise admin, not Schema Admin, not Domain Admin
- Common Use Cases
- Traditional Authentication as a Service (Kerberos, NTLM)
- Cloud solutions that need domain join (Microsoft Virtual Desktop, AD Auth for file shares)

Create Azure AD Domain Services
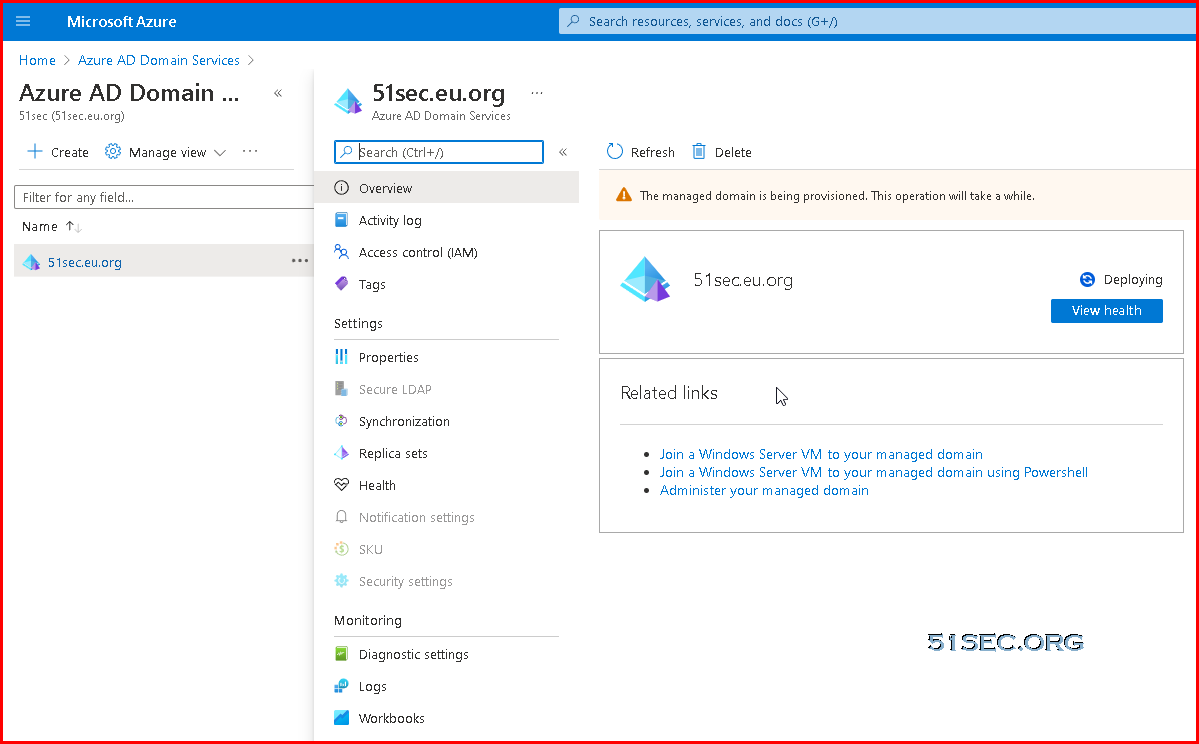
Succeed:
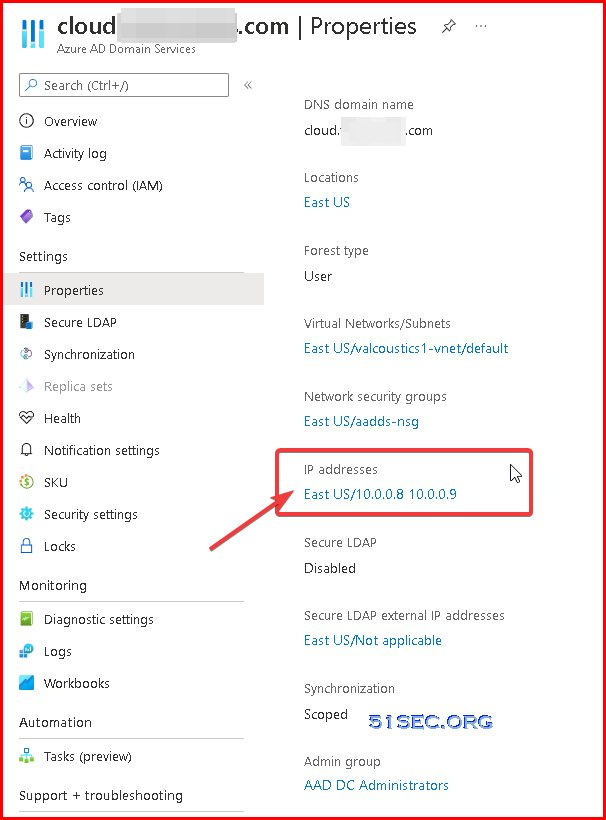
Check DNS server ip addresses after created Azure AD Domain Services:
Update DNS settings for the Azure virtual network
With Azure AD DS successfully deployed, now configure the virtual network to allow other connected VMs and applications to use the managed domain. To provide this connectivity, update the DNS server settings for your virtual network to point to the two IP addresses where the managed domain is deployed.
The Overview tab for your managed domain shows some Required configuration steps. The first configuration step is to update DNS server settings for your virtual network. Once the DNS settings are correctly configured, this step is no longer shown.
The addresses listed are the domain controllers for use in the virtual network. In this example, those addresses are 10.0.0.8 and 10.0.0.9. You can later find these IP addresses on the Properties tab.
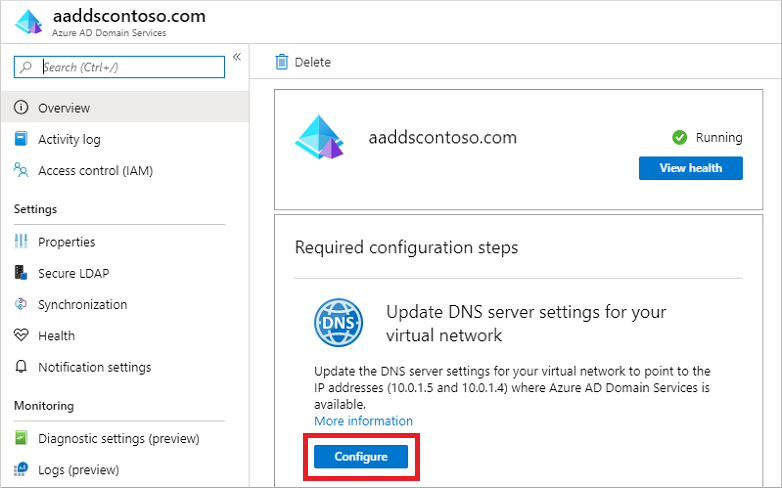
To update the DNS server settings for the virtual network, select the Configure button. The DNS settings are automatically configured for your virtual network.
You will get two DNS server ip addresses, which will be automatically / manuallyconfigured to your VNET configuration.

Steps to join an Azure cloud Windows server to AAD DS
1 Create a new VM, log into it using your local account
Check IP Address configuration:
C:\Users\netsec>ipconfig /allWindows IP Configuration Host Name . . . . . . . . . . . . : rg-fileshare-te Primary Dns Suffix . . . . . . . : Node Type . . . . . . . . . . . . : Hybrid IP Routing Enabled. . . . . . . . : No WINS Proxy Enabled. . . . . . . . : No DNS Suffix Search List. . . . . . : reddog.microsoft.com Ethernet adapter Ethernet: Connection-specific DNS Suffix . : reddog.microsoft.com Description . . . . . . . . . . . : Microsoft Hyper-V Network Adapter Physical Address. . . . . . . . . : 00-0D-3A-12-8C-29 DHCP Enabled. . . . . . . . . . . : Yes Autoconfiguration Enabled . . . . : Yes Link-local IPv6 Address . . . . . : fe80::1cfc:928a:4e56:3b99%6(Preferred) IPv4 Address. . . . . . . . . . . : 10.0.0.11(Preferred) Subnet Mask . . . . . . . . . . . : 255.255.255.0 Lease Obtained. . . . . . . . . . : Sunday, April 17, 2022 4:20:39 PM Lease Expires . . . . . . . . . . : Thursday, May 25, 2158 12:39:44 AM Default Gateway . . . . . . . . . : 10.0.0.1 DHCP Server . . . . . . . . . . . : 168.63.129.16 DHCPv6 IAID . . . . . . . . . . . : 100666682 DHCPv6 Client DUID. . . . . . . . : 00-01-00-01-29-ED-8C-60-00-0D-3A-12-8C-29 DNS Servers . . . . . . . . . . . : 10.0.0.8 10.0.0.9 NetBIOS over Tcpip. . . . . . . . : Enabled C:\Users\netsec>
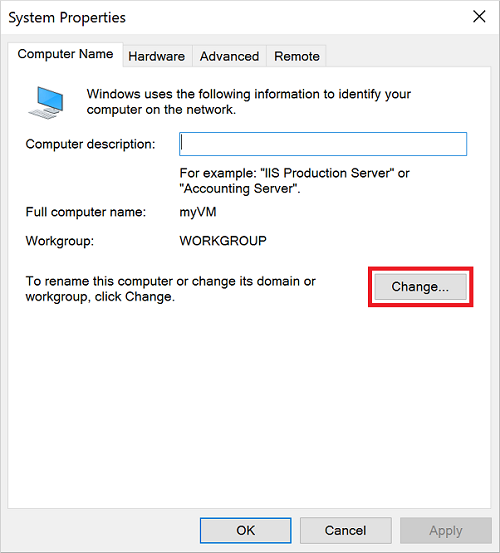
2 In the System Properties window, select Change to join the managed domain.
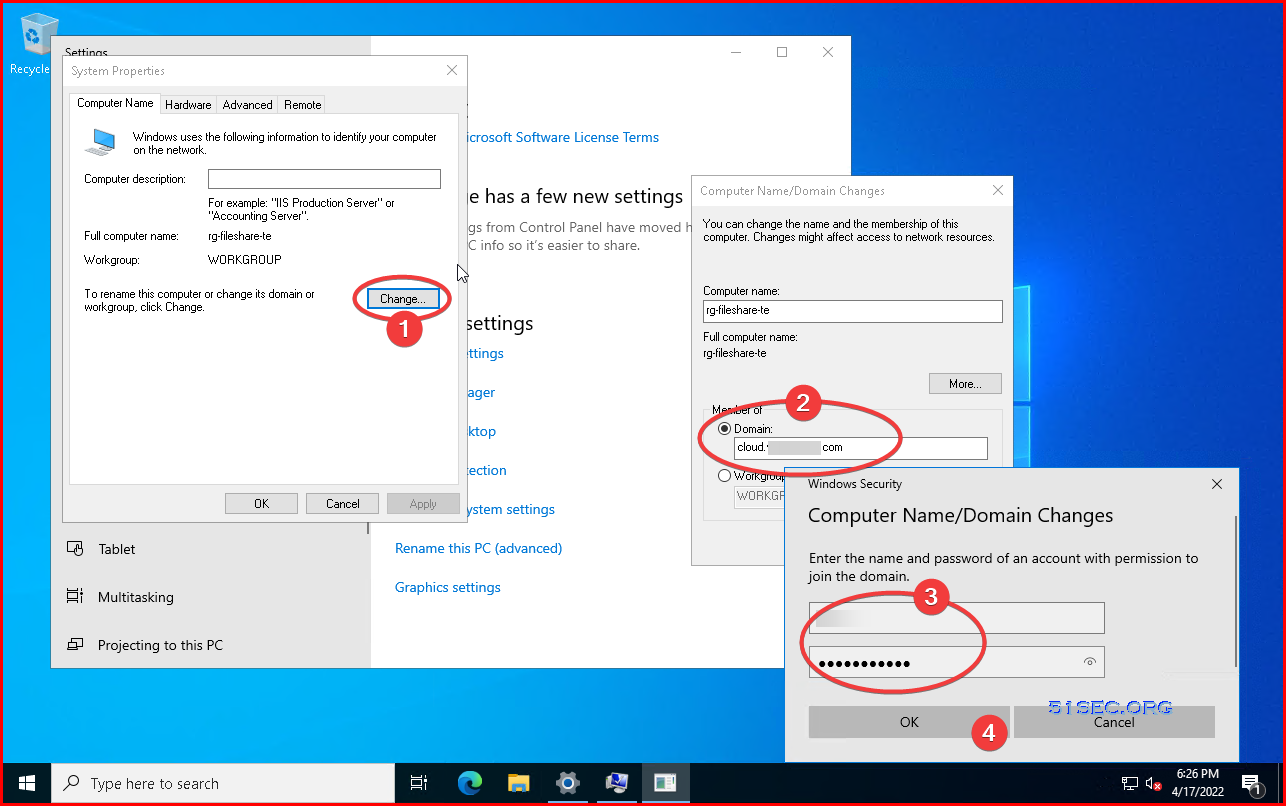
3 In the Domain box, specify the name of your managed domain, such as aaddscontoso.com, then select OK.

4 Enter domain credentials to join the domain. Provide credentials for a user that's a part of the managed domain. The account must be part of the managed domain or Azure AD tenant - accounts from external directories associated with your Azure AD tenant can't correctly authenticate during the domain-join process. It takes a few seconds to join to the managed domain. When complete, the following message welcomes you to the domain:

Enable non - NLA

Administrative tasks you can perform on a managed domain
Members of the AAD DC Administrators group are granted privileges on the managed domain that enables them to do tasks such as:
- Configure the built-in group policy object (GPO) for the AADDC Computers and AADDC Users containers in the managed domain.
- Administer DNS on the managed domain.
- Create and administer custom organizational units (OUs) on the managed domain.
- Gain administrative access to computers joined to the managed domain.
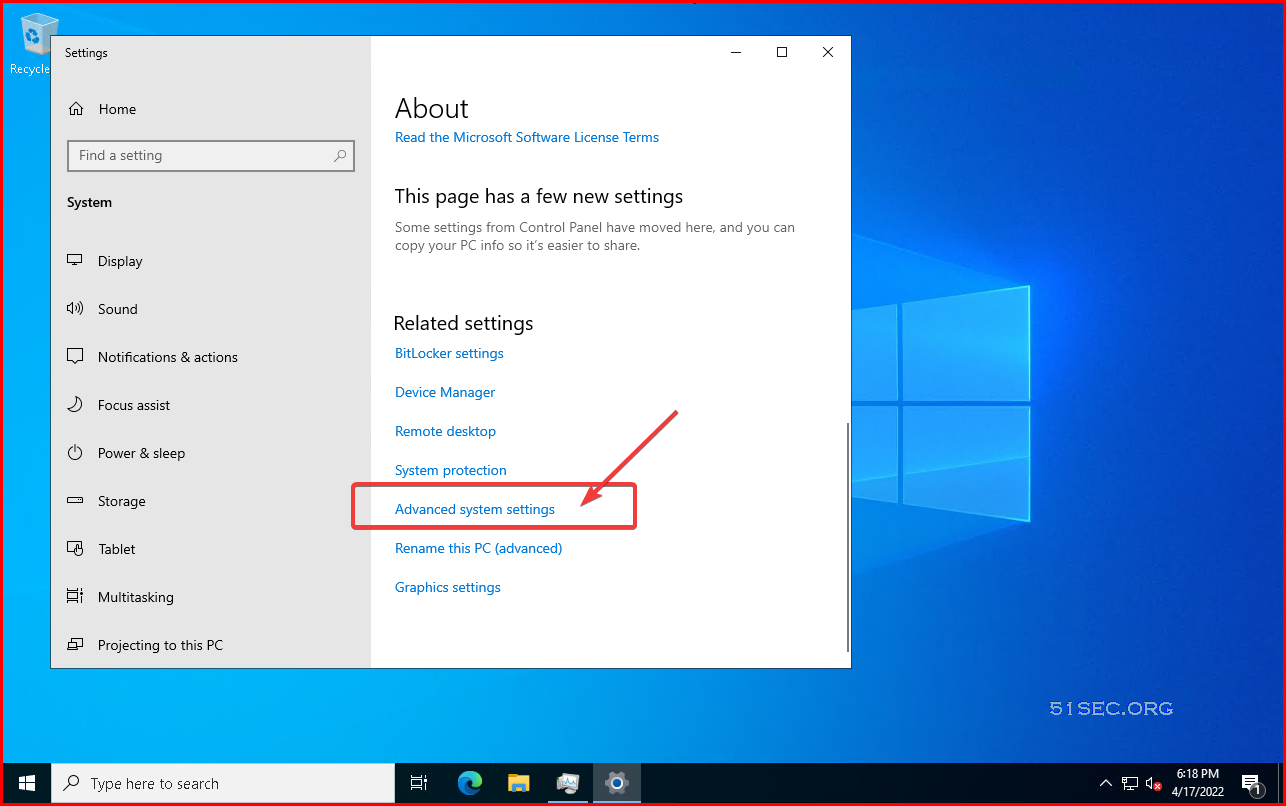
Install Active Directory administrative tools
You use the same administrative tools in a managed domain as on-premises AD DS environments, such as the Active Directory Administrative Center (ADAC) or AD PowerShell. These tools can be installed as part of the Remote Server Administration Tools (RSAT) feature on Windows Server and client computers. Members of the AAD DC Administrators group can then administer managed domains remotely using these AD administrative tools from a computer that is joined to the managed domain.
To install the Active Directory Administration tools on a domain-joined VM, complete the following steps:
If Server Manager doesn't open by default when you sign in to the VM, select the Start menu, then choose Server Manager.
In the Dashboard pane of the Server Manager window, select Add Roles and Features.
On the Before You Begin page of the Add Roles and Features Wizard, select Next.
For the Installation Type, leave the Role-based or feature-based installation option checked and select Next.
On the Server Selection page, choose the current VM from the server pool, such as myvm.aaddscontoso.com, then select Next.
On the Server Roles page, click Next.
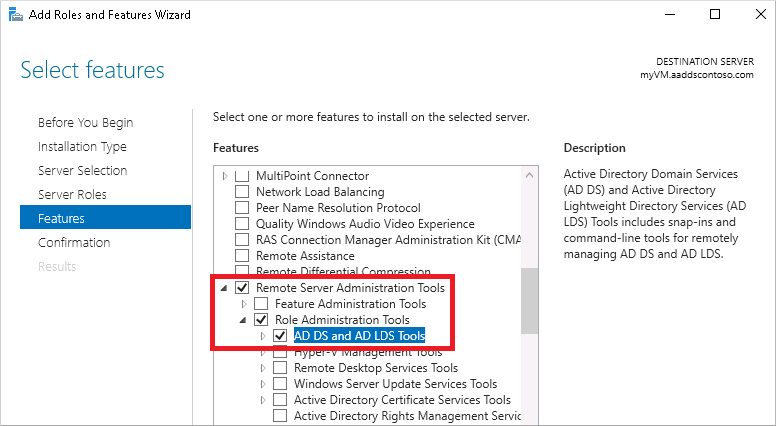
On the Features page, expand the Remote Server Administration Tools node, then expand the Role Administration Tools node.
Choose AD DS and AD LDS Tools feature from the list of role administration tools, then select Next.
On the Confirmation page, select Install. It may take a minute or two to install the administrative tools.
When feature installation is complete, select Close to exit the Add Roles and Features wizard.
Use Active Directory administrative tools
With the administrative tools installed, let's see how to use them to administer the managed domain. Make sure that you're signed in to the VM with a user account that's a member of the AAD DC Administrators group.
From the Start menu, select Windows Administrative Tools. The AD administrative tools installed in the previous step are listed.
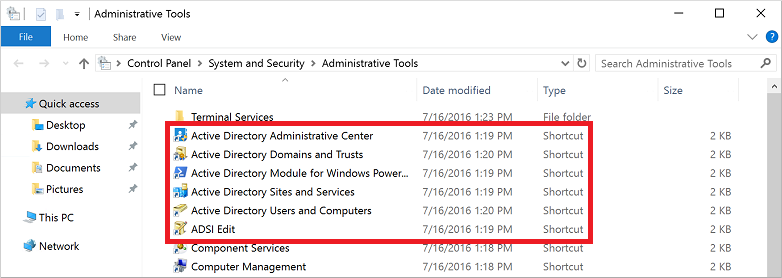
Select Active Directory Administrative Center.
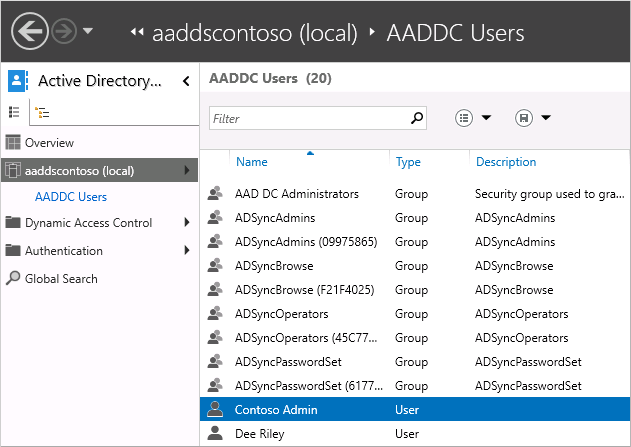
To explore the managed domain, choose the domain name in the left pane, such as aaddscontoso. Two containers named AADDC Computers and AADDC Users are at the top of the list.

To see the users and groups that belong to the managed domain, select the AADDC Users container. The user accounts and groups from your Azure AD tenant are listed in this container.
In the following example output, a user account named Contoso Admin and a group for AAD DC Administrators are shown in this container.
To see the computers that are joined to the managed domain, select the AADDC Computers container. An entry for the current virtual machine, such as myVM, is listed. Computer accounts for all devices that are joined to the managed domain are stored in this AADDC Computers container.
Common Active Directory Administrative Center actions such as resetting a user account password or managing group membership are available. These actions only work for users and groups created directly in the managed domain. Identity information only synchronizes from Azure AD to Azure AD DS. There's no write back from Azure AD DS to Azure AD. You can't change passwords or managed group membership for users synchronized from Azure AD and have those changes synchronized back.
You can also use the Active Directory Module for Windows PowerShell, installed as part of the administrative tools, to manage common actions in your managed domain.


![[5 Mins Docker] Deploy FreshRSS Using Docker Run Command and Deploy To Fly.io](https://lh3.googleusercontent.com/blogger_img_proxy/AEn0k_uEYCKOYLpJvBczh_O4rAlELcEE9nDzU7LsLmqU7ruwTZZhGf0nYfbw5zYv1z7sRb1iJEFQhjNPZWbbB4hXGyCggtOgQycF_k0GZZvBfDMt-w)


No comments:
Post a Comment