Azure AD Connect comes with several features you can optionally turn on or are enabled by default. Some features might sometimes require more configuration in certain scenarios and topologies.
Filtering is used when you want to limit which objects are synchronized to Azure AD. By default all users, contacts, groups, and Windows 10 computers are synchronized. You can change the filtering based on domains, OUs, or attributes.
Password hash synchronization synchronizes the password hash in Active Directory to Azure AD. The end-user can use the same password on-premises and in the cloud but only manage it in one location. Since it uses your on-premises Active Directory as the authority, you can also use your own password policy.
Password writeback will allow your users to change and reset their passwords in the cloud and have your on-premises password policy applied.
Device writeback will allow a device registered in Azure AD to be written back to on-premises Active Directory so it can be used for Conditional Access.
The prevent accidental deletes feature is turned on by default and protects your cloud directory from numerous deletes at the same time. By default it allows 500 deletes per run. You can change this setting depending on your organization size.
Automatic upgrade is enabled by default for express settings installations and ensures your Azure AD Connect is always up to date with the latest release.
Pre-requisites
Azure AD
- You need an Azure AD tenant.
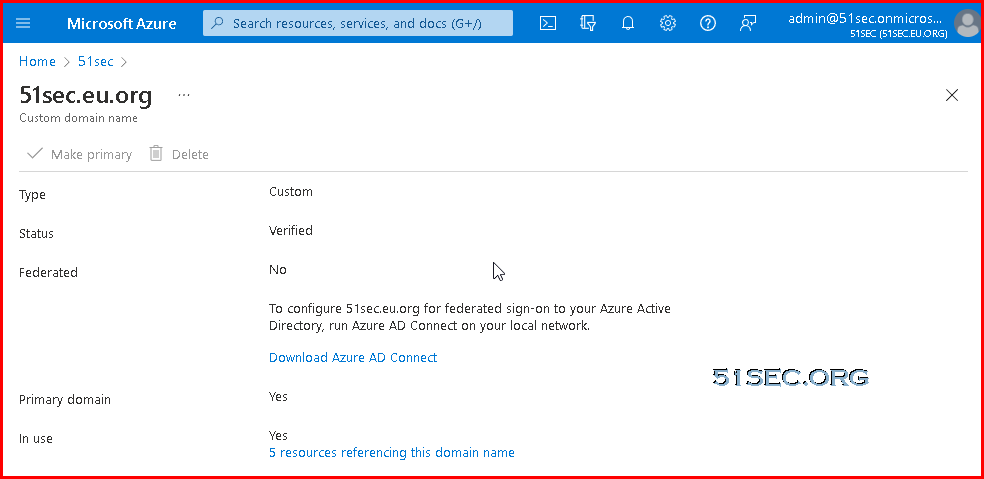
- Add and verify the domain you plan to use in Azure AD. An Azure AD tenant allows, by default, 50,000 objects. When you verify your domain, the limit increases to 300,000 objects.

On-Prem Prepare
- Use IdFix to identify errors such as duplicates and formatting problems in your directory before you synchronize to Azure AD and Microsoft 365.
- Review optional sync features you can enable in Azure AD, and evaluate which features you should enable.
- The Active Directory schema version and forest functional level must be Windows Server 2003 or later.
- If you plan to use the feature password writeback, the domain controllers must be on Windows Server 2016 or later.
- The domain controller used by Azure AD must be writable.
- Using on-premises forests or domains by using "dotted" (name contains a period ".") NetBIOS names isn't supported.
- We recommend that you enable the Active Directory recycle bin.
- Azure Active Directory Connect runs signed PowerShell scripts as part of the installation. Ensure that the PowerShell execution policy will allow running of scripts. The recommended execution policy during installation is "RemoteSigned".
Set-ExecutionPolicy -ExecutionPolicy RemoteSigned -Scope LocalMachine
Get-ExecutionPolicy -List

Scope ExecutionPolicy
        ----- ---------------
MachinePolicy       Undefined
   UserPolicy       Undefined
      Process       Undefined
  CurrentUser    RemoteSigned
 LocalMachine    RemoteSigned
Installation prerequisites
- Azure AD Connect must be installed on a domain-joined Windows Server 2016 or later.
- The minimum .Net Framework version required is 4.6.2, and newer versions of .Net are also supported.
- Azure AD Connect can't be installed on Small Business Server or Windows Server Essentials before 2019 (Windows Server Essentials 2019 is supported). The server must be using Windows Server standard or better.
- The Azure AD Connect server must have a full GUI installed. Installing Azure AD Connect on Windows Server Core isn't supported.
- The Azure AD Connect server must not have PowerShell Transcription Group Policy enabled if you use the Azure AD Connect wizard to manage Active Directory Federation Services (AD FS) configuration. You can enable PowerShell transcription if you use the Azure AD Connect wizard to manage sync configuration.
- If AD FS is being deployed:
- The servers where AD FS or Web Application Proxy are installed must be Windows Server 2012 R2 or later. Windows remote management must be enabled on these servers for remote installation.
- You must configure TLS/SSL certificates. For more information, see Managing SSL/TLS protocols and cipher suites for AD FS and Managing SSL certificates in AD FS.
- You must configure name resolution.
- It is not supported to break and analyze traffic between Azure AD Connect and Azure AD. Doing so may disrupt the service.
- If your global administrators have MFA enabled, the URL https://secure.aadcdn.microsoftonline-p.com must be in the trusted sites list. You're prompted to add this site to the trusted sites list when you're prompted for an MFA challenge and it hasn't been added before. You can use Internet Explorer to add it to your trusted sites.
- If you plan to use Azure AD Connect Health for syncing, ensure that the prerequisites for Azure AD Connect Health are also met. For more information, see Azure AD Connect Health agent installation.
Express installation of Azure AD Connect
Introduction Express Installation
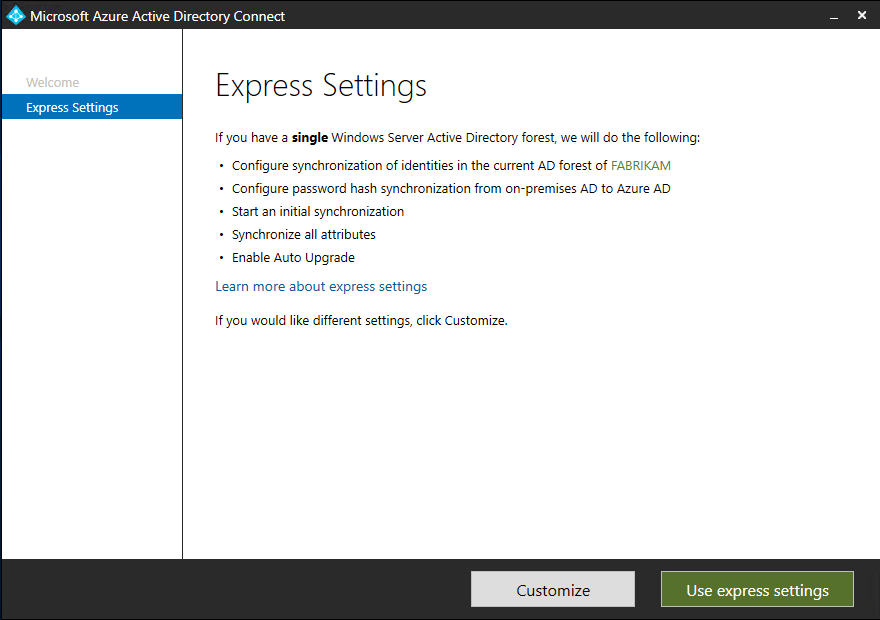
Express is the most common option and is used by about 90% of all new installations. It was designed to provide a configuration that works for the most common customer scenarios.
It assumes:
- You have a single Active Directory forest on-premises.
- You have an enterprise administrator account you can use for the installation.
- You have less than 100,000 objects in your on-premises Active Directory.
You get:
- Password hash synchronization from on-premises to Azure AD for single sign-on.
- A configuration that synchronizes users, groups, contacts, and Windows 10 computers.
- Synchronization of all eligible objects in all domains and all OUs.
- Automatic upgrade is enabled to make sure you always use the latest available version.
Options where you can still use Express:
- If you do not want to synchronize all OUs, you can still use Express and on the last page, unselect Start the synchronization process...*. Then run the installation wizard again and change the OUs in configuration options and enable scheduled sync.
- You want to enable one of the features in Azure AD Premium, such as Password writeback. First go through express to get the initial installation completed. Then run the installation wizard again and change the configuration options.
Steps:
- Sign in as a local administrator to the server you wish to install Azure AD Connect on. You should do this on the server you wish to be the sync server.
- Navigate to and double-click AzureADConnect.msi.
- On the Welcome screen, select the box agreeing to the licensing terms and click Continue.
- On the Express settings screen, click Use express settings.
- On the Connect to Azure AD screen, enter the username and password of a global administrator for your Azure AD. Click Next.

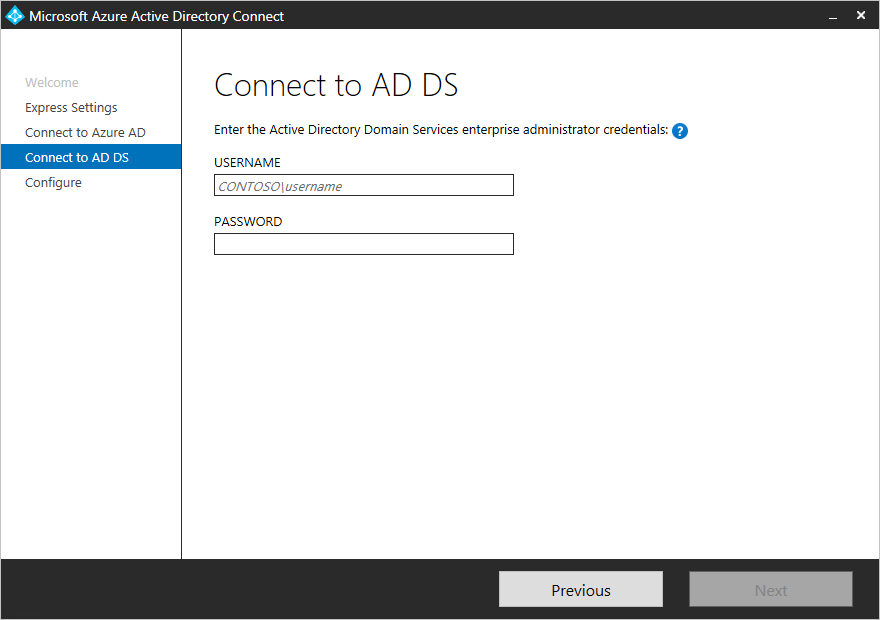
If you receive an error and have problems with connectivity, then see Troubleshoot connectivity problems. - On the Connect to AD DS screen, enter the username and password for an enterprise admin account. You can enter the domain part in either NetBios or FQDN format, that is, FABRIKAM\administrator or fabrikam.com\administrator. Click Next.
- The Azure AD sign-in configuration page only shows if you did not complete verify your domains in the prerequisites.
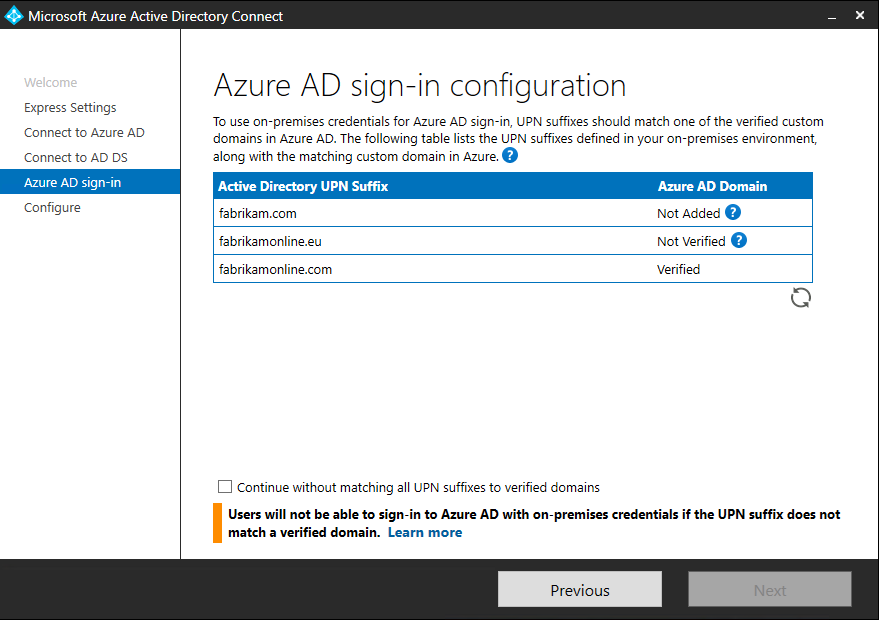
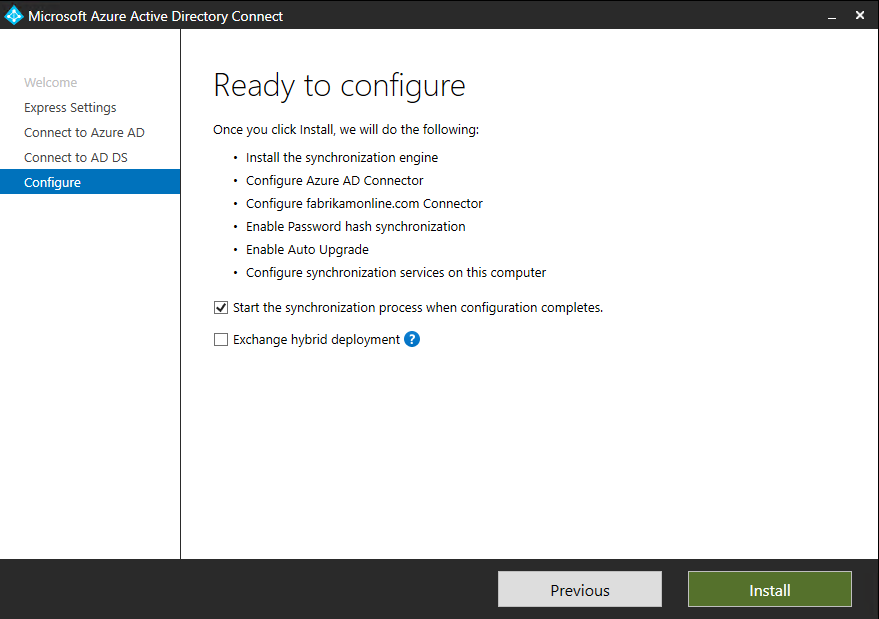
If you see this page, then review every domain marked Not Added and Not Verified. Make sure those domains you use have been verified in Azure AD. Click the Refresh symbol when you have verified your domains. - On the Ready to configure screen, click Install.
- Optionally on the Ready to configure page, you can unselect the Start the synchronization process as soon as configuration completes checkbox. You should unselect this checkbox if you want to do additional configuration, such as filtering. If you unselect this option, the wizard configures sync but leaves the scheduler disabled. It does not run until you enable it manually by rerunning the installation wizard.
- Leaving the Start the synchronization process as soon as configuration completes checkbox enabled will immediately trigger a full synchronization to Azure AD of all users, groups, and contacts.
- If you have Exchange in your on-premises Active Directory, then you also have an option to enable Exchange Hybrid deployment. Enable this option if you plan to have Exchange mailboxes both in the cloud and on-premises at the same time.
- When the installation completes, click Exit.
- After the installation has completed, sign off and sign in again before you use Synchronization Service Manager or Synchronization Rule Editor.
Post Installation
Add additional sync admins
By default, only the user who did the installation and local admins are able to manage the installed sync engine. For additional people to be able to access and manage the sync engine, locate the group named ADSyncAdmins on the local server and add them to this group.Assign licenses to Azure AD Premium and Enterprise Mobility Suite users
Now that your users have been synchronized to the cloud, you need to assign them a license so they can get going with cloud apps such as Microsoft 365.Verify the scheduled synchronization task
Use the Azure portal to check the status of a synchronization.Start a scheduled synchronization task
If you need to run a synchronization task, you can do this by:
- Double-click on the Azure AD Connect desktop shortcut to start the wizard.
- Click Configure.
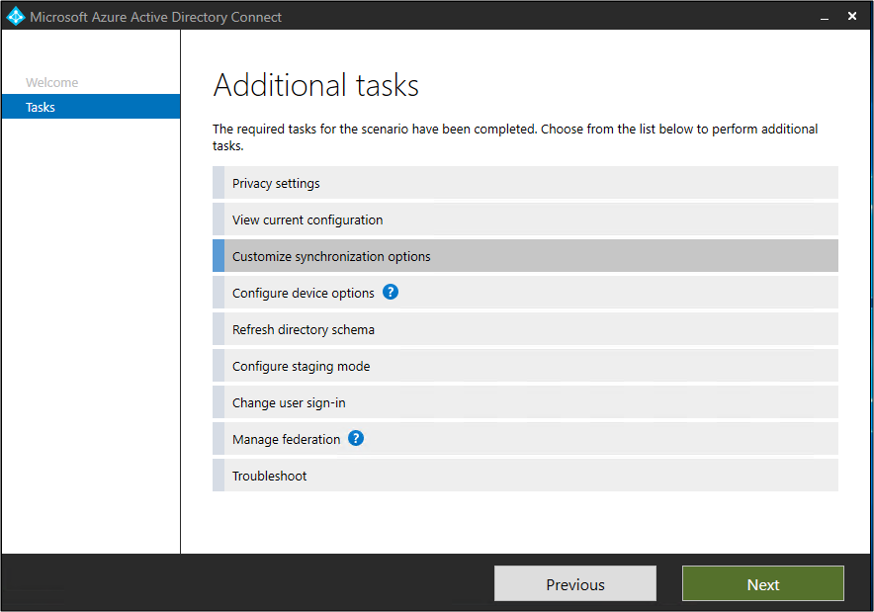
- On the tasks screen, select the Customize synchronization options and click Next
- Enter your Azure AD credentials
- Click Next. Click Next. Click Next.
- On the Ready to Configure screen, ensure that the Start the synchronization process when configuration completes box is selected.
- Click Configure.
Additional Tasks
Additional tasks available in Azure AD Connect
After your initial installation of Azure AD Connect, you can always start the wizard again from the Azure AD Connect start page or desktop shortcut. You will notice that going through the wizard again provides some new options in the form of additional tasks.
The following table provides a summary of these tasks and a brief description of each task.
Manage Azure AD Connect
Tasks to Manage AAD Connect
- Enable device writeback
- Enable group writeback
- Device options
- Additional features in Azure AD Connect
- Prevent accidental deletes
- Enable AD recycle bin
- Configure the AD DS Connector account
- Change the Azure ADSync service account password
- Change the Azure AD Connector account password
- Change the AD DS Connector account password
Enable Sync features:
| Topic | Link |
|---|---|
| Configure filtering | Azure AD Connect sync: Configure filtering |
| Password hash synchronization | Password hash synchronization |
| Pass-through Authentication | Pass-through authentication |
| Password writeback | Getting started with password management |
| Device writeback | Enabling device writeback in Azure AD Connect |
| Prevent accidental deletes | Azure AD Connect sync: Prevent accidental deletes |
| Automatic upgrade | Azure AD Connect: Automatic upgrade |
PowerShell Command Line
Delta sync cycle
A delta sync cycle includes the following steps:
- Delta import on all Connectors
- Delta sync on all Connectors
- Export on all Connectors
Full sync cycle
A full sync cycle includes the following steps:
- Full Import on all Connectors
- Full Sync on all Connectors
- Export on all Connectors
Start a full synchronization of AD Connect with the command
Start-ADSyncSyncCycle -PolicyType Initial
- Start-ADSyncSyncCycle d
- Start-ADSyncSyncCycle i
PS C:\Windows\system32> Get-ADUser atestone | Select-Object UserPrincipalName, objectGUID, @{Name = 'ImmutableID'; Expression = {
[system.convert]::ToBase64String(([GUID]$_.objectGUID).ToByteArray()) } }

PS C:\Windows\system32> Set-MsolUser -UserPrincipalName [email protected] -ImmutableId 9fdf35QFG0+HHFhj2jBAug==
PS C:\Windows\system32> Start-ADSyncSyncCycle d
Hard Match Sync with Immutable ID
Hard matching can only be used when a user is initially created in the cloud. Once soft matching is done, the cloud user is bound to AD with an immutable ID instead of a primary email (SMTP) address.
Now, when a user is manually created in Azure AD, the ImmutableID is blank. So if you have an on premise user with a UPN of [email protected] and you manually create the same user name in Azure AD, the ImmutableID will be blank, and when AD Connect sees the object it will kick out a “duplicate object” error.
A cloud user’s primary email (SMTP) address cannot update at the time of a soft matching process as the primary email (SMTP) address is the attribute used to link the on-premise AD user to the cloud user.
Import-Module MSOnline
Connect-MSOLServicePS C:\Windows\system32> Get-ADUser test1 | Select-Object UserPrincipalName, objectGUID, @{Name = 'ImmutableID'; Expression
= { [system.convert]::ToBase64String(([GUID]$_.objectGUID).ToByteArray()) } }
UserPrincipalName objectGUID ImmutableID
----------------- ---------- -----------
[email protected] 204e9bec-9b1b-48f8-a9f9-3399c78499c6 JtOIBub+Eip+TOZx4SZxg== You might need to install Module MSOnline first using following command for following tasks:
Install-Module -Name MSOnline
Connect to MSOL service and run the following command with the Immutable ID which copied from the output of the above command. In our case, JtOIBub+Eip+TOZx4SZxg== is the immutable ID. We are going to use Set-Msoluser command to set Immutable ID to UPN user [email protected]. In this case, it can create a hard match link between local AD user and cloud Azure AD user.
PS C:\Windows\system32> Set-MsolUser -UserPrincipalName [email protected] -ImmutableId JtOIBub+Eip+TOZx4SZxg==
PS C:\Windows\system32> Get-MsolUser | Where-Object {$_.ImmutableId -eq "JtOIBub+Eip+TOZx4SZxg=="} | select UserPrincip
alName

UserPrincipalName
-----------------
[email protected]
When run Set-Msoluser command , if there is an error to say:

You might need to search which user is having this Immutable ID:
In following example, we found a existing user [email protected] is having this Immutable ID. We will need to permanently delete this user.
PS C:\Windows\system32> Get-MsolUser | Where-Object {$_.ImmutableId -eq "JtOIBub+Eip+TOZx4SZxg=="} | select UserPrincip
alName

UserPrincipalName
-----------------
[email protected]
Last step is to run a delta sync from your ADSync/ADConnect server using the following command.
Start-ADSyncSyncCycle -PolicyType DeltaImport-module msonline
Import-Module activedirectory
Connect-MsolService
#Get a list of all the Azure users
$users = get-msoluser
foreach ($user in $users) {
#Ensures the object has an @CompanyX UPN, has never been synced, and contains details for a first and last name
if ($user.UserPrincipalName -match “@companyX.com” -and !$user.LastDirSyncTime -and $user.FirstName -and $user.LastName) {
#Put the SAM account together by getting the last name, adding an underscore and adding the first name (eg. smith_john). This will need to be modified to match whatever your company uses as a SAM account format.
$sam = $user.LastName + “_” + $user.firstname
#Get the AD user object based on the created SAM above, get the ObjectGUID value and convert it to a base64 value.
$ImmID = Get-ADUser -identity $sam -Properties ObjectGUID | select ObjectGUID | foreach {[system.convert]::ToBase64String(([GUID]($_.ObjectGUID)).tobytearray())}
#Sets the converted ObjectGUID as the ImmutableID for the user
set-msoluser -UserPrincipalName $user.UserPrincipalName -ImmutableId $ImmID
}
}


![[5 Mins Docker] Deploy FreshRSS Using Docker Run Command and Deploy To Fly.io](https://lh3.googleusercontent.com/blogger_img_proxy/AEn0k_smRLej4Rm-WMsrVdnX4-0jRjFzBI4J4-TFXc42SIEsR-sJeRf4t_Sk6fmGcnQoAZtEpMRU4o2UI4Z-uNr8yvZx172iJGPhDsGCwlgoubQbJw)


No comments:
Post a Comment