In this post, I am gonna show how you can use Cloudflare Tunnel (free) to access our home lab internal network with a couple of simple steps and also how you can make this access secure.
Related posts:
- Use Cloudflare Argo Tunnel to Expose Internal Web Application to Internet
- [Free Hosting] Get Permanent Free Domain Name from EU.ORG & Integrate with Cloudflare
- Cloudflare Tips and Tricks
- Set Up CloudFlare Workers to Use Your Own Domain
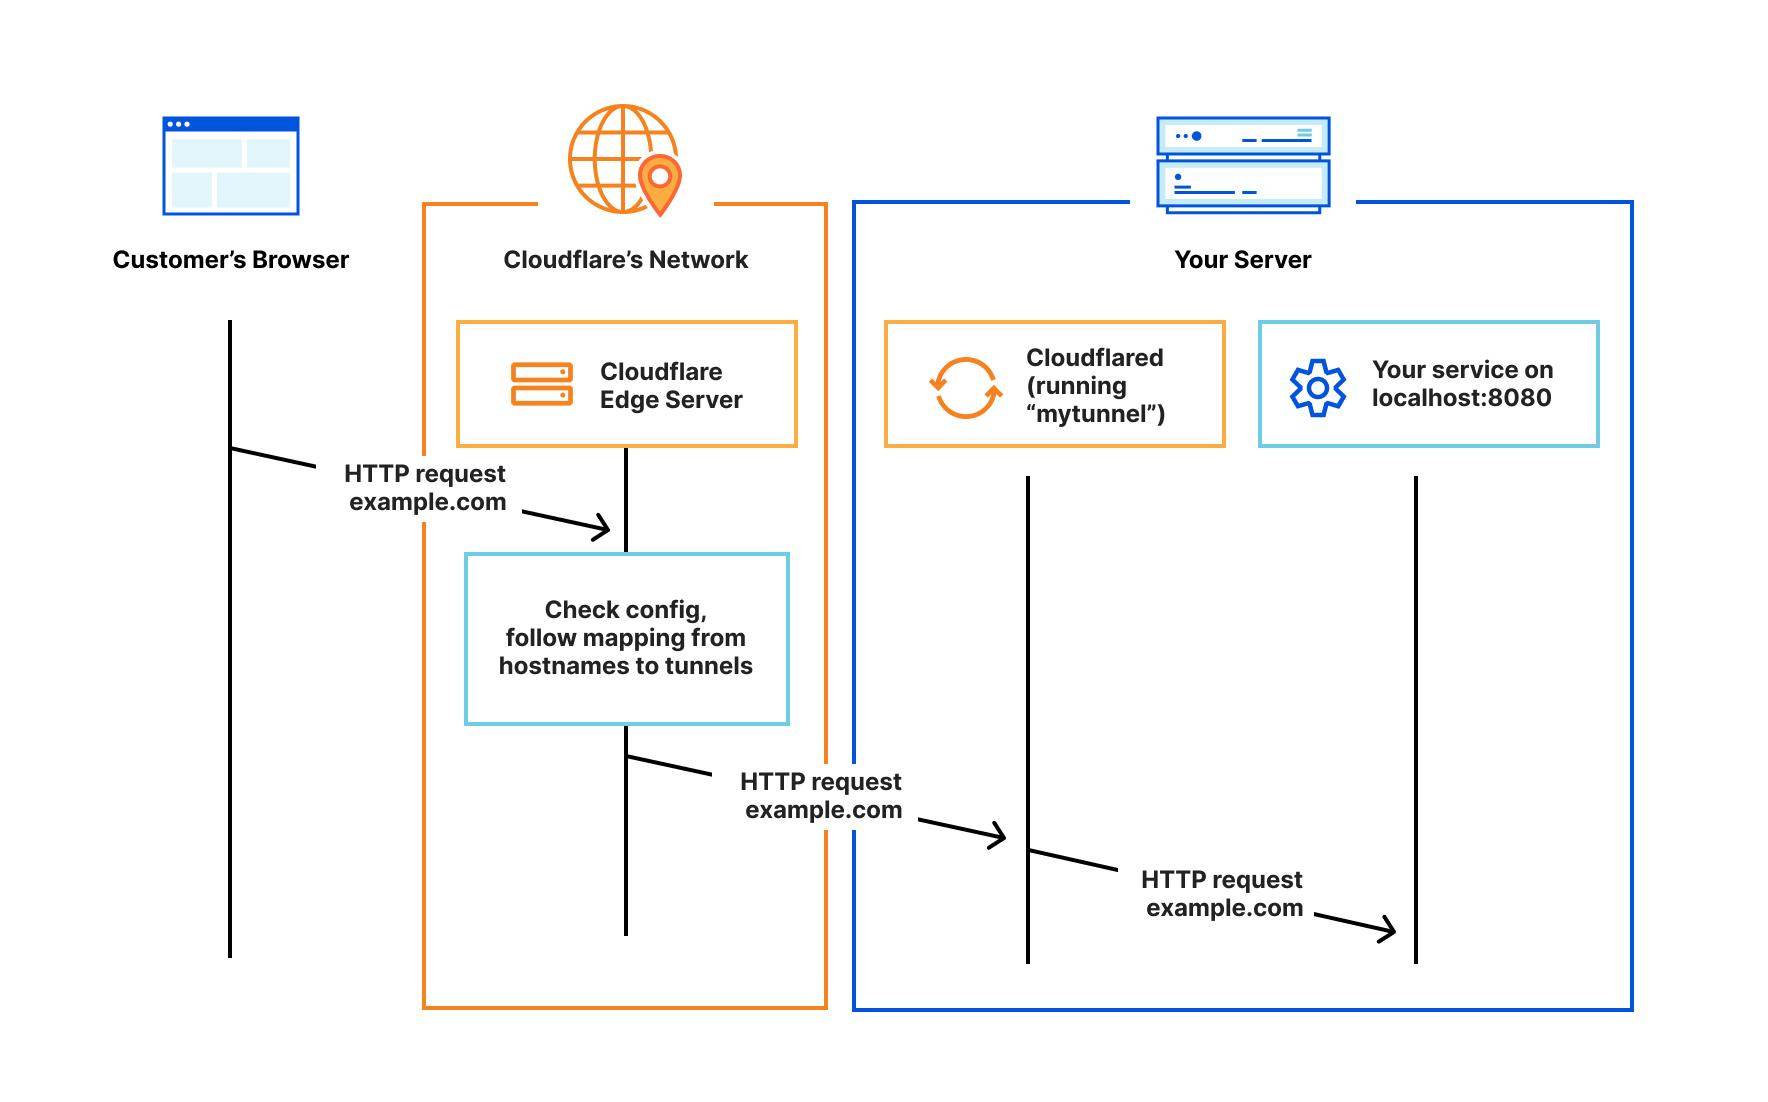
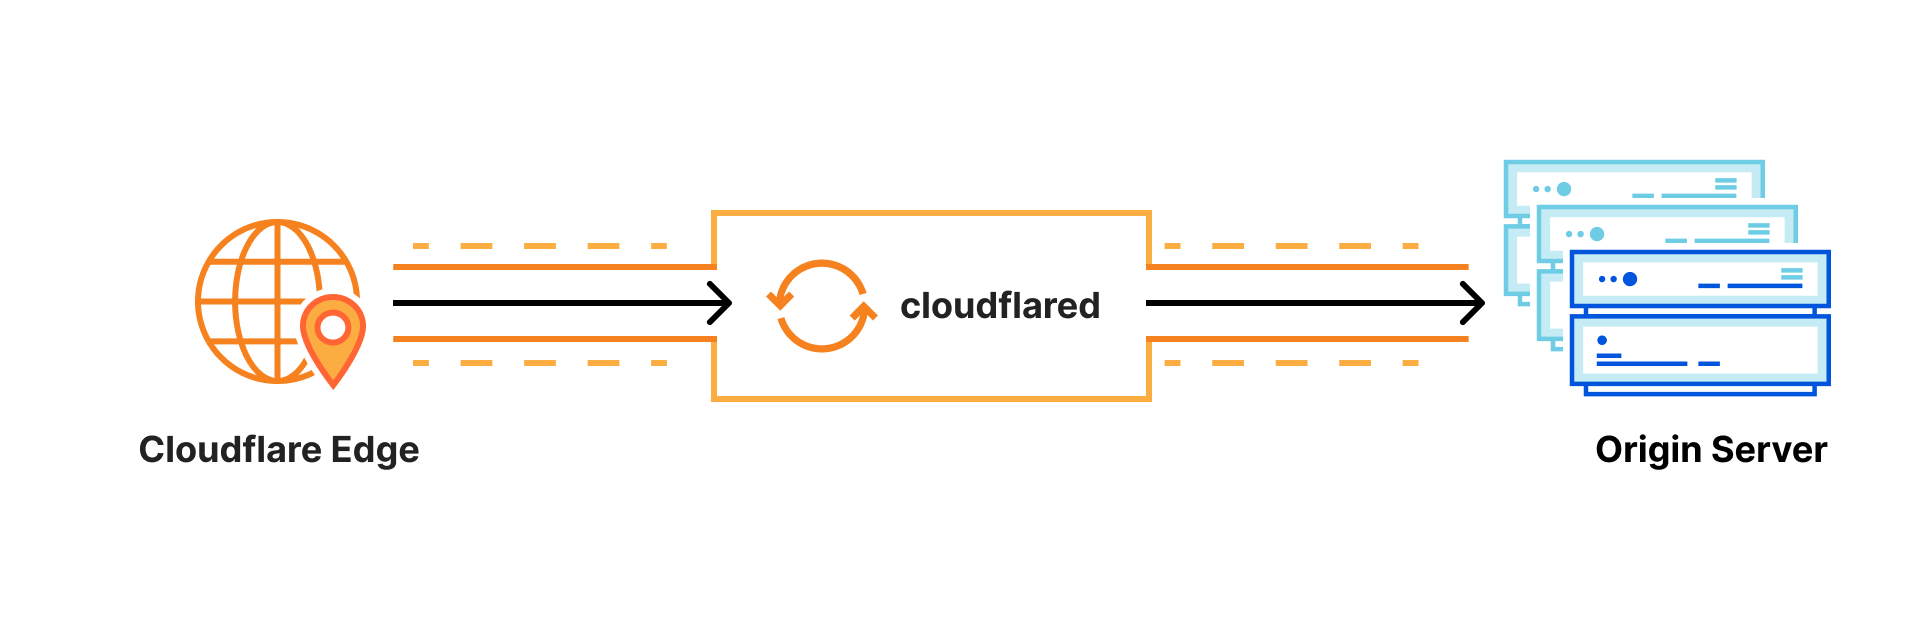
Diagram
Steps to Install Cloudflared in Windows
- Free Cloudflare accound
- Free Domain (https://nic.eu.org/)
1 Add a tunnel
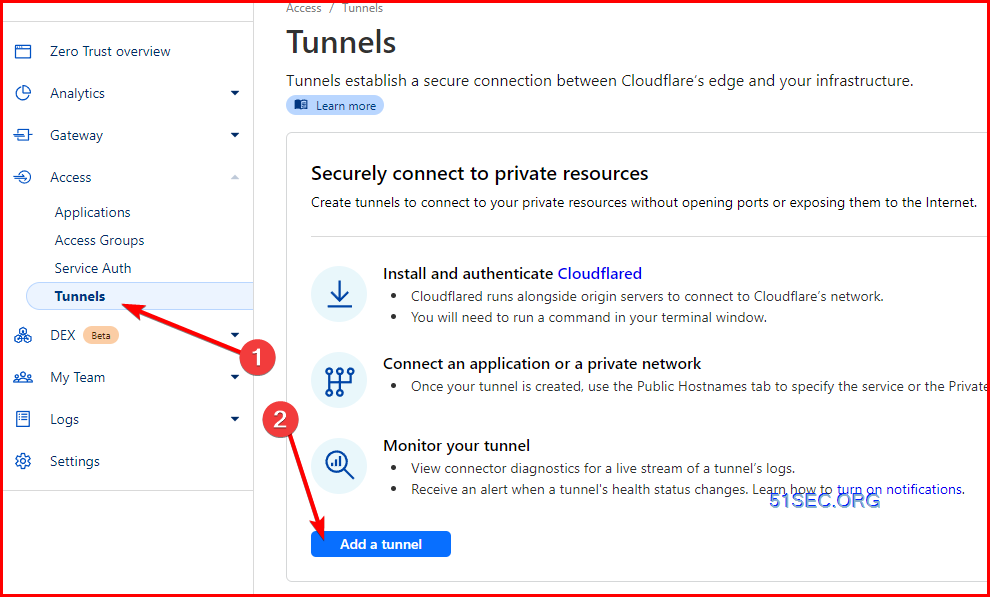
2 Create a new tunnel
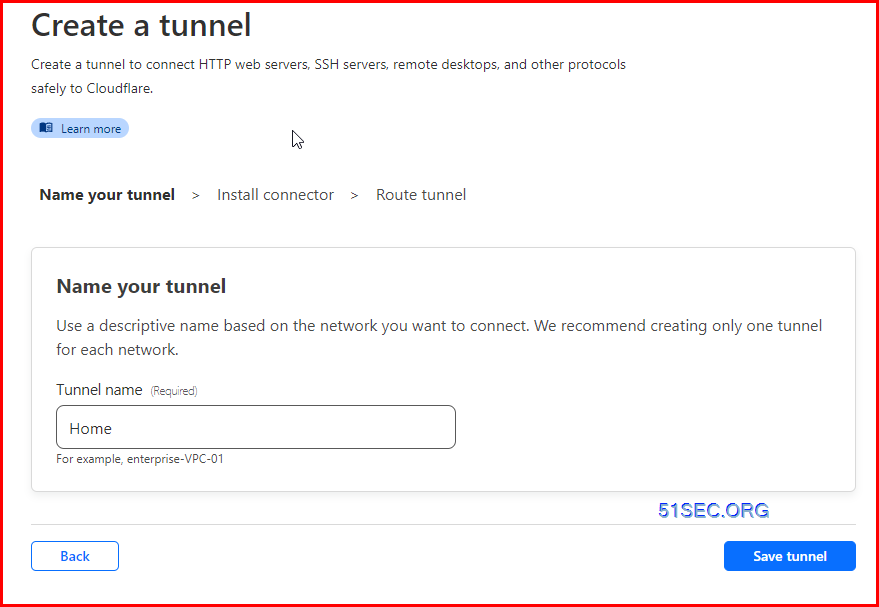
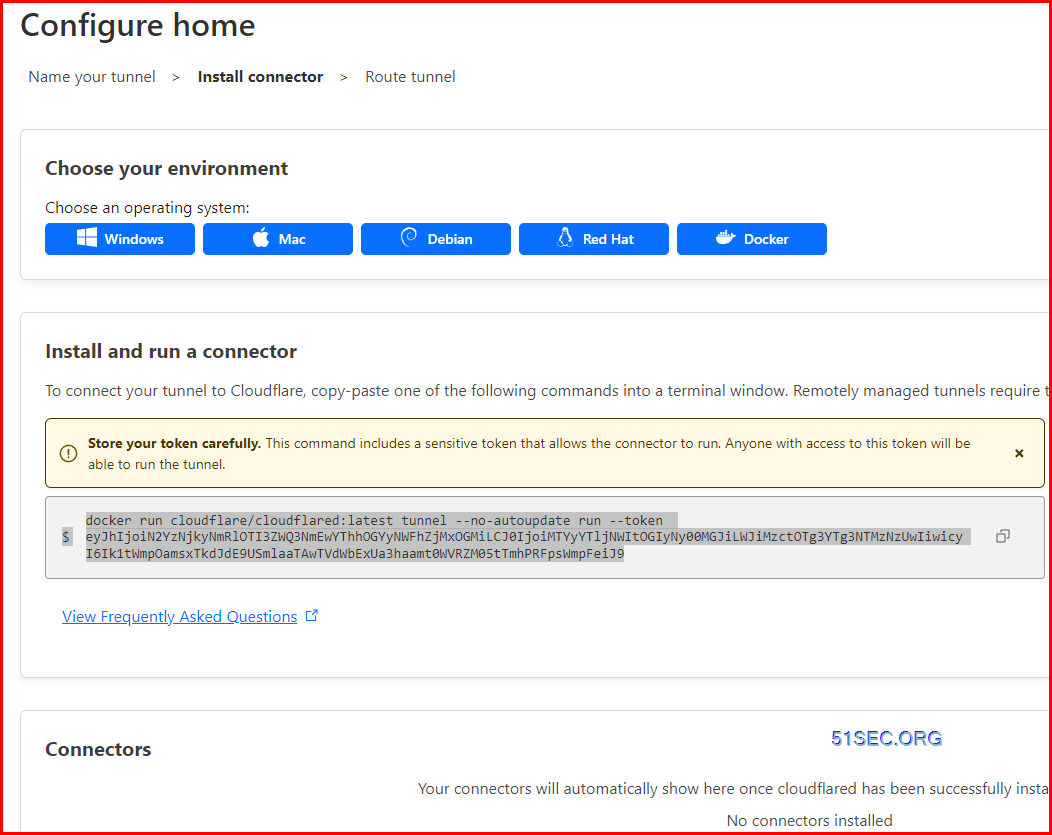
3 Install and run a connector

Download https://github.com/cloudflare/cloudflared/releases/latest/download/cloudflared-windows-amd64.msi.
Double Click to run the installer cloudflared-windows-amd64.msi. The files will be installed under folder: C:\Program Files (x86)\cloudflared. You will not get a prompt the Cloudflared service has been installed successfully this kind of message. As long as you confirmed file from C:\Program Files (x86)\cloudflared folder, you are good to go for next step.
Open Command Prompt or Powershell as Administrator.
Run the following command:
PS C:\Users\WDAGUtilityAccount> cloudflared.exe service install eyJhIjoiN2YzNjkyNmRlOTI3ZWQ3NmEwYThhOGYyNWFhZjMxOGMiLCJ0IjoiOTkwMmE0ZTQtZWVjZS00ZTdmLWIyODctODgwMzQwMGY1YmUxIiwicyI6Ik9XSXlNR0poTVRFdE1qUTNNUzAwTkRka0xXSmhNMkl0T0dNMU9EQTJPR0UwWXpKbCJ9
2023-09-17T13:11:49Z INF Installing cloudflared Windows service
2023-09-17T13:11:49Z INF cloudflared agent service is installed windowsServiceName=Cloudflared
2023-09-17T13:11:49Z INF Agent service for cloudflared installed successfully windowsServiceName=Cloudflared
PS C:\Users\WDAGUtilityAccount>
4 Route traffic to your applications
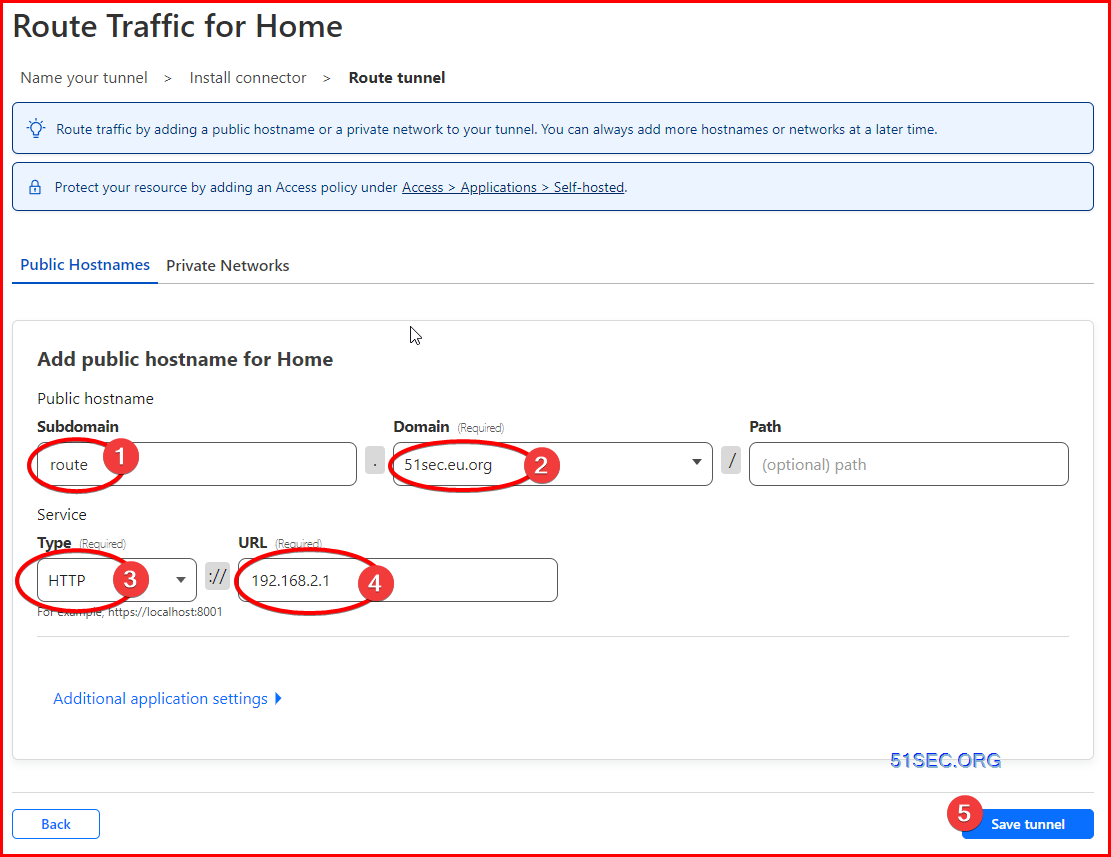
Save the configuration.
Steps to Install Cloudflared in Docker
- apt update
- apt install docker.io
- apt update docker.io
- docker volume create portainer_data
- docker run -d -p 9000:9000 --name portainer --restart always -v /var/run/docker.sock:/var/run/docker.sock -v portainer_data:/data portainer/portainer-ce:latest
4. Console output
netsec@hpthin:~$ sudo -i
[sudo] password for netsec:
root@hpthin:~# apt update
Hit:1 http://archive.ubuntu.com/ubuntu focal InRelease
Get:2 http://archive.ubuntu.com/ubuntu focal-updates InRelease [114 kB]
Hit:3 https://download.newrelic.com/infrastructure_agent/linux/apt focal InRelease
Get:4 http://archive.ubuntu.com/ubuntu focal-backports InRelease [108 kB]
Get:5 http://archive.ubuntu.com/ubuntu focal-security InRelease [114 kB]
Get:6 http://archive.ubuntu.com/ubuntu focal-updates/main amd64 Packages [2,852 kB]
Fetched 3,188 kB in 4s (805 kB/s)
Reading package lists... Done
Building dependency tree
Reading state information... Done
102 packages can be upgraded. Run 'apt list --upgradable' to see them.
root@hpthin:~#
root@hpthin:~# apt install docker.io
Reading package lists... Done
Building dependency tree
Reading state information... Done
Suggested packages:
aufs-tools cgroupfs-mount | cgroup-lite debootstrap docker-doc rinse zfs-fuse | zfsutils
The following packages will be upgraded:
docker.io
1 upgraded, 0 newly installed, 0 to remove and 101 not upgraded.
Need to get 26.4 MB of archives.
After this operation, 27.0 MB disk space will be freed.
Get:1 http://archive.ubuntu.com/ubuntu focal-updates/universe amd64 docker.io amd64 24.0.5-0ubuntu1~20.04.1 [26.4 MB]
Fetched 26.4 MB in 3s (8,473 kB/s)
Preconfiguring packages ...
(Reading database ... 145184 files and directories currently installed.)
Preparing to unpack .../docker.io_24.0.5-0ubuntu1~20.04.1_amd64.deb ...
Unpacking docker.io (24.0.5-0ubuntu1~20.04.1) over (20.10.21-0ubuntu1~20.04.2) ...
Setting up docker.io (24.0.5-0ubuntu1~20.04.1) ...
Processing triggers for man-db (2.9.1-1) ...
root@hpthin:~# docker version
Client:
Version: 24.0.5
API version: 1.43
Go version: go1.20.3
Git commit: 24.0.5-0ubuntu1~20.04.1
Built: Mon Aug 21 19:50:14 2023
OS/Arch: linux/amd64
Context: default
Server:
Engine:
Version: 24.0.5
API version: 1.43 (minimum version 1.12)
Go version: go1.20.3
Git commit: 24.0.5-0ubuntu1~20.04.1
Built: Mon Aug 21 19:50:14 2023
OS/Arch: linux/amd64
Experimental: false
containerd:
Version: 1.6.12-0ubuntu1~20.04.3
GitCommit:
runc:
Version: 1.1.4-0ubuntu1~20.04.3
GitCommit:
docker-init:
Version: 0.19.0
GitCommit:
root@hpthin:~# docker run cloudflare/cloudflared:latest tunnel --no-autoupdate run --token eyJhIjoiN2YzNjkyNmRlOTI3ZWQ3NmEwYThhOGYyNWFhZjMxOGMiLCJ0IjoiMTYyYTljNWItOGIyNy00MGJiLWJiMzctOTg3YTg3NTMzNzUwIiwicyI6Ik1tWmpOamsxTkdJdE9USmlaaTAwTVdWbExUa3haamt0WVRZM05tTmhPRFpsWmpFeiJ9
Unable to find image 'cloudflare/cloudflared:latest' locally
latest: Pulling from cloudflare/cloudflared
dd5ad9c9c29f: Pull complete
960043b8858c: Pull complete
b4ca4c215f48: Pull complete
eebb06941f3e: Pull complete
02cd68c0cbf6: Pull complete
d3c894b5b2b0: Pull complete
b40161cd83fc: Pull complete
46ba3f23f1d3: Pull complete
4fa131a1b726: Pull complete
01f38fc88b34: Pull complete
6e24d515f042: Pull complete
0460cb7a0f85: Pull complete
b39375cac515: Pull complete
Digest: sha256:93561dfa0032006354be56476f09e3d8743d53d202368672c2847c1631f7be50
Status: Downloaded newer image for cloudflare/cloudflared:latest
2023-09-23T17:29:02Z INF Starting tunnel tunnelID=162a9c5b-8b27-40bb-bb37-987a87533750
2023-09-23T17:29:02Z INF Version 2023.8.2
2023-09-23T17:29:02Z INF GOOS: linux, GOVersion: go1.20.6, GoArch: amd64
2023-09-23T17:29:02Z INF Settings: map[no-autoupdate:true token:*****]
2023-09-23T17:29:02Z INF Generated Connector ID: 33cee496-81df-4d32-a8a7-56cd4310ef93
2023-09-23T17:29:02Z INF Initial protocol quic
2023-09-23T17:29:02Z INF ICMP proxy will use 172.17.0.5 as source for IPv4
2023-09-23T17:29:02Z INF ICMP proxy will use :: as source for IPv6
2023-09-23T17:29:02Z INF Starting metrics server on 127.0.0.1:42961/metrics
2023/09/23 17:29:03 failed to sufficiently increase receive buffer size (was: 208 kiB, wanted: 2048 kiB, got: 416 kiB). See https://github.com/quic-go/quic-go/wiki/UDP-Receive-Buffer-Size for details.
2023-09-23T17:29:03Z INF Registered tunnel connection connIndex=0 connection=8959d98a-e305-4f86-8c16-ed2616281795 event=0 ip=198.41.192.167 location=yyz01 protocol=quic
2023-09-23T17:29:03Z INF Registered tunnel connection connIndex=1 connection=31892503-d646-4c1b-a4ac-0b6a10ab175a event=0 ip=198.41.200.73 location=ord02 protocol=quic
2023-09-23T17:29:03Z INF Updated to new configuration config=null version=0
2023-09-23T17:29:04Z INF Registered tunnel connection connIndex=2 connection=45771c08-0818-4d92-91fa-bb501c908f7e event=0 ip=198.41.200.23 location=ord11 protocol=quic
2023-09-23T17:29:05Z INF Registered tunnel connection connIndex=3 connection=30b37439-8e18-424b-bb36-6187fa658584 event=0 ip=198.41.192.27 location=yyz01 protocol=quic
2023-09-23T17:34:58Z INF Updated to new configuration config="{\"ingress\":[{\"service\":\"http://192.168.2.8:3000\",\"hostname\":\"speedtest.51sec.eu.org\",\"originRequest\":{}},{\"service\":\"http_status:404\"}],\"warp-routing\":{\"enabled\":false}}" version=1
2023-09-23T17:40:58Z ERR error="stream 105 canceled by remote with error code 0" cfRay=80b4931c9926a228-YYZ event=1 ingressRule=0 originService=http://192.168.2.8:3000
2023-09-23T17:40:58Z ERR Request failed error="stream 105 canceled by remote with error code 0" connIndex=3 dest=https://speedtest.51sec.eu.org/downloading?n=0.17752728579938704 event=0 ip=198.41.192.27 type=http
2023-09-23T17:40:58Z ERR error="stream 97 canceled by remote with error code 0" cfRay=80b4931adeeca228-YYZ event=1 ingressRule=0 originService=http://192.168.2.8:3000
2023-09-23T17:40:58Z ERR Request failed error="stream 97 canceled by remote with error code 0" connIndex=3 dest=https://speedtest.51sec.eu.org/downloading?n=0.2870544567397595 event=0 ip=198.41.192.27 type=http
2023-09-23T17:40:58Z ERR error="stream 109 canceled by remote with error code 0" cfRay=80b4931d19a9a228-YYZ event=1 ingressRule=0 originService=http://192.168.2.8:3000
2023-09-23T17:40:58Z ERR Request failed error="stream 109 canceled by remote with error code 0" connIndex=3 dest=https://speedtest.51sec.eu.org/downloading?n=0.7172544233950537 event=0 ip=198.41.192.27 type=http
2023-09-23T17:40:58Z ERR error="stream 101 canceled by remote with error code 0" cfRay=80b4931b8fdfa228-YYZ event=1 ingressRule=0 originService=http://192.168.2.8:3000
2023-09-23T17:40:58Z ERR Request failed error="stream 101 canceled by remote with error code 0" connIndex=3 dest=https://speedtest.51sec.eu.org/downloading?n=0.6693955675928318 event=0 ip=198.41.192.27 type=http
^C2023-09-23T17:41:52Z INF Initiating graceful shutdown due to signal interrupt ...
2023-09-23T17:41:52Z INF Unregistered tunnel connection connIndex=0 event=0 ip=198.41.192.167
2023-09-23T17:41:52Z ERR Failed to serve quic connection error="context canceled" connIndex=0 event=0 ip=198.41.192.167
2023-09-23T17:41:52Z INF Retrying connection in up to 1s connIndex=0 event=0 ip=198.41.192.167
2023-09-23T17:41:52Z INF Unregistered tunnel connection connIndex=1 event=0 ip=198.41.200.73
2023-09-23T17:41:52Z ERR Failed to serve quic connection error="context canceled" connIndex=1 event=0 ip=198.41.200.73
2023-09-23T17:41:52Z INF Retrying connection in up to 1s connIndex=1 event=0 ip=198.41.200.73
2023-09-23T17:41:52Z INF Unregistered tunnel connection connIndex=2 event=0 ip=198.41.200.23
2023-09-23T17:41:52Z ERR Failed to serve quic connection error="context canceled" connIndex=2 event=0 ip=198.41.200.23
2023-09-23T17:41:52Z INF Retrying connection in up to 1s connIndex=2 event=0 ip=198.41.200.23
2023-09-23T17:41:52Z INF Unregistered tunnel connection connIndex=3 event=0 ip=198.41.192.27
2023-09-23T17:41:52Z ERR Failed to serve quic connection error="context canceled" connIndex=3 event=0 ip=198.41.192.27
2023-09-23T17:41:52Z INF Retrying connection in up to 1s connIndex=3 event=0 ip=198.41.192.27
2023-09-23T17:41:52Z ERR no more connections active and exiting
2023-09-23T17:41:52Z INF Tunnel server stopped
2023-09-23T17:41:52Z ERR icmp router terminated error="context canceled"
2023-09-23T17:41:52Z INF Metrics server stopped
root@hpthin:~# docker run -d cloudflare/cloudflared:latest tunnel --no-autoupdate run --token eyJhIjoiN2YzNjkyNmRlOTI3ZWQ3NmEwYThhOGYyNWFhZjMxOGMiLCJ0IjoiMTYyYTljNWItOGIyNy00MGJiLWJiMzctOTg3YTg3NTMzNzUwIiwicyI6Ik1tWmpOamsxTkdJdE9USmlaaTAwTVdWbExUa3haamt0WVRZM05tTmhPRFpsWmpFeiJ9
6faf071af6dd1e145ed4ea03c93471fe8aa83dc4c6c0b232cdea4ff91d181c65
root@hpthin:~#
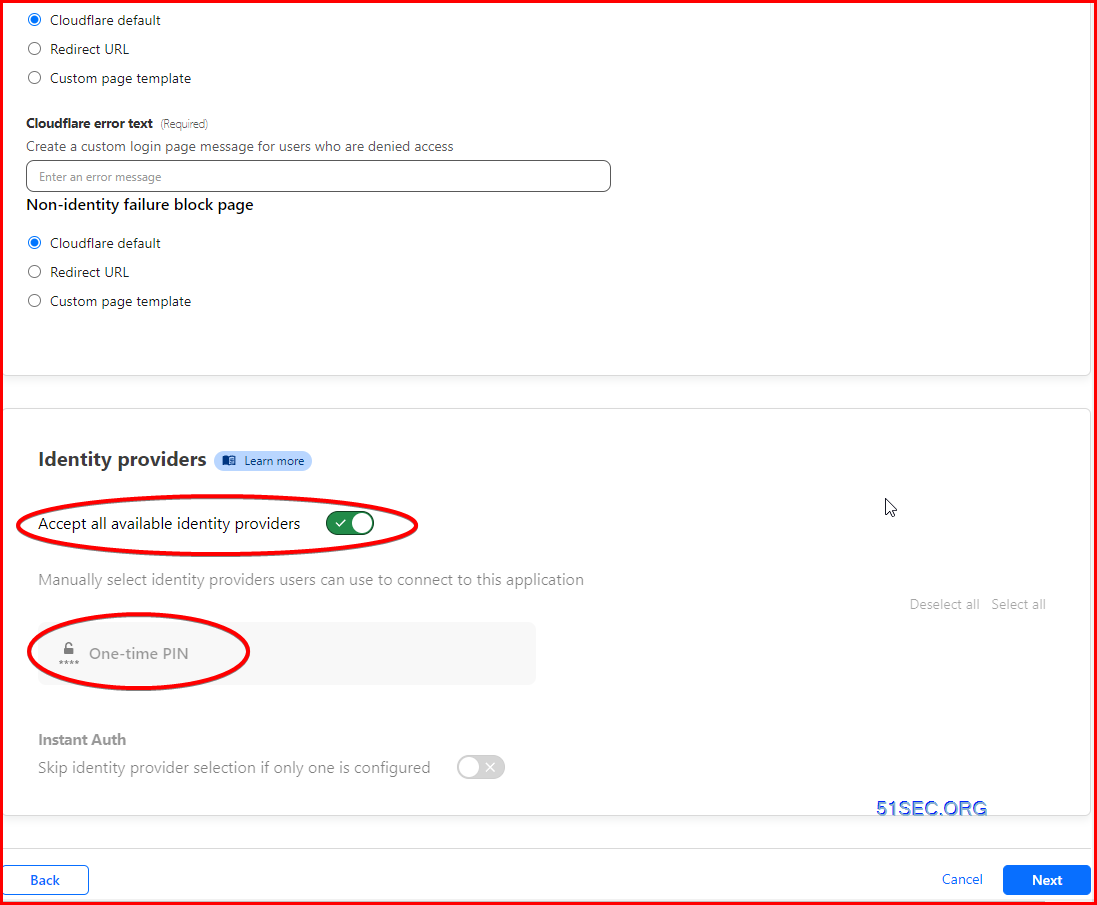
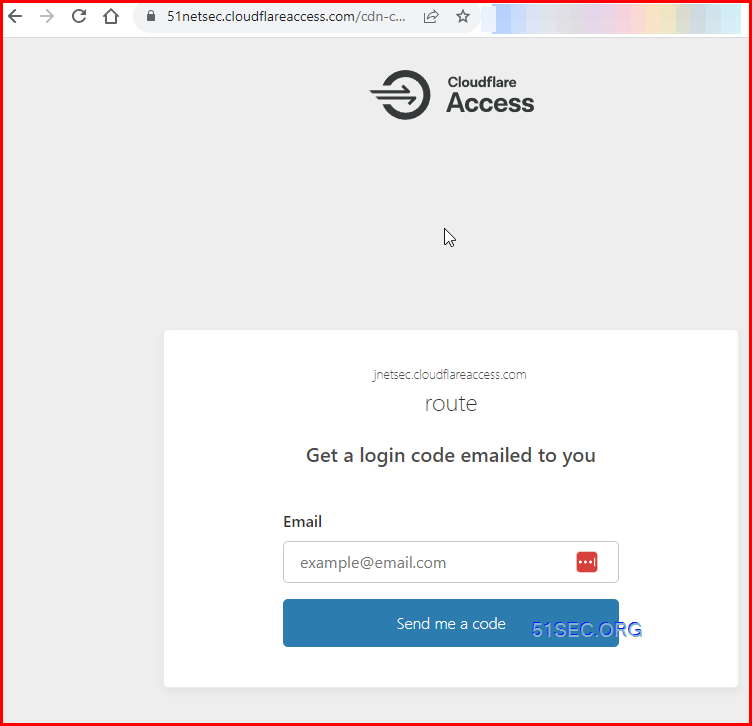
Access Policy - OneTime Password
One Time PIN
1 Add an application
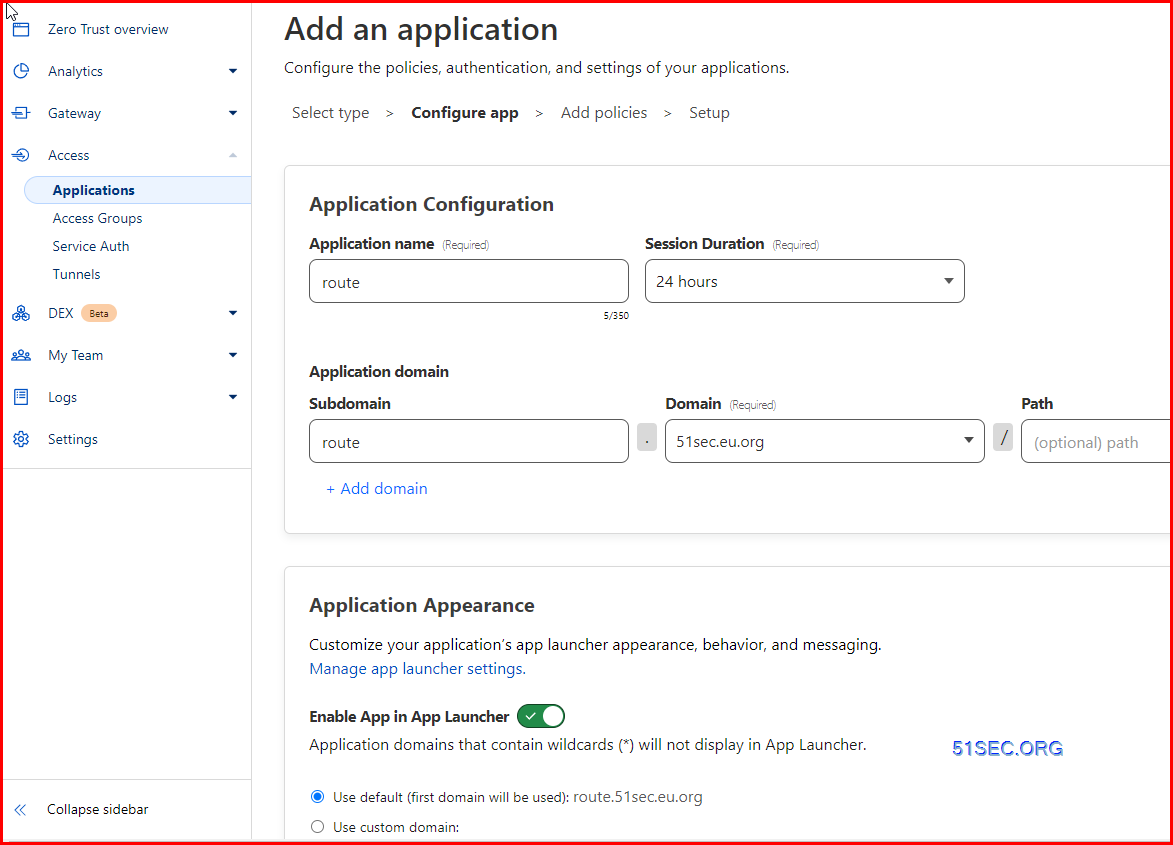
2 Add policies
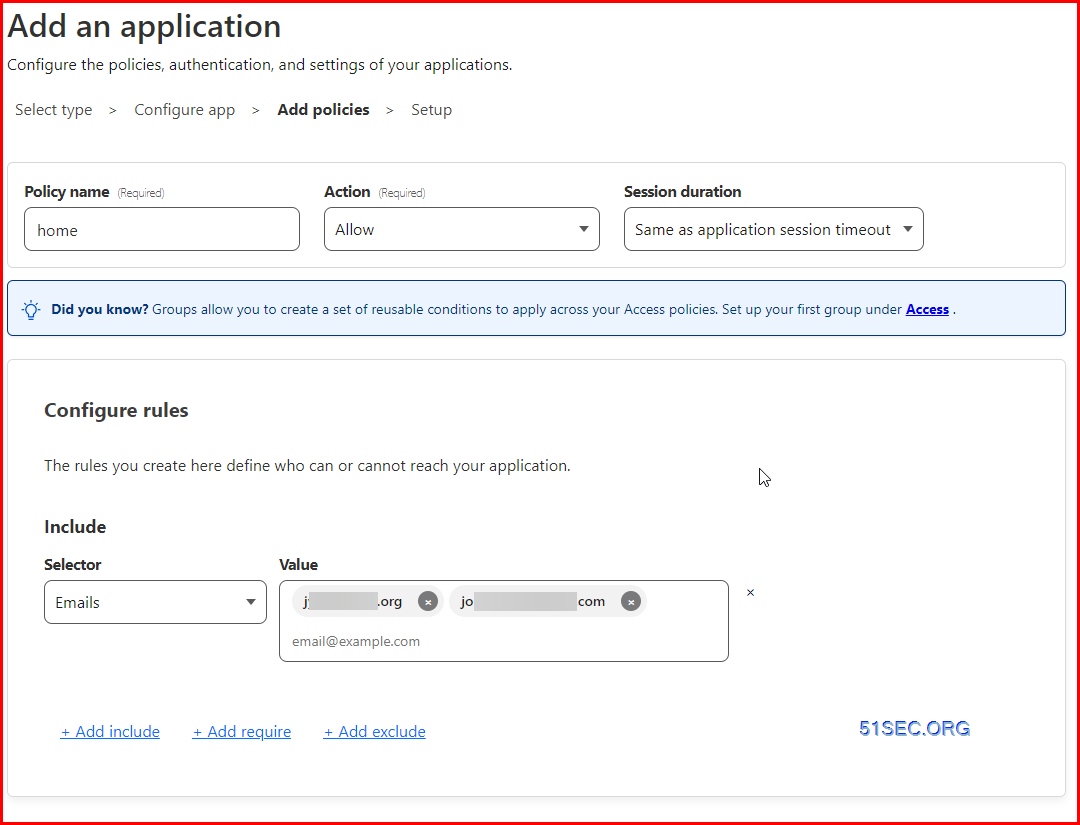
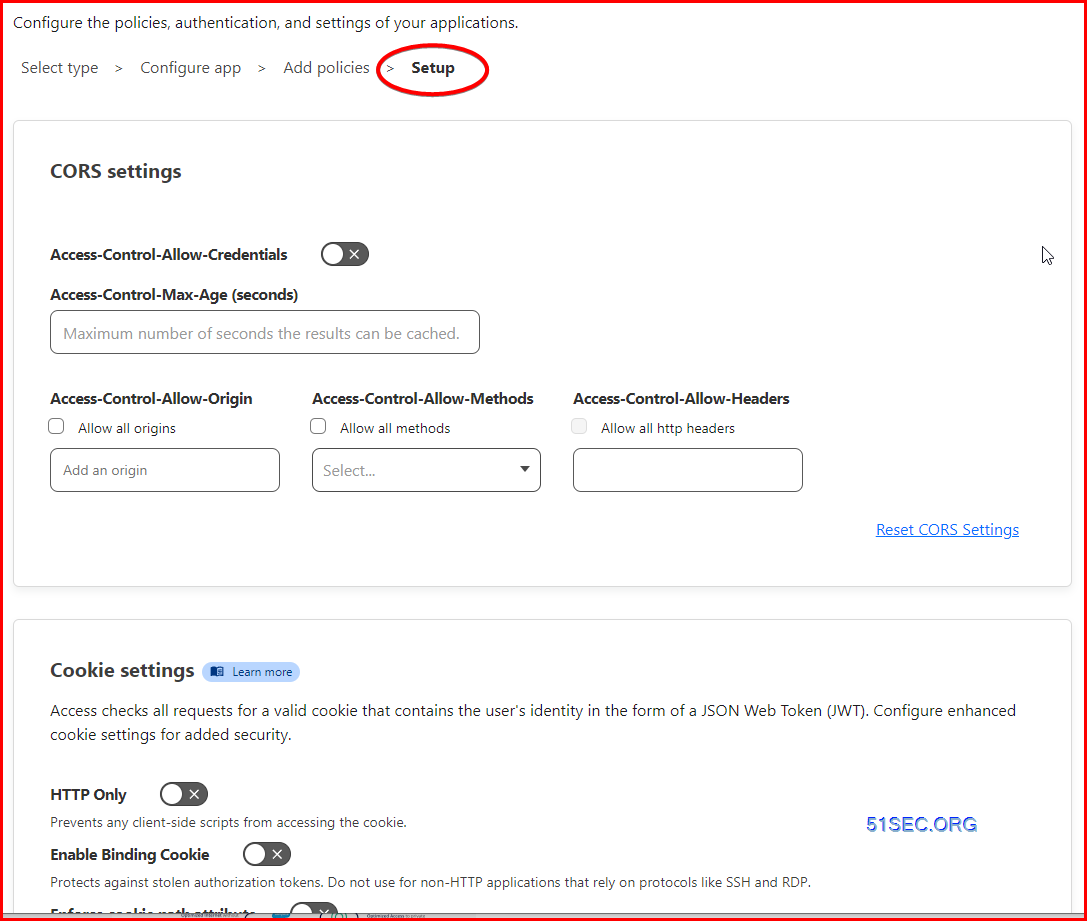
3 Setup
4 Access to route.51sec.eu.org
Set Up Google as an IdP (Identity Provider)
You can add other authentication methods such as Google, GitHub as an identity provider.
Set up Google as an identity provider
Visit the Google Cloud Platform console. Create a new project, name the project, and select Create.
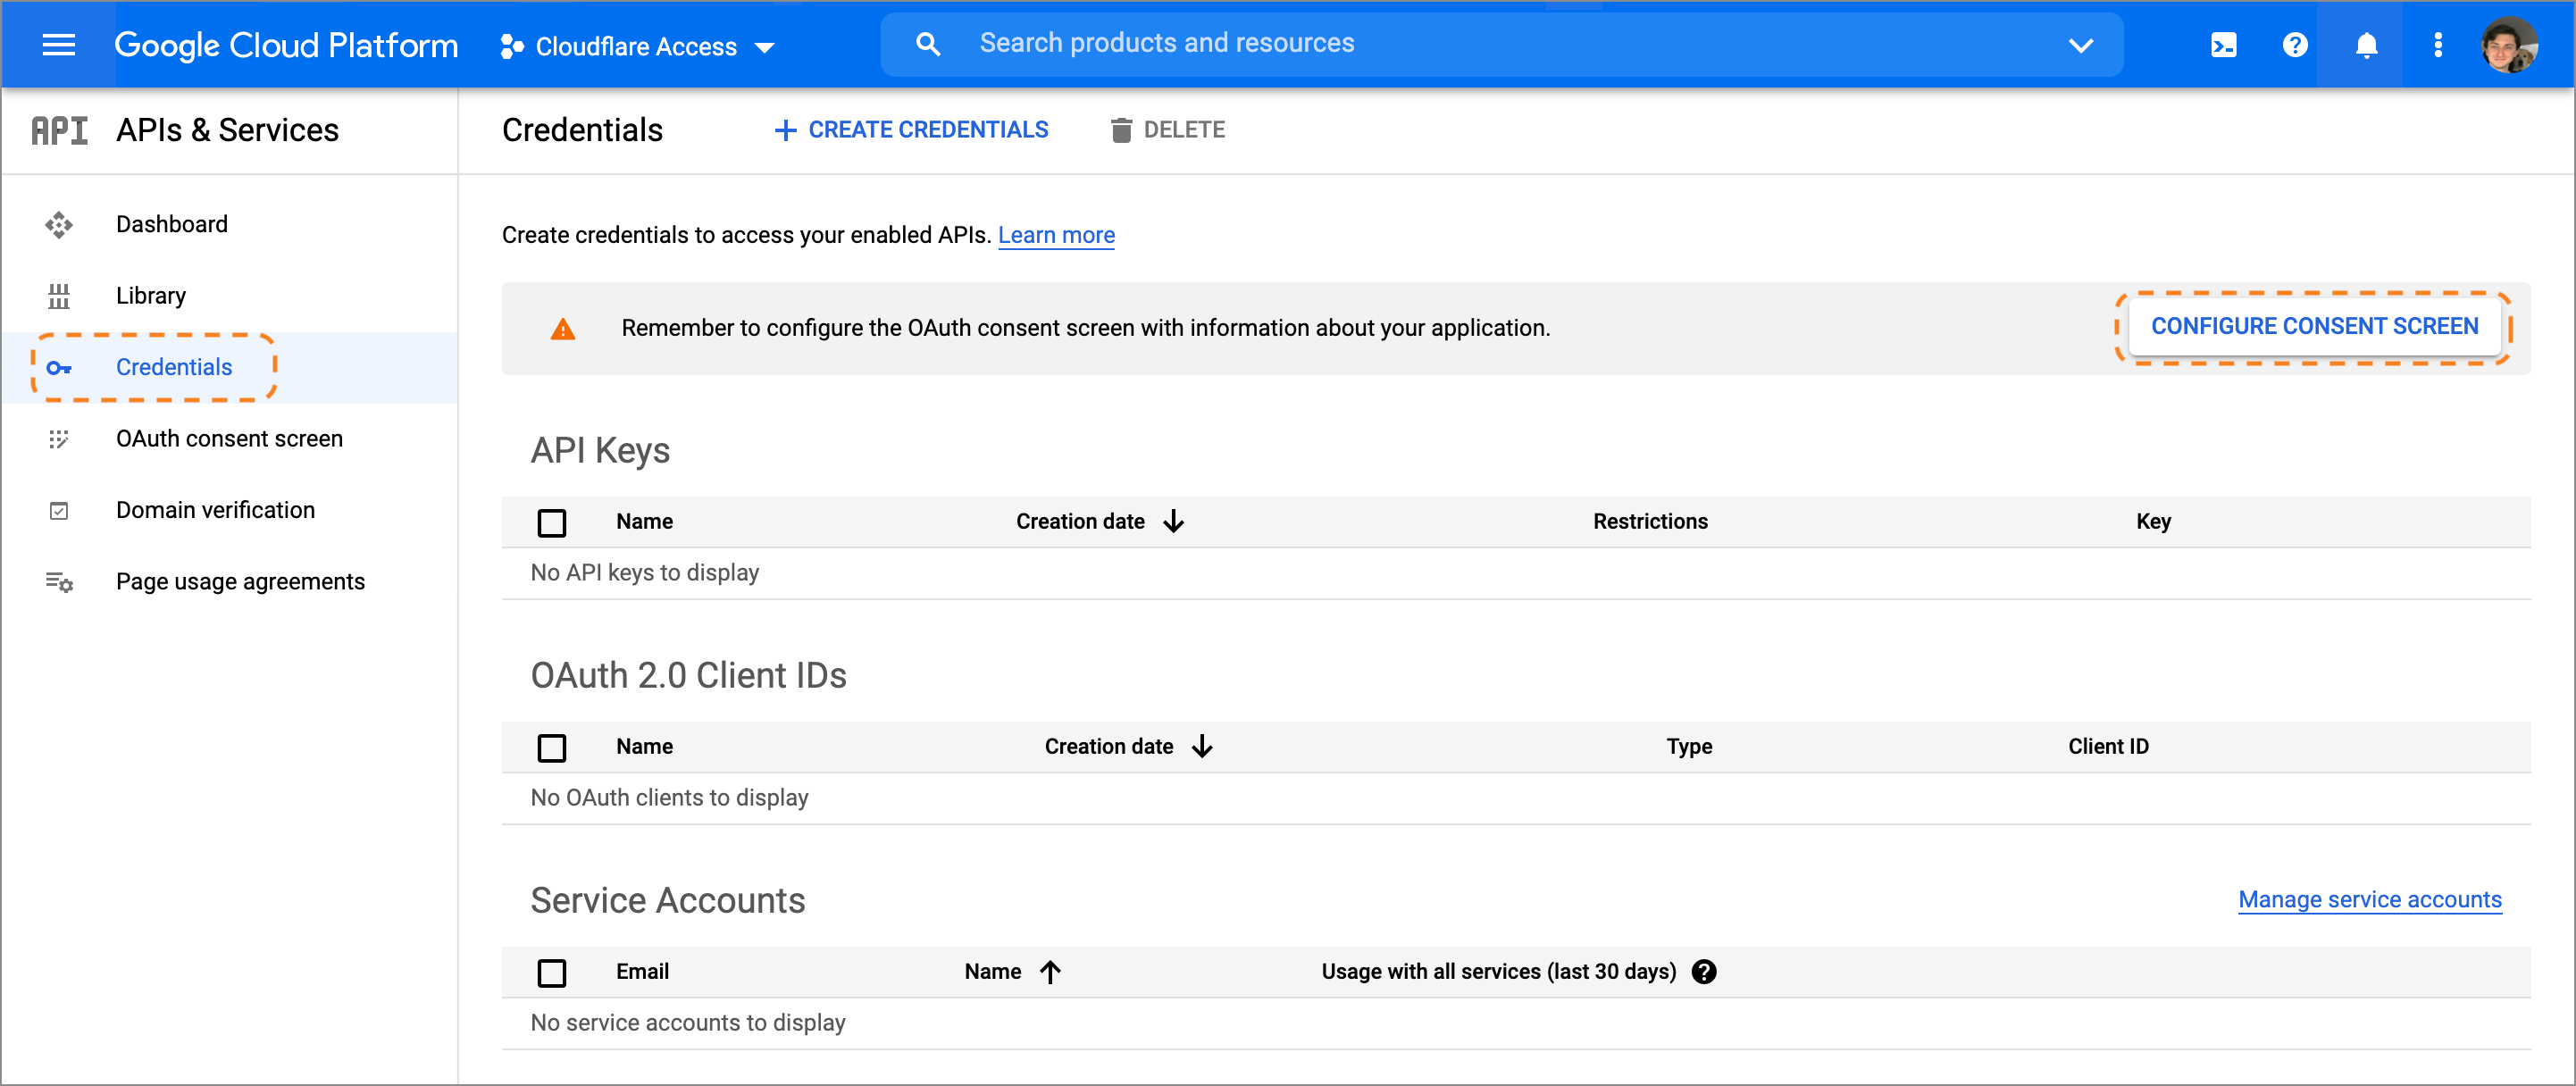
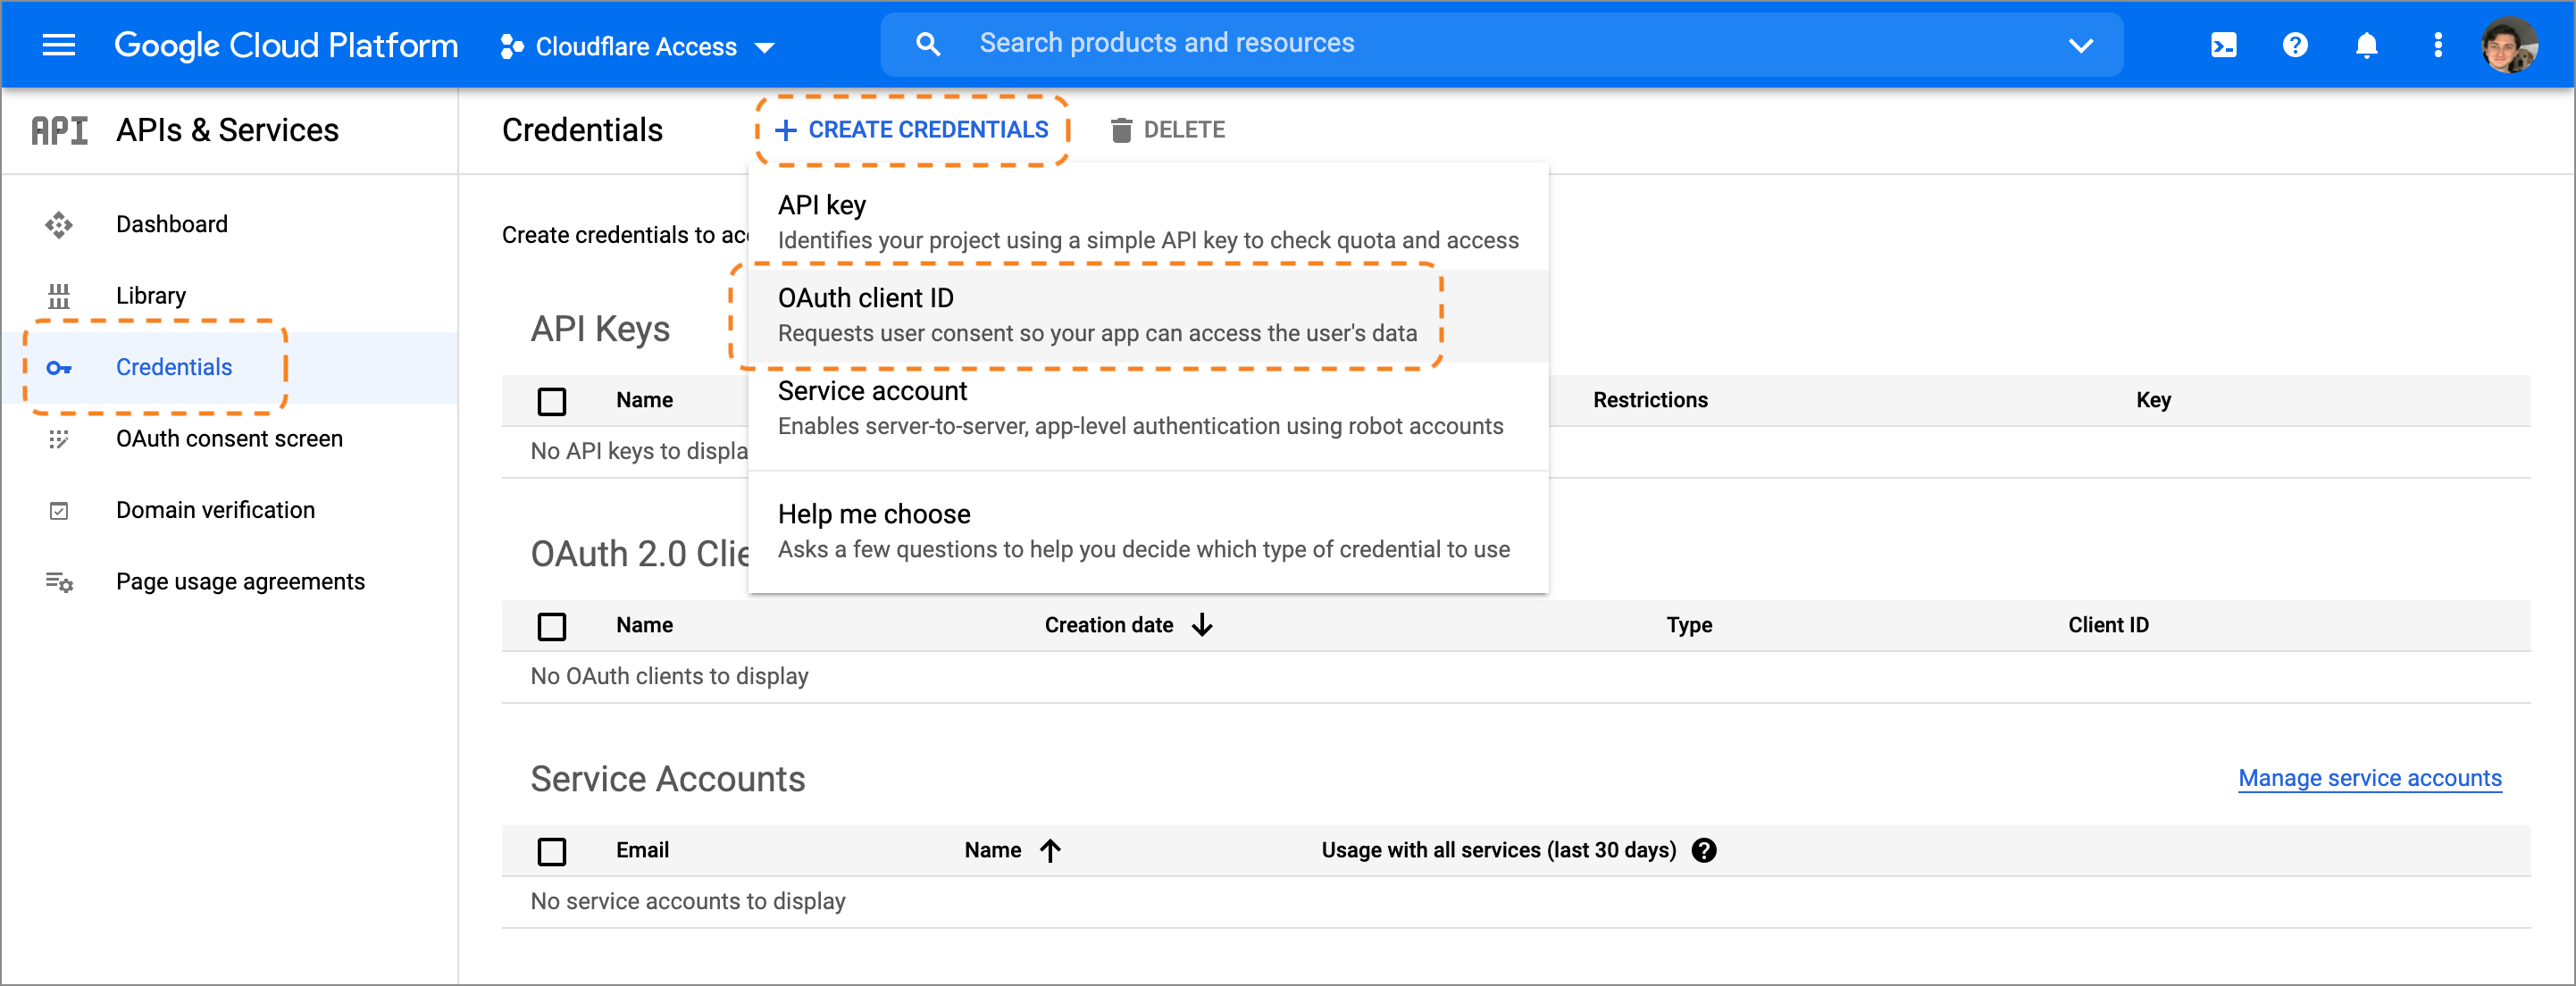
On the project home page, go to APIs & Services on the sidebar and select Dashboard.
On the sidebar, go to Credentials and select Configure Consent Screen at the top of the page.
Choose
Externalas the User Type. Since this application is not being created in a Google Workspace account, any user with a Gmail address can login.Name the application, add a support email, and input contact fields. Google Cloud Platform requires an email in your account.
Return to the APIs & Services page, select Create Credentials > OAuth client ID, and name the application.
Under Authorized JavaScript origins, in the URIs field, enter your team domain.
Under Authorized redirect URIs, in the URIs field, enter your team domain followed by this callback at the end of the path:
/cdn-cgi/access/callback. For example:https://<your-team-name>.cloudflareaccess.com/cdn-cgi/access/callbackGoogle will present the OAuth Client ID and Secret values. The secret field functions like a password and should not be shared. Copy both values.
In Zero Trust, go to Settings > Authentication.
Under Login methods, select Add new. Choose Google on the next page.
Input the Client ID and Client Secret fields generated previously.
(Optional) Enable Proof of Key Exchange (PKCE). PKCE will be performed on all login attempts.
Select Save.


No comments:
Post a Comment