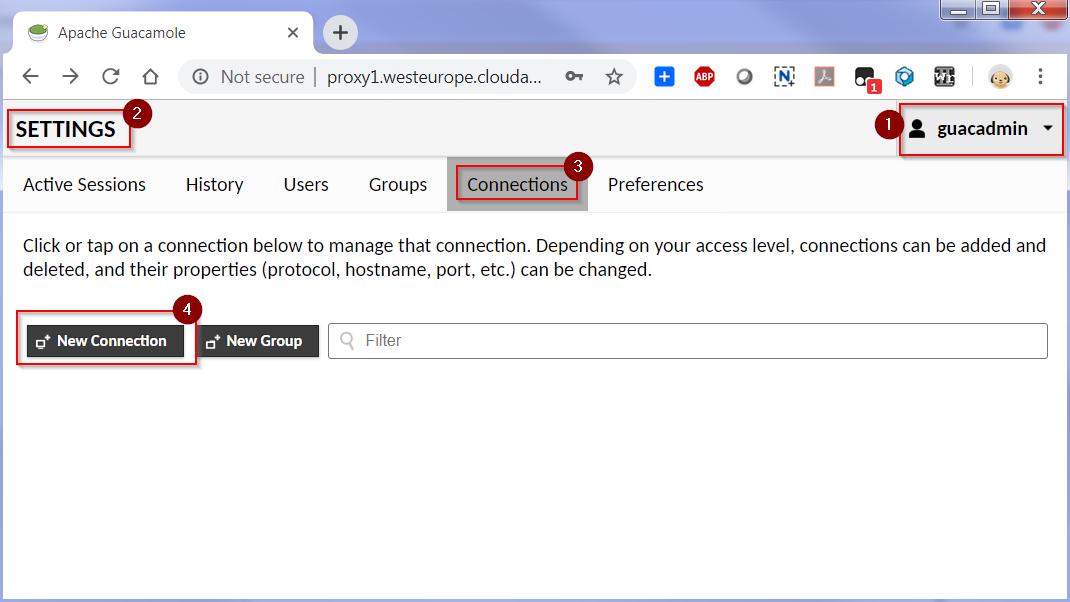
Architecture
Guacamole consists of the following components: |
| Guacamole architecture |
- Guacamole Server (Tomcat Servlet Container)
- Guacamole Proxy Server (guacd), establishes remote connections
- Remote hosts – accessible via protocols above
In this post, I am gong to present a way to set up Guacamole server in Azure free tier cloud VM. I am using docker technology with the help from Docker Web UI Portainer, to deploy a Guacamole docker into a Linux virtual machine.
I have a YouTube video recorded for whole process which posted at the end of this post. You can check it out after read this post. Again, the whole infrastructure is based on Azure free tier Linux machine where I installed the whole docker packages.
Before installing docker packages, lets update the repository on your Ubuntu system and upgrade packages.
sudo apt update
sudo apt upgrade
Deploy Docker
Now install docker using the apt command below.sudo apt install docker.io -ynetsec@Ubuntu18-EU-Small:~$ sudo apt install docker.io -y Reading package lists... Done Building dependency tree Reading state information... Done The following additional packages will be installed: bridge-utils cgroupfs-mount containerd pigz runc ubuntu-fan Suggested packages: ifupdown aufs-tools debootstrap docker-doc rinse zfs-fuse | zfsutils The following NEW packages will be installed: bridge-utils cgroupfs-mount containerd docker.io pigz runc ubuntu-fan 0 upgraded, 7 newly installed, 0 to remove and 0 not upgraded. Need to get 52.2 MB of archives. After this operation, 257 MB of additional disk space will be used. Get:1 http://azure.archive.ubuntu.com/ubuntu bionic/universe amd64 pigz amd64 2.4-1 [57.4 kB] Get:2 http://azure.archive.ubuntu.com/ubuntu bionic/main amd64 bridge-utils amd64 1.5-15ubuntu1 [30.1 kB] Get:3 http://azure.archive.ubuntu.com/ubuntu bionic/universe amd64 cgroupfs-mount all 1.4 [6320 B] Get:4 http://azure.archive.ubuntu.com/ubuntu bionic-updates/universe amd64 runc amd64 1.0.0~rc7+git20190403.029124da-0ubuntu1~18.04.1 [1902 kB] Get:5 http://azure.archive.ubuntu.com/ubuntu bionic-updates/universe amd64 containerd amd64 1.2.6-0ubuntu1~18.04.1 [19.4 MB] Get:6 http://azure.archive.ubuntu.com/ubuntu bionic-updates/universe amd64 docker.io amd64 18.09.5-0ubuntu1~18.04.2 [30.7 MB] Get:7 http://azure.archive.ubuntu.com/ubuntu bionic/main amd64 ubuntu-fan all 0.12.10 [34.7 kB] Fetched 52.2 MB in 3s (15.7 MB/s) Preconfiguring packages ... Selecting previously unselected package pigz. (Reading database ... 80108 files and directories currently installed.) Preparing to unpack .../0-pigz_2.4-1_amd64.deb ... Unpacking pigz (2.4-1) ... Selecting previously unselected package bridge-utils. Preparing to unpack .../1-bridge-utils_1.5-15ubuntu1_amd64.deb ... Unpacking bridge-utils (1.5-15ubuntu1) ... Selecting previously unselected package cgroupfs-mount. Preparing to unpack .../2-cgroupfs-mount_1.4_all.deb ... Unpacking cgroupfs-mount (1.4) ... Selecting previously unselected package runc. Preparing to unpack .../3-runc_1.0.0~rc7+git20190403.029124da-0ubuntu1~18.04.1_amd64.deb ... Unpacking runc (1.0.0~rc7+git20190403.029124da-0ubuntu1~18.04.1) ... Selecting previously unselected package containerd. Preparing to unpack .../4-containerd_1.2.6-0ubuntu1~18.04.1_amd64.deb ... Unpacking containerd (1.2.6-0ubuntu1~18.04.1) ... Selecting previously unselected package docker.io. Preparing to unpack .../5-docker.io_18.09.5-0ubuntu1~18.04.2_amd64.deb ... Unpacking docker.io (18.09.5-0ubuntu1~18.04.2) ... Selecting previously unselected package ubuntu-fan. Preparing to unpack .../6-ubuntu-fan_0.12.10_all.deb ... Unpacking ubuntu-fan (0.12.10) ... Setting up runc (1.0.0~rc7+git20190403.029124da-0ubuntu1~18.04.1) ... Processing triggers for ureadahead (0.100.0-21) ... Setting up cgroupfs-mount (1.4) ... Setting up containerd (1.2.6-0ubuntu1~18.04.1) ... Created symlink /etc/systemd/system/multi-user.target.wants/containerd.service 鈫/lib/systemd/system/containerd.service. Setting up bridge-utils (1.5-15ubuntu1) ... Setting up ubuntu-fan (0.12.10) ... Created symlink /etc/systemd/system/multi-user.target.wants/ubuntu-fan.service 鈫/lib/systemd/system/ubuntu-fan.service. Processing triggers for systemd (237-3ubuntu10.21) ... Processing triggers for man-db (2.8.3-2ubuntu0.1) ... Setting up pigz (2.4-1) ... Setting up docker.io (18.09.5-0ubuntu1~18.04.2) ... Adding group `docker' (GID 115) ... Done. Created symlink /etc/systemd/system/sockets.target.wants/docker.socket 鈫/lib/systemd/system/docker.socket. Processing triggers for ureadahead (0.100.0-21) ... Processing triggers for systemd (237-3ubuntu10.21) ... netsec@Ubuntu18-EU-Small:~$
sudo systemctl start docker
sudo systemctl enable dockerdocker versionnetsec@Ubuntu18-EU-Small:~$ docker version Client: Version: 18.09.5 API version: 1.39 Go version: go1.10.4 Git commit: e8ff056 Built: Thu May 9 23:11:19 2019 OS/Arch: linux/amd64 Experimental: false Got permission denied while trying to connect to the Docker daemon socket at unix:///var/run/docker.sock: Get http://%2Fvar%2Frun%2Fdocker.sock/v1.39/version: dial unix /var/run/docker.sock: connect: permission denied
Deploy Portainer
Before installing Portainer, download the Portainer image from the DockerHub using the docker pull command below.
sudo docker pull portainer/portainerdocker volume create portainer_data
Now run Portainer using the simple docker command below.
sudo docker run -d -p 9000:9000 --name portainer --restart always -v /var/run/docker.sock:/var/run/docker.sock -v portainer_data:/data portainer/portainersudo docker psnetsec@Ubuntu18-EU-Small:~$ sudo docker pull portainer/portainer Using default tag: latest latest: Pulling from portainer/portainer d1e017099d17: Pull complete fac26901c311: Pull complete Digest: sha256:cc226d8a06b6d5e24b44a4f10d0d1fd701741e84a852adc6d40bef9424a000ec Status: Downloaded newer image for portainer/portainer:latest netsec@Ubuntu18-EU-Small:~$ sudo docker volume create portainer_data portainer_data netsec@Ubuntu18-EU-Small:~$ sudo docker run -d -p 9000:9000 --name portainer --restart always -v /var/run/docker.sock:/var/run/docker.sock -v portainer_data:/data portainer/portainer 836861e9d94fae0098c3a9dcfa7e437c5cd5dace6ea10ba02d3b9556dc295c9e netsec@Ubuntu18-EU-Small:~$
netsec@Ubuntu18-EU-Small:~$ sudo docker ps
CONTAINER ID        IMAGE                 COMMAND             CREATED              STATUS              PORTS                    NAMES
836861e9d94f        portainer/portainer   "/portainer"        About a minute ago   Up About a minute   0.0.0.0:9000->9000/tcp   portainer
netsec@Ubuntu18-EU-Small:~$
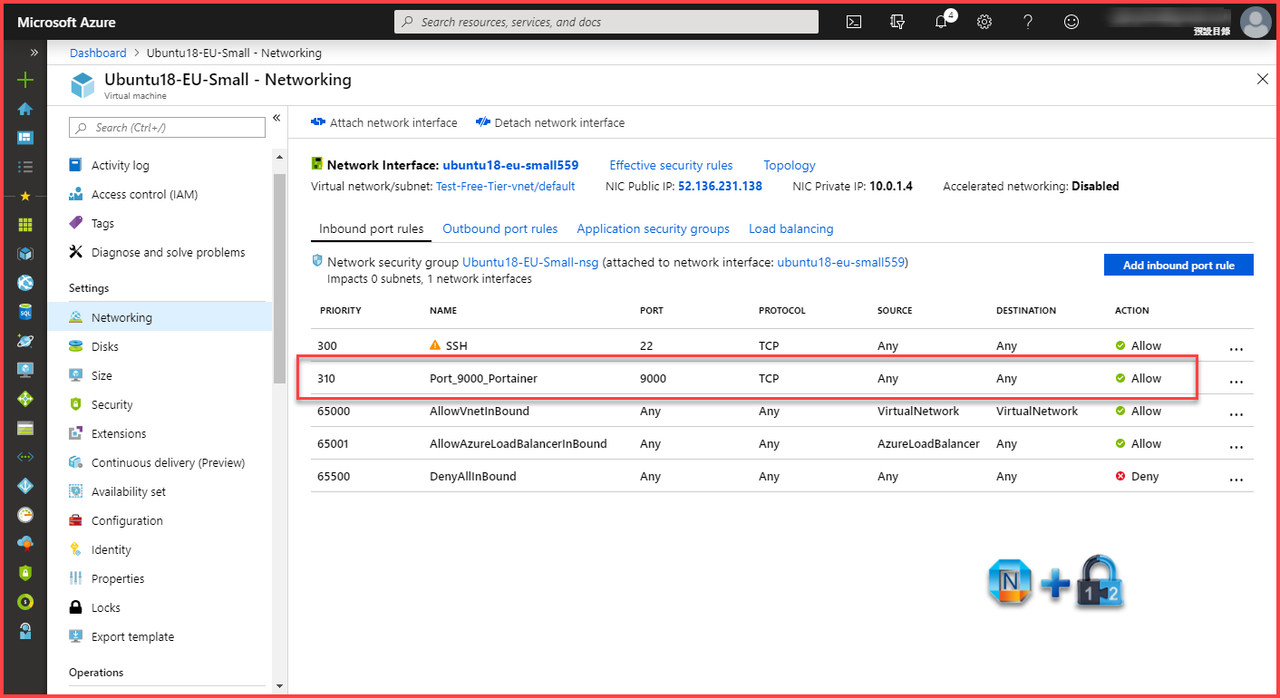
Now you can access your portainer with your VM's public ip:9000. More details please refer to my previous post:
https://blog.51sec.org/2019/03/install-portainer-in-centos-ubuntu-and.html
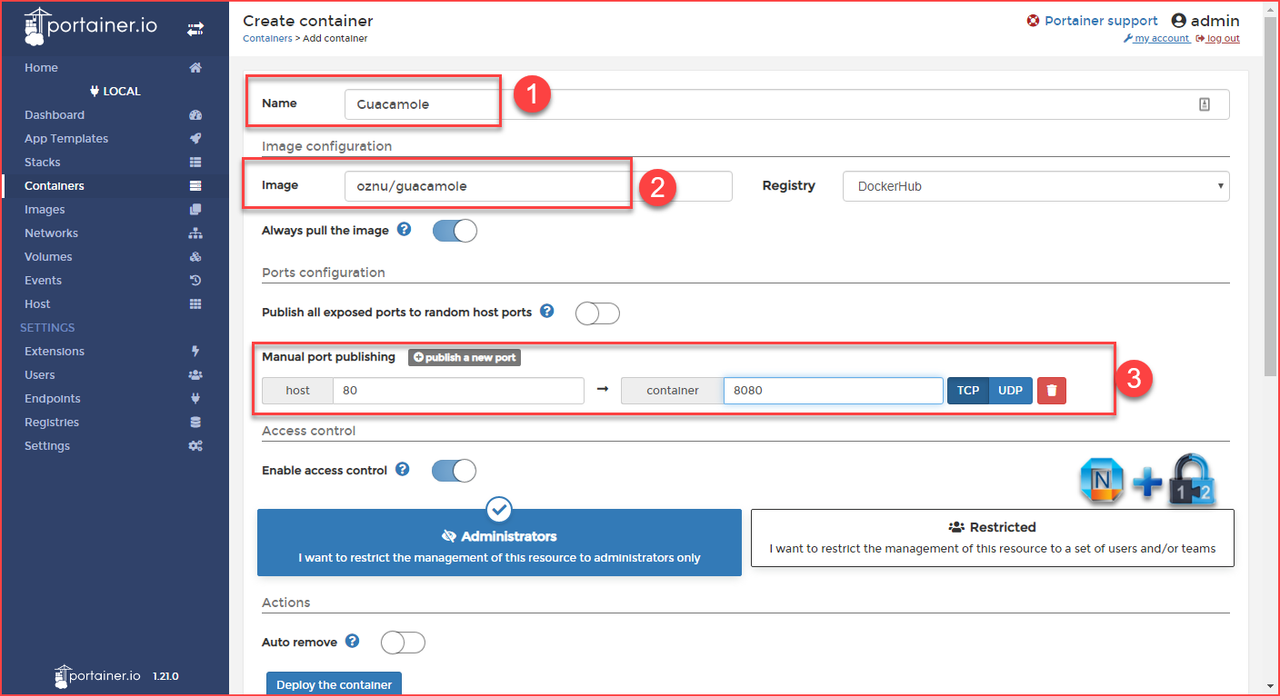
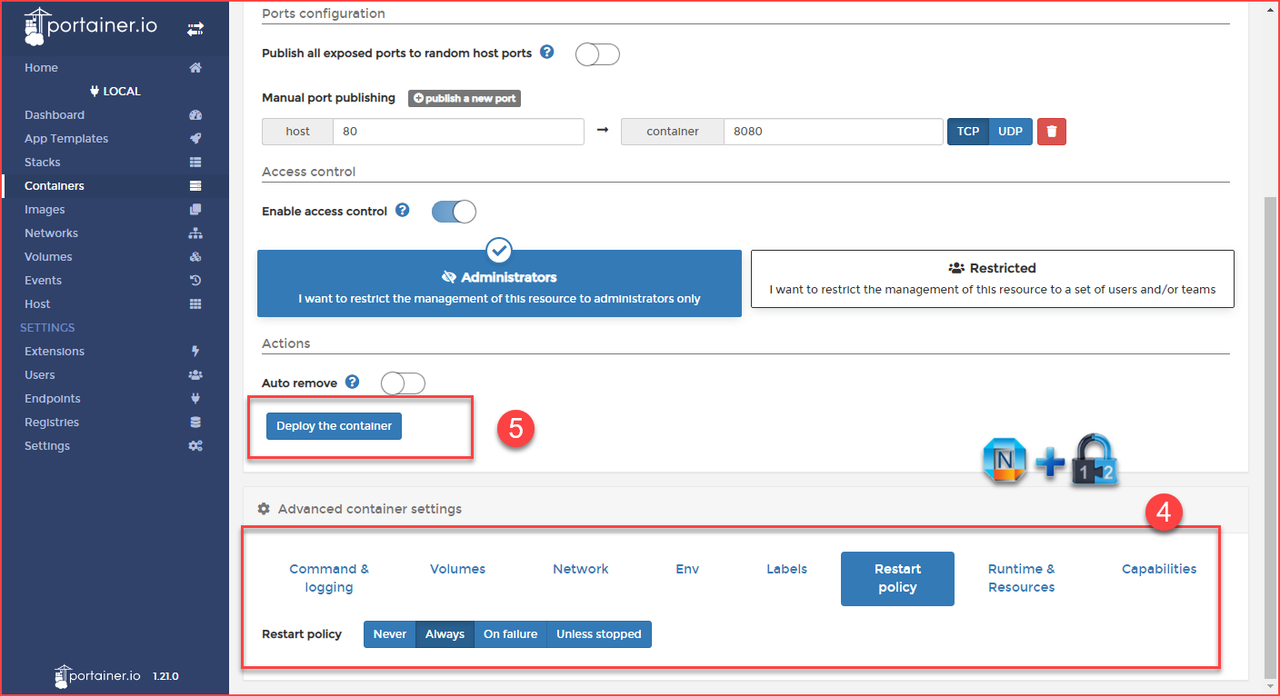
Deploy Guacamole Container through Portainer
Standard steps, using image oznu/guacamole which pull from Docker hub.
Since I am going to use port 80 for Guacamole, I mapped host port 80 to container's 8080. By default, Guacamole docker has set up port 8080 for web connection.
Log in to Guacamole Web Gui
After container deployed, you can try to log in to web GUI through your browser. Default username and password is guacadmin. If it does not work, restart your Guacamole docker. I met this problem for somehow, but rebooting docker made it worked for me.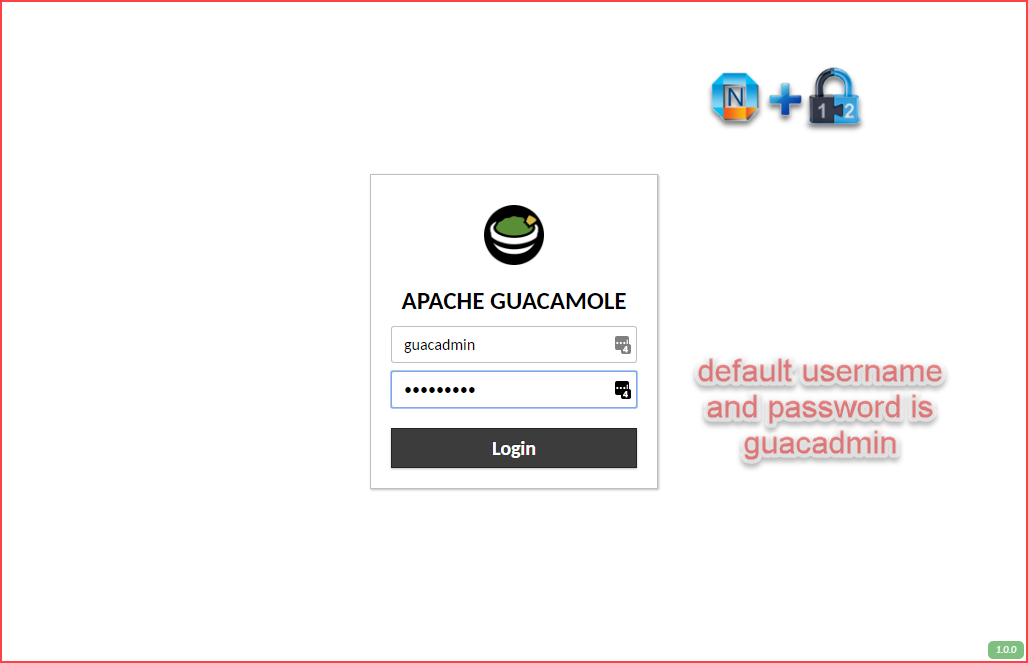
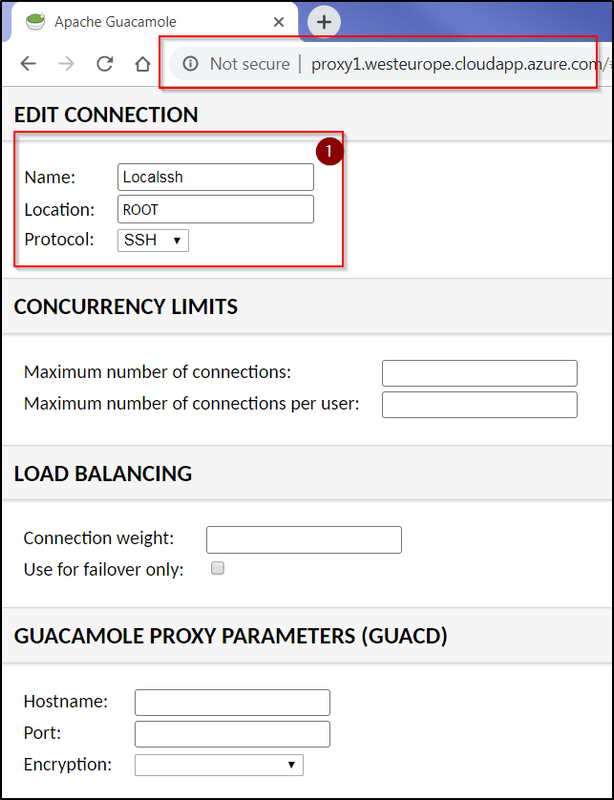
Create a new SSH connection
All configuration is basic. Choose right protocol, hostname which is ip address, port is tcp 22.

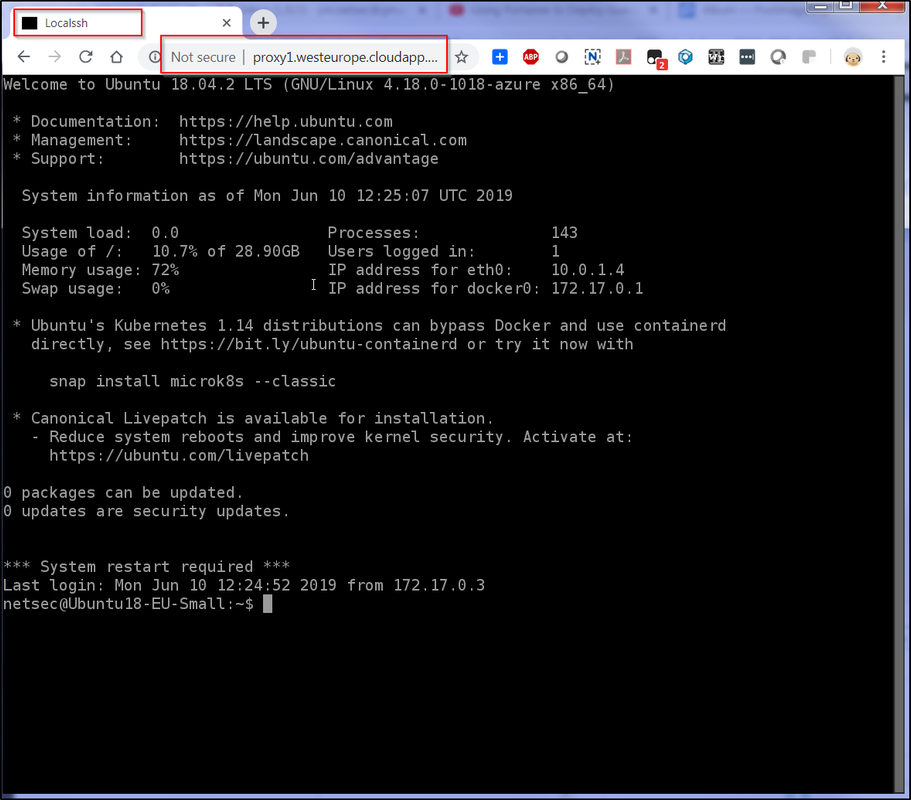 |
| Guacamole Web SSH Log In |
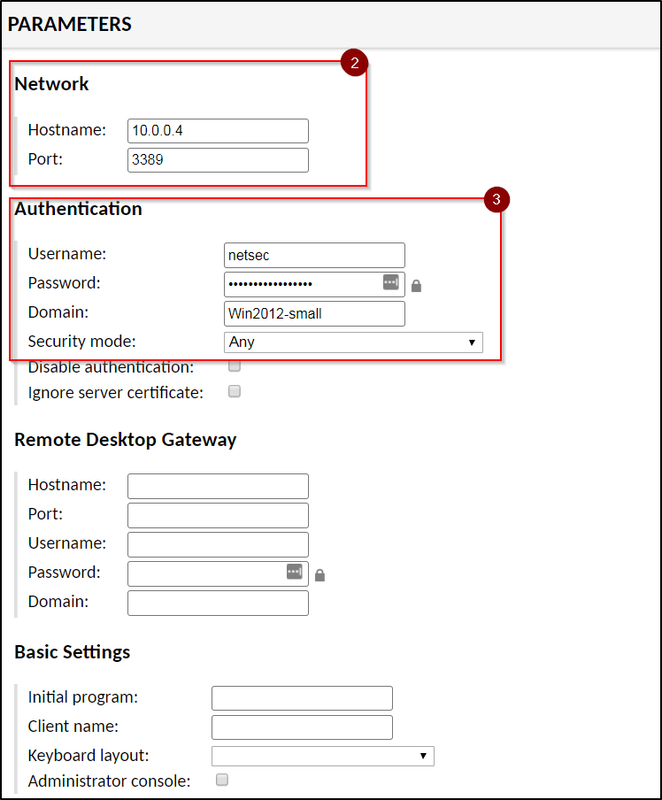
Create a new RDP connection

Here is the YouTube Video - Using Portainer deploy Apache Guacamole;
References:
- Apache Guacamole™
- https://github.com/oznu/docker-guacamole
- https://github.com/MaxWaldorf/guacamole


![[5 Mins Docker] Deploy FreshRSS Using Docker Run Command and Deploy To Fly.io](https://lh3.googleusercontent.com/blogger_img_proxy/AEn0k_u3CByYhtT_K3lgI_lCb6Po20GnjEk7IjUSmr1jlTX2-K7lSVXFRZs9c5IvC1jshooVmhBFQmYmX8hzVNHI1CZsZCf0QvxaOkCOmsiKh7aQ2Q)


No comments:
Post a Comment