Download Raspberry Pi Imager
Since we are using windows, you might want to download Raspberry Pi Imager for Windows
Scroll down the menu click “Ubuntu”. You will then be able to see a list of Ubuntu downloads to choose from. For this tutorial we recommend you select the Ubuntu 20.04 download. As indicated in the imager this will work for the Raspberry Pi 2,3, 3+ and any of the 4’s.

Choose Ubuntu -> Ubuntu 20.04 LTS (Pi 2/3/4)
Open the “SD Card” menu. Select the microSD card you have inserted.
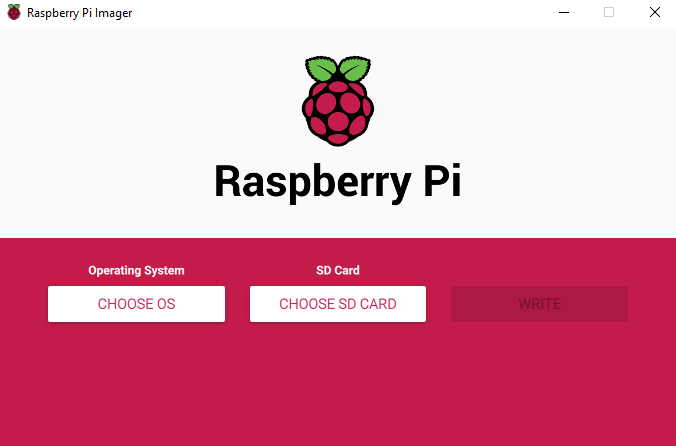
Then Write
Install and Run Raspberry Pi Imager
Once download is done, start the Imager and open the “CHOOSE OS” menu.
Choose OS and SD Card
Choose Ubuntu -> Ubuntu 20.04 LTS (Pi 2/3/4)
Open the “SD Card” menu. Select the microSD card you have inserted.
Then Write
Boot Raspberry Pi with your SD Card
User following username and Password
User: ubuntu
Passord: ubuntu
It will prompt you to change password right away after you log in.
Your Wifi might not working since the configuration for Wifi not done yet.
It will prompt you to change password right away after you log in.
Log in to try Internet access
You will need to connect your Ethernet cable to get DHCP IPv4 address , and Internet access to update your system.
sudo apt update -y && apt upgrade -y
- sudo -i : Gives you a root prompt with a new shell environment (as if root did a login). It also does a cd to root's home directory as well.
- sudo sh or sudo bash: Gives a basic root shell spawned in the environment of the calling user (sanitized by sudo).
- sudo -s -H: Gives a shell and resets $HOME, but doesn't cd to $HOME like sudo -i.
- sudo su: Uses the normal su method of becoming root but doesn't need a root password.
Your Wifi might not working since the configuration for Wifi not done yet.
Get Wifi Working
7.1 Find WiFi card name:
$ ls /sys/class/neteth0 lo wlan0
7.2 Edit network configuration file to add WiFi info:
sudo vi /etc/netplan/50-cloud-init.yamlyou will see the following in the original file:
network:
    version: 2
    ethernets:
        eth0:
            dhcp4: true
            optional: true
After adding your WiFi info such that it should look something like the following:
network:
    version: 2
    ethernets:
        eth0:
            dhcp4: true
            optional: true
    wifis:
        wlan0:
            dhcp4: true
            dhcp6: false
            access-points:
                    "<your network ESSID>":
                     password: "<your WIFI Password>"
Last step is to execute the netplan.generate the configuration using this command:
sudo netplan generate
And now apply this:
sudo netplan apply
If you are lucky, you should have network connected. Try to ping a website or run apt update command.
However, things may not go as smooth and you may see some errors. Try some extra steps if that’s the case.
Possible troubleshooting
It is possible that when you use the netplan apply command, you see an error in the output that reads something like this:
Failed to start netplan-wpa-wlan0.service: Unit netplan-wpa-wlan0.service not found.
Traceback (most recent call last):
  File "/usr/sbin/netplan", line 23, in <module>
    netplan.main()
  File "/usr/share/netplan/netplan/cli/core.py", line 50, in main
    self.run_command()
  File "/usr/share/netplan/netplan/cli/utils.py", line 179, in run_command
    self.func()
  File "/usr/share/netplan/netplan/cli/commands/apply.py", line 46, in run
    self.run_command()
  File "/usr/share/netplan/netplan/cli/utils.py", line 179, in run_command
    self.func()
  File "/usr/share/netplan/netplan/cli/commands/apply.py", line 173, in command_apply
    utils.systemctl_networkd('start', sync=sync, extra_services=netplan_wpa)
  File "/usr/share/netplan/netplan/cli/utils.py", line 86, in systemctl_networkd
    subprocess.check_call(command)
  File "/usr/lib/python3.8/subprocess.py", line 364, in check_call
    raise CalledProcessError(retcode, cmd)
subprocess.CalledProcessError: Command '['systemctl', 'start', '--no-block', 'systemd-networkd.service', 'netplan-wpa-wlan0.service']' returned non-zero exit status 5.
It is possible that wpa_supplicant service is not running. Run this command:
sudo systemctl start wpa_supplicant
Run netplan apply once again. If it fixes the issue well and good. Otherwise, shutdown your Ubuntu system using:
shutdown now
Start your Ubuntu system again, your wifi should be ok now. If not, just log in and generate and apply netplan once again:
sudo netplan generate
sudo netplan apply
Manually Assign Static IP to Network Card
You might want to install net-tools for ifconfig command.
You might want to manually assign a static ip address to your wifi network. Here is the configuration:
sudo apt install net-tools
You might want to manually assign a static ip address to your wifi network. Here is the configuration:
sudo vi /etc/netplan/50-cloud-init.yaml
Apply the changes using netplan.
network:
    version: 2
    ethernets:
        eth0:
            dhcp4: true
            optional: true
    wifis:
        wlan0:
            dhcp4: true
                dhcp4: false
        	addresses: [192.168.2.9/24]
        	gateway4: 192.168.2.1
        	nameservers:
          		addresses: [8.8.8.8, 1.1.1.1]
            dhcp6: false
            access-points:
                    "<your network ESSID>":
                     password: "<your WIFI Password>"
sudo netplan apply
YouTube video:


![[5 Mins Docker] Deploy FreshRSS Using Docker Run Command and Deploy To Fly.io](https://lh3.googleusercontent.com/blogger_img_proxy/AEn0k_un3ZASHIid8Jmu7kEeeCjd263JoXk1_tpF5Hahe4BdMecntK1N5k2v8ZpJjcP120i_U3S-1i9HWhWLn1BYFdIN6PgHv9Zc_hqS-jDdt7TT6Q)


No comments:
Post a Comment