This post is to summarize a PAM project's designing process from Blueprint to a roadmap then to stages, phases, until to solid steps for each phases, also it gives out an example of onboarding process.
Blueprint
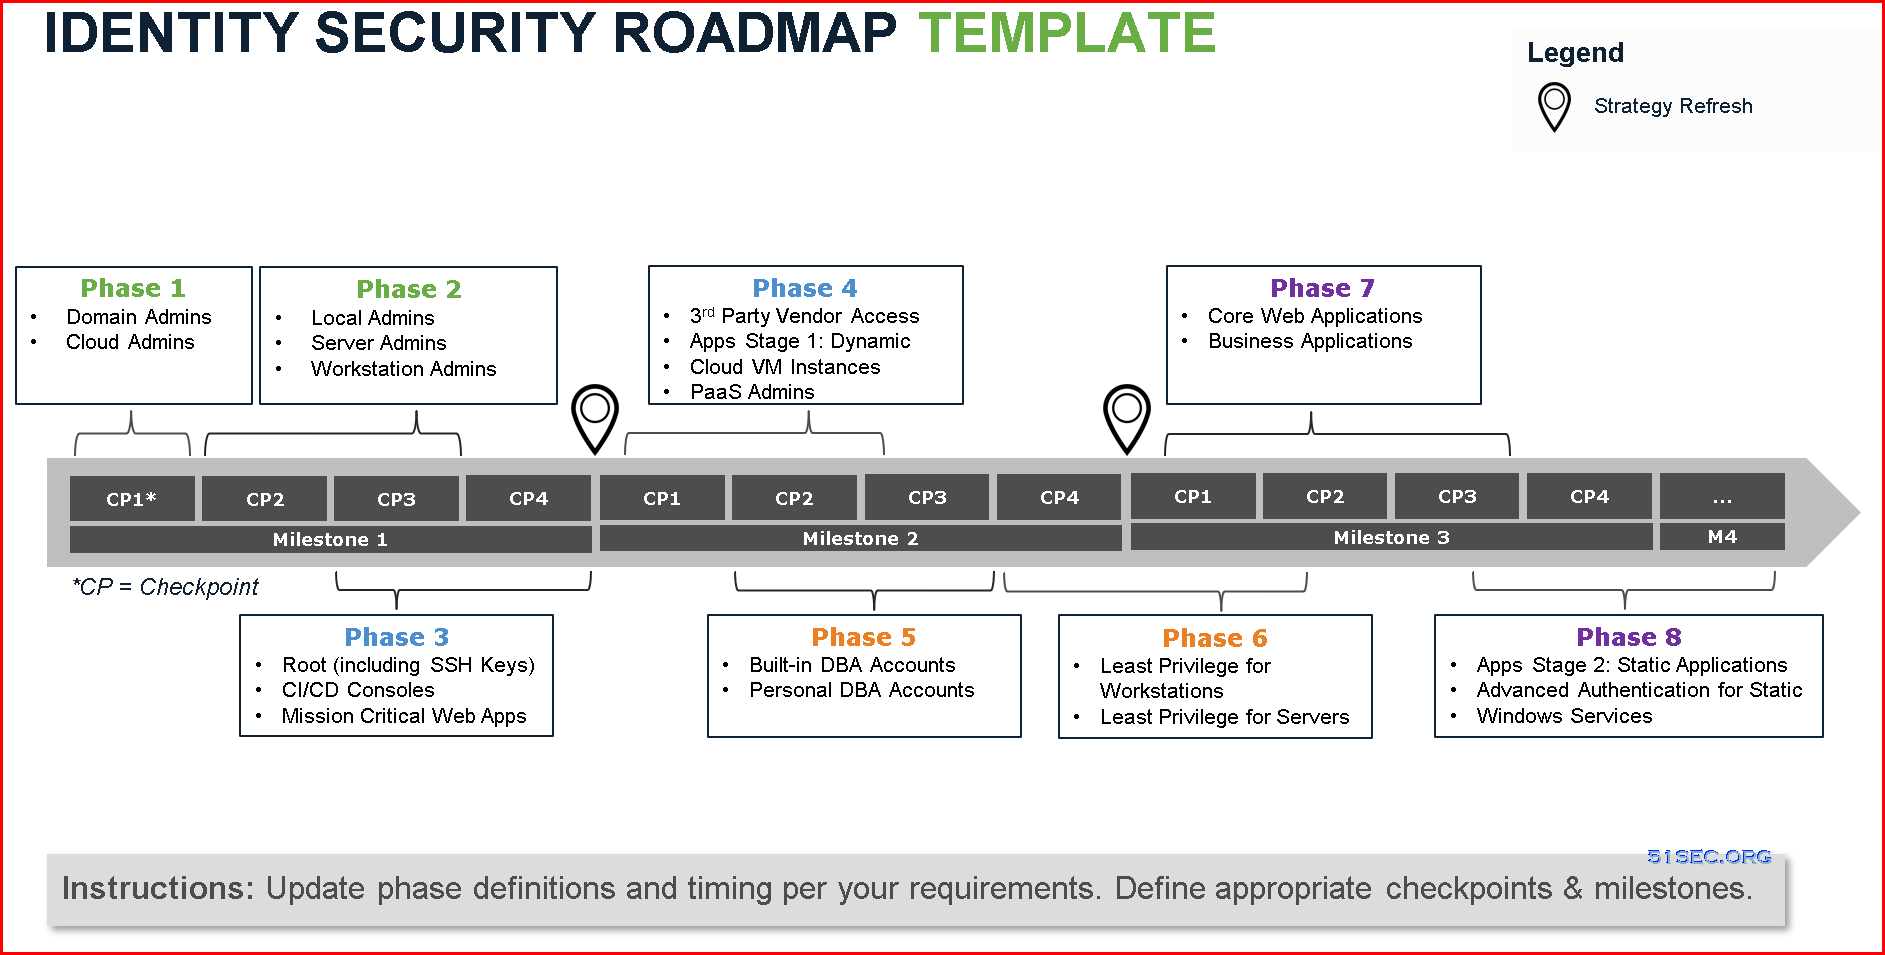
Template
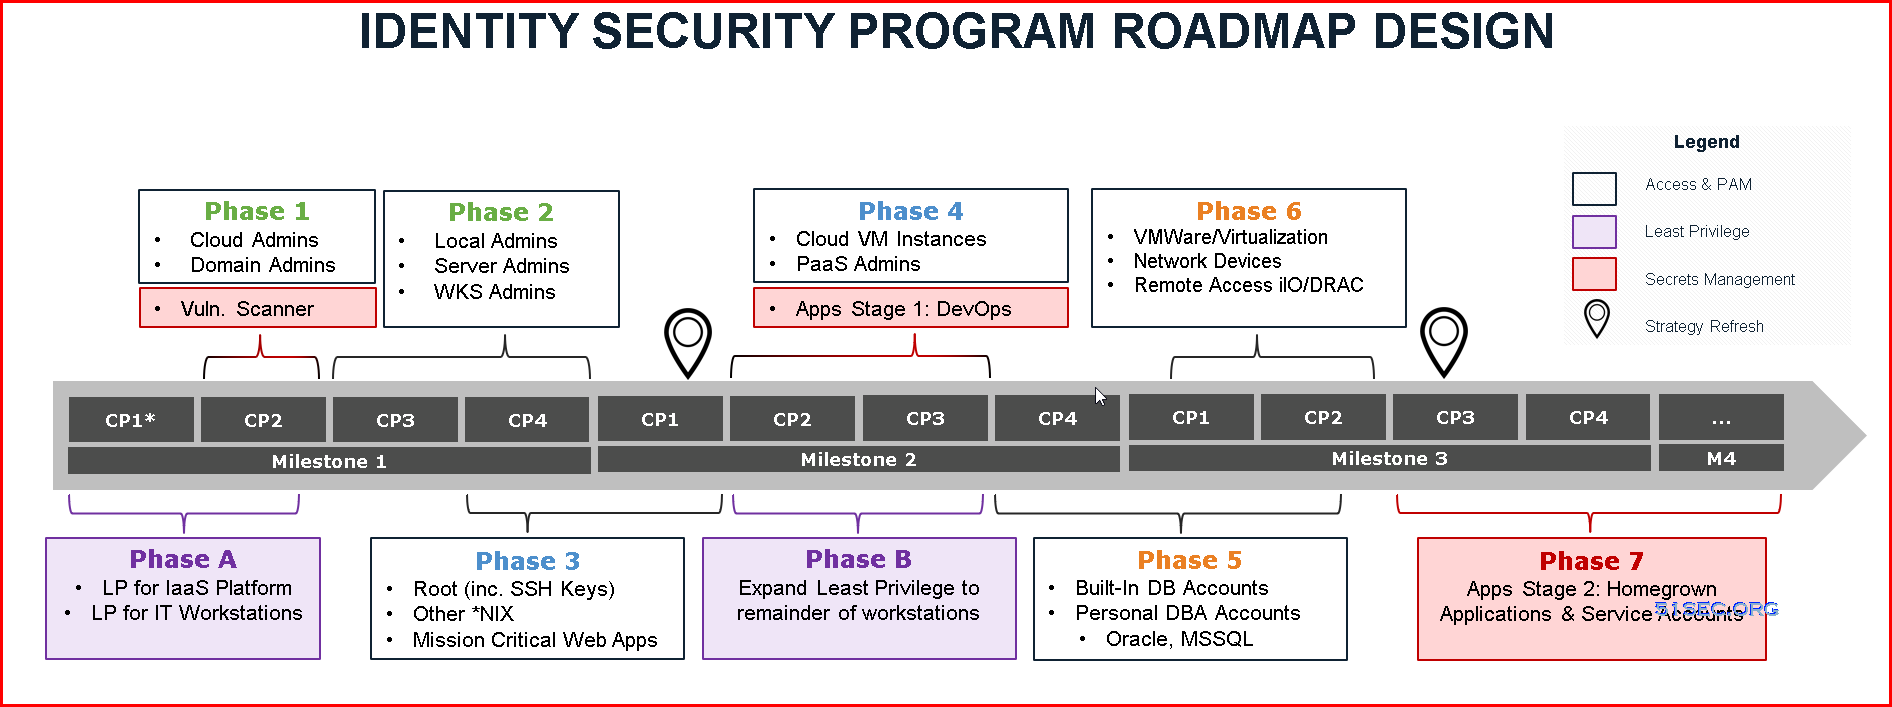
Example based on template:

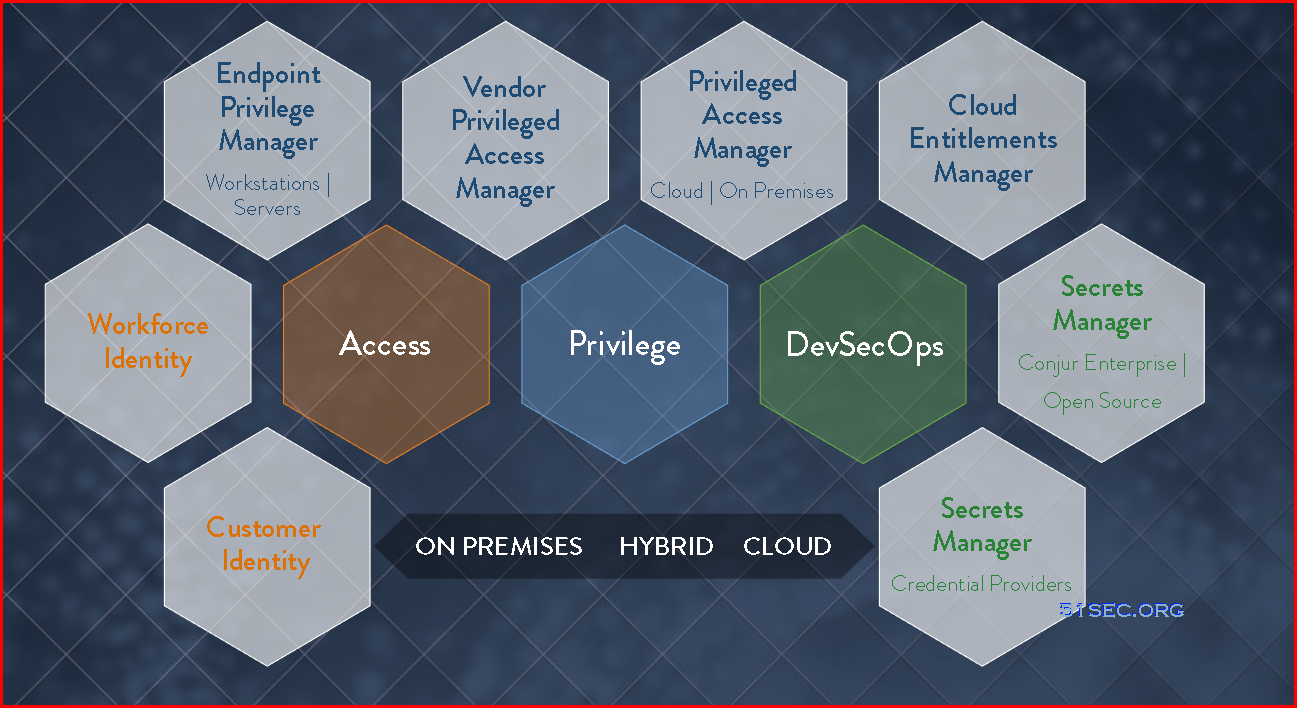
CyberArk Shared Technology Platform:
CynerArk Blueprint Stages overview

Roadmap
A roadmap is typically broken down into phases of work, and can stem from multiple technologies and security controls. Phases can partially overlap as well. The example below illustrates an organization that has an audit finding around least privilege on workstation computers, which has been prioritized over other use cases. From there, this roadmap leverages the CyberArk Blueprint’s rapid risk mitigation approach and prioritizes securing the most risky credentials before expanding to other technology platforms in later phases.Project Stages / Phases
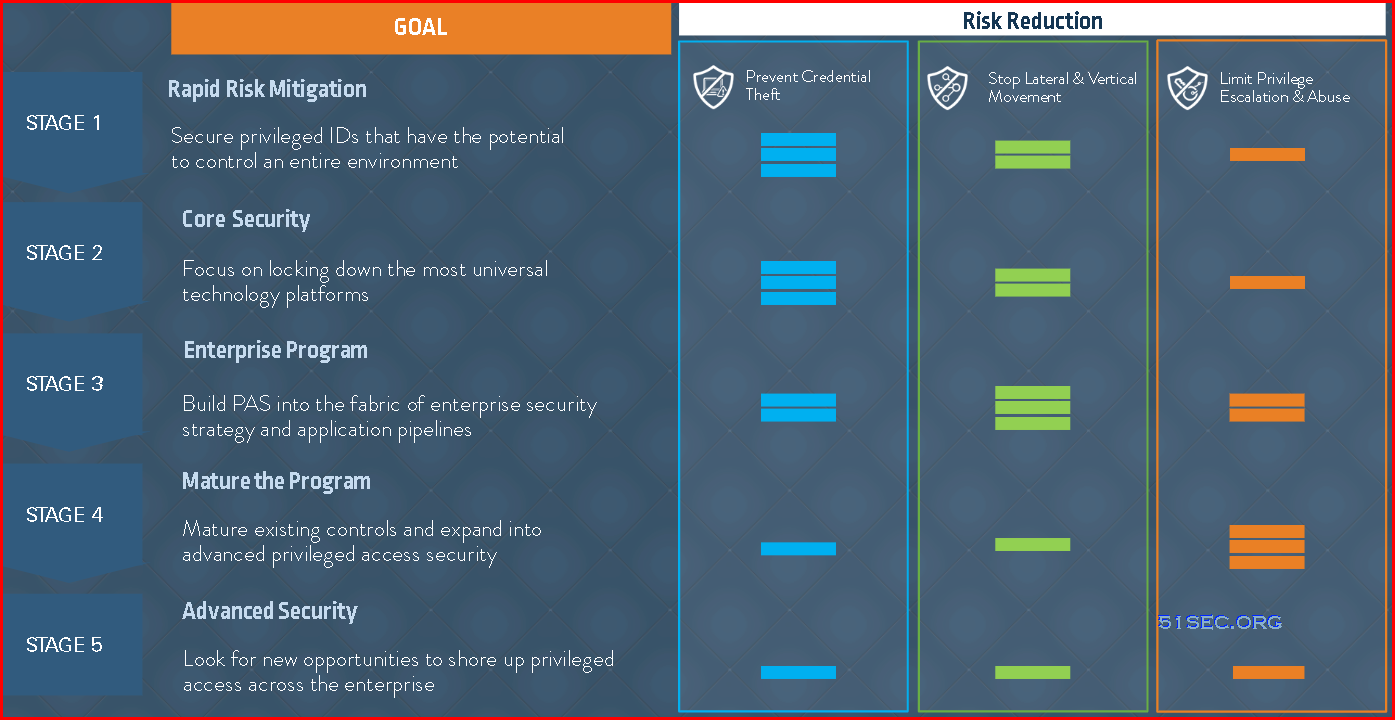
PAM Blueprint five stages overview:
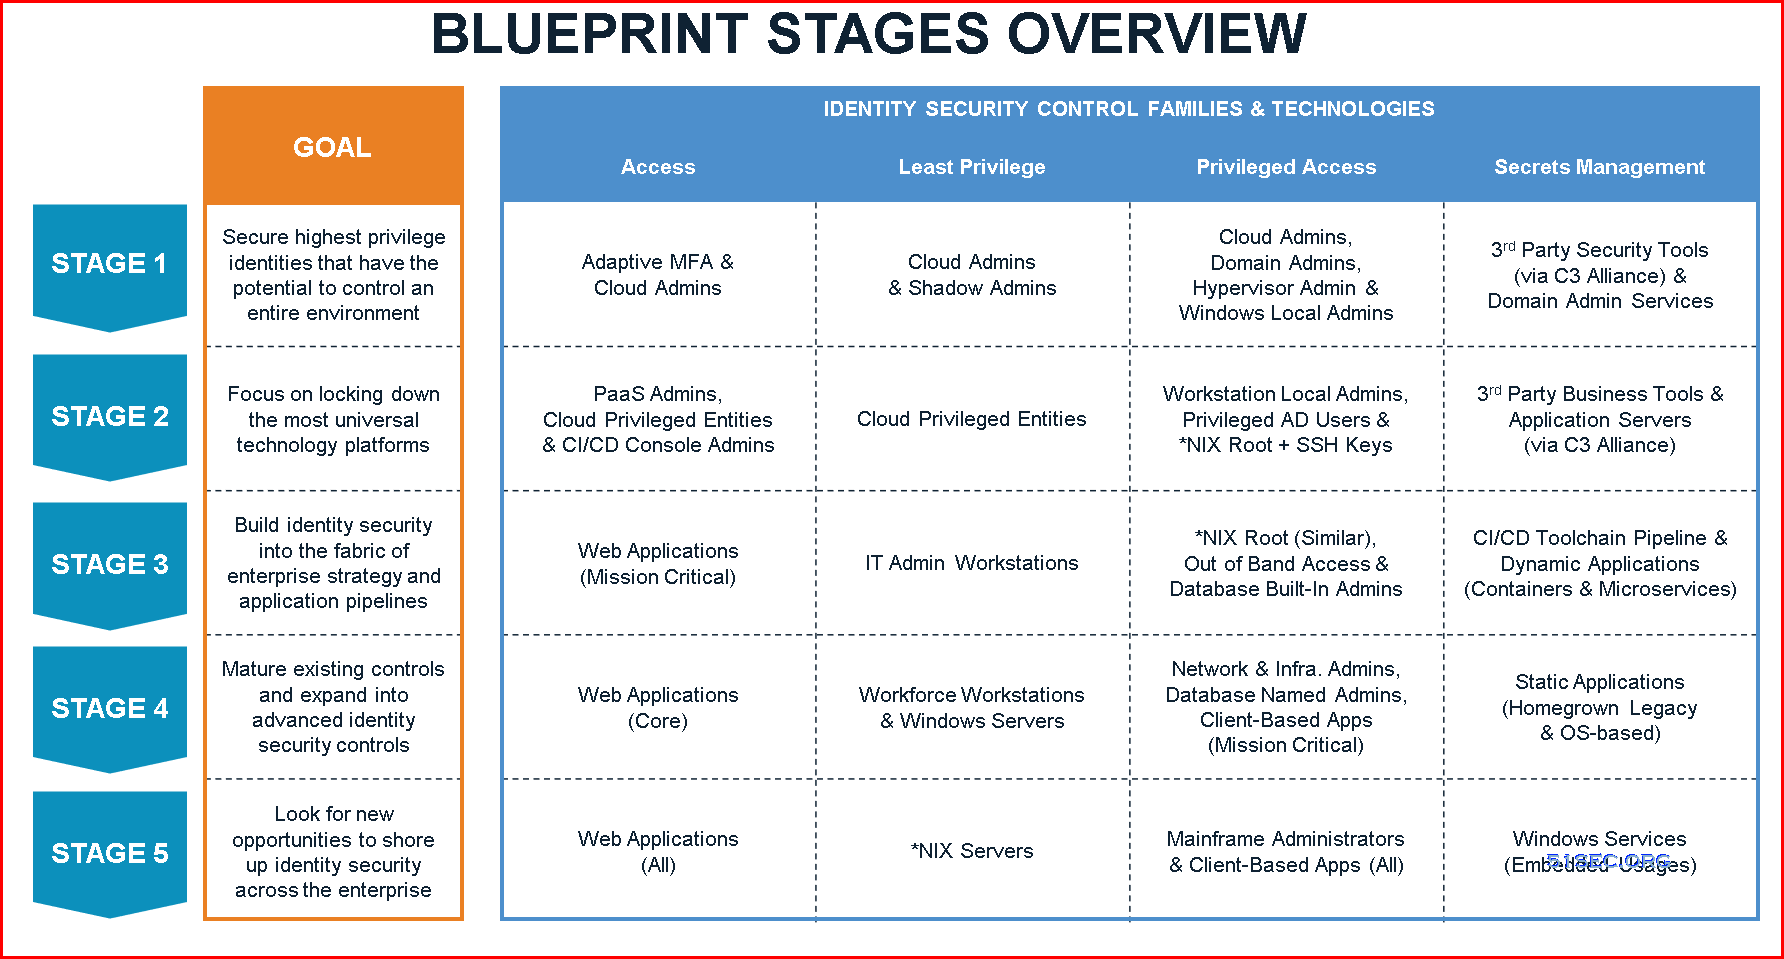
Five PAM Blueprint Stages
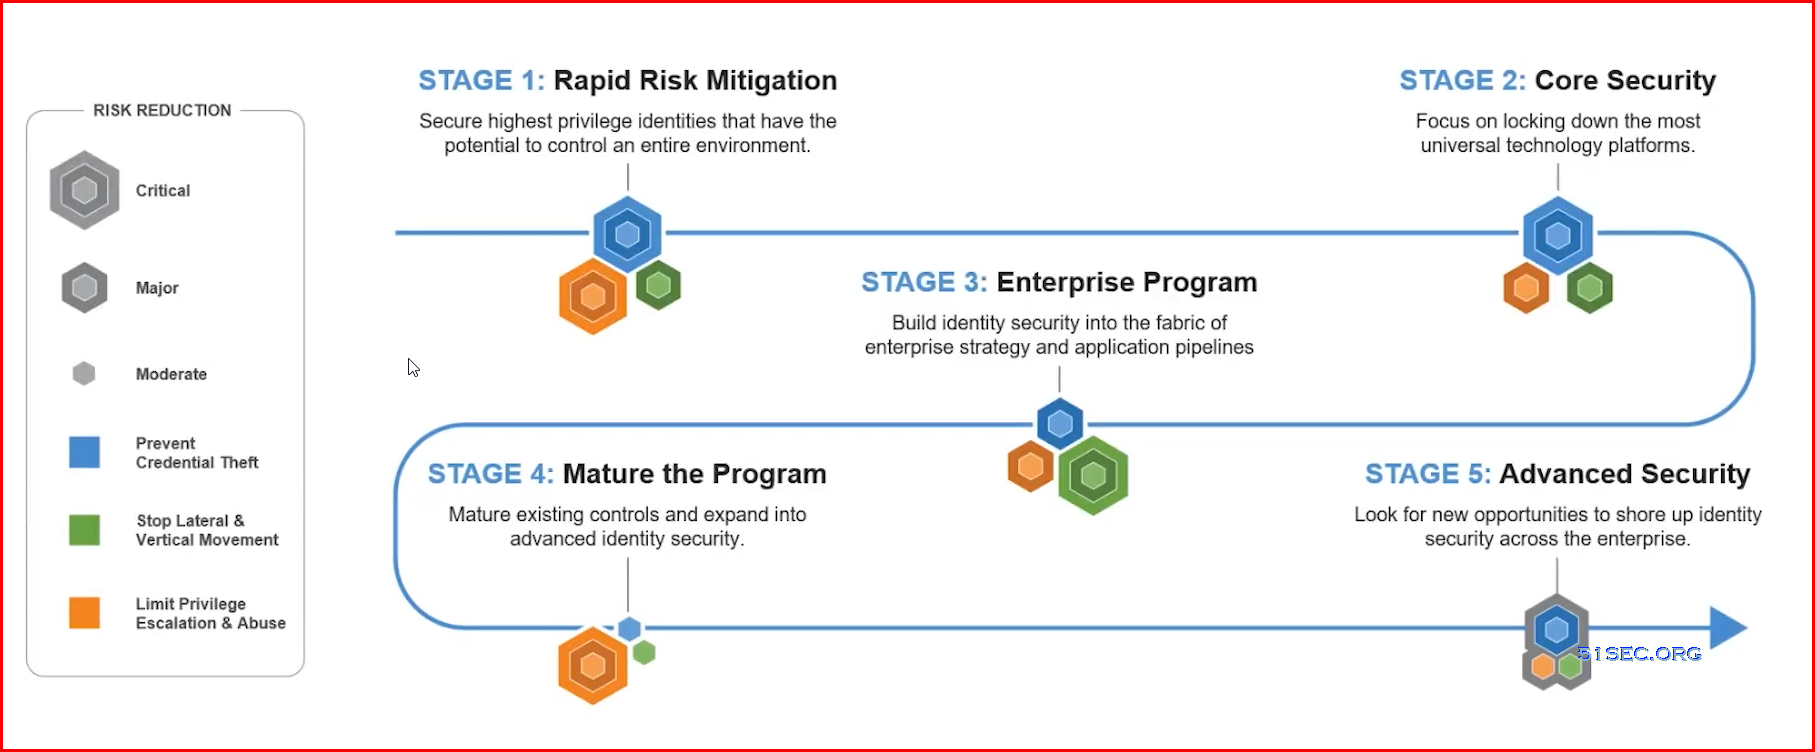
This section provides a high-level roadmap for deploying the CyberArk Privileged Access Security Solution in organizations, based on the extensive implementation experience of CyberArk Security Services. The five-phase overview discusses recommendations for risk assessment, identification of critical controls, program and scope planning, rapid risk mitigation, program execution, and program development.
Following these guidelines, organizations can build a successful and, ultimately, mature privileged account security program.
1 Phase 1 – Discovery and initiation
The first phase of the program is to discover business and security requirements, analyze the risks, define critical controls and map out the high- level timelines. It is generally challenging to define what the “keys to the kingdom” in an organization are; organizations typically say “we want to secure everything.” By engaging with the trusted experts in CyberArk Security Services or CyberArk certified service partners, organizations draw from the experiences of security professionals and technical specialists who have been on the front lines of breach remediation efforts.
2 Phase 2 – Definition and planning
The second phase of a privileged account security program is to define the scope of the project. CyberArk recommends starting with a narrow scope as trying to do too much will put the overall project success at risk. The key is to build a repeatable process using the privileged account SPRINT Framework, starting with the most critical privileged credentials, and use it iteratively. By mapping out use cases for each critical control, organizations can visualize how execution will occur.
3 Phase 3 – Launch and execution
4 Phase 4 – Rapid risk mitigation
In the fourth phase, organizations develop a roll-out plan, identify a small group of accounts that will be used as a “pilot,” identify (or create) a group of test accounts for each group and identify issues and update the roll-out plan as needed.
5 Phase 5 – Mature the Privileged Access Security program
Example of phases for one PAM project:

Steps in each phases
1 Phase 1 – Discovery and initiation
Step 1: Identify drivers and success criteria
What are business drivers for the project? To start, consider security goals in the areas of audit (SOX, PCI, etc.), compliance, breach, best practices or other drivers for the project. Consider initial use cases, objectives, and timelines that will drive the priority and order of privileged credentials to be managed, as well as control goals and audit requirements, including retention, credential rotation frequency, etc. Senior management should be included in defining the goals and objectives of the company with the tone and direction of the security program.
Step 2: Identify critical and high value assets
- Identify the most critical assets and systems
- Classify Tier 0 assets as a critical
- Create a tactical process
Step 3: Discover the privileged accounts
CyberArk Discovery & Audit (CyberArk DNA®) is a simple executable that can scan systems based on either Active Directory or an input file. Following the scan, CyberArk DNA delivers a comprehensive report that shows the number of systems scanned and the percentage of systems that do not comply with your password policy, which can be defined in CyberArk DNA prior to scan. The management summary will give you an overview of your environment, including maps of Pass-the-Hash vulnerabilities in Windows environments and SSH key trusts in Unix environments. Details of the discovered accounts and credentials are provided in tables that contain all available information for each account.
Step 4: Identify and prioritize privileged accounts to be secured
There are multiple approaches to assessing risk and setting priorities using the CyberArk DNA report and map. Organizations can see which machines and accounts create the highest risk and which machines are exposed to the greatest lateral movement risks. Based on this Pass-the- Hash map, organizations can prioritize the security and management of privileged accounts on the most at-risk systems.
Step 5: Define critical controls and timelines
Once the privileged account security risks are assessed, the next step is to define the critical controls and high-level timeline. As described in the Rapid Risk Reduction: A 30-Day Sprint to Protect Privileged Credentials White Paper, attackers frequently exploit vulnerabilities with Windows Administrator credentials and use a privileged pathway to get to critical assets.
2 Phase 2 – Definition and planning
Step 1: Engage leadership and technology teams for managing rapid organizational changes
- Set the right tone
- Cross-functional support
- Engage with the technology teams
- Consider the corporate culture
Step 2: Scope definition
Step 3: Define roles and responsibilities
A small team can put controls around the most important privileged accounts quite quickly. In one case, in the aftermath of a breach, a team of just eight members working with a security consultant vaulted the administrator accounts for 20 domains and 6,500 servers in four weeks. Compared with implementing controls in a hostile, post-breach environment, doing the work proactively is likely to proceed relatively smoothly.
Dedicated CyberArk internal resources
Dedicated CyberArk internal resources can be the organization’s champions for the privileged account security program, managing organizational changes, and engaging with technology teams who need to be aware of what CyberArk solution does and how it will change their daily lives.
Stakeholders
Identify internal stakeholders of the CyberArk solution. It is important to identify the consumers and stakeholders of the CyberArk solution. It’s recommended that organizations agree upon which users will fall into what roles prior to an implementation. Organizations should also consider establishing a process for how new users can be added to each of these respective roles following the initial rollout.
Trusted experts
3 Phase 3 – Launch and execution
Step 1: Project kick-off
Once the team, scope, project goals, product breakdown structure, use cases, high level schedule, and budget are prepared, a kick-off meeting should be scheduled to ensure all the stakeholders are informed and prepared to engage. This will set the expectations for all parties involved and define accountabilities for driving progress.
Step 2: Architecture design
The CyberArk Digital Vault will house the organization’s most sensitive credentials which provide access to the most sensitive data and business critical systems. The CyberArk Privileged Access Security Solution will sit between your privileged users and your highly sensitive systems, and it will enable users to securely carry out extremely important tasks. As such, the security of the CyberArk solution Privileged Access Security Solution and the stability of the platform are paramount.
Step 3: Solution design
Step 4: Solution implementation
CyberArk Security Services will provide organizations with a pre-requisites checklist so that they can be prepared for your deployment. With the guidance of certified CyberArk experts/SMEs, the Technical Leads will be ready to proceed with the installation, configuration, and/or upgrade of the CyberArk Privileged Access Security Solution.
4 Phase 4 – Rapid risk mitigation

Step 1: Load and Verify
Step 2a: Rotate Credentials
Step 2b: Isolate & Monitor
This should be done in conjunction with Step 2a. The Rotate Credentials process is not dependent on the Isolation & Monitor process, since they are separate modules. While accounts are being managed, organizations can include high value asset credentials that will benefit from CyberArk Privileged Session Manager and CyberArk Privileged Threat Analytics, further expanding the credential boundary.
Step 3: Standardize for production roll-out
During this phase, additional primary groups will be rolled out per the updated roll-out plan. Management functionality, workflows, and permissions should be confirmed along with the solution design—and analysis performed on the use cases/requirements for the next phases based on organization’s roadmap. Organizations will receive review and advice on resolving gaps in the architectural design, solution design, and implementation phases of the project.
5 Phase 5 – Mature the Privileged Access Security program
Step 1: Going “wide” with basic controls and “deep” with advanced controls
After the initial implementation of the CyberArk Privileged Access Security Solution, organizations will continue their privileged account security program throughout the enterprise using the same processes – moving to functional accounts, onboarding the new accounts created, vaulting the built-in accounts, rotating them, and then using CyberArk Privileged Session Manager and CyberArk Privileged Threat Analytics for isolation and monitoring.
Expansion | Details |
|---|---|
Go “wide” |
|
Go “deep” |
|
Step 2: Formalizing the program with metrics for success
By locking down the credentials, isolating and controlling sessions, and then monitoring behavior, the security posture of an organization is increased in an efficient, and controlled manner, with limited impact to production processes.
Others
PAM Baseline : Safe Access Roles

Privileged Access Control Matrix:

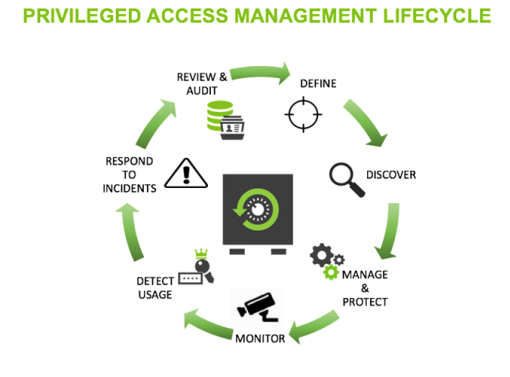
PAM lifecycle:
How to do PAM Privileged Accounts Onboarding
Example of an onboarding process: for each business unit (Departments, Branches)
- Starting Department or Branch's Application / Assets information gathering (1w)
- Contact application or asset owners and set up initial meeting (1w)
- those communication email, meeting schedule should have been templated well
- a couple of initial meeting videos should be available for new team member to review as a training material
- Initial communication, demo, FAQ and explanation (2w-4w)
- Identify contacts
- Set expectations (timelines & responsibilities)
- Get or confirm assets list and users access
- Role mining (Optionnal)
- Fill documentation (2w-4w)
- PAM Privileged Accounts Onboarding Form Template should be availabe for filling information
- PAM group creation and user onboarding documentation template
- Dev / Test onboarding (Optionnal - 4w-8w)
- Request PAM groups and users membership
- Request PAM Accounts and add to Back-end groups
- Create folder stucture
- Create secrets.
- Testing different use case. Check test documentation.
- Fix issues
- Sign-off testing
- Prod onboarding (4w-8w)
- Duplicate folder structure from DEV
- AD group creation
- Configure folder permission (Official Prod documentation)
- Configure secret policies
- Import secrets (Mass-onboarding)
- Validation heartbeat if necessary
- X weeks Soft Launch (1w) - Project Team support (Soft launch date is designed based on project schedule.)
- Owner signoff that named accounts have been removed and that current process is accepted (1w)
- Change ownership of secrets to the owners
- Assign super users for other onboarding
- Support is now provided by Service Desk technical support
- Remove all human accounts from application group
- Provide client with other documentation bundle
- Post onborading docs


![[5 Mins Docker] Deploy FreshRSS Using Docker Run Command and Deploy To Fly.io](https://lh3.googleusercontent.com/blogger_img_proxy/AEn0k_smOYIVYRUaGVaNOx4_jpNQwvKHqyeD6P30cDZsetkVd2nVKA-iQcQ33I0gamLa7lyvsrTWqvTBYFqMM5Mq23wsf_jV9ZN1lEAFxpZ99tdbKA)


No comments:
Post a Comment