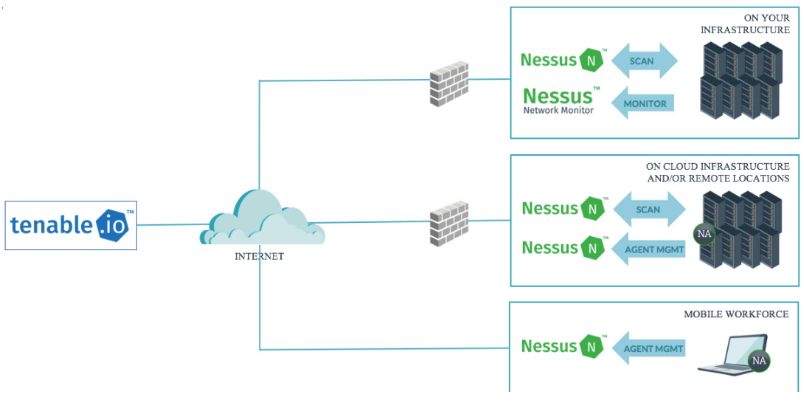
Tenable Vulnerability ManagementTenable Vulnerability Management® (formerly known as Tenable.io) allows security and audit teams to share multiple Tenable Nessus, Tenable Nessus Agent, and Tenable Nessus Network Monitor scanners, scan schedules, scan policies, and scan results among an unlimited set of users or groups.
Tenable Vulnerability Management can schedule scans, push policies, view scan findings, and control multiple Tenable Nessus scanners from the cloud. This enables the deployment of Tenable Nessus scanners throughout networks to both public and private clouds as well as multiple physical locations.
In this post, I am gonna show some basic steps to bring this popular Tenable Vulnerability Scanning tools into your environment as quick as I can.
If need read more marterials, please go to Tenable Docs sit, Get Started with Tenable Vulnerability Management. You can use the following getting started sequence to configure and mature your Tenable Vulnerability Management deployment.
- Prepare a Deployment Plan
- Install and Link Scanners
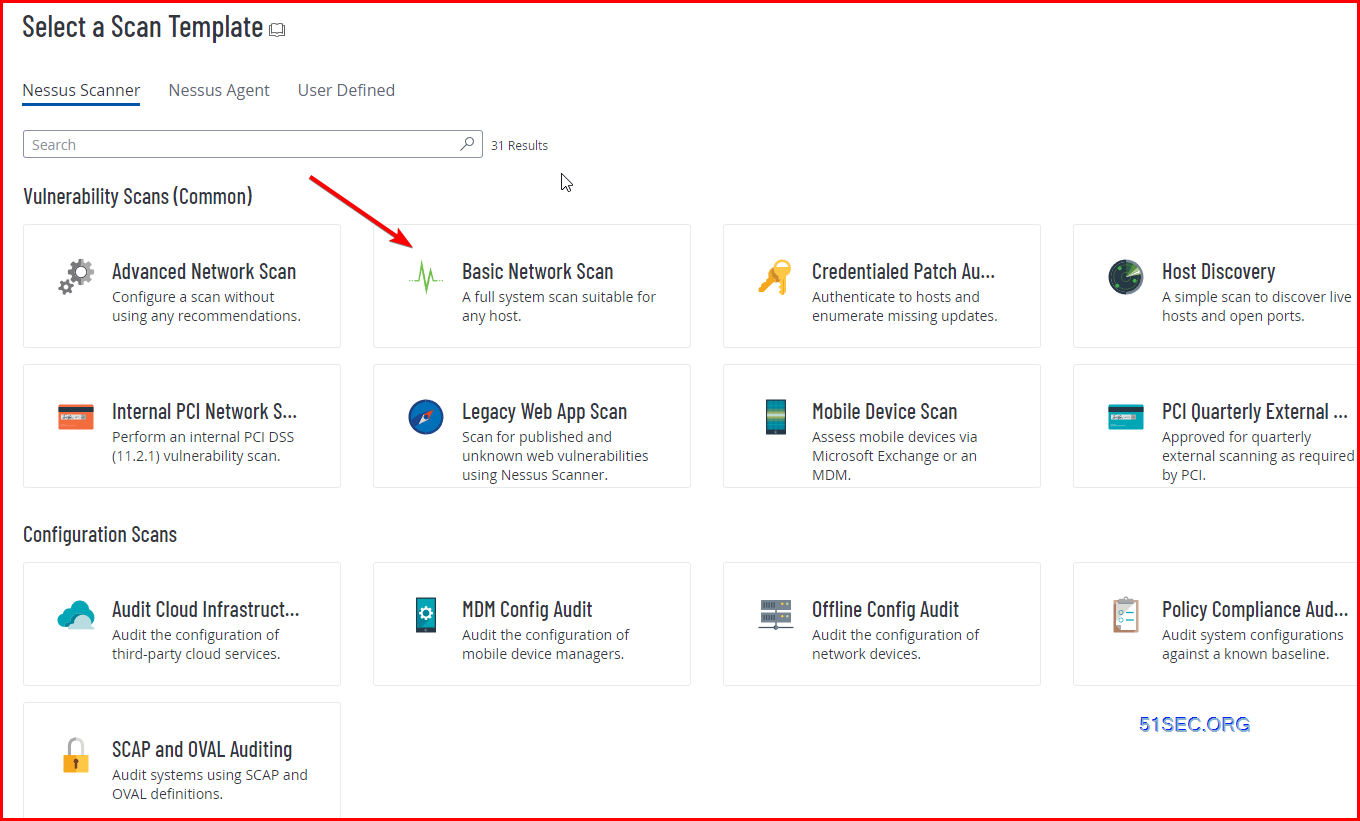
- Configure Scans
- Additional Tenable Vulnerability Management Configurations
- Review and Analyze
- Expand

Diagram
Compare with other Tenable Products
Tenable Security Center (Formerly Tenable.sc)
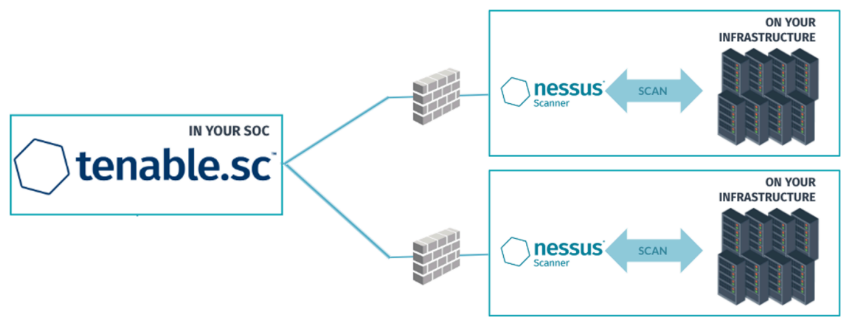
Essentially, this means that Tenable.sc customers are responsible for the hardware for the entire infrastructure, including data storage. The Tenable Vulnerability Management “console” (and data storage) is hosted in the cloud and is therefore Tenable's responsibility.
Your Tenable.sc is on-prem, with all your Nessus Pro scanners linked to Tenable.sc providing all the remote scanning of your network.
For devices which are not on your network (remote workstations) then you need to use Nessus Agents.
Tenable.sc does not directly support Nessus Agents, so you need a collector for your Agent data.
You can either use the older method of having your Nessus Agents communicate with Nessus Manager, which then forwards those to Tenable.sc
or you the modern way of use Tenable.io as your collector, and then Tenable.sc collecting the Agent data from Tenable.io. You do not login to Tenable.io, you still use Tenable.sc as your console.
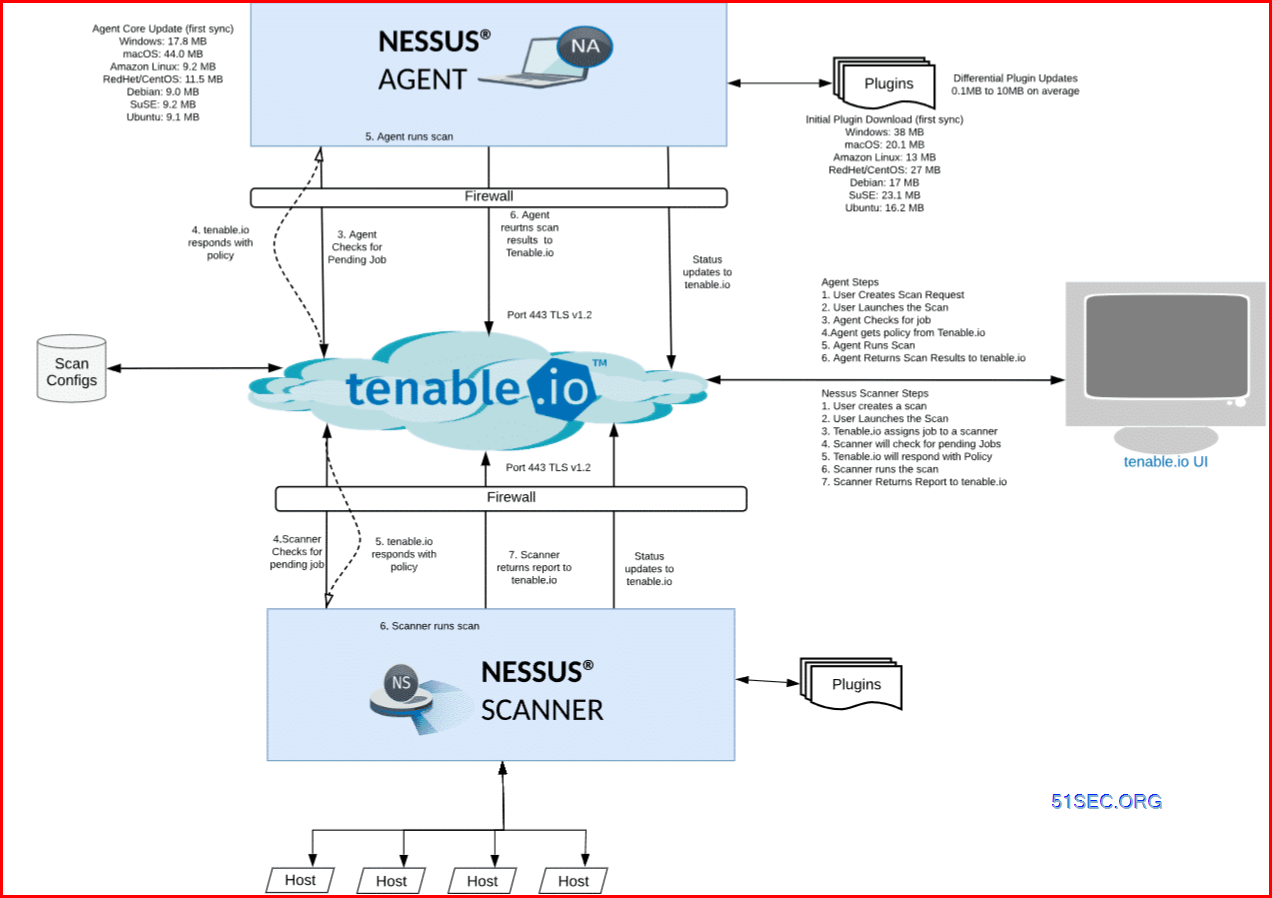
How Tenable.io Agent and Scanner Works - Traffic flow Diagram
Tenable One
| Tenable Vulnerability Management |
| Tenable Web App Scanning |
| Tenable Cloud Security |
| Lumin Exposure View |
| Asset Inventory |
| Identity Exposure |
All products in Tenable One Standard, plus:
| Attack Path Analysis |
| Tenable Attack Surface Management |
Tenable PCI ASV Scanning
Note: Tenable Vulnerability Management excludes PCI Quarterly External scan data from dashboards, reports, and workbenches intentionally. This is due to the scan's paranoid nature, which may lead to false positives that Tenable Vulnerability Management would otherwise not detect.In Tenable PCI ASV, you can create the following scans using scan templates:
Vulnerability Management Scan using the Internal PCI Network Scan and PCI Quarterly External Scan templates
Tenable Web App Scanning scan using the PCI template
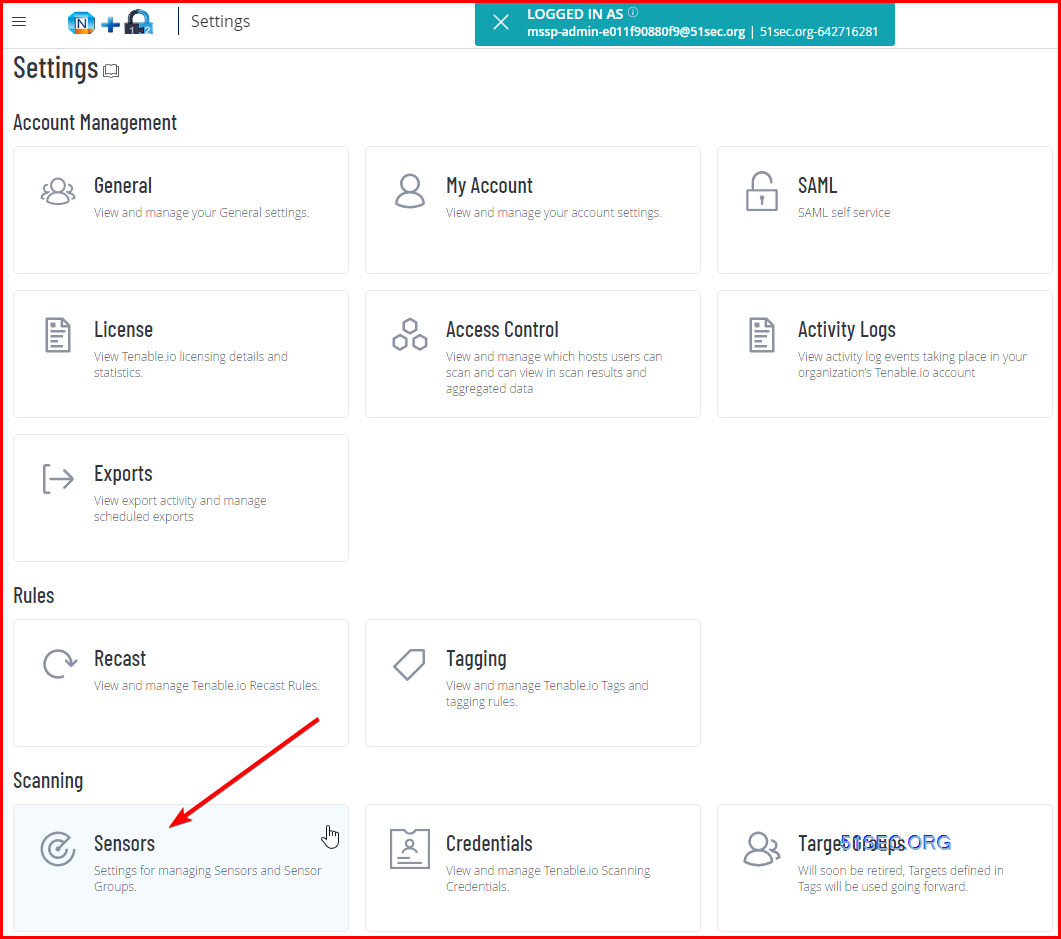
Install Scanner
Get the Scanner Key from Portal's Settings -> Sensors:
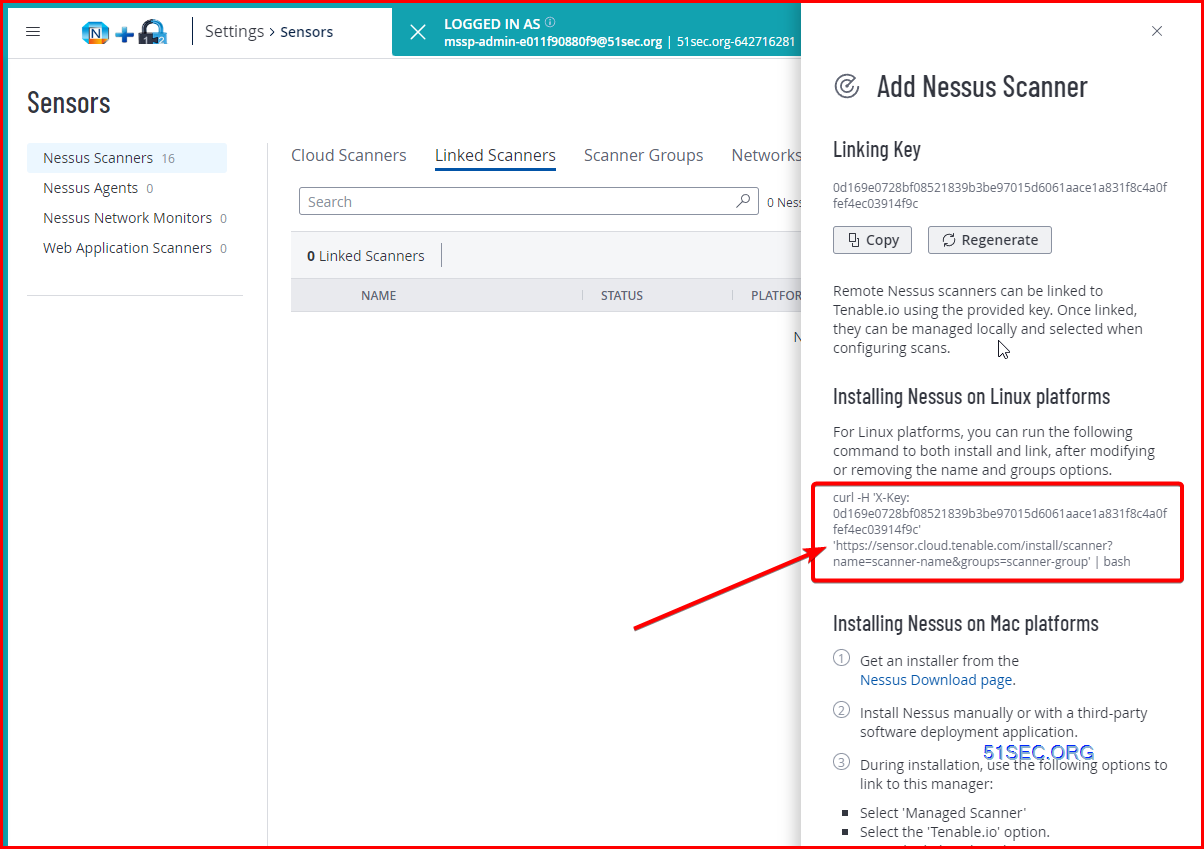
Installing Nessus on Linux or other OS
root@u-20-1-test:~# curl -H 'X-Key: 0d169e0728bf08520ffef4ec03914f9c' 'https://sensor.cloud.tenable.com/install/scanner?name=scanner-name&groups=scanner-group' | bash
  % Total    % Received % Xferd  Average Speed   Time    Time     Time  Current
                                 Dload  Upload   Total   Spent    Left  Speed
** Beginning Nessus installation process. **0 --:--:-- --:--:-- --:--:--     0
100  9129    0  9129    0     0  18442      0 --:--:-- --:--:-- --:--:-- 18442
Downloading Nessus install package for Ubuntu.
Installing Nessus.
Selecting previously unselected package nessus.
(Reading database ... 143634 files and directories currently installed.)
Preparing to unpack Nessus-ubuntu1404_amd64.deb ...
Unpacking nessus (10.5.3) ...
Setting up nessus (10.5.3) ...
HMAC : (Module_Integrity) : Pass
SHA1 : (KAT_Digest) : Pass
SHA2 : (KAT_Digest) : Pass
SHA3 : (KAT_Digest) : Pass
TDES : (KAT_Cipher) : Pass
AES_GCM : (KAT_Cipher) : Pass
AES_ECB_Decrypt : (KAT_Cipher) : Pass
RSA : (KAT_Signature) : RNG : (Continuous_RNG_Test) : Pass
Pass
ECDSA : (PCT_Signature) : Pass
ECDSA : (PCT_Signature) : Pass
DSA : (PCT_Signature) : Pass
TLS13_KDF_EXTRACT : (KAT_KDF) : Pass
TLS13_KDF_EXPAND : (KAT_KDF) : Pass
TLS12_PRF : (KAT_KDF) : Pass
PBKDF2 : (KAT_KDF) : Pass
SSHKDF : (KAT_KDF) : Pass
KBKDF : (KAT_KDF) : Pass
HKDF : (KAT_KDF) : Pass
SSKDF : (KAT_KDF) : Pass
X963KDF : (KAT_KDF) : Pass
X942KDF : (KAT_KDF) : Pass
HASH : (DRBG) : Pass
CTR : (DRBG) : Pass
HMAC : (DRBG) : Pass
DH : (KAT_KA) : Pass
ECDH : (KAT_KA) : Pass
RSA_Encrypt : (KAT_AsymmetricCipher) : Pass
RSA_Decrypt : (KAT_AsymmetricCipher) : Pass
RSA_Decrypt : (KAT_AsymmetricCipher) : Pass
INSTALL PASSED
Unpacking Nessus Scanner Core Components...
Created symlink /etc/systemd/system/nessusd.service → /lib/systemd/system/nessusd.service.
Created symlink /etc/systemd/system/multi-user.target.wants/nessusd.service → /lib/systemd/system/nessusd.service.

 - You can start Nessus Scanner by typing /bin/systemctl start nessusd.service
 - Then go to https://u-20-1-test:8834/ to configure your scanner

Applying auto-configuration.
Starting Nessus.
Waiting for Nessus to start and link...
......................
Auto-configuration complete.
Nessus is now linked to sensor.cloud.tenable.com:443
root@u-20-1-test:~#
Using Linking Key to set up your sensor
How to change sensor's link:
Linux (as root):
# service nessusd stop
# cd /opt/nessus/sbin
# ./nessuscli fix --reset-all
# ./nessuscli adduser
# ./nessuscli managed link --key=<LINKING KEY> --cloud
# service nessusd start
Add Nessus Agent
Linking Key
24d35777c41ecdff8e686e3725412ef4412d01a2dd019171e076cca1cf59b2e4
Agents can be linked to Tenable Vulnerability Management using the following setup instructions. Once linked, they will automatically download all necessary plugins. This process takes several minutes and is required before an agent will return results.
Installing Agent on Linux platforms
For Linux platforms, you can run the following command to both install and link, after modifying or removing the name and groups options.
curl -H 'X-Key: 24d35777c41ecdff8e686e3725412ef4412d01a2dd019171e076cca1cf59b2e4' 'https://sensor.cloud.tenable.com/install/agent?name=agent-name&groups=agent-group' | bash
Installing Agent on Mac platforms
Get an installer from the
Nessus Agent Download page.
Install the agent on your targets manually, via Group Policy, SCCM, or other third-party software deployment application.
During installation, use the following options to link to this manager:
Host: sensor.cloud.tenable.com
Port: 443
The linking key above.
root@ubuntu-test1:~# curl -H 'X-Key: 24d35777c41ecdff8e686e3725412ef4412d01a2dd019171e076cca1cf59b2e4' 'https://sensor.cloud.tenable.com/install/agent?name=agent-name&groups=agent-group' | bash
% Total % Received % Xferd Average Speed Time Time Time Current
Dload Upload Total Spent Left Speed
100 8850 0 8850 0 0 15364 0 --:--:-- --:--:-- --:--:-- 15364
** Beginning Nessus Agent installation process. **
Downloading Nessus Agent install package for Ubuntu.
Installing Nessus Agent.
Selecting previously unselected package nessusagent.
(Reading database ... 104225 files and directories currently installed.)
Preparing to unpack NessusAgent-ubuntu1404_amd64.deb ...
Unpacking nessusagent (10.4.4) ...
Setting up nessusagent (10.4.4) ...
HMAC : (Module_Integrity) : Pass
SHA1 : (KAT_Digest) : Pass
SHA2 : (KAT_Digest) : Pass
SHA3 : (KAT_Digest) : Pass
TDES : (KAT_Cipher) : Pass
AES_GCM : (KAT_Cipher) : Pass
AES_ECB_Decrypt : (KAT_Cipher) : Pass
RSA : (KAT_Signature) : RNG : (Continuous_RNG_Test) : Pass
Pass
ECDSA : (PCT_Signature) : Pass
ECDSA : (PCT_Signature) : Pass
DSA : (PCT_Signature) : Pass
TLS13_KDF_EXTRACT : (KAT_KDF) : Pass
TLS13_KDF_EXPAND : (KAT_KDF) : Pass
TLS12_PRF : (KAT_KDF) : Pass
PBKDF2 : (KAT_KDF) : Pass
SSHKDF : (KAT_KDF) : Pass
KBKDF : (KAT_KDF) : Pass
HKDF : (KAT_KDF) : Pass
SSKDF : (KAT_KDF) : Pass
X963KDF : (KAT_KDF) : Pass
X942KDF : (KAT_KDF) : Pass
HASH : (DRBG) : Pass
CTR : (DRBG) : Pass
HMAC : (DRBG) : Pass
DH : (KAT_KA) : Pass
ECDH : (KAT_KA) : Pass
RSA_Encrypt : (KAT_AsymmetricCipher) : Pass
RSA_Decrypt : (KAT_AsymmetricCipher) : Pass
RSA_Decrypt : (KAT_AsymmetricCipher) : Pass
INSTALL PASSED
Unpacking Nessus Agent Core Components...
Created symlink /etc/systemd/system/nessusagent.service → /lib/systemd/system/nessusagent.service.
Created symlink /etc/systemd/system/multi-user.target.wants/nessusagent.service → /lib/systemd/system/nessusagent.service.
- First, start Nessus Agent by typing /bin/systemctl start nessusagent.service
- To link this agent, use the '/opt/nessus_agent/sbin/nessuscli agent' command.
Type '/opt/nessus_agent/sbin/nessuscli agent help' for more info.
Applying auto-configuration.
Starting Nessus Agent.
Waiting for Nessus Agent to start and link...
......................
Auto-configuration complete.
The Nessus Agent is now linked to sensor.cloud.tenable.com:443
root@ubuntu-test1:~#
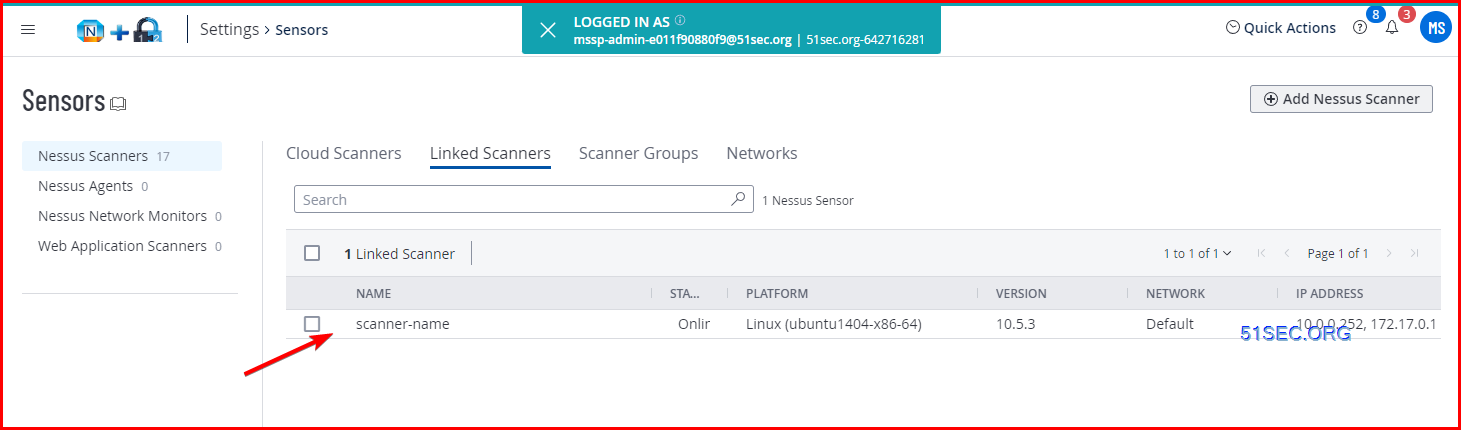
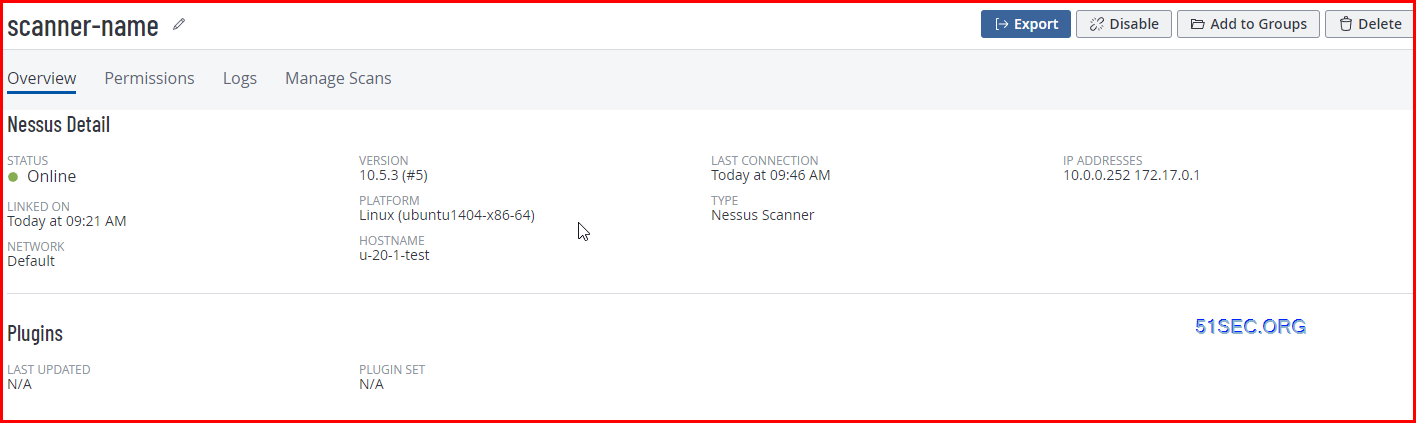
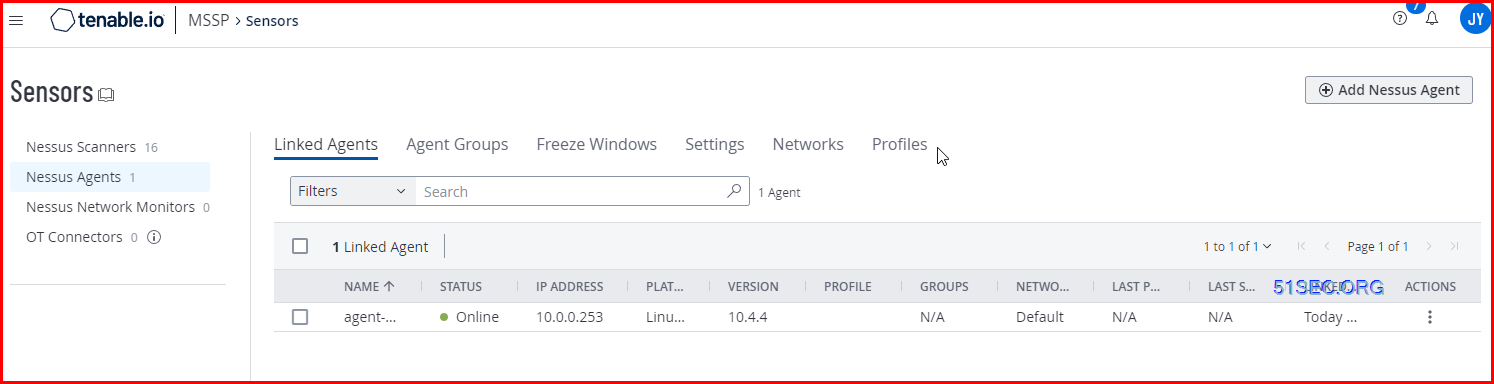
Once done, you can find it from Linked Agents page, and you might want to add it into one of your Agent Group for scanning.
- https://cloud.tenable.com/tio/app.html#/settings/sensors/agents/agents-list?agent_id_agents-list.st=name.0
Relink an agent:
change the key:
root@ubuntu-test1:~# /opt/nessus_agent/sbin/nessuscli agent link --key=edcc5d5f2a68706a9ac28aafac288ae367c8497ba68f4641029b0d8b70a39895
[info] [agent] Loading manager settings from configuration: sensor.cloud.tenable.com:443
[info] [agent] Successfully linked to sensor.cloud.tenable.com:443
root@ubuntu-test1:~#
Manual Installation Steps:
1. On the Tenable Nessus Agent Download Page, download the package specific to your operating system.
2. Run Linux Install Commands from https://docs.tenable.com/nessus-agent/Content/InstallNessusAgentLinux.htm
3. Link the Agent using the Command Line
At the command prompt, use the nessuscli agent link command. For example:
/opt/nessus_agent/sbin/nessuscli agent link
--key=00abcd00000efgh11111i0k222lmopq3333st4455u66v777777w88xy9999zabc00
--name=MyOSXAgent --groups="All" --host=yourcompany.com --port=8834 --cloud
Note: You must copy and paste the entire link command on the same line. Otherwise, you receive an error.
4. Manually Start Nessus Agent Service and enable service starts anytime the host is rebooted.
After installing a Nessus Agent, you must manually start the service using the /sbin/service nessusagent start command. Tenable also recommends running systemctl enable nessusagent to ensure that the Nessus Agent service starts anytime the host is rebooted.
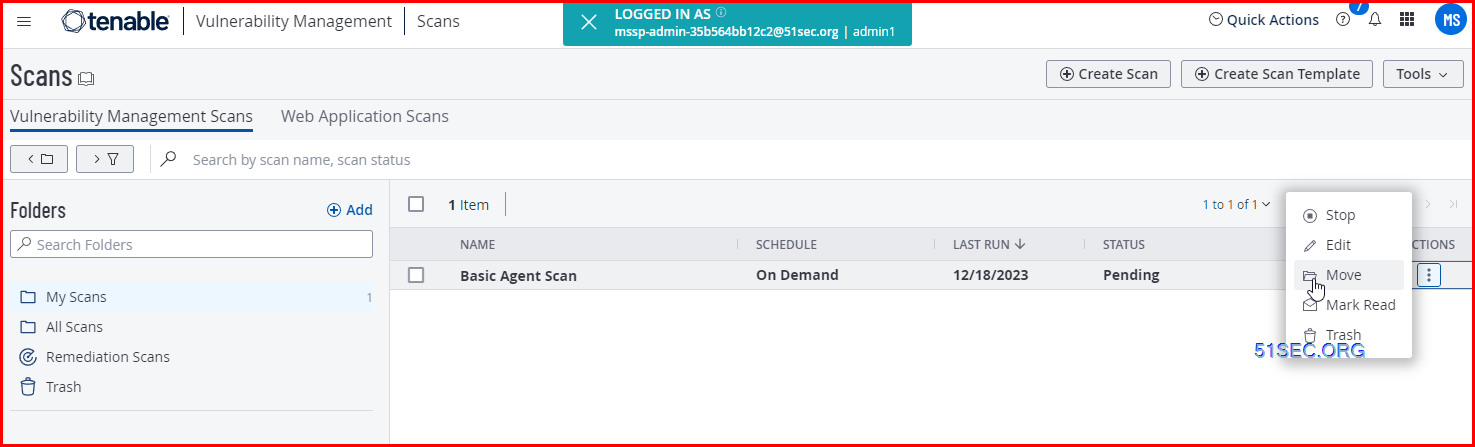
Execute a basic agent scan:
Choose Specific Agent Group to scan.
Tenable Agent Installation On CentOS
https://docs.tenable.com/nessus-agent/10_7/Content/InstallNessusAgentLinux.htm- # dnf install NessusAgent-<version number>-es8.x86_64.rpm
- /opt/nessus_agent/sbin/nessuscli agent link --key=24d34567c41ecdf2e686e3715412ef412d01a2d019171e07cca1cf59b2e4 --cloud
- /etc/tenable_tag ; /etc/machine_id
/etc/machine_id or /etc/tenable_tag file. To resolve this issue, replace the value in the /etc/tenable_tag file with a valid UUIDv4 value. If the /etc/machine_id file does not exist, you can delete /etc/tenable_tag to generate a new value.Tags
Tag Agent
Creat Group
Vulnerability Management - Settings - Sensors - Agent Group - Add Agent Group
Static Tag or Dynamic Tag
- Filter asset and vulnerability
- Filter for dashboards and reports
- Create permissions for asset access control
- use consistent naming convention
- limit number of tags
- Aligh with business goals
- add tags
- assign tags to asset
Exclusions
Portal - settings - exclusionsHost Discovery Scans
Select scanner type : internal or externalCompliance Scan
Uninstall Nessus Agent
Before you begin:
- Unlink the agent from the manager.
To uninstall Tenable Nessus Agent on Linux:
Type the remove command specific to your Linux-style operating system.
Example Nessus Agent Remove Commands
 Red Hat 6 and 7, CentOS 6 and 7, Oracle Linux 6 and 7
# yum remove NessusAgent
Red Hat 8 and later, CentOS 8 and later, Oracle Linux 8 and later, Fedora, SUSE# dnf remove NessusAgent
Debian/Kali and Ubuntu# dpkg -r NessusAgent
│ │ └─11434 grep --color=auto agent
├─nessusagent.service
│ ├─ 492 /opt/nessus_agent/sbin/nessus-agent-module -q
│ └─9459 /opt/nessus_agent/sbin/nessus-service -q
├─snap.oracle-cloud-agent.oracle-cloud-agent.service
│ ├─21152 /snap/oracle-cloud-agent/68/agent
│ ├─21292 /snap/oracle-cloud-agent/current/plugins/gomon/gomon
│ └─21313 /snap/oracle-cloud-agent/current/plugins/oci-wlp/oci-wlp
├─snap.oracle-cloud-agent.oracle-cloud-agent-updater.service
│ └─21162 /snap/oracle-cloud-agent/68/updater/updater
root@ubuntu-test1:~# systemctl status nessusagent
● nessusagent.service - The Nessus Client Agent
Loaded: loaded (/lib/systemd/system/nessusagent.service; enabled; vendor preset: enabled)
Active: active (running) since Tue 2023-12-19 02:13:59 UTC; 2 weeks 4 days ago
Main PID: 9459 (nessus-service)
Tasks: 13 (limit: 1110)
CGroup: /system.slice/nessusagent.service
├─ 490 nessusd -q
├─ 492 /opt/nessus_agent/sbin/nessus-agent-module -q
└─9459 /opt/nessus_agent/sbin/nessus-service -q
Dec 30 21:11:33 ubuntu-test1 nessus-service[9459]: Cached 189 plugin libs in 317msec
Dec 30 21:11:33 ubuntu-test1 nessus-service[9459]: Cached 189 plugin libs in 164msec
Dec 31 21:14:22 ubuntu-test1 nessus-service[9459]: Cached 189 plugin libs in 314msec
plugin libs in 281msec
Jan 02 03:27:32 ubuntu-test1 nessus-service[9459]: Cached 189 plugin libs in 111msec
root@ubuntu-test1:~# dpkg -r nessusagent
(Reading database ... 104268 files and directories currently installed.)
Removing nessusagent (10.4.4) ...
root@ubuntu-test1:~#
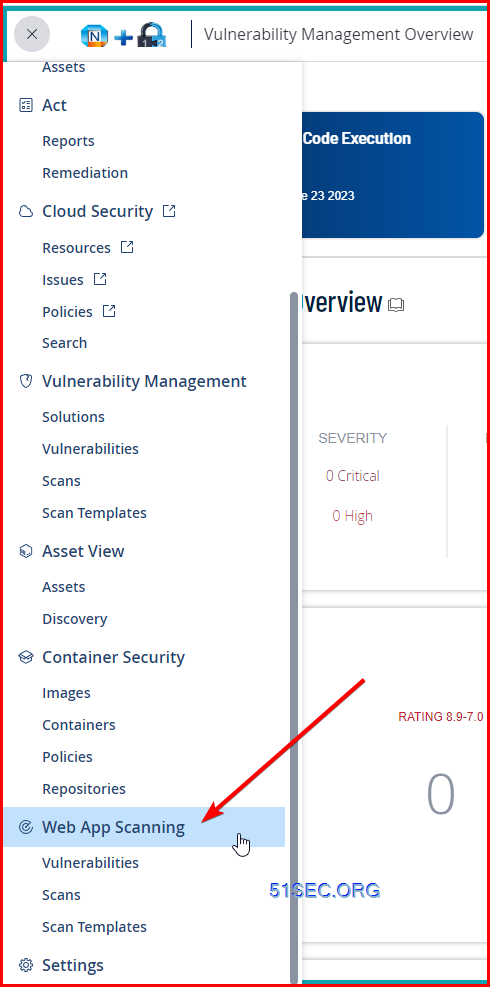
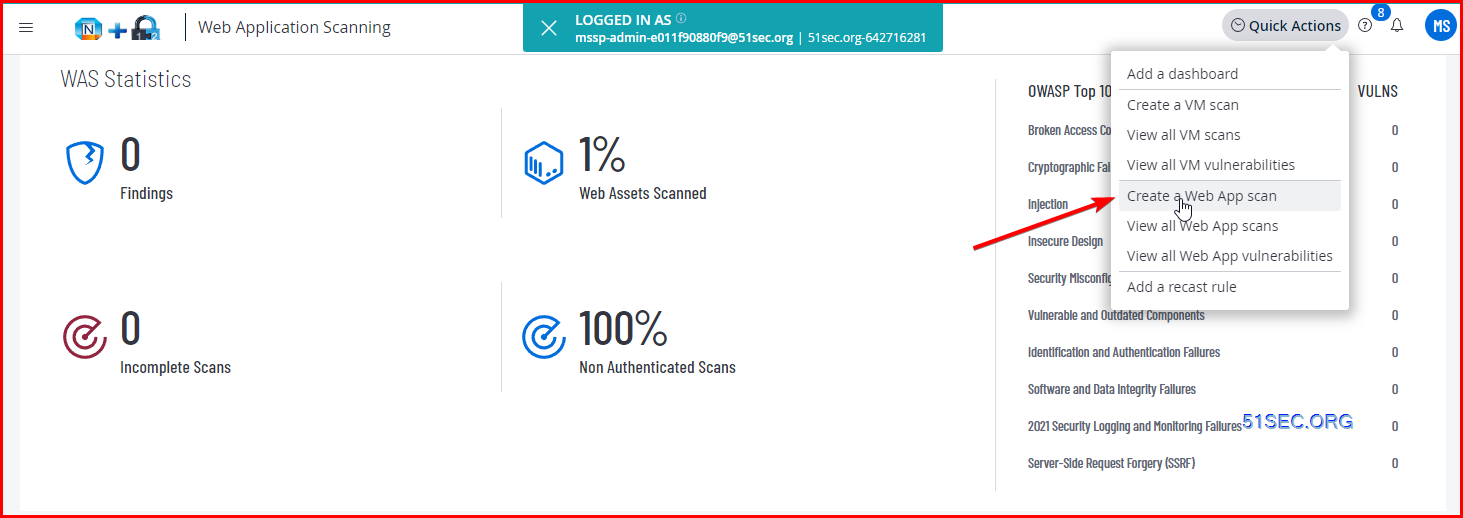
Web Application Scanning

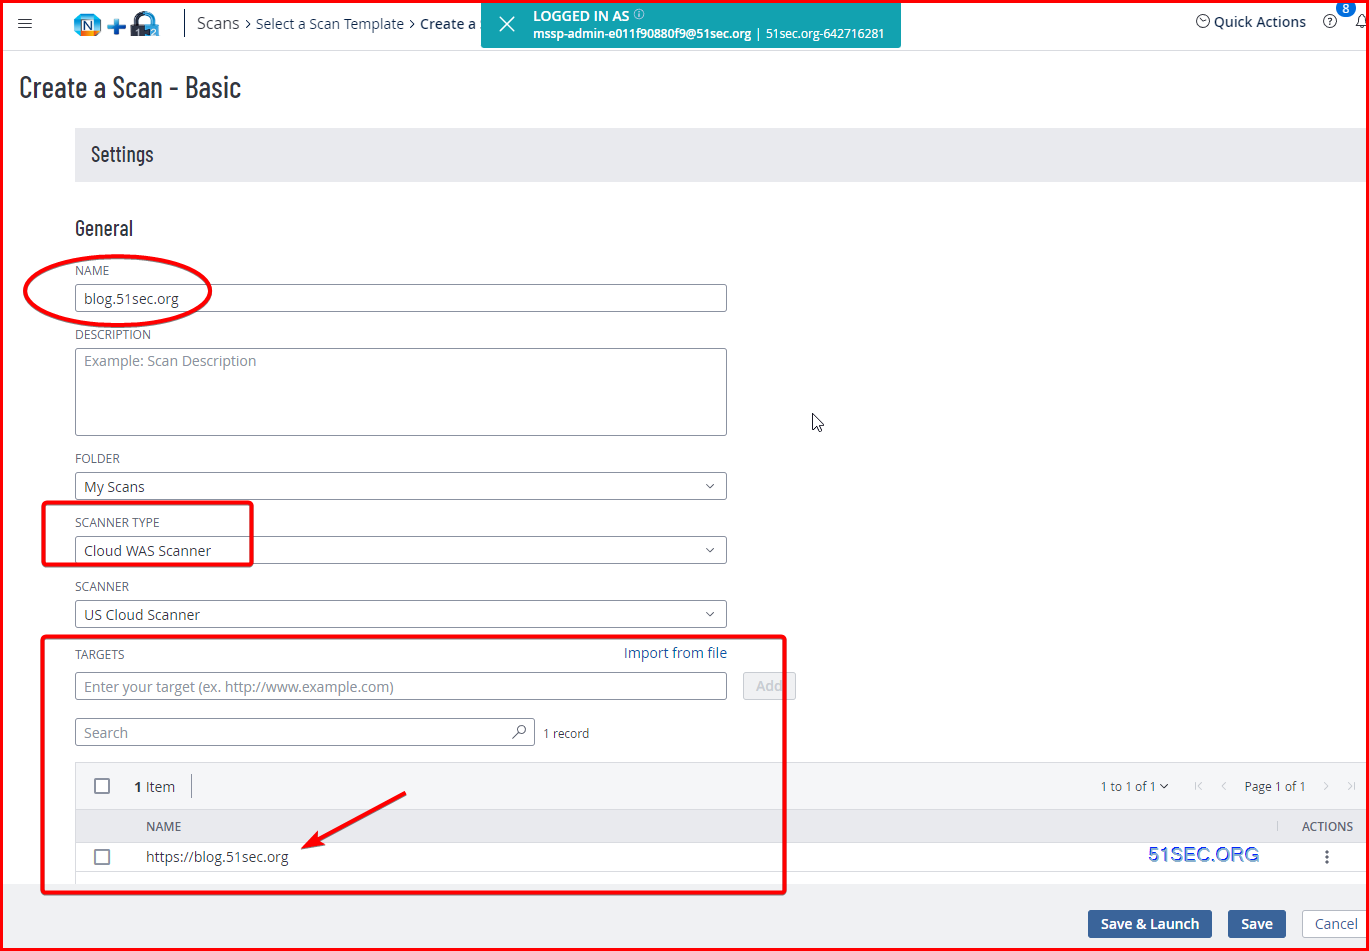
Infrastructure Or Network Scan (Vulnerability Management Scan)
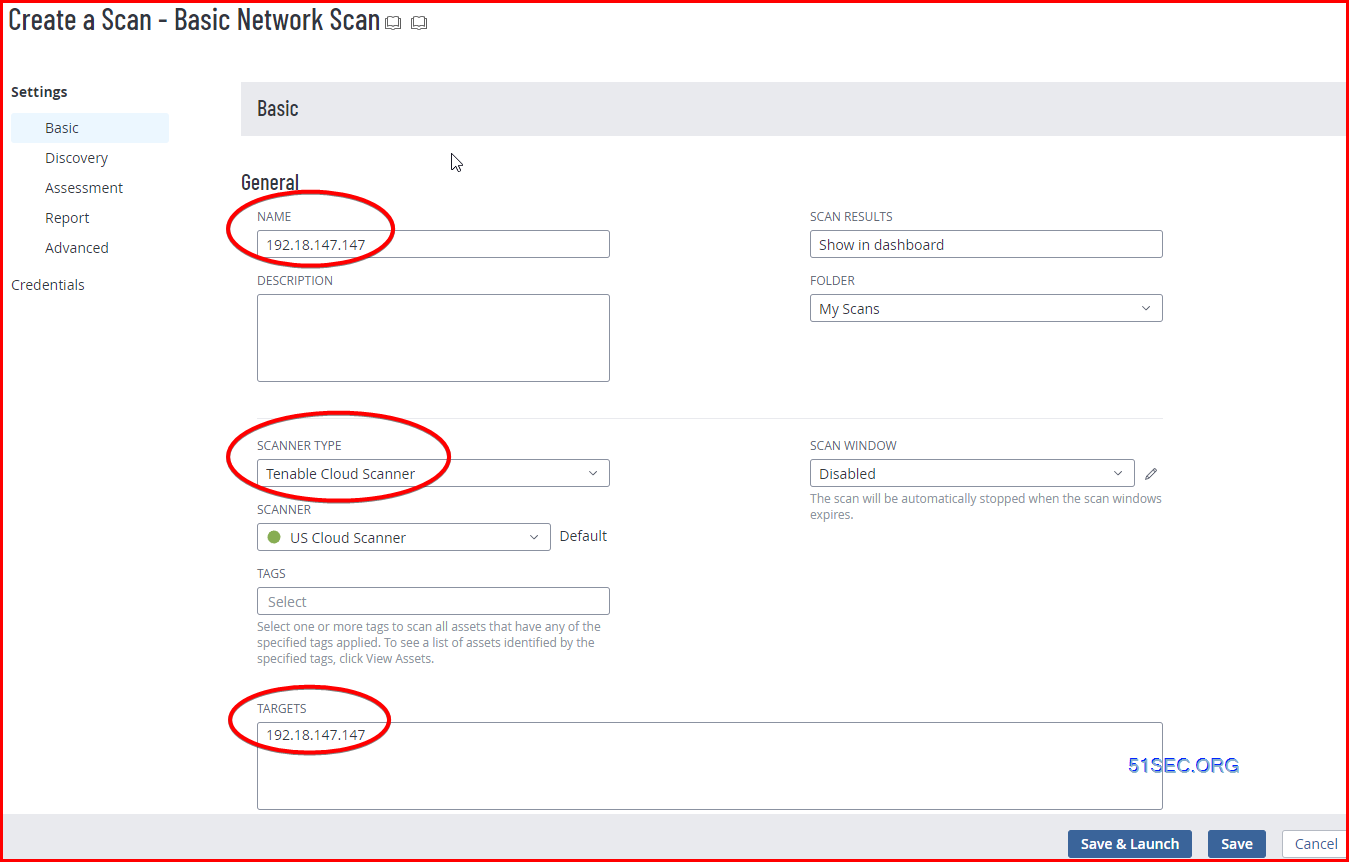
External Scan
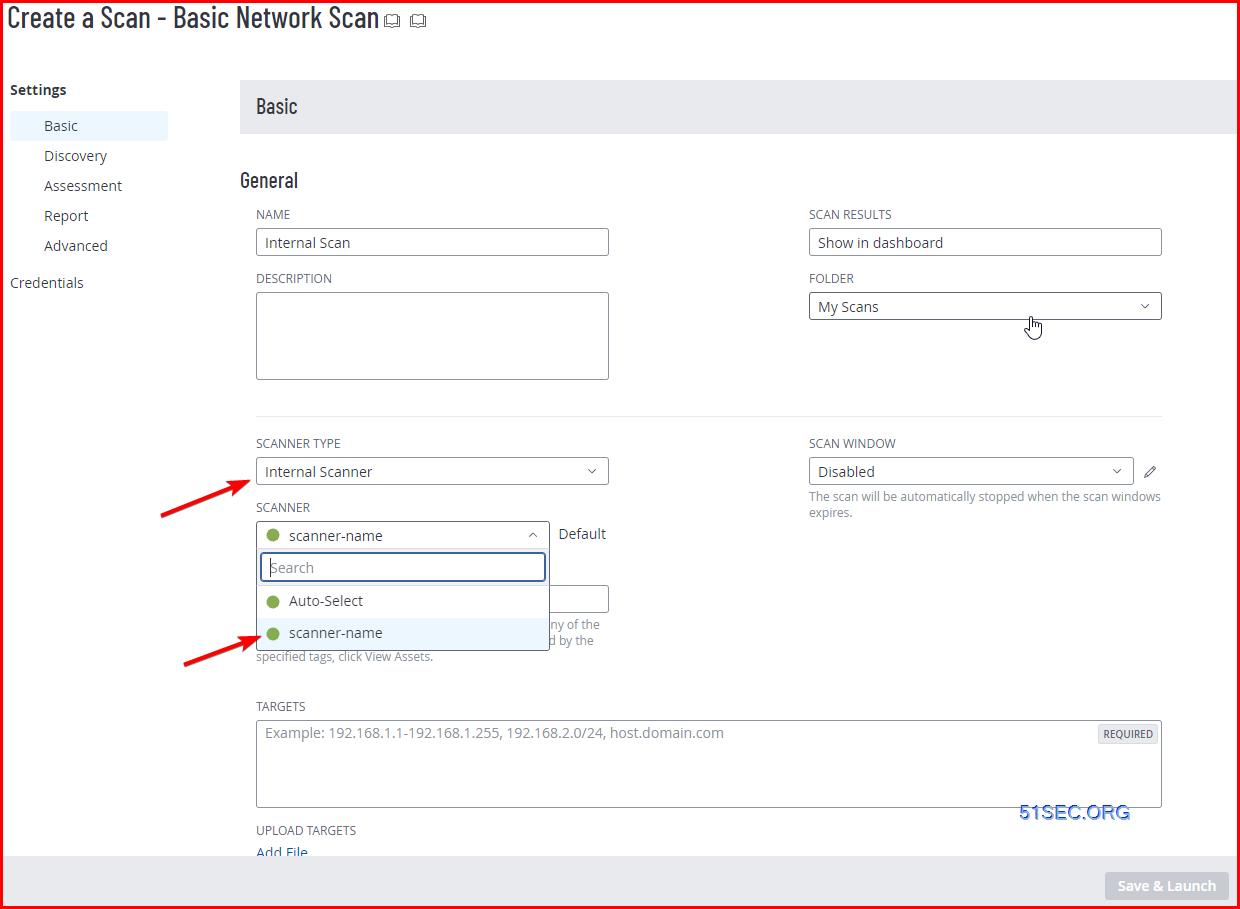
Internal Scan:
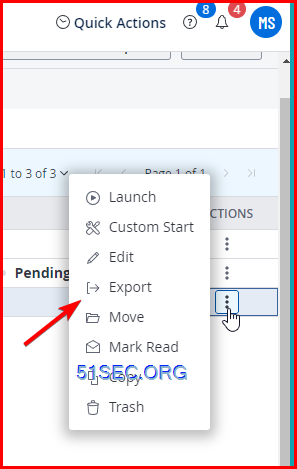
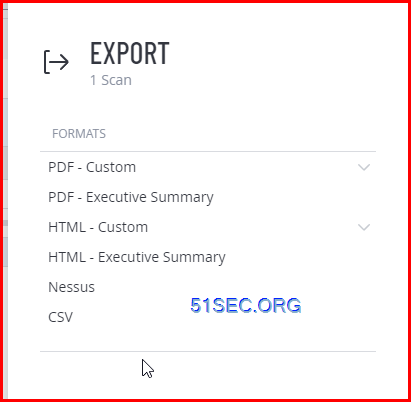
Agent Scan and Report
Agent Scan


Report
Videos
References
- https://cloud.tenable.com/
- https://partners.tenable.com/
- https://cloud.tenable.com/tio/app.html#/settings


![[5 Mins Docker] Deploy FreshRSS Using Docker Run Command and Deploy To Fly.io](https://lh3.googleusercontent.com/blogger_img_proxy/AEn0k_sKXc4u30rtk2sfIcdnaUWFpkXFpVPaNRJGLO-7eMDCelz_NjR57CmvGu1BLmbS3ZDpNqCVFv3JaB2Fh_w2_omD092qlkmc_eHaIdB04maGVQ)


No comments:
Post a Comment