- Workflow
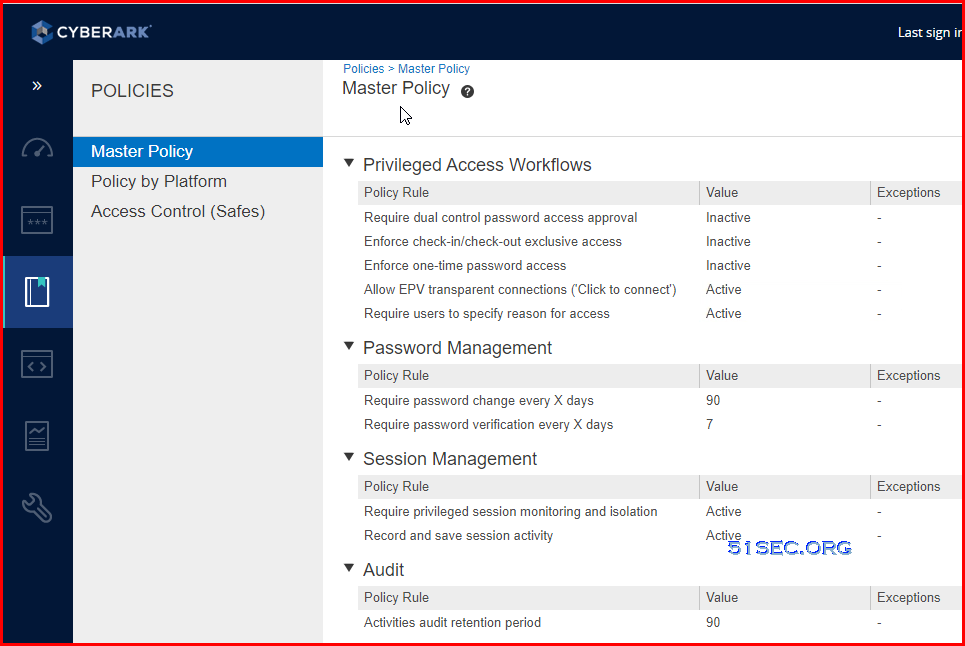
- Master Policy
- On board CyberArk End User
- Create a safe
- Platform Management
- Create an account
- Grant User to Add New Account to their Own Safe
- Change account password
- Reset CyberArk Built-in administrator Password
- Reset/Log in CyberArk Built-in Master Password
- CyberArk PAS Quick Operation Handbook
- Reconcile Account
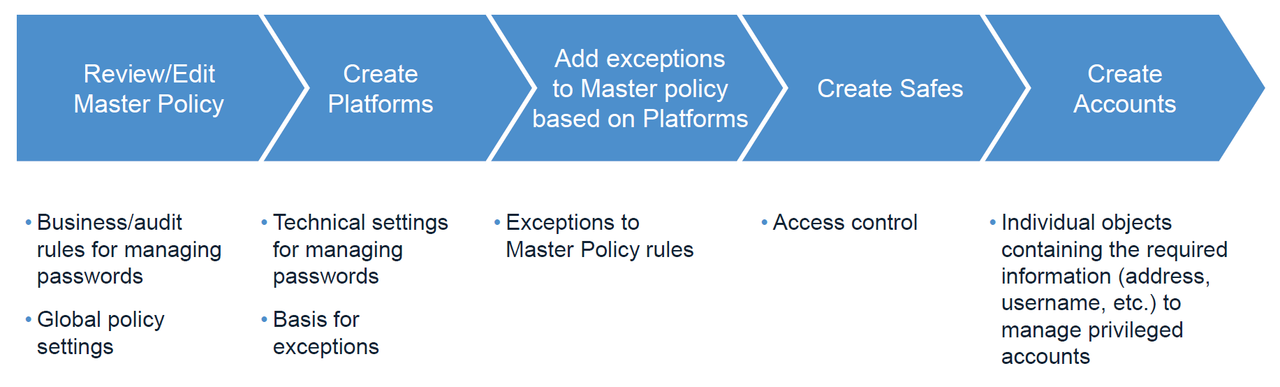
Workflow
Workflow for creating policies and accounts in CyberArk PAS:
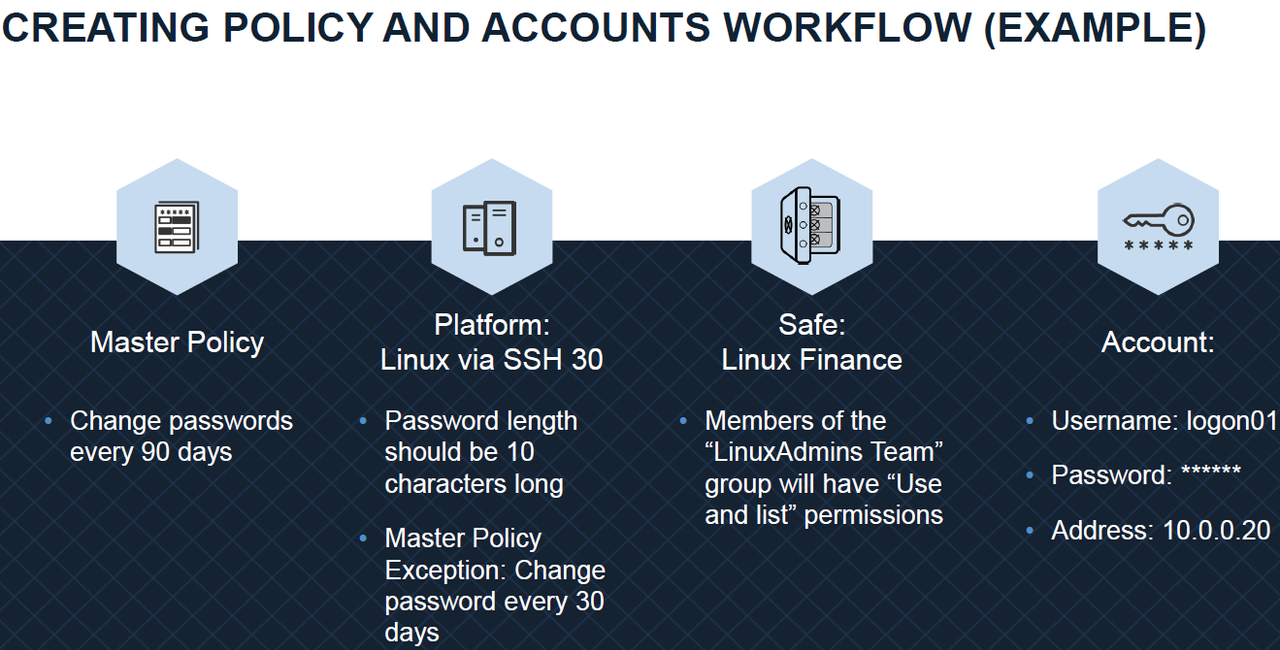
An Example for Creating Policy and Accounts:
Master Policy
Onboard CyberArk End User
If you CyberArk has AD integrated, you will need to add this user into proper CybreArk AD group. Usually, you will have three types of CyberArk AD user groups:- CyberArk Users
- CyberArk Auditors
- CyberArk Admins
You can check my previous post about CyberArk AD Integration configuration.
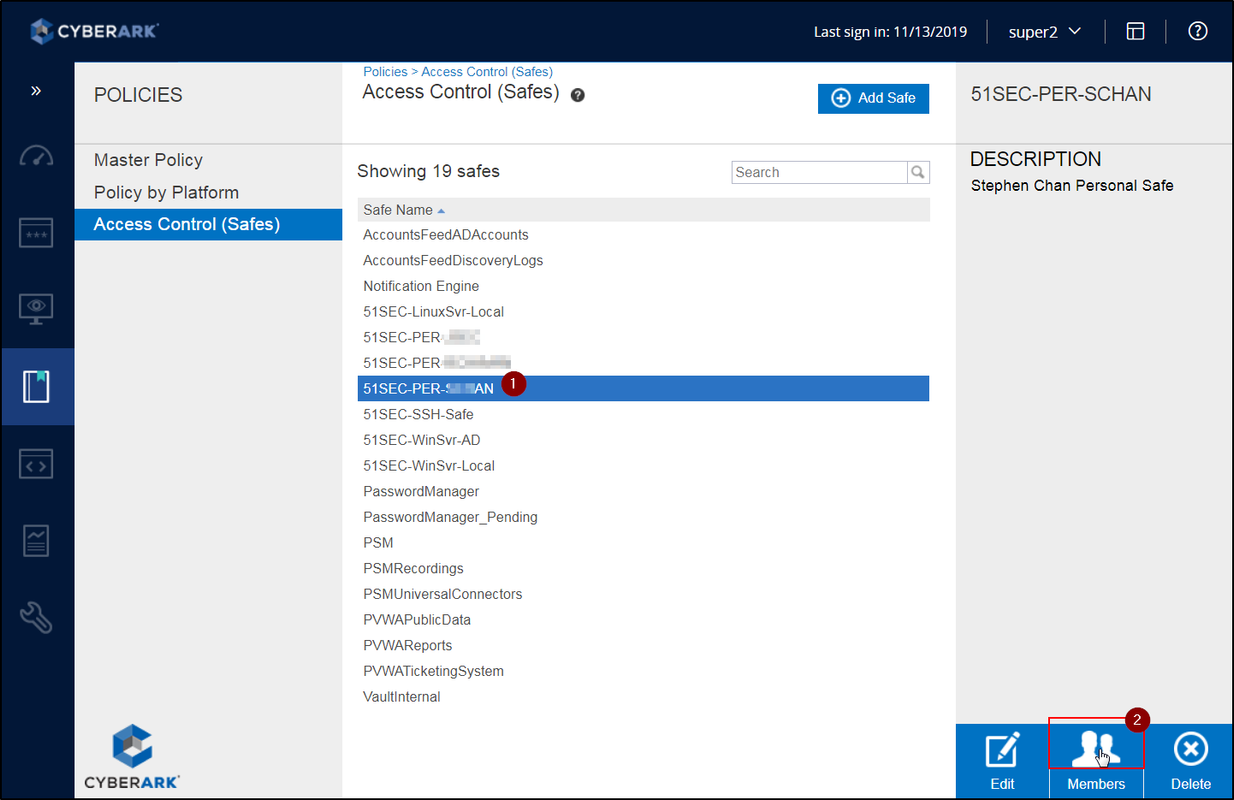
Create a safe
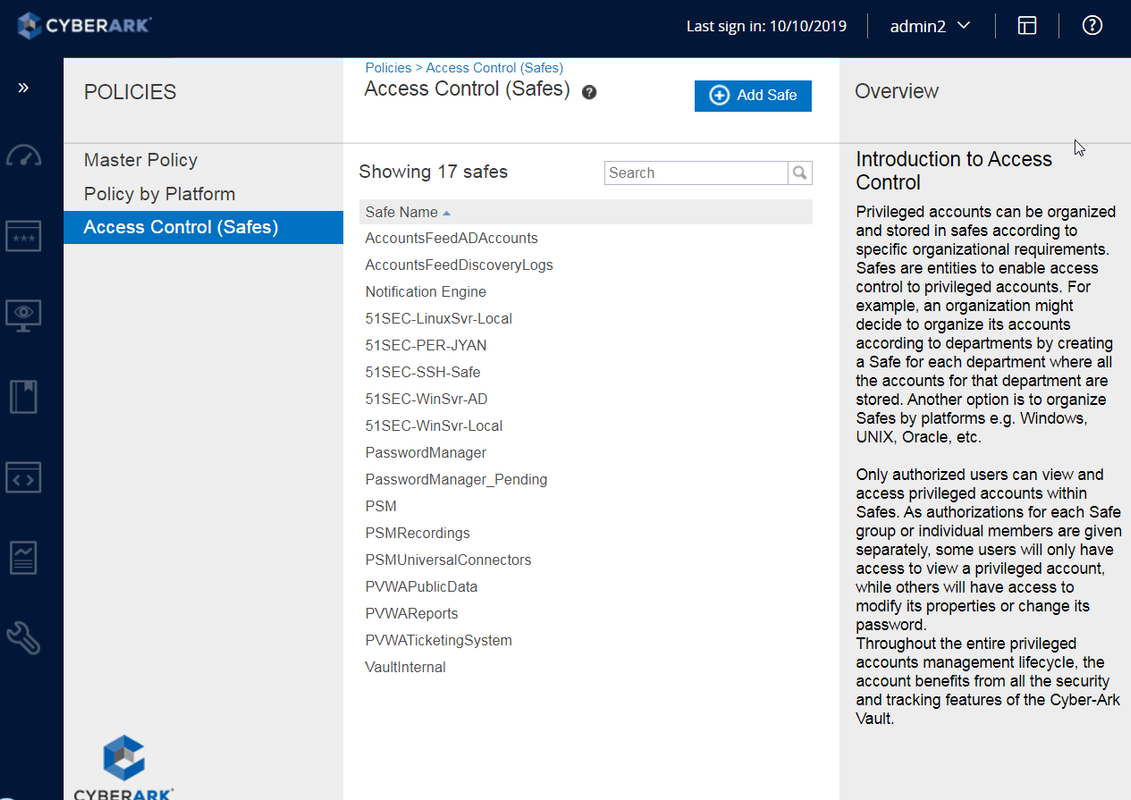
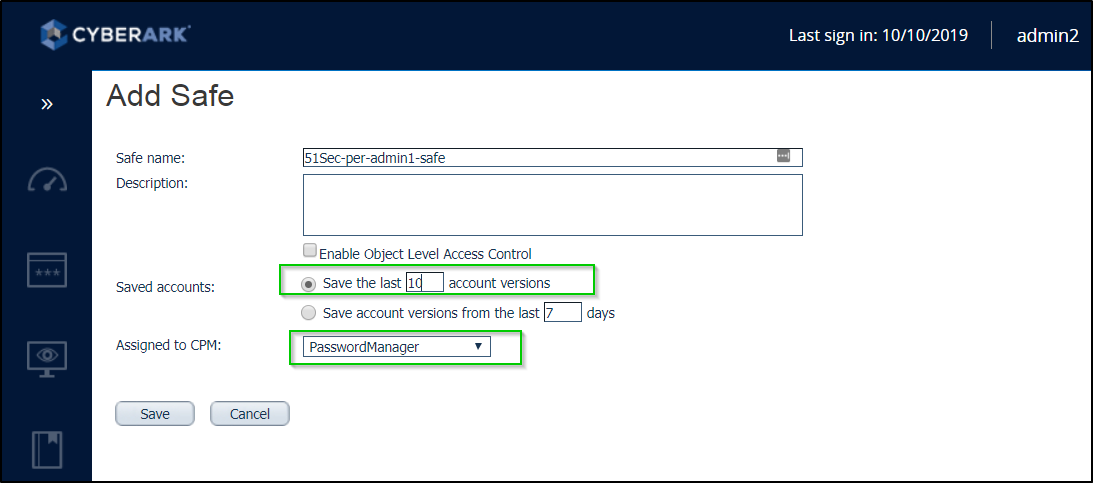
Notes:
- Don't Change Safe Name until you are sure the accounts in the safe not used by other accounts.
- By default, Safe creator will have quota ownership which will not be deleted. For how to delete it, check post https://blog.51sec.org/2019/11/cyberark-pta-solution-issues-and.html
- Suggested permission: It should only two users in the safe member list: PSM Manager and Safe Domain User
- Hide predefined users and groups. You can change this settings through one ini file in the vault server.
- A safe name cannot be more than 28 characters. Description of the new Safe. Up to 100 characters.
- Due to performance considerations, a maximum number of objects stored in a safe is 20000. This includes versions of objects, therefore the recommended number of actual accounts or files stored in a safe is 3000-5000
- Due to security considerations, it is recommended to separate objects stored in safes in groups, following the “least privilege” concept, to avoid situations where providing access for a user to a group of accounts also gives said user access to unrelated accounts. For example: “Windows Accounts” vs “Window Local Administrators for HR App” (28 character limit was not enforced in this example)
- Safe name convention
- Define business designations that are important for your environment. For example: Line of Business, Geographical Location, Data Center, Platform, Account Type, Application Association, Environment, etc
- List them in order of importance
- Discuss and agree on the resulting layered structure. This will be your Safe Naming Convention Base. Eliminate any layers that are redundant or not needed.
- List out as many examples of each designation as possible and define 2-4 letter translations for each. For example ORA for Oracle Database or LADM for Local Administrative Account. Alternatively, define a 1-2 digit number and its place in the Safe name instead of a 2-4 letter translation. For example 06 in the 8th and 9th spot for Oracle Database or 1 in the 1st spot for Production
- Create 7-10 examples of safe names to ensure the structure is sufficiently robust to account for any future need
- Document the Safe Naming Convention. Examples
- 1. P-TOR-SRV-WIN-LADM – Local Administrative Accounts (LADM) for Production (P) Windows (WIN) Servers (SRV) in Toronto (TOR)
- 2. P-MAR-SRV-WIN-DSVC-HR – Domain Service Accounts (DSVC) for the HR Application (HR) living on Production (P) Windows (WIN) Servers (SRV) in the Markham (MAR)
- 3. D-AWS-DB-ORA-LSVC-HR – Local Service Accounts (LSVC) for the HR Application (HR) living on Development (D) Oracle (ORA) Database (DB) in the Amazon Cloud (AWS)

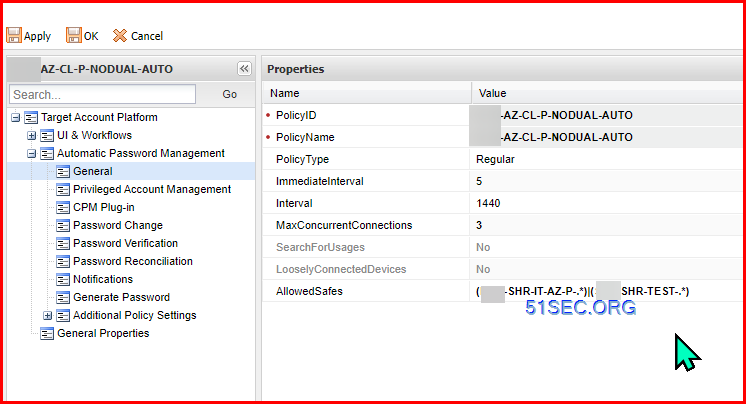
AllowedSafe Configuraiton
Safe Allow List example:
- (SHR-IT-AZ-P-.*)|(SHR-TEST-.*)
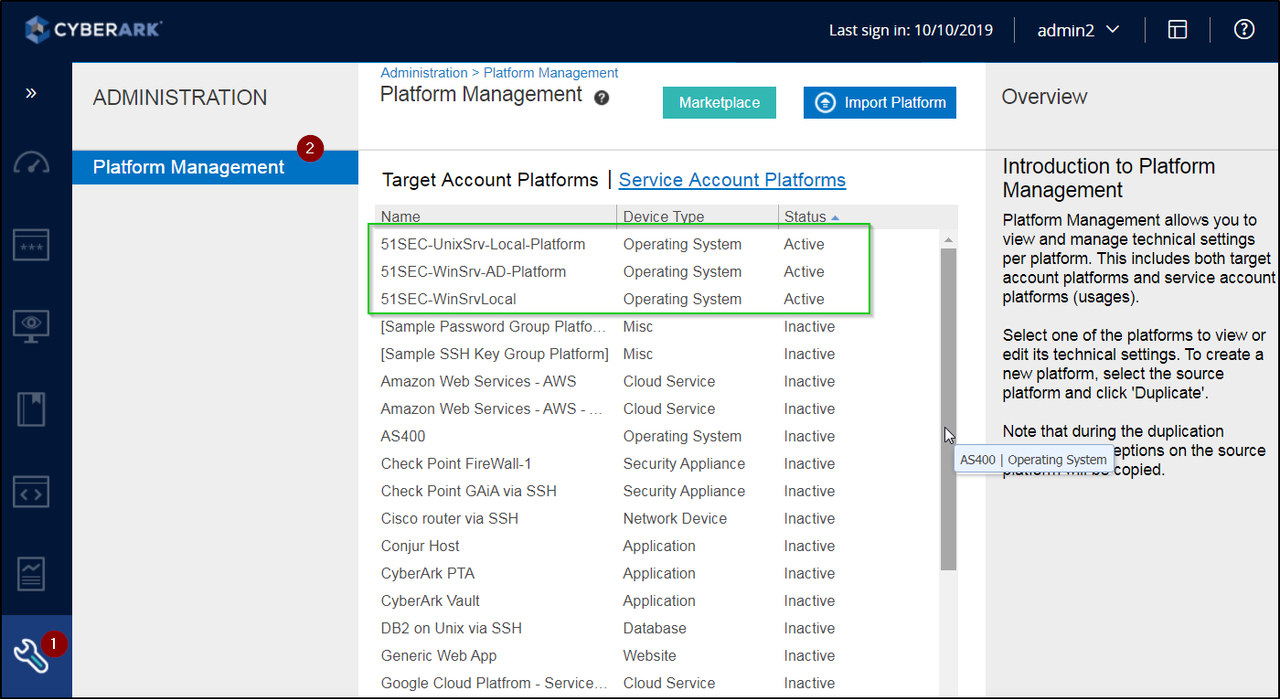
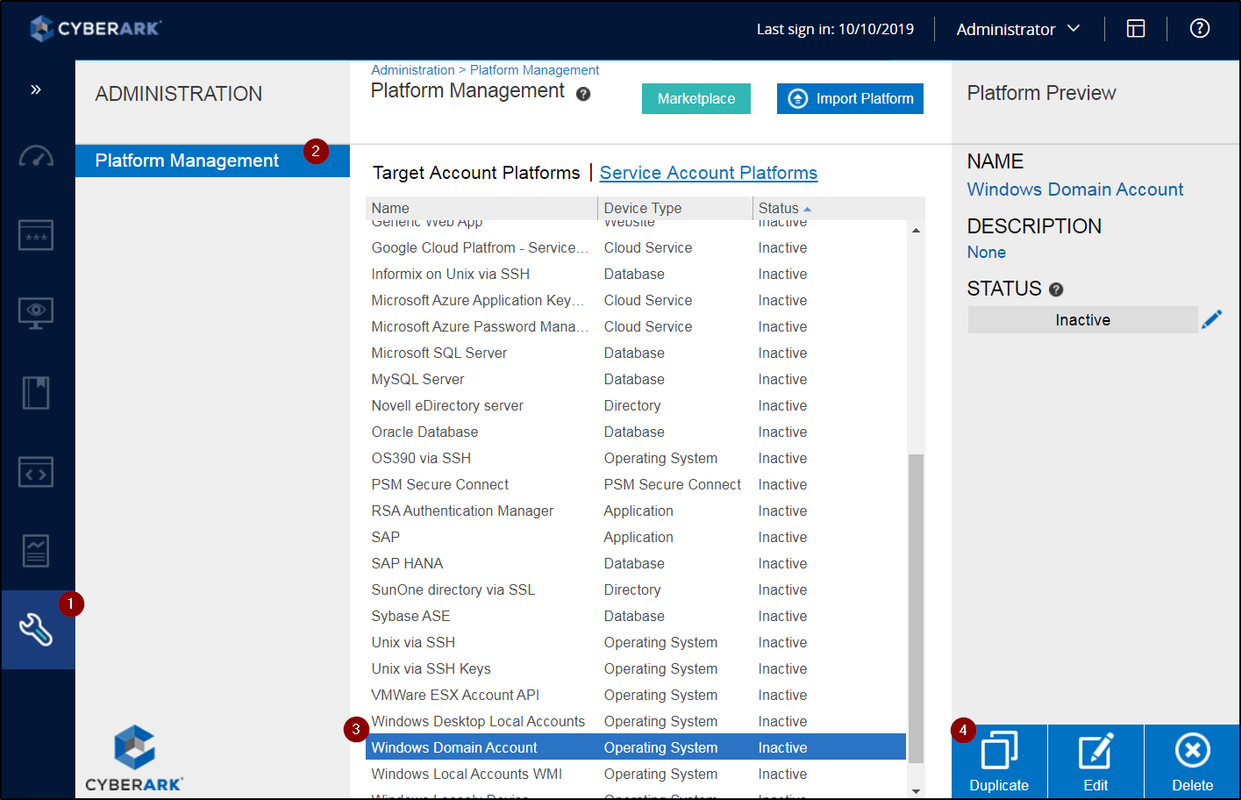
Platform Management
- Password requirements - length, complexity, etc, rotation and verfication frequence.
- Workflow
- Check-in/Check-out exclusive access
- OTP - One time password access
- Connect button
- If enable PSM
Notes:
- New platform can be downloaded and imported from market place.
- Platform name convention need to defined well
- You can delete platform even there is account assigned to it. (Delete need to be very careful here). But since platform has gone, you wont be able to do connect, change, reconcile, this kind of actions anymore. You will not be able to edit it without select a new platform.
- PAS supports up to 800 platforms.
- Platform name length: (44 Characteristics recommended. PVWA does not allow you to see Platform Name fully if the name is near the 100 character limit. Note: https://cyberark-customers.force.com/s/article/KI00015464)
- Platform Name Convention
- Prefix-Technology-Controls (or Descriptor)
Component | Description |
|---|---|
Prefix | Used to differentiate custom platforms from the default platforms. In many cases you can use an abbreviation for the name of your organization. In the following example we use TOR as the prefix. |
Technology | Generally taken from the default platform name from which the custom platform was copied, the technology field indicates what type of password is being managed (and sometimes the protocol being used). For example, WinDomain for Windows domain accounts, or UnixSSH for Unix accounts managed over SSH (as opposed to Telnet). |
Controls (or descriptor) | You can indicate what controls are being applied that may be exceptions to the Master Policy settings, or use any other descriptors that may help differentiate one platform from another. For example, you can identify platforms that have Dual Control policies applied or PSM workflows enforced. |
Examples
Platform name | Settings indicated |
|---|---|
TOR-WinDomain-PSM-DUA |
|
TOR-WinDomain-DUA-OTP-EAC |
|
TOR-WinServerLocal-PSM |
|
TOR-WinServerLocal-30day |
|
| TOR-HPILOSSH |
|
Sample Platform List from Lab:

Create an account

Notes:
- Default account names (Application-<Safe>-<Address>-<Username>
- The CPM Login methods possess the 38 character limit on the password field, same as the Vault.
- The account name pattern can be changed (Administration > Options > Account Name Pattern) - just delete/add properties of the account that should form the account name.
- The maximum length of the full path of a filename (that includes all folders in the path) is 170 characters. I generally remove "Device Type" from the default pattern to reduce chances of auto-generated names reaching the limit.
- Domain admin accounts can set restriction to pre-defined server which will have a drop-down menu to select
- Local admin accounts will need to define target address and name well.
- Account Name Limitation
- Windows - 32
- *NIX
- Legacy Unix - 8 characters
- Modern *NIX - 32
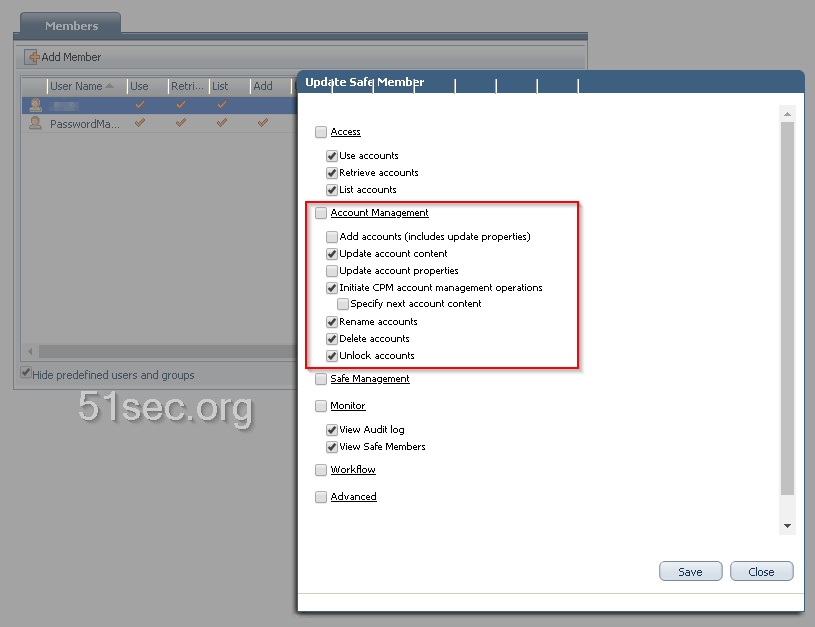
Grant User to Add New Account to their Own Safe
Grant user to account management ability.
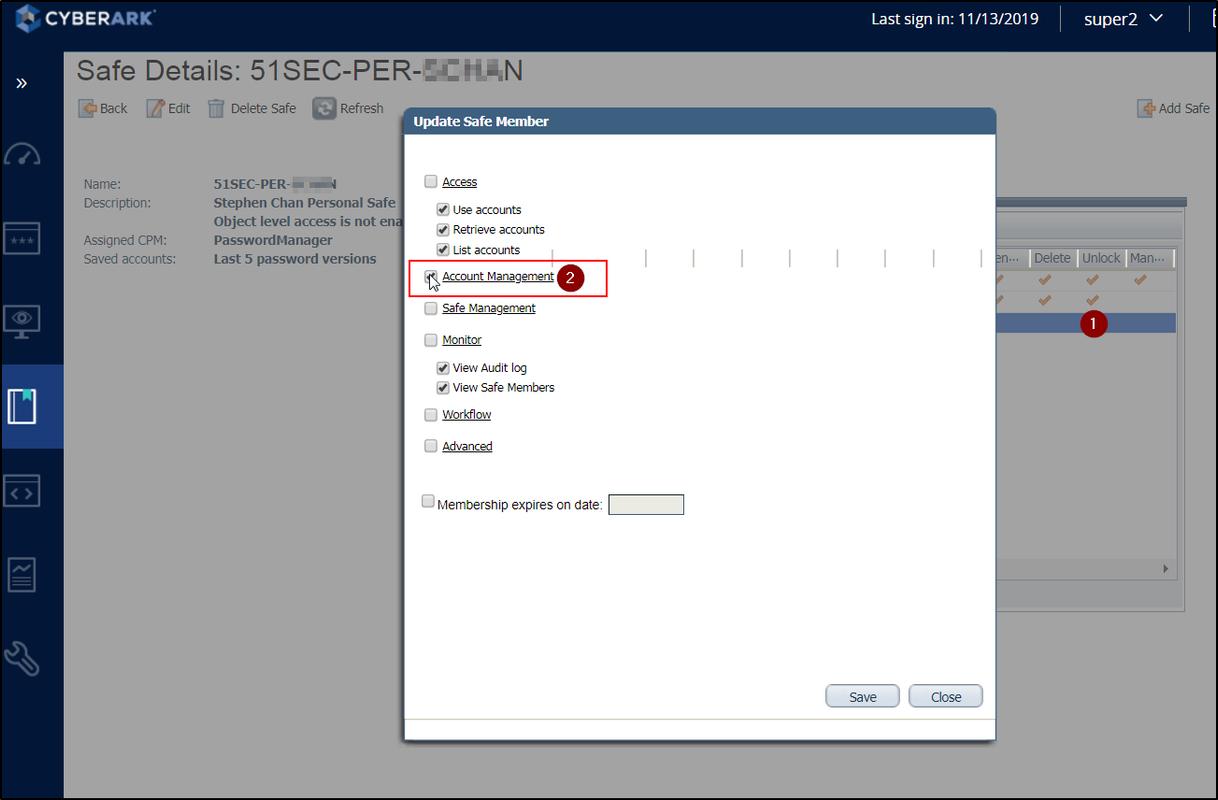
Or more specifically, you can remove some permissions from user to have better control. Even update account content can be removed.
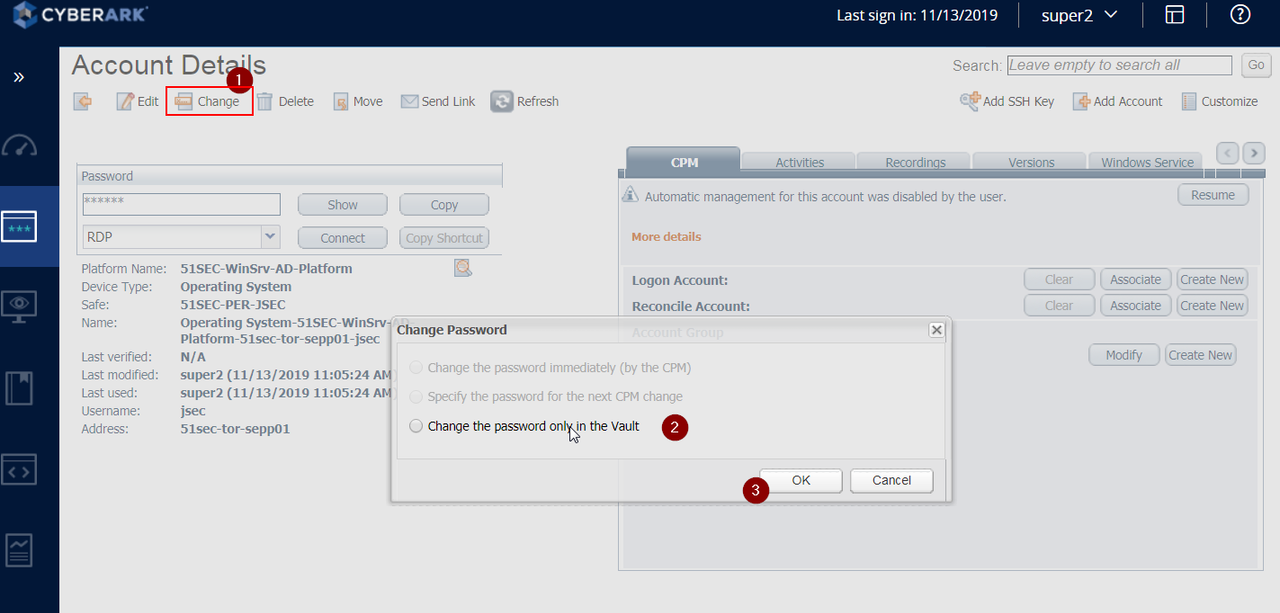
Change account password
To change added account's password, you will need to switch Web Gui to classic interface mode.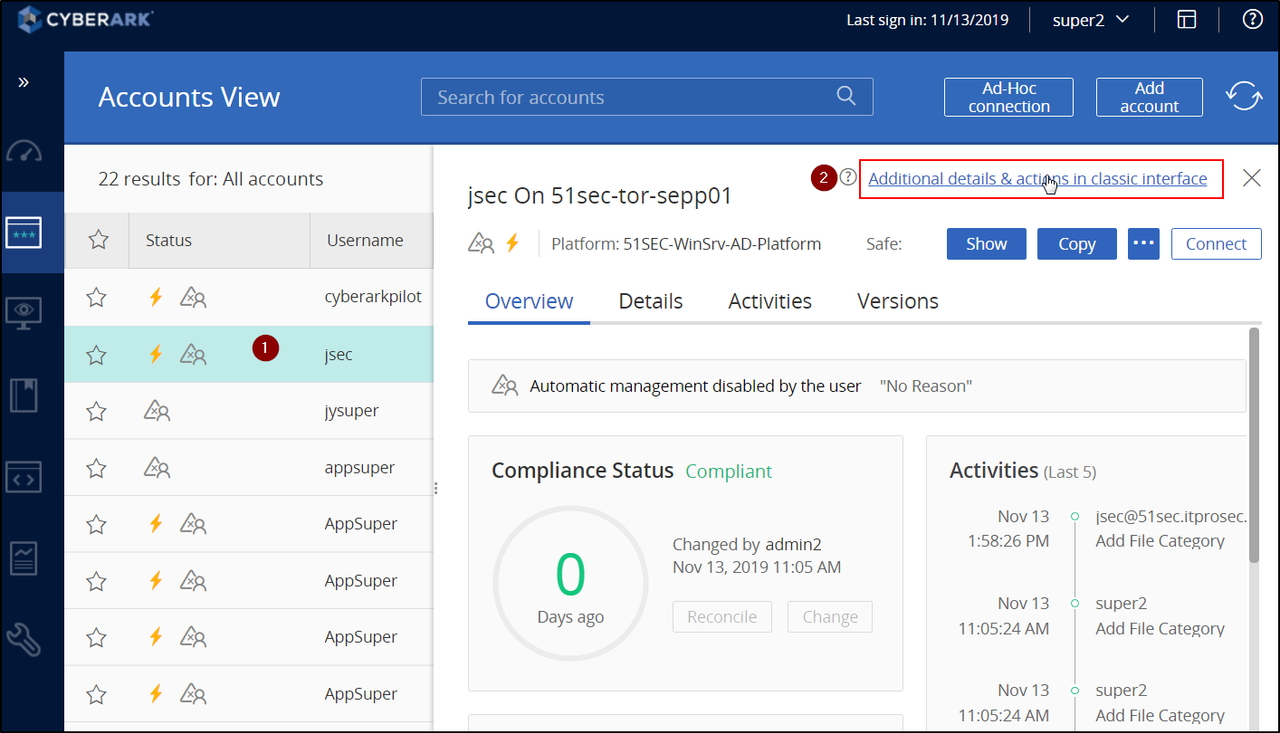
YouTube Video:
Reset CyberArk Built-in administrator Password
- Master user is automatically added to all new safes with full rights - even safes it did not create. It requires a special configuration in order to login into it.
- Administrator is a built-in administrative user, but unlike Master it does not get automatically assigned to all new safes created (by other users).
If for somehow, your CyberArk administrator account has been locked up or you want to update the password, you can follow following steps to work on:
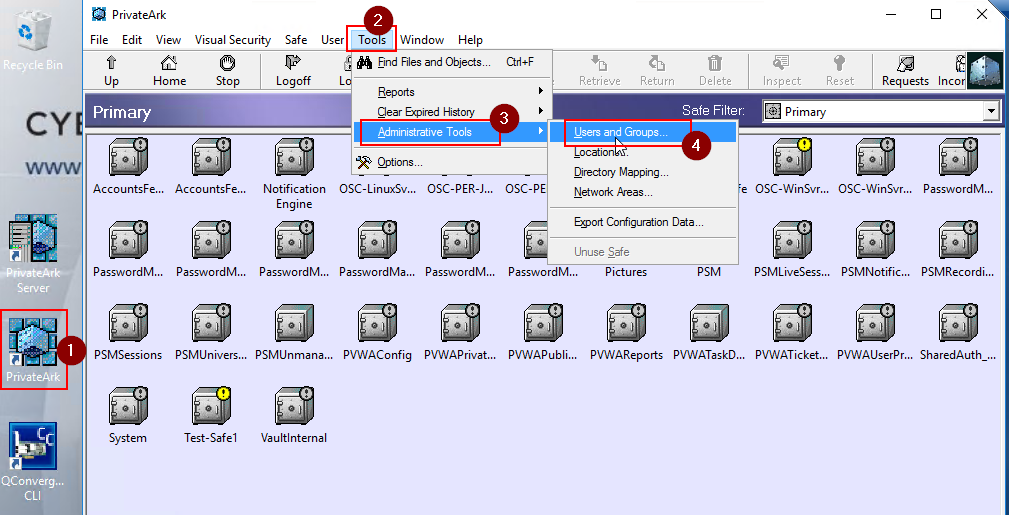
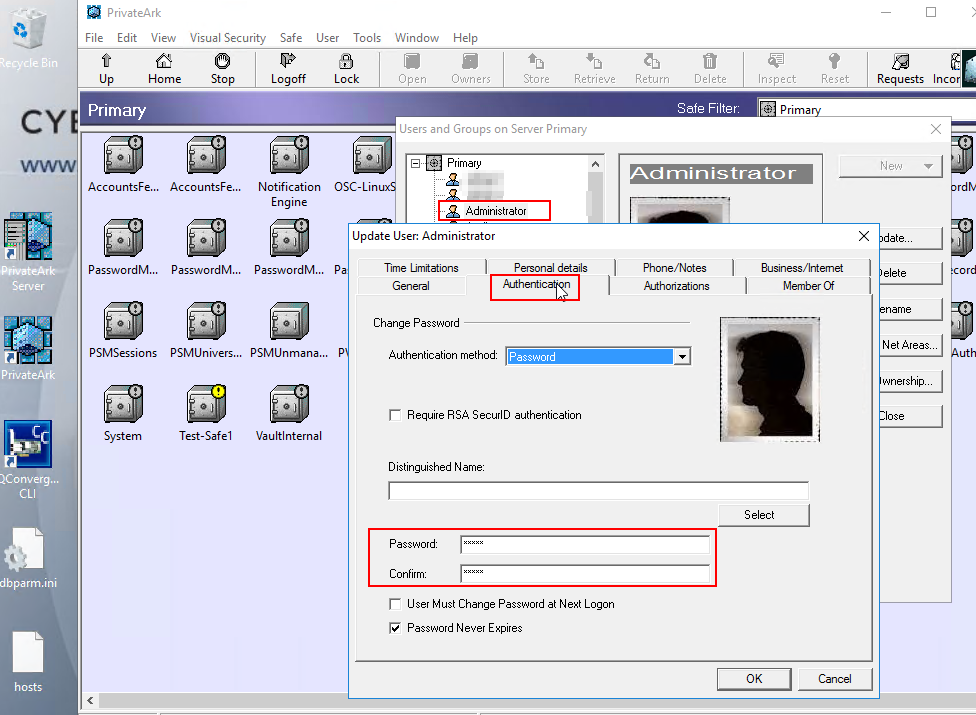
First, you will have RDP into your PVWA which has PrivateArk installed.
Then, Log into PrivateArk client with another account with Vault-level permissions such as Administrator2 . Click Tools > Administrative Tools > users and groups. Click on the "Administrator" account, and then "Trusted Networks Areas..." and click Activate.
Reset/Log in CyberArk Built-in Master Password
As per best practices you should always have a Backup administration account for operational stuff and shouldn't use Administrator account. In case you got into such situation, here are some thing you can follow to help you out:Steps to Log In with Master Account:
- Place Master CD into server.
- Double click Private Ark icon
- Enter 'Master' as the user and enter password.
More details from CyberArk KB:
To log in as the Master user please do the following on the Vault Machine:
1. Insert the Master CD in the CD Drive
2. Verify if the dbparm.ini lists the location of the Master key in the Master CD
• dbparm.ini is located in the following location : Drive:\Program Files (x86)\PrivateArk\Server\dbparm.ini
• In v10+, the dbparm.ini is located here: Drive:\Program Files (x86)\PrivateArk\Server\conf\dbparm.ini
• The Master key parameter and value can be found as the following in the dbparm.ini file : RecoveryPrvKey="Drive:\RecPrv.key"
• If the location needs to be changed, a restart of the PrivateArk Server service is required for changes to take effect
3. Start the PrivateArk Client Application on the Vault Machine
4. Right Click on the "<VaultName> Server" icon within the Private Ark Client and choose "Properties" > "Advanced" > "Authentication" tab > "Authentication methods" section > Choose "PrivateArk authentication" > Click OK in the advanced window > Click OK in the Properties window
5. Log into the Vault with the username as "Master"
• If you need to reset the Master password, this can be accomplished by going to User > Set password after logging in
Delete Safe / Change Safe Members
There is a KB for how to delete safe member: Delete Safe member
using following URL to delete a safe member.
https://<IIS_Server_Ip>/PasswordVault/WebServices/PIMServices.svc/Safes/{SafeName}/Members/{MemberName}
Unfortunately, I got following error;
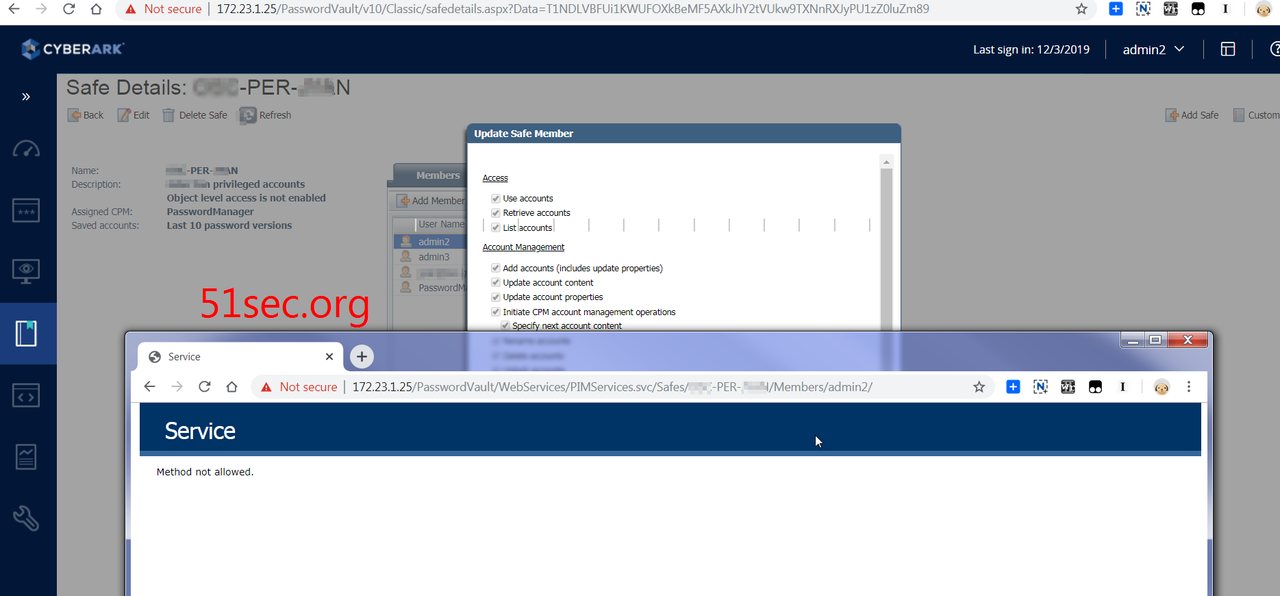
At the end of account member record, there is a delete icon. You will need drag slide bar to the end to see it. That will delete member.
If the safe is not empty, the objects inside safe might have retention requiremetns , by default it is 7 days, you will have to wait 7 days to delete the safe.
Reconcile Account
Passwords in the Vault must be synchronized with corresponding passwords on remote devices to ensure that they are constantly available. Therefore, the CPM runs a verification process to check that passwords are synchronized. If the verification process discovers passwords that are not synchronized with their corresponding password in the Vault, the CPM can reset both passwords and reconcile them. This ensures that the passwords are resynchronized automatically, without any manual intervention.During password reconciliation, the unsynchronized password is replaced in the Vault and on the remote device with a new password that is generated according to the relevant platform. As soon as reconciliation is finished successfully, all standard verifications and changes can be carried out as usual. Users can see details of the last reconciliation process in the Operational Views in the Accounts List.
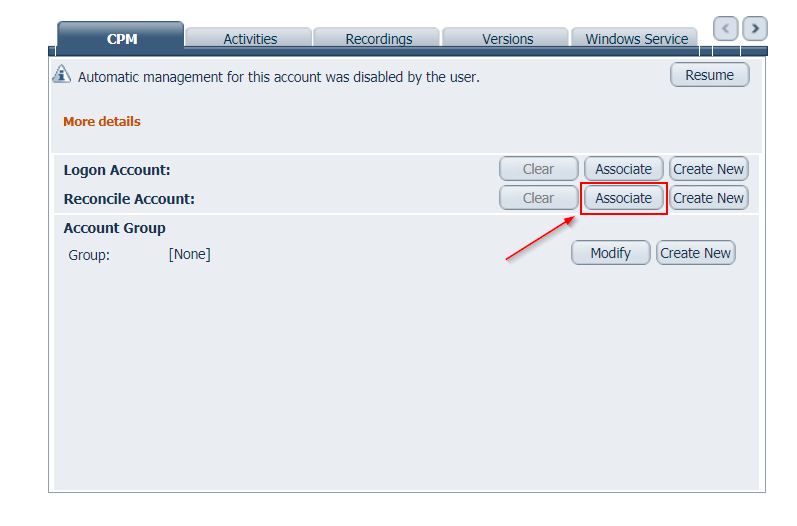
Find account details and copy them into Platform Password Reconciliation settings. Then all accounts (new or existing) will have this setting automatically.

References
- How to log in as the Master user (CyberArk KB)


![[5 Mins Docker] Deploy FreshRSS Using Docker Run Command and Deploy To Fly.io](https://lh3.googleusercontent.com/blogger_img_proxy/AEn0k_t20tPTI1bcK4X1UXiN4UE-5m1Hv-XsJIeENKCWQ4RdO1E1yNU563ywaTWvAPSsUj7i6IRS7zQv2xkzeGKRlBtpuOEsdBOuOd_jMmJeJEwbMw)


No comments:
Post a Comment