The Digital Vault, also referred to as the Password Vault, is the secure location where your passwords and sensitive data can be stored. The Vault is designed to be installed on a dedicated computer, for complete data isolation. It is packed with state‑of‑the‑art security technology, and is already configured and ready‑to‑use upon installation. This means that the security system does not require any security expertise or complicated configuration to operate at peak capacity.
The Vault tracks access to every password that it stores, and provides a central repository for detailed auditing information.
EPV = Digital Vault + PVWA + CPM
PAS = EPV + PSM
Related Posts:

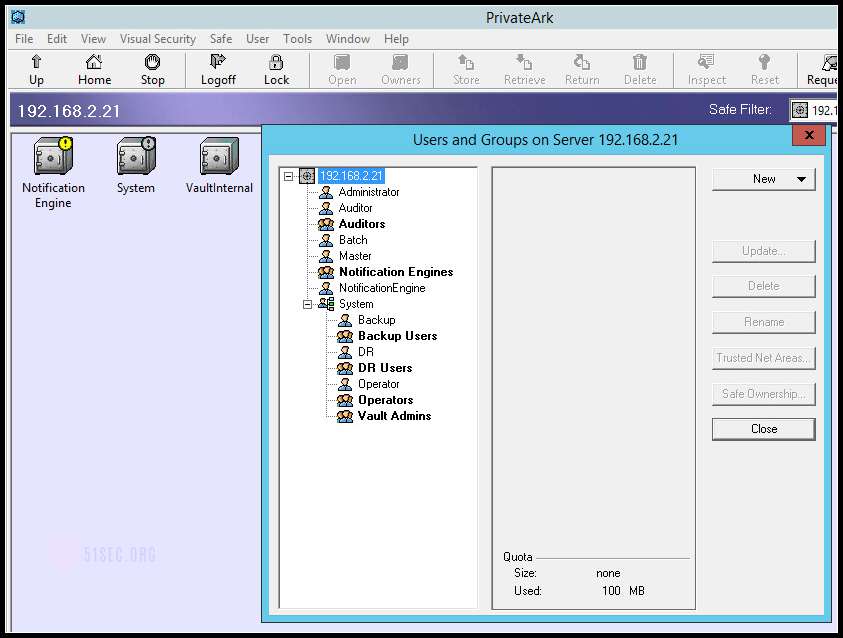
After completed Vault Server installation, you will find there are three built-in Safes in the vault and located at c:\PrivateArk folder:
1. Notification Engine
2. System
3. VaultInternal.
There are 8 built-in users and 6 built-in groups as show below.
- CyberArk PAS (Vault PrivateArk Server and Client) Installation - Part 1
- CyberArk PAS (PVWA) Installation - Part 2
- CyberArk PAS (CPM) Installation - Part 3
- CyberArk PAS (PSM) Installation - Part 4
- CyberArk PAS (PTA) Installation - Part 5
- CyberArk PAS (PTA) Configuration - Part 5.1
- CyberArk PSM HTML5 Gateway Installation and Configuration - Part 6
Enterprise Password Vault Solution (Vault)
For the vaults (details are in separate post):
- Install Windows 2012 R2 or Windows 2016
- Install at least .NET Framework 4.6.2 (if that or a greater version not already included)
- DO NOT join it to the domain
- Install all the latest Windows OS patches
- Remove all protocols and services from the network card except TCP/IP version 4
- The rest is performed during the install
Digital Vault Server Installation:
Support Platforms:- The Digital Vault server requires an Intel Pentium IV (or compatible) processor or later.
- Support Windows 2016 and Windows 2012 R2
- .NET Framework 4.5.2 (It will be installed automatically once you started setup.exe installation wizzard). Reboot will be required.
- On the Vault machine, create a new folder and copy the contents of the installation package to it.
There will be three folders. One for Server, one for client, and the third one for high availability DR.
- Display the contents of the Server folder, then start the installation procedure:■Double-click Setup.exeor,■On systems that are UAC-enabled, right-click Setup.exe, then select Run as Administrator.The Vault installation wizard appears and displays a list of required features that it will install on your computer before it can install the Digital Vault
- Click Install to begin the installation process; the installation process begins and the PrivateArk Server Setup window appears,
- Select Installation Locations.
- Installation
- Select Skip Remote Control Agent Configuration to proceed to the next step of the installation procedure without configuring the Remote Control Agent,
- If you skipped Remote Contral Agent Configuration here , and later you want it to be enabled, you might need to go through lots of steps to bring t back. Strongly suggest you choose it now
- To install RabbitMQ, select the checkbox, then click Next, to proceed to the next step of the installation.
- This step of the installation hardens the Vault machine.
- Hardening can be done later.
- To confirm that the Vault hardening procedure will be run as part of the installation, click Next,
- This step of the installation enables you to specify the name of the folder where the Server files will be stored,
- Setup Passwords
- The next step of the installation prompts you for passwords for the built-in Master user and Administrator user
- Type the Master user’s password, then type it again to confirm.
- Type the Administrator user’s password, then type it again to confirm
- Select Yes, I want to restart my computer now, then click Finish to restart your computer.
- You also can choose no, and after installed PrivateArk client then do restart.
- The installation automatically updates your Windows Start menu, places a PrivateArk Server shortcut icon on the desktop, and updates the computer registry information. If you configured the Remote Control Agent during installation, it will start automatically after you restart your computer.
- Create a new Local User for the Logic Container Service
- CyberArk has created a script that covers all the manual steps described below for all versions.
- The LogicContainerUserConfiguration.ps1 script can be downloaded from the CD image.
- To run the script, copy it to the Vault server and run it either by double-clicking the script or by opening PowerShell and running the script.
- The script creates a log file next to it detailing all the steps done.
After completed Vault Server installation, you will find there are three built-in Safes in the vault and located at c:\PrivateArk folder:
1. Notification Engine
2. System
3. VaultInternal.
There are 8 built-in users and 6 built-in groups as show below.
Manual Hardening
1. From a command line, run an elevated cmd.exe prompt and navigate to the
\Hardening folder.
2. Run the following command:
CAVaultHarden.exe StandAloneVault "[Full Path of Current
Directory]" /AllowRDP [RDP Station IP]
For example: CAVaultHarden.exe StandAloneVault "c:\temp" /AllowRDP 192.168.2.71
The usage from CAVaultHarden.exe is complete wrong. Do not follow the usage from exe file.
PrivateArk Remote Control Agent
If PriavateArk Remote Control Agent service has been installed during vault server installation, you will have a problem to start it later.I got following error message and not sure how to resolve it.
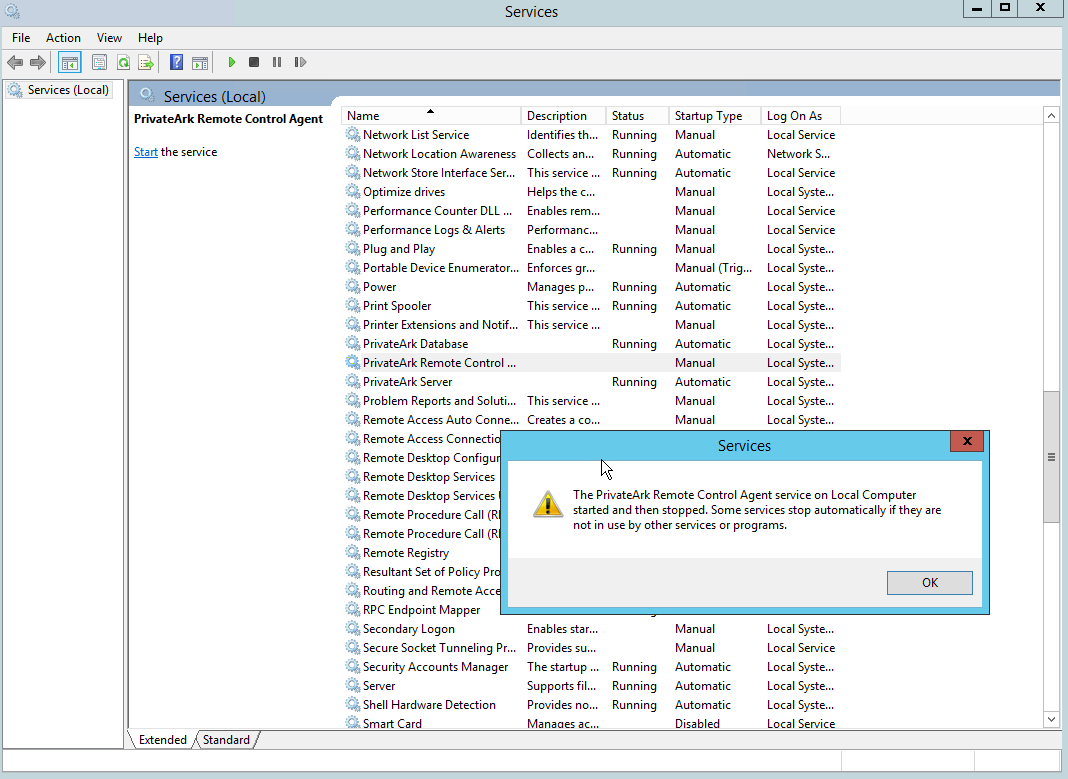
Only thing I can think about is to remove Vault installation and reinstall it with enable Remote Control agent during installation. Not sure how I could enable it manually after installed Vault.
Only thing I can think about is to remove Vault installation and reinstall it with enable Remote Control agent during installation. Not sure how I could enable it manually after installed Vault.
Test Remote Control and Admin
The Remote Control Client is a utility that runs from a command line interface and carries out tasks on a Vault component where the Remote Control Agent is installed. It does not require any Vault components to be installed on the same computer, including a PrivateArk Client.
The Remote Control utility can be used for administrative tasks on the Password Vault and the DR Vault. It contains several general commands that are the same for each component. In these commands, use the following names to specify each component:
| Component | Name |
|---|---|
| Vault server | Vault |
| Disaster Recovery Vault | PADR |
| Event Notification Engine | ENE |
| Cluster Vault Manager | CVM |
At a command line prompt, access the PARClient folder and do the following:
- Access the Vault and find out the current status of the Vault. Specify the password of the Remote Control Agent. In this example, the password is ‘Asdf1234’.
>parclient 10.1.1.250/Asdf1234 /c "status vault"
- Find out the current CPU usage on the Vault.
>parclient 10.1.1.250/Asdf1234 /c getcpu
- Set the ‘Debug’ parameter in the DBParm.ini file in the Vault.
>parclient 10.1.1.250/Asdf1234 /c “SetParm Vault Debug=yes /Immediate”
Test remote administration on the DR Vault
- Access the DR Vault and start the DR service:
>parclient 10.1.1.250/Asdf1234 /c "start PADR"
- Find out the status of the DR Vault:
>parclient 10.1.1.250/Asdf1234 /c “status padr”
- Return the DR Vault log file:
>parclient 10.1.1.250/Asdf1234 /c “getlog padr”
Test remote control and administration on the ENE
At a command line prompt, access the PARClient folder and do the following:
- Start the ENE service. Specify the password of the Remote Control Agent. In this example, the password is ‘Asdf1234’.
>parclient 10.1.1.250/Asdf1234 /c "start ENE"
- Now find out the current status of the ENE service:
>parclient 10.1.1.250/Asdf1234 /c “status ENE”
The above command should show you that the ENE service is active.
- Lastly, stop the ENE service.
>parclient 10.1.1.250/Asdf1234 /c "stop ENE"
To enable the ENE, refer to Enabling the ENE in the Privileged Access Security Implementation Guide.


Great article and video's you have posted. Really helps me a lot, so thank you very much for all the effort you must have put into it all.
ReplyDeleteKind regards,
Gerard
You are welcome. Also thanks for comments. It is a long journey to learn CyberArk.
DeleteGreat article, thanks so very much for the efforts. Quick question, is there a Part-2 to this document? If yes, can you pls share the link?
ReplyDeleteYou can find other parts from related posts:
DeleteCyberArk PAS (PVWA) Installation - Part 2
CyberArk PAS (CPM) Installation - Part 3
CyberArk PAS (PSM) Installation - Part 4
CyberArk PAS (PTA) Installation - Part 5
CyberArk PAS (PTA) Configuration - Part 5.1
CyberArk PSM HTML5 Gateway Installation and Configuration - Part 6https://blog.51sec.org/logout?d=https://www.blogger.com/logout-redirect.g?blogID%3D3065805205966125044%26postID%3D318040651611400956