Here is some explanation about the different between Master account and built-in Administrator account.
Master user is automatically added to all new safes with full rights - even safes it did not create. It requires a special configuration in order to login into it.
Administrator is a built-in administrative user, but unlike Master it does not get automatically assigned to all new safes created (by other users).

Before Logging into Vault Using Master Account
A couple of ways to do that.
1 Using Master CD
- Place Master CD into server.
- Double click Private Ark icon
- Enter 'Master' as the user and enter password.
2 Using Master Key File
- Edit dbparm.ini File
- Change RecoveryPrvKey settings to your Master Key file location
- Restart PrivateArk Server Service
- Log in using Master Account
DBPARM.ini File
[MAIN]
TasksCount=20
DateFormat=DD.MM.YY
TimeFormat=HH:MM:SS
ResidentDelay=10
BasePort=1858
LogRetention=7
LockTimeOut=30
DaysForAutoClear=30
DaysForPicturesDistribution=Never
ClockSyncTolerance=600
TraceArchiveMaxSize=5120
VaultEventNotifications=NotifyOnNewRequest,NotifyOnRejectRequest,NotifyOnConfirmRequestByAll,NotifyOnDeleteRequest
RecoveryPubKey=C:\keys\operator\RecPub.key
ServerKey=C:\keys\operator\Server.key
StagingAreaDirectory=C:\PrivateArk\StagingArea
EntropyFile=C:\PrivateArk\Safes\entropy.rnd
DatabaseConnectionPasswordFile=C:\keys\operator\VaultUser.pass
ServerCertificateFile=C:\keys\operator\Server.pem
ServerPrivateKey=C:\keys\operator\Server.pvk
*AllowedVirusSafeFileTypes=DOC,DOT,XLS,XLT,EPS,BMP,GIF,TGA,TIF,TIFF,LOG,TXT,PAL,,
AutoClearSafeHistory=Yes,1,1,2
AutoClearUserHistory=Yes,1,3,4
AutoSyncExternalObjects=Yes,1,23,24
DebugLevel=PE(1),PERF(1,2)
VaultId=3efd1eb0-7012-11e9-8329-63fd6b776400
DefaultTimeout=30
PooledSocketTimeout=600
RecoveryPrvKey=D:\RecPrv.key
EnablePreDefinedUsers=ALL
AutomaticallyAddBuiltInGroups="Backup Users,DR Users,Operators,Auditors,Notification Engines"
LicenseUsageAlertLevel=85,90,99
MaxTasksAllocation=8(CPM,AIMApp,AppPrv):7-23,16(CPM,AIMApp,AppPrv):23-7,1(PTAApp)
AllowNonStandardFWAddresses=[192.169.1.25],Yes,3389:outbound/udp,3389:inbound/udp
AllowNonStandardFWAddresses=[192.169.1.25],Yes,3389:outbound/tcp,3389:inbound/tcp
AllowNonStandardFWAddresses=[192.169.1.22],Yes,514:outbound/udp,514:inbound/udp
AllowNonStandardFWAddresses=[192.169.1.34],Yes,514:outbound/udp,514:inbound/udp
AllowNonStandardFWAddresses=[192.168.1.146],Yes,25:outbound/tcp
AllowNonStandardFWAddresses=[10.1.4.41],Yes,25:outbound/tcp
ComponentNotificationThreshold=PIMProvider,Yes,30,1440;AppProvider,Yes,30,1440;OPMProvider,Yes,30,1440;CPM,Yes,720,1440;PVWA,Yes,90,1440;PSM,Yes,30,1440;DCAUser,Yes,60,2880;SFE,Yes,10,2880;FTP,Yes,60,2880;ENE,Yes,60,360
UserLockoutPeriodInMinutes=-1
MaskUserIsSuspendedMessage=No
TerminateOnDBErrorCodes=2003
[BACKUP]
BackupKey=C:\keys\operator\Backup.key
[CRYPTO]
SymCipherAlg=AES-256
ASymCipherAlg=RSA-2048
[SYSLOG]
SyslogTranslatorFile=Syslog\ArcSight.xsl
SyslogServerPort=514
*SyslogTranslatorFile=Syslog\ArcSight.xsl,Syslog\PTA.xsl
*SyslogServerPort=514,11514
SyslogServerIP=192.169.1.22,192.169.1.34
*SyslogServerProtocol=TCP,UDP
SyslogServerProtocol=UDP
SyslogMessageCodeFilter=0-999
SyslogSendBOMPrefix=No
UseLegacySyslogFormat=No
SendMonitoringMessage=No

[NTP]
AllowNonStandardFWaddresses=[192.168.1.110],Yes,123:outbound/udp,123:inbound/udp
AllowNonStandardFWaddresses=[192.168.1.111],Yes,123:outbound/udp,123:inbound/udp
Important: You don’t need to do anything here, but in a real environment, you would have to retrieve the Master CD from a physical safe, load it into the Vault server, and only then be able to connect to the Vault as Master.
Log in using Master Account
1 Open the PrivateArk Client from the Vault server machine.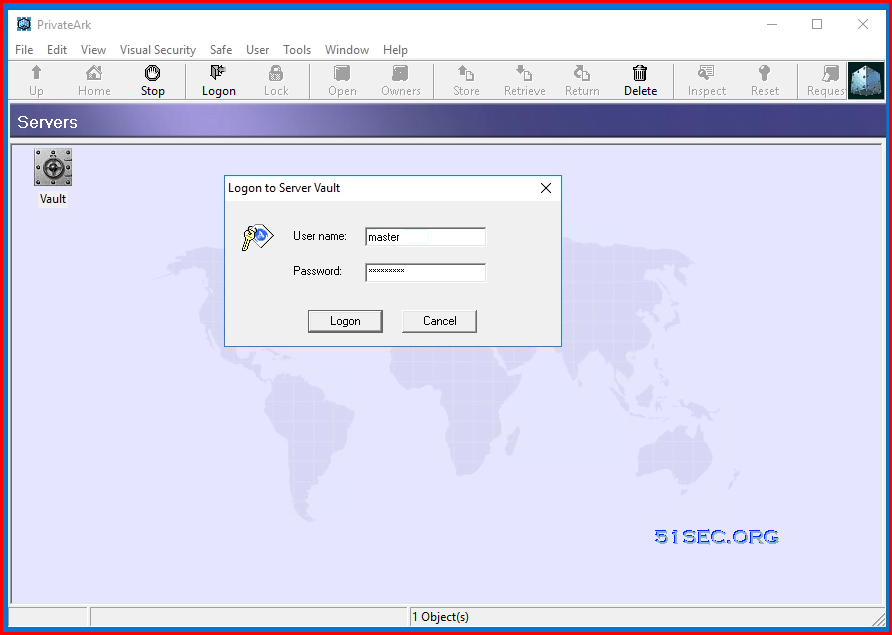
3 After master account logged in, you will find more safes will showing in the PrivateArk window.
Total 35 safes.


![[5 Mins Docker] Deploy FreshRSS Using Docker Run Command and Deploy To Fly.io](https://lh3.googleusercontent.com/blogger_img_proxy/AEn0k_tbpLKLUKopSi5qWQK8xVSTT5xLqSmHZR2XtLbze8wE_7J3xLdNvRrHvadlQhqadrQAH8BiZSOId8eiLyANyWIn0A7pXtTEm6DXSkMXNYE2zw)


No comments:
Post a Comment