 The Raspberry Pi is a credit-card sized general purpose Linux computer designed and manufactured by the Raspberry Pi Foundation, a non-profit organization dedicated to making computers and programming instruction as accessible as possible to the widest number of people. Just recently I installed at home to play with it. There are already lots of resources available from Internet. This post and others are used to record all steps I did for making it useful to my daily work.
Power Consumption
| Pi Model | Pi State | Power Consumption |
|---|---|---|
| 4 B | HDMI off, LEDs off | TODO |
| 4 B | HDMI off, LEDs off, onboard WiFi | TODO |
| 3 B+ | HDMI off, LEDs off | 350 mA (1.7 W) |
| 3 B+ | HDMI off, LEDs off, onboard WiFi | 400 mA (2.0 W) |
| 3 B | HDMI off, LEDs off | 230 mA (1.2 W) |
| 3 B | HDMI off, LEDs off, onboard WiFi | 250 mA (1.2 W) |
| 2 B | HDMI off, LEDs off | 200 mA (1.0 W) |
| 2 B | HDMI off, LEDs off, USB WiFi | 240 mA (1.2 W) |
| Zero | HDMI off, LED off | 80 mA (0.4 W) |
| Zero | HDMI off, LED off, USB WiFi | 120 mA (0.7 W) |
| B+ | HDMI off, LEDs off | 180 mA (0.9 W) |
| B+ | HDMI off, LEDs off, USB WiFi | 220 mA (1.1 W) |
| A+ | HDMI off, LEDs off | 80 mA (0.4 W) |
| A+ | HDMI off, LEDs off, USB WiFi | 160 mA (0.8 W) |
Note: https://www.pidramble.com/wiki/benchmarks/power-consumption
Install Raspberry Pi Software
After you hooked up power cable, HDMI cable, mouse and keyboard, you will see the following screen: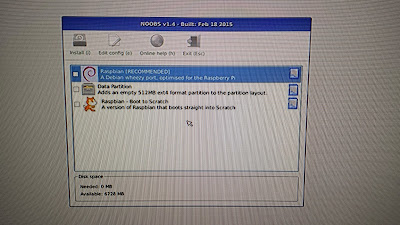
Run Raspberry Pi Software Configuration Tool
After you installed OS, the first time system will show you Raspberry Pi Software Configuration Tool to do some basic configuration such as change password, enable camera, etc.
sudo raspi-config
|
During installation, the screen will notify you, by default, the user name is pi and password is raspberry.
You can disable "wait network interface up"


After enabled SSH, you should be able to use SecreCRT or Putty this kind of tool to access it remotely.
From SSH session, you can check your network configuration:
or command
Enable SSH
From Raspberry Pi Software Configuration Tools Setup Option 8 Advanced Options:

After enabled SSH, you should be able to use SecreCRT or Putty this kind of tool to access it remotely.
Enable Wireless
My package has a usb wireless card. Followed instruction below, I was able to enable it.From SSH session, you can check your network configuration:
Linux raspberrypi 3.18.7-v7+ #755 SMP PREEMPT Thu Feb 12 17:20:48 GMT 2015 armv7l
The programs included with the Debian GNU/Linux system are free software; the exact distribution terms for each program are described in the individual files in /usr/share/doc/*/copyright. Debian GNU/Linux comes with ABSOLUTELY NO WARRANTY, to the extent permitted by applicable law. Last login: Mon Oct 5 00:54:54 2015 from 192.168.2.216 pi@raspberrypi ~ $ ifconfig |
ip a
To scan for WiFi networks, use the command
Adding your scanned wireless information to Raspberry Pi. You can use "sudo raspi-config" to do that as well.
Open the wpa-supplicant configuration file in nano:
Go to the bottom of the file and add the following:
In a couple of seconds, your Pi will join into SSID you entered and got the ip address
Temporary:
To scan for WiFi networks, use the command
pi@raspberrypi ~ $ sudo iwlist wlan0 scan
wlan0 Scan completed : Cell 01 - Address: C4:09:38:70:BB:DE ESSID:"Bobby" Protocol:IEEE 802.11bgn Mode:Master Frequency:2.437 GHz (Channel 6) Encryption key:on Bit Rates:144 Mb/s Extra:wpa_ie=dd1c0050f20101000050f20202000050f2040050f20201000050f2020c00 IE: WPA Version 1 Group Cipher : TKIP Pairwise Ciphers (2) : CCMP TKIP Authentication Suites (1) : PSK Extra:rsn_ie=30180100000fac020200000fac04000fac020100000fac020c00 IE: IEEE 802.11i/WPA2 Version 1 Group Cipher : TKIP Pairwise Ciphers (2) : CCMP TKIP Authentication Suites (1) : PSK Quality=100/100 Signal level=100/100 Cell 02 - Address: 84:94:8C:91:1D:28 ESSID:"Rogers02520" Protocol:IEEE 802.11bgn Mode:Master Frequency:2.422 GHz (Channel 3) Encryption key:on Bit Rates:300 Mb/s Extra:wpa_ie=dd1a0050f20101000050f20202000050f2020050f20401000050f202 IE: WPA Version 1 Group Cipher : TKIP Pairwise Ciphers (2) : TKIP CCMP Authentication Suites (1) : PSK Extra:rsn_ie=30180100000fac020200000fac02000fac040100000fac020000 IE: IEEE 802.11i/WPA2 Version 1 Group Cipher : TKIP Pairwise Ciphers (2) : TKIP CCMP Authentication Suites (1) : PSK IE: Unknown: DD270050F204104A000110104400010210470010BC329E00F1DD7F11B2F8600F84948C91103C000101 Quality=0/100 Signal level=42/100 Cell 03 - Address: 84:94:8C:C3:73:E8 ESSID:"SnowWhite" Protocol:IEEE 802.11bgn Mode:Master Frequency:2.412 GHz (Channel 1) Encryption key:on Bit Rates:300 Mb/s Extra:rsn_ie=30180100000fac020200000fac02000fac040100000fac020000 IE: IEEE 802.11i/WPA2 Version 1 Group Cipher : TKIP Pairwise Ciphers (2) : TKIP CCMP Authentication Suites (1) : PSK IE: Unknown: DD270050F204104A000110104400010210470010BC329E00F1DD7F11B2F8600F84948CC3103C000101 Quality=81/100 Signal level=44/100 |
Adding your scanned wireless information to Raspberry Pi. You can use "sudo raspi-config" to do that as well.
Open the wpa-supplicant configuration file in nano:
sudo nano /etc/wpa_supplicant/wpa_supplicant.conf
|
Go to the bottom of the file and add the following:
network={
ssid="Bobby" psk="password12345" } |
In a couple of seconds, your Pi will join into SSID you entered and got the ip address
pi@raspberrypi ~ $ ifconfig
eth0 Link encap:Ethernet HWaddr b8:27:eb:1c:f4:ae UP BROADCAST MULTICAST MTU:1500 Metric:1 RX packets:0 errors:0 dropped:0 overruns:0 frame:0 TX packets:0 errors:0 dropped:0 overruns:0 carrier:0 collisions:0 txqueuelen:1000 RX bytes:0 (0.0 B) TX bytes:0 (0.0 B) lo Link encap:Local Loopback inet addr:127.0.0.1 Mask:255.0.0.0 UP LOOPBACK RUNNING MTU:65536 Metric:1 RX packets:8 errors:0 dropped:0 overruns:0 frame:0 TX packets:8 errors:0 dropped:0 overruns:0 carrier:0 collisions:0 txqueuelen:0 RX bytes:1104 (1.0 KiB) TX bytes:1104 (1.0 KiB) wlan0 Link encap:Ethernet HWaddr 74:da:38:41:33:35 inet addr:192.168.2.218 Bcast:192.168.2.255 Mask:255.255.255.0 UP BROADCAST RUNNING MULTICAST MTU:1500 Metric:1 RX packets:3767 errors:0 dropped:10 overruns:0 frame:0 TX packets:816 errors:0 dropped:0 overruns:0 carrier:0 collisions:0 txqueuelen:1000 RX bytes:553750 (540.7 KiB) TX bytes:222808 (217.5 KiB) |
Assign Static IP Address:
pi@raspberrypi ~ $sudo nano /etc/network/interfaces
auto lo iface lo inet loopback iface eth0 inet dhcp allow-hotplug wlan0 iface wlan0 inet manual wpa-roam /etc/wpa_supplicant/wpa_supplicant.conf iface default inet static address 192.168.2.9 netmask 255.255.255.0 network 192.168.2.0 broadcast 192.168.2.255 gateway 192.168.2.1 |
Assign Domain Name Servers:
Temporary:
sudo sh -c 'echo "nameserver 8.8.8.8" >> /etc/resolv.conf'
Permanent:
# cat /etc/network/interfaces.d/50-cloud-init.cfg
# This file is generated from information provided by
# the datasource.  Changes to it will not persist across an instance.
# To disable cloud-init's network configuration capabilities, write a file
# /etc/cloud/cloud.cfg.d/99-disable-network-config.cfg with the following:
# network: {config: disabled}
auto lo
iface lo inet loopback

auto eth0
iface eth0 inet dhcp

allow-hotplug wlan0
iface wlan0 inet manual
        wpa-roam /etc/wpa_supplicant/wpa_supplicant.conf
iface default inet static
address 192.168.2.9
netmask 255.255.255.0
network 192.168.2.0
broadcast 192.168.2.255
gateway 192.168.2.1
dns-nameserver 8.8.8.8
# static domain_name_servers=8.8.8.8 1.1.1.1
$ sudo -i
HypriotOS/armv7: root@black-pearl in ~
# cat /etc/resolv.conf
# Dynamic resolv.conf(5) file for glibc resolver(3) generated by resolvconf(8)
#     DO NOT EDIT THIS FILE BY HAND -- YOUR CHANGES WILL BE OVERWRITTEN
nameserver 8.8.8.8
HypriotOS/armv7: root@black-pearl in ~
# ping www.google.ca
PING www.google.ca (172.217.1.3) 56(84) bytes of data.
64 bytes from yyz10s14-in-f3.1e100.net (172.217.1.3): icmp_seq=1 ttl=117 time=24.7 ms
64 bytes from yyz10s14-in-f3.1e100.net (172.217.1.3): icmp_seq=2 ttl=117 time=23.0 ms
^C
--- www.google.ca ping statistics ---
2 packets transmitted, 2 received, 0% packet loss, time 3ms
rtt min/avg/max/mdev = 23.014/23.865/24.716/0.851 ms
HypriotOS/armv7: root@black-pearl in ~
Google DNS: 8.8.4.4 8.8.8.8
You can utilize the Cloudflare Public DNS by using the IP addresses 1.1.1.1 and 1.0.0.1
The second popular alternative to the Google Public DNS is OpenDNS which is run by Cisco. It operates using the IP’s 208.67.222.222 and 208.67.220.220.
Display full screen image on Startup
- here is an one way to open an image full screen at boot up
- this solution uses gpicview that ships with the raspbian os
- add these lines in the application section of /etc/xdg/openbox/lxde-pi-rc.xml
<application name="gpicview">
<fullscreen>true</fullscreen>
</application>
- run this command to reload the openbox config
/etc/xdg/openbox>openbox --reconfigure
- create a .sh file, e.g. /home/pi/launch_gpicview.sh (you can give the .sh file any name you want)
#!/bin/bash
gpicview /home/pi/[your_image_file]
- give the .sh file execution permissions
> chmod +x /home/pi/launch_gpiciview.sh
- test the .sh file
> ./launch_gpicview.sh
- create a .desktop file, e.g. /home/pi/.config/autostart/launch_gpicview.desktop
[Desktop Entry]
Name=lfg_start_gpic
Exec=/home/pi/launch_gpicview.sh (this is the .sh file you create above)
Type=application
- reboot
- press esc to exit full screen mode
- press q to close gpicview
Note: https://forums.raspberrypi.com/viewtopic.php?t=207795
References:
- Installation Instructions for Raspberry Pi
- How to Configure Your Raspberry Pi for Remote Shell, Desktop, and File Transfer
- VNC (VIRTUAL NETWORK COMPUTING)


No comments:
Post a Comment