I have searched CyberArk document site and found following two KBs are very helpful:
- https://docs.cyberark.com/Product-Doc/OnlineHelp/PAS/Latest/en/Content/PAS%20INST/Optional-Setting-up-PSM-for-Databases-and-Virtualization.htm
- https://docs.cyberark.com/Product-Doc/OnlineHelp/PAS/Latest/en/Content/PAS%20INST/Optional-Setting-up-PSM-for-Databases-and-Virtualization.htm#_Ref292008898
Eventually I have gone through those documents and guessed some steps to get this configuration working. I am trying to summarize those steps here for future reference:
First, you will need to have your PVWA, CPM, PSM and Vault server working properly. You already can use PSM to manage your remote RDP/SSH connections to target servers.
1. Download and Install SQL Server Management Studio (SSMS) on your PSM server.
b. For version 17 and earlier, you can find it from https://docs.microsoft.com/en-us/sql/ssms/release-notes-ssms?view=sql-server-ver15#previous-ssms-releases. For example, version 17.91 download link is https://go.microsoft.com/fwlink/?linkid=2043154&clcid=0x409
c. Installation process is very straightforward. Click next , next , next, you should be able to get it done.
Note: For SSMS 18, there is a new connection component for it at Market Place: https://cyberark-customers.force.com/mplace/s/#a352J000000pQWkQAM-a392J000001h4KeQAI
2. PSM AppLocker Configuration
The steps for PSM AppLocker configuration is well documented at https://docs.cyberark.com/Product-Doc/OnlineHelp/PAS/Latest/en/Content/PAS%20INST/Optional-Setting-up-PSM-for-Databases-and-Virtualization.htm#_Ref292008898Here is just a copy from the section relating to this step:
Note: You can find out file PSMConfigureAppLocker.xml at location: C:\Program Files (x86)\CyberArk\PSM\Hardening
The PSM AppLocker configuration is saved in the PSMConfigureAppLocker.xml configuration file and must be edited manually before you run the configuration script.
- Remove the read-only permissions from the PSMConfigureAppLocker.xml file.
- In the Hardening subfolder of the PSM installation folder, open the PSMConfigureAppLocker.xml configuration file and edit it as described in the next steps.
- Configure the AppLocker to permit SQL Server Management Studio to run on the PSM server.
- Modify the SQL Server Management Studio <version> processes section:SQL Server Management Studio VersionAdd2008
<Application Name="SSMS2008" Type="Exe" Path="C:\Program Files (x86)\Microsoft SQL Server\100\Tools\Binn\VSShell\Common7\IDE\Ssms.exe" Method="Publisher" />2012<Application Name="SSMS2012" Type="Exe" Path="C:\Program Files (x86)\Microsoft SQL Server\110\Tools\Binn\ManagementStudio\Ssms.exe" Method="Publisher" />2016<Application Name="SSMS2016" Type="Exe" Path="C:\Program Files (x86)\Microsoft SQL Server\130\Tools\Binn\ManagementStudio\Ssms.exe" Method="Publisher" />2017<Application Name="SSMS2017" Type="Exe" Path="C:\Program Files (x86)\Microsoft SQL Server\140\Tools\Binn\ManagementStudio\Ssms.exe" Method="Publisher" /> - Make sure that the paths specified in the PSMConfigureAppLocker.xml match the installation paths of SQL Server Management Studio.
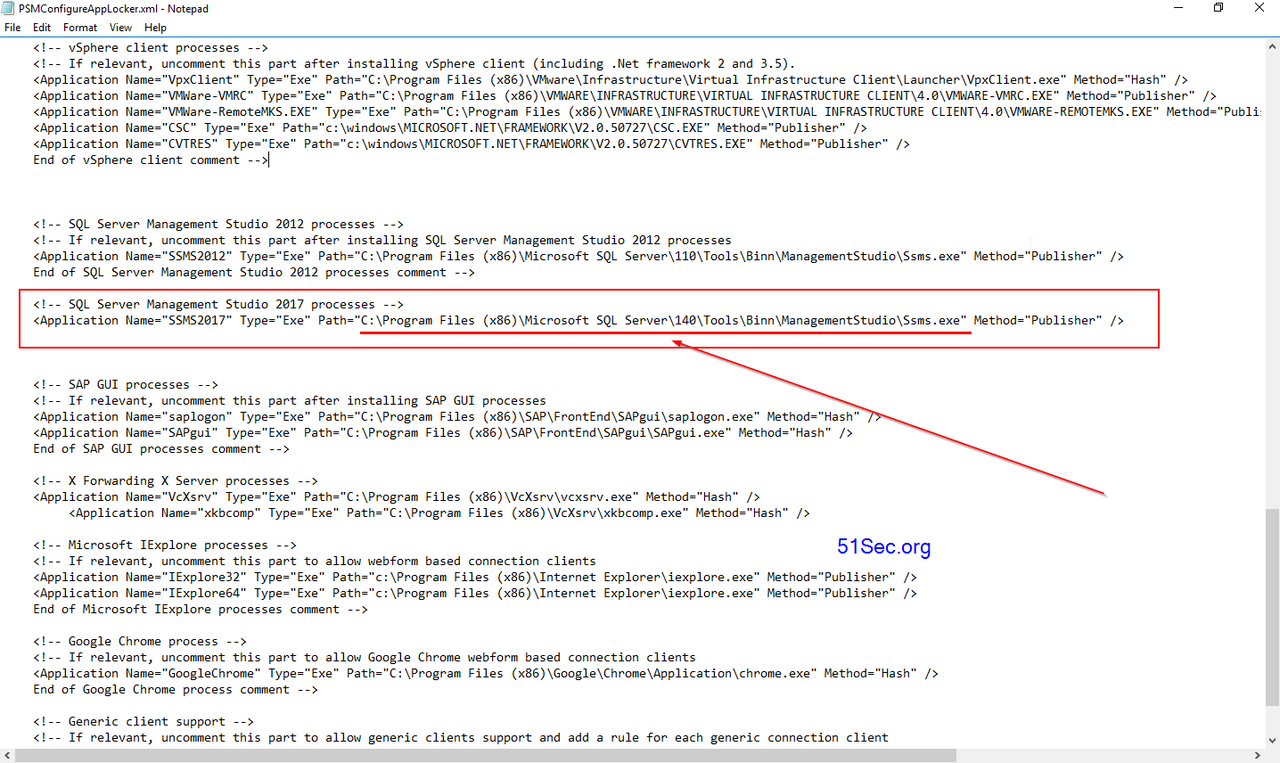
- Save the PSMConfigureAppLocker.xml configuration file and close it.
- Open a PowerShell window running as administrator, and use the following command to start the AppLocker script:
C:\Windows\system32>CD "C:\Program Files (x86)\CyberArk\PSM\Hardening"

C:\Program Files (x86)\CyberArk\PSM\Hardening>.\PSMConfigureAppLocker.ps1
3. Change PVWA Configuration for PSM Connection Component
Update the PSM-SQLServerMgmtStudio and PSMSQLServerMgmtStudio-Win connection components as follows:- In the PVWA, click ADMINISTRATION to display the System Configuration page, then click Options; the main system configuration editor appears.
- Expand the Connection Components section, then expand the PSMSQLServerMgmtStudio connection component.

- For PSM-SQLServerMgmtStudio: In Target Settings, set the ClientApp parameter to the SQL Server Management Studio installation path on the PSM machine.
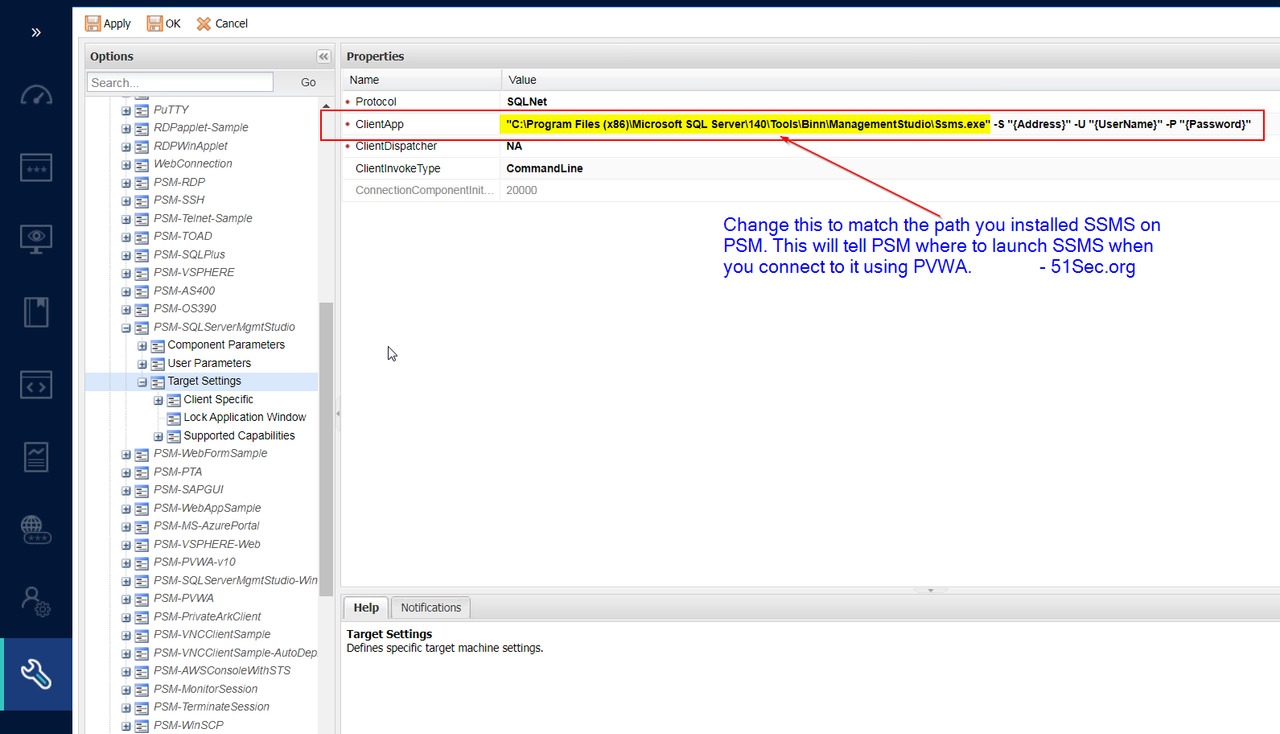
- For PSM-SQLServerMgmtStudio-Win: In Target Settings > Client Specific, set the ClientInstallationPath parameter value to the SQL Server Management Studio installation path on the PSM machine.
- For PSM-SQLServerMgmtStudio and PSM-SQLServerMgmtStudio-Win: In Target Settings > Client Specific, make sure that the WaitBeforeCmdlineParmsHide parameter value is set to 20000.
- Expand Target Settings, then select Lock Application Window.
- For PSM-SQLServerMgmtStudio: Right-click the MainWindowClass parameter and in the pop-up menu, select Revert to Default. This clears the MainWindowClass setting. For PSM-SQLServerMgmtStudio-Win: Set the parameter Enable to No.
Donot forget to do IISReset on your PVWA to get your configuration change into effect.
After configuring the PSM-SQLServerMgmtStudio or PSMSQLServerMgmtStudio-Win, when trying to connect you might see an error message with the title "PSM Disconnect Failed", with further dialog: PSMSR133E [<unique identifier>] Failed to create process <Program Path>. Code: 2
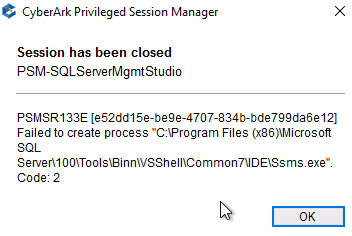 Above screenshot shows a different path. The cause of the problem is generally an invalid program path. For example, check to make sure that any program with \Program Files (x86) in the path has a space between the Files and (x86)
After configuring the PSM-SQLServerMgmtStudio or PSMSQLServerMgmtStudio-Win, when trying to connect you might see an error message with the title "PSM Disconnect Failed", with further dialog: PSMSR133E [<unique identifier>] Failed to create process <Program Path>. Code: 2
To fix this error correct the program path by going to Administration -> Options -> Connection Components and then Target Settings for the connection component. If the path has configured correctly, you might need to restart your PVWA and PSM services to get your settings taking effect right away.
4. Configure Safe, Platform and Account
4.1 Duplicate Built-in Microsoft SQL Server Platform template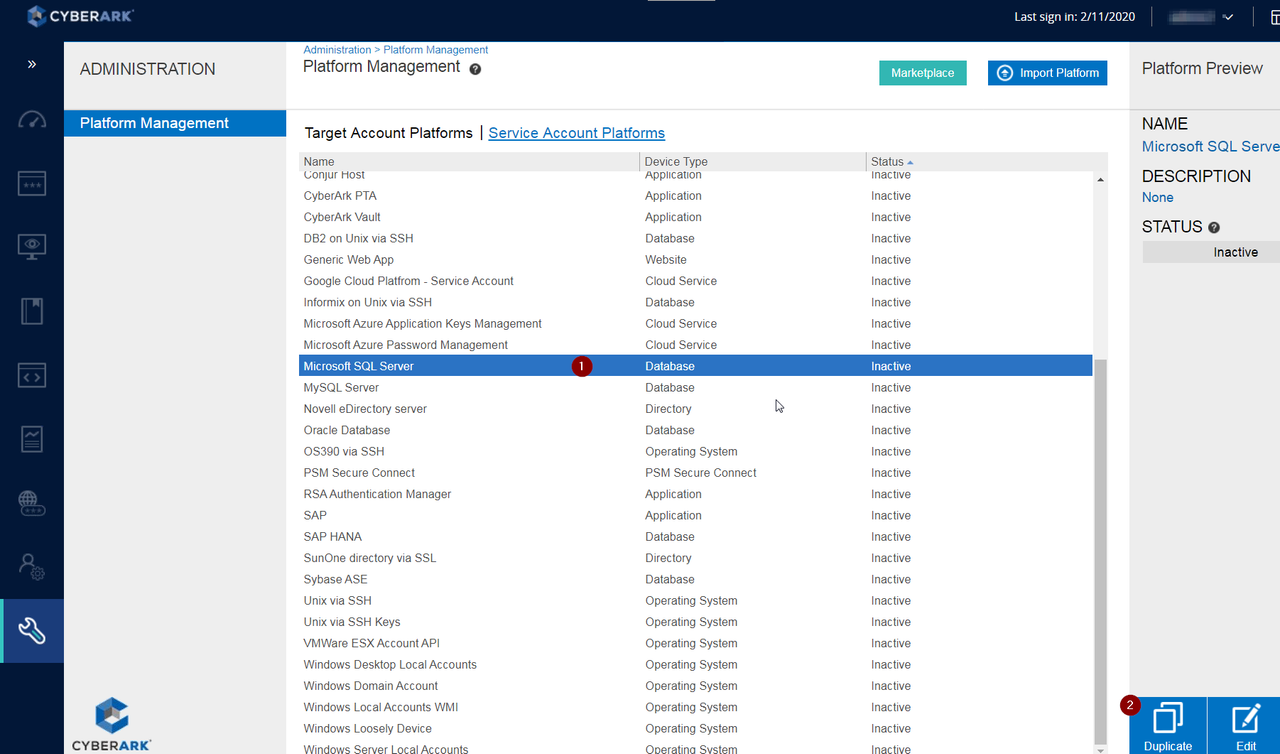
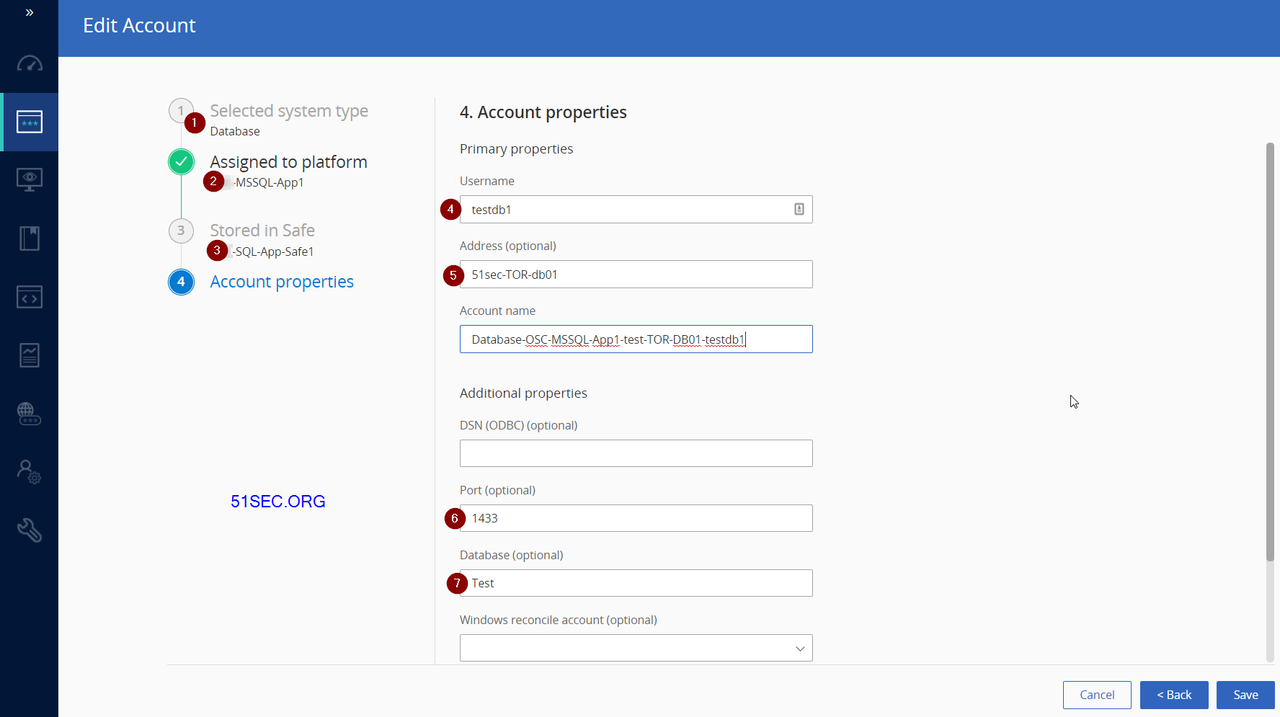
4.3 Add a new account to use the new duplicated MS SQL Server platform. Most of settings are optional, you can add those information accordingly. Here is my example :


No comments:
Post a Comment