Vulture allows you to filter incoming and outgoing web trafic and block threats like injection, cross site scriping... and other attacks of the OWASP Top10.
It is relying on mod_security, mod_defender (fork of Naxsi), and mod_svm (Machine learning based on Support Vector Machines) to filter HTTP traffic.
It is relying on mod_security, mod_defender (fork of Naxsi), and mod_svm (Machine learning based on Support Vector Machines) to filter HTTP traffic.
mod_security has been improved to fit Vulture's clustered design. mod_svm is the exclusive property of aDvens, and freely usable in Vulture. mod_defender is freely available under a GPLv3 licence : https://github.com/VultureProject/mod_defender
All these filtering engines works together, and you don't have the complexity of managing 3 different engines: All is simplified in the Vulture GUI. Another cool benefit of having mod_security and mod_defender is that you can create ruleset that mix MAXSI's syntax and mod_security's syntax, depending of what you want to achieve.
If a "abnormal request" is detected, mod_security or mod_svm or mod_defender will increment the score of the request. If the request score reach the maximum accepted score, Vulture will block.
Vulture WAF Modules and Engines
Web Application Firewall modules:1. Clustered mod_security, using hiredis [blacklisting]
2. mod_defender, aka "Naxsi for Apache2" [whitelisting]
3. mod_svm [machine learning]
Filtering Engine:
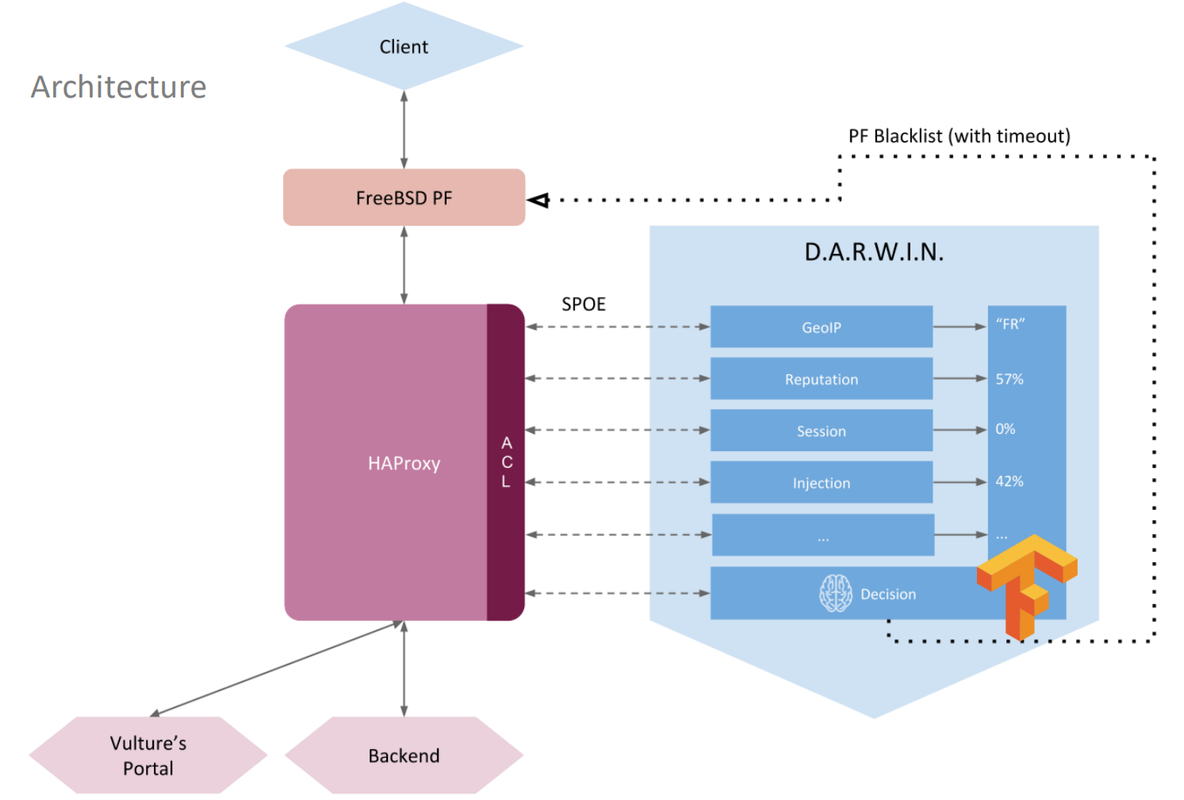
Client <--> FreeBSD pf <--> Apache httpd <----> following filters :
1. IP Reputation (Immediate Block)
2. Geo IP (Immediate Block)
3. mod_vulture (Authentication & SSO)
4. mod_defender (Request scoring ++)
5. mod_security (Request scoring ++)
6. mod_svm (Request scoring ++)
Architecture
Installation Steps
1. Downloading: https://download.vultureproject.org/v4/12.1/isos/vulture4-12.1-amd64.ova
2. Double click downloaded ova file to import into VMWare workstation
For Cluster Primary node vul1:
3. Start VM
4. Log in Vulture with username/password: vlt-adm/vlt-adm
5. type 'admin' to start configuration tool,
6. set up network config (static ip 192.168.74.10), change hostname vul1,
7. exit from 'admin'.
8. execute "sudo /home/vlt-adm/gui/cluster_create.sh" and create an account for Web GUI interface. For example: admin / P@ssword1234!
9. Open Web browser https://192.168.74.10:8000/
10. Log in with created Web GUI account, such as admin / P@ssword1234!
For Cluster Secondary node vul2:
11. Same process for second node to log in, admin->change to static ip 192.168.74.11, change hostname to vul2
12. restart vul2 via admin->root shell-> 'reboot' or "shutdown -r now"
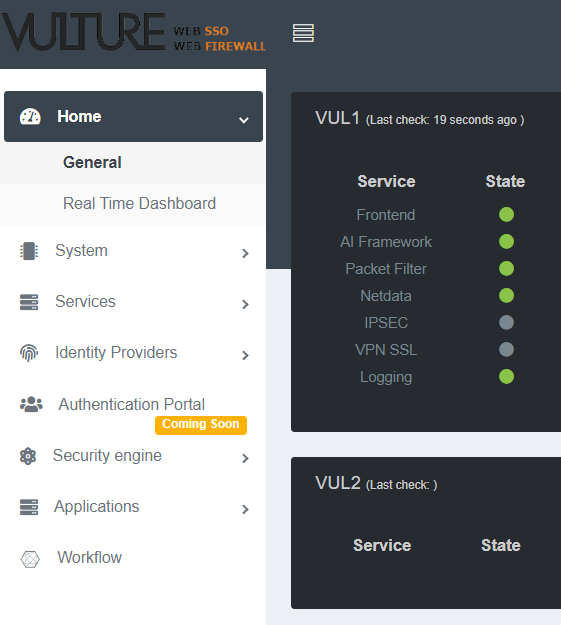
Home:


YouTube
References:
12. restart vul2 via admin->root shell-> 'reboot' or "shutdown -r now"
Web GUI Overview
Home:
YouTube
References:


No comments:
Post a Comment