Virtual machines are a very practical technology for IT personnel and program developers. For example, I often rely on tools such as VMware Player/Workstation, or Oracle VirtualBox to build virtual machines in order to test systems and software. Windows 8 / 10 Pro's built-in Hyper-V 3.0 function, sandwiching the advantages of Windows system, Microsoft released Windows Sandbox, to put it bluntly, is a lightweight virtual machine built into Windows 10, that is, when Windows Sandbox starts execution , It will re-create a clean operating system environment. Once the operation of the application is ended, all the operating data will be cleared. It will not affect and affect the current operating system. However, this function will wait until Windows 10 1903 version is only supported.
Virtualization technology seems to be one of the hot software technologies in the last few years and later. Microsoft's Hyper-V technology started slowly. Its own products first appeared on the Windows Serve 2008 platform, which is mainly used to build virtual machines for 64-bit operating systems. Windows 8/10 Pro has made Hyper-V 3.0 a part of the system . As long as your machine's CPU is 64-bit and 4GB of memory, you can enjoy it. It seems to tell users that the personal computer officially enters the era of virtualization, and the intimate Microsoft releases Windows virtual machine image files for different IE versions.
The Windows Sandbox application is executed in a specific isolated area. When the application breaks the system in the sandbox mode, it will not affect the main system.
 Virtual machines are the favorite gadgets of MIS personnel. There is a virtual system to play and test will not affect the operating system, but the system installed in the virtual machine is too large and consumes memory and capacity. Although you You can imagine the Sandbox mode as a lightweight virtual machine, but Sandbox does not need to maintain a virtual operating system. Instead of using virtualization, it uses dynamic image files to correspond to the main operating system files. In the sandbox mode, Only a few hundred MB of space is required during operation, which is quite resource-saving and can be easily operated without using high-end equipment.
Enable Windows Sandbox
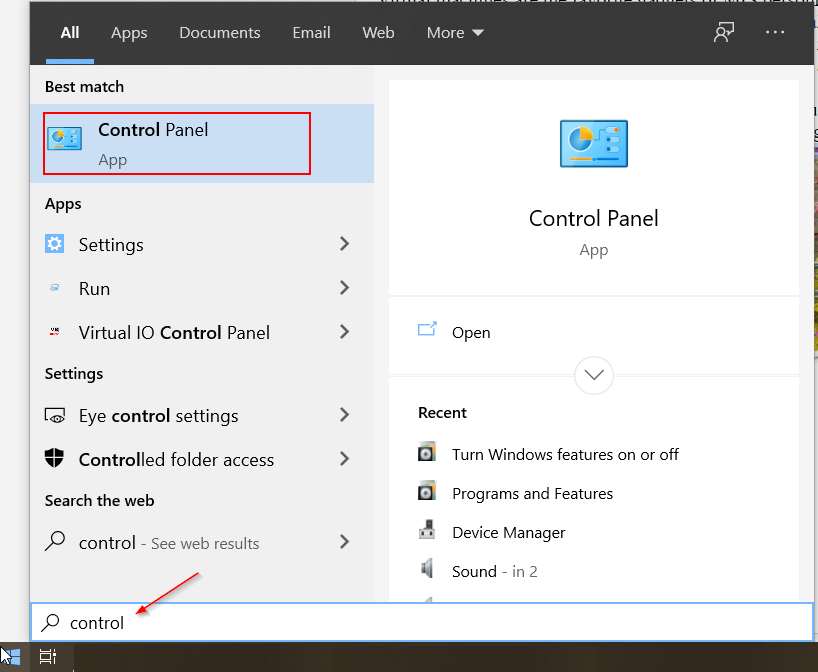
After upgrading to Windows 10 1903, Microsoft's sandbox mode will not be automatically pre-installed and turned on, so you can find the "Control Panel" from the search button on the taskbar by typing control.
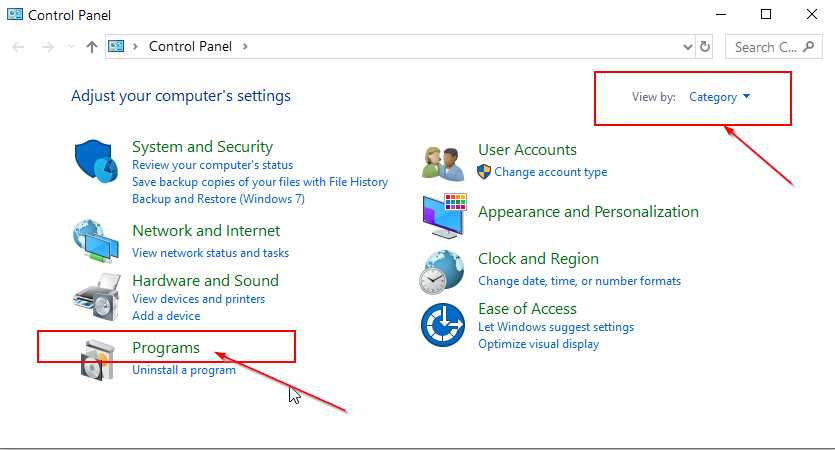
Make sure you selected Sort by category, then click Programs:
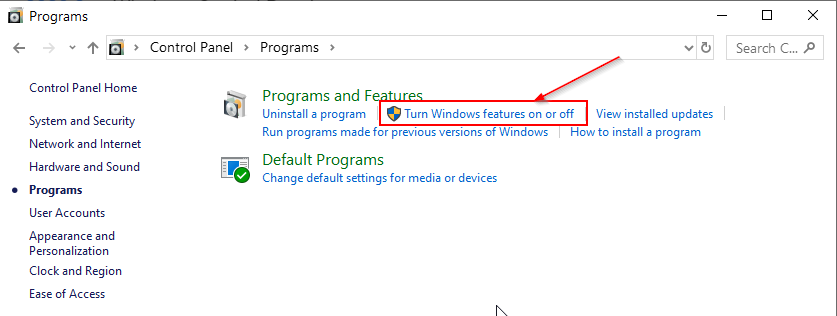
You will find 'Turn Windows features on or off' link:
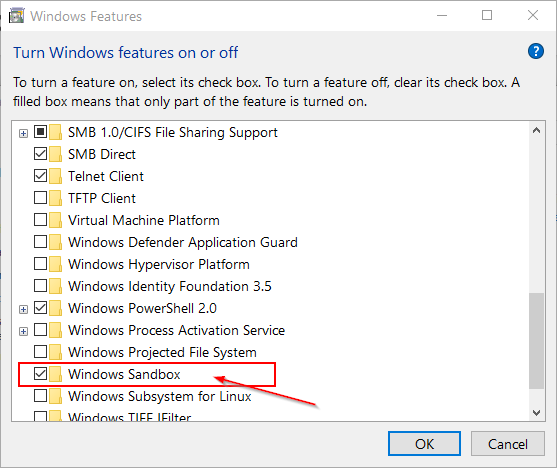
From opened 'Turn Windows features on or off' window, enable 'Windows Sandbox' feature.
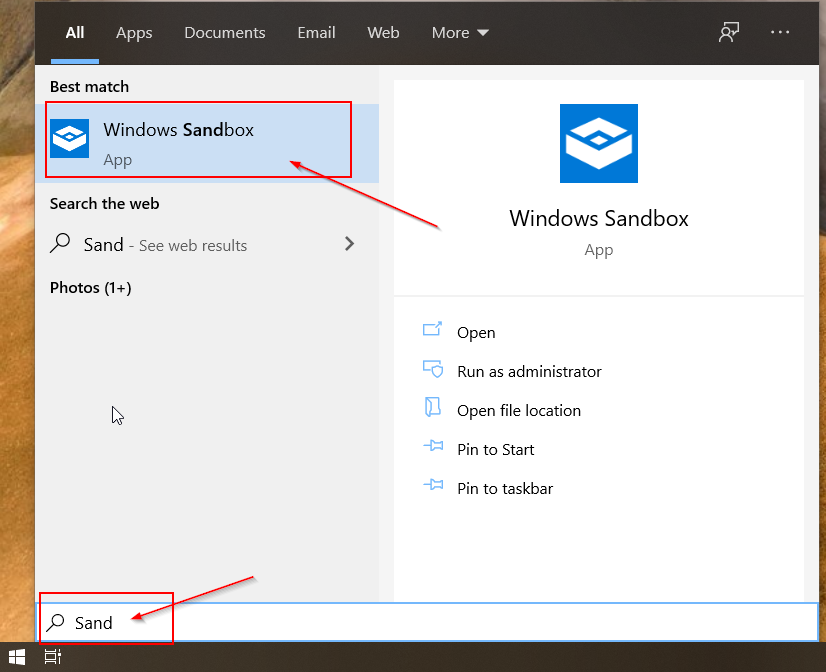
Installation will take 1 or 2 minutes. It requires a reboot. Once you rebooted machine, you can search Sandbox from Windows search taskbar or Windows menu. You will see there is a new app, Windows Sandbox.
That is all you will need to do. The first time to start Windows Sandbox might take a bit longer since it will need to create a virtual machine in your system. But after that, it will just take a couple of seconds.
Keep that in mind, all your work you done in the Sandbox will not be saved for next time to start your Sandbox. You will be able to copy and paste your files out of the Sandbox. You also only allowed to use one Sandbox, not multiple.
There are some tuning you can do to customize some functions of your Sandbox machine. It can be done by editing one configuration file. It wont be in this post but for sure I will post it out once tested those customization.
YouTube Video:
Issues and fixes
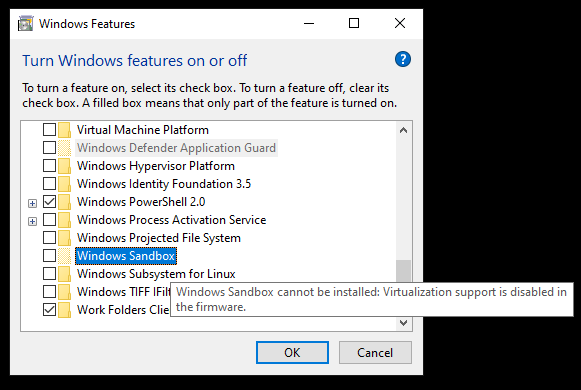
In some circumstances, you might meet following issue , Windows Sandbox feature is grey-out, because Windows Sandbox cannot be installed: Virtualization support is disabled in the firmware.
It is relating to your BIOS CPU virtualization settings. here is someone I found how he resolved this issue:
"After looking up each BIOS setting I discovered the issue was SVM Mode was disabled. This is apparently the AMD Secure Virtual Mode. Enabling it allows me to install all the virtual machine features.
For the my mother board it was hard to find. In the BIOS I went to M.I.T category, then Advanced Frequency Settings->Advanced CPU Core Settings and then you will find SVN Mode."
Different motherboard might have different place to enable this. Just take a look at your BIOS settings, you should be able to find it out.
Or, in some BIOS settings, you might find Virtualization settings. There are two settings need to be enabled:
- Intel Virtualization Technology
- Intel VT-d Feature




No comments:
Post a Comment