I have been introduced a couple ways to display OneDrive's content, either using Cloudflare workers or using Heroku. You can find them from my previous posts:
- OneManager - Deploy a free OneDrive List App using Heroku and Cloudflare
- Fast OneDrive Index - A Serverless OneDrive Index Setup
Deploying OneManager to Heroku is simple and easy but there are two issues which will cause the OneManager will be down.
- New accounts receive 550 free dyno hours and you can verify your identity with a credit card for an additional 450 hours.
- The app will be put into idle mode automatically, after 30 minutes of inactivity. It will take 1-2 minutes to wake it up when it receives access activity.
To resolve those two issues, I developed following three steps to bypass them.
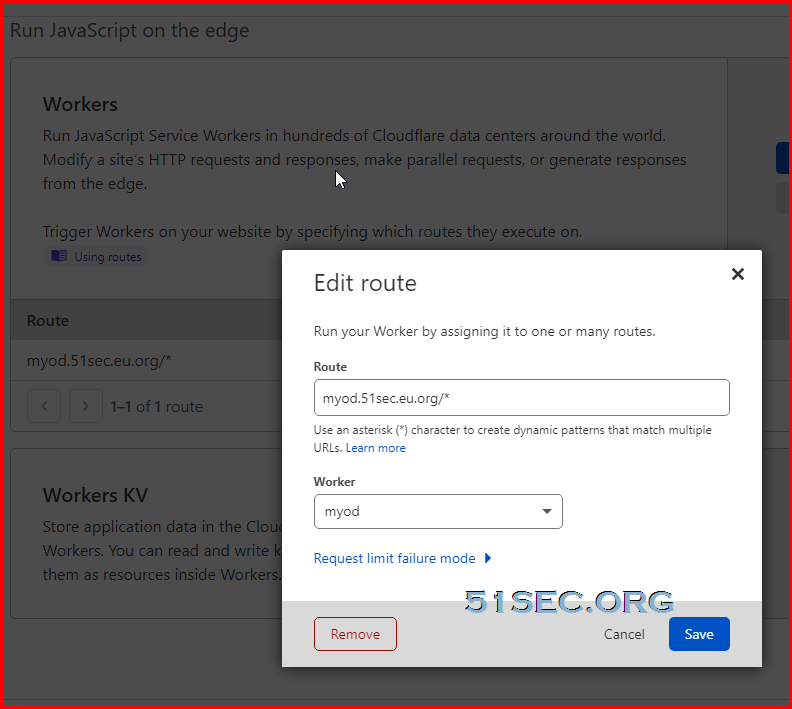
Demo site: https://myod.51sec.eu.org
Deploy Two OneManager into Two Heroku Accounts
Lets say, you created two Heroku accounts, and deployed two OneManager apps into them one by one with the process described in my previous post:
You got following two OneManager apps:
- https://myod1.herokuapp.com/
- https://myod2.herokuapp.com/
They are exactly same except the app name and app url is different. Both apps have added same OneDrive disk in it.
The logic behind it to use two OneManager apps which not get us exceeding the 550 hours / month limits if we only activate one app every day and keep another one in idle.
Create a Cloudflare Workers to Rotate Access to Those Two Apps
LispaddEventListener(
    "fetch",event => {
        let url=new URL(event.request.url);
        url.hostname="myod1.herokuapp.com";
        let request=new Request(url,event.request);
        event. respondWith(
            fetch(request)
        )
    }
)
// odd days
const SingleDay = 'myod1.herokuapp.com'
// plural days
const DoubleDay = 'myod2.herokuapp.com'
// Using CF to do porxy? true/false
const CFproxy = true

// Heroku only has 550 hours/month for free plan by default.
// This CloudFlare Workers code can let use different Heroku app based on odd or even number's day.
// Please change above code for your Heroku's app in either SingleDay or Doubleday parameter.

addEventListener('fetch', event => {
    let nd = new Date();
    if (nd.getDate()%2) {
        host = SingleDay
    } else {
        host = DoubleDay
    }
    if (!CFproxy) {
        let url=new URL(event.request.url);
        if (url.protocol == 'http:') {
            url.protocol = 'https:'
            response = Response.redirect(url.href);
            event.respondWith( response );
        } else {
            url.hostname=host;
            let request=new Request(url,event.request);
            event.respondWith( fetch(request) )
        }
    } else {
        event.respondWith( fetchAndApply(event.request) );
    }
})

async function fetchAndApply(request) {
    let response = null;
    let url = new URL(request.url);
    if (url.protocol == 'http:') {
        url.protocol = 'https:'
        response = Response.redirect(url.href);
        return response;
    }
    url.host = host;

    let method = request.method;
    let body = request.body;
    let request_headers = request.headers;
    let new_request_headers = new Headers(request_headers);

    new_request_headers.set('Host', url.host);
    new_request_headers.set('Referer', request.url);

    let original_response = await fetch(url.href, {
        method: method,
        body: body,
        headers: new_request_headers
    });

    response = new Response(original_response.body, {
        status: original_response.status,
        headers: original_response.headers
    })

    return response;
}
Of course, do not forget to set up a DNS A record (myod.51sec.eu.org) and workers route to it.
Create two CRON Job
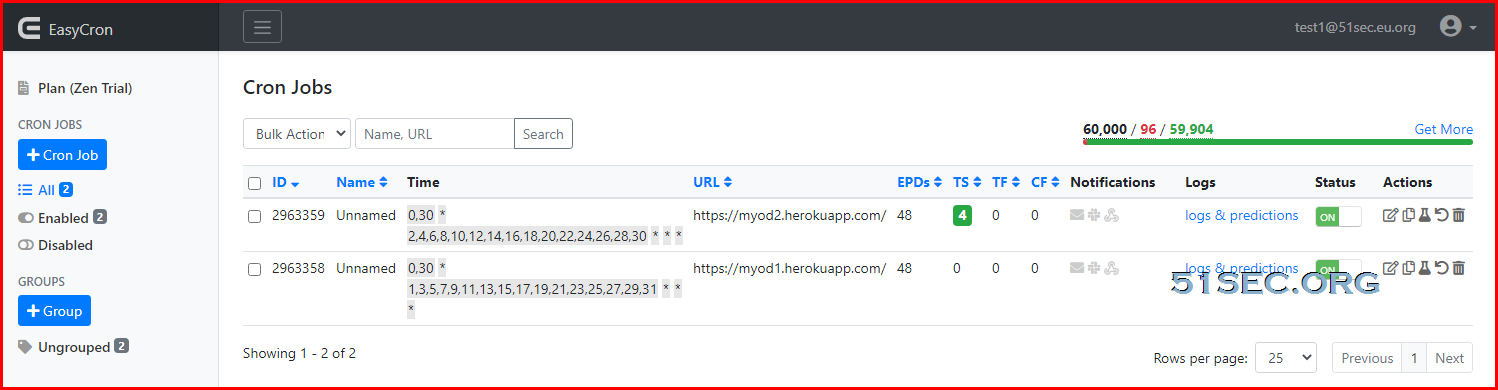
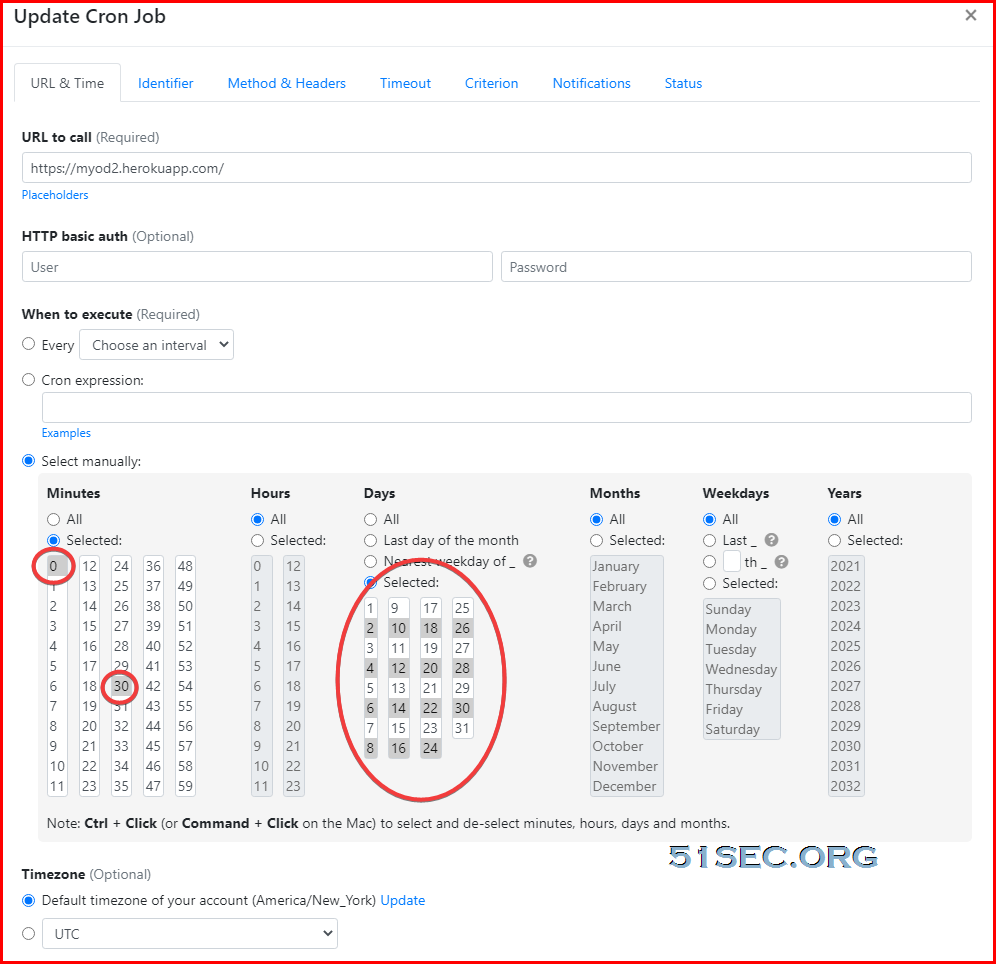
Done, that is all you will need to set up a OneManager at Heroku, which will make your site up all the time to end user when they using your Cloudflare dns to access your site.
Note: For https://cron-job.org/en/ site, you will have to configure it to use head as request method, else you will get a failure message "Response data too big". Here is the configuration screenshot:

YouTube
Also I recorded videos to show the whole process:
References
- Onedrive+OneManager+Heroku+CFWorkers 羊毛衫新织法
- OnePoint:利用Cloudflare Workers +kv部署一个轻量级、多平台、多网盘的文件目录索引程序
- OneManager搭建一个免费的文件分享站


![[5 Mins Docker] Deploy FreshRSS Using Docker Run Command and Deploy To Fly.io](https://lh3.googleusercontent.com/blogger_img_proxy/AEn0k_sgZfQfXztUDAL9Sw5_r2T-yHUNKlXREJHzUbWxA1oCt0EwhFtJG7J6bvoNKWQOUwb8bkFcsUarouhcY6-zupdk4KbMoIhvtolkwiN-nCVcFA)


It only works with domain name?
ReplyDeletei mean if i dont have domain name so can i still do this trick to keep the site alive for whole month on heroku?