This post summarizes some steps to install vault.
Diagram
PAM Components and Utilities
- Digital Vault

- Password Vault Web Access (PVWA)
- Central Policy Manager (CPM)
- Privileged Session Manager (PSM)
- Privilege Threat Analytics (PTA)
- PrivateArk Client
- PACLI (PrivateArk Command Line Interface)
- PAM Web Services (REST API)
- Vault Central Administration Station
- Remote Control Client - using CyberArk Remote Control Protocol 9022 to communicate with Vault via installed Remote Control Agent on the Vault. It will reduce the need to open an RDP port for the vault.
System Requirements
Architecture


Installation Prerequisite
- CyberArk Vault server and Disaster Recovery software packages
- Master folder
- Operator folder
- License file
Installation Steps
1 Start installation CyberArk Digital Vault server and clientIf you don't currently need a Distributed Vaults environment but are likely to migrate to this architecture, select the check box.
If you want to install RabbitMQ after the Vault is already installed, you must upgrade or install again on a clean machine.

Click Next.
In the Vault Server Machine Hardening window, click Next.
Don't select the check box to skip hardening without first confirming with your CyberArk support representative.
The server hardening can't be reversed.

- In rare cases, due to Windows services timing issues, the automatic hardening procedure might complete with errors. If it does, retry the hardening. If the automatic hardening does not succeed the second time, contact your CyberArk support representative.
- When installing on Windows Server 2016, Japanese edition, the hardening stage of the installation may seem to complete with failures. See Troubleshooting Installation for details.
In the Select Program Folder window, specify the name of the folder where the server files will be stored.
In the Program Folders field, enter a name for the CyberArk Vault folder inside the Windows Programs folder, then click Next,
or,
Click Next to accept the default name.

- In the Set Built-in Users Passwords window, type the passwords for the built-in Master user and Administrator user.
The Master user is a break-glass account, and the Administrator user has extensive privileges in the system, and should have complex passwords with a mixture of numeric and mixed case characters. By default, the password must contain at least one numeric character and 5 mixed case characters. |
Type the Master user’s password, then type it again to confirm.
Type the Administrator user’s password, then type it again to confirm.

Click Next.

Select No, I will restart my computer later, then click Finish .That is for installing PrivateArk Client.
| a. | In C:\Program Files\PrivateArk\Server\DBParm.ini, set the following parameter: |
|
Where X.X.X.X, Y.Y.Y.Y, Z.Z.Z.Z and so on are the Time Server IP addresses and port 123 is the Windows Time port.
| b. | Restart the Vault application using the Private-Ark Central Administration Console (the PrivateArk Server icon on the desktop). |
Verification
After hardening, total running service number has been reduced 31. Check that the following services have been installed and started:
- PrivateArk Database
- PrivateArk Server
- CyberArk Logic Container
- Cyber-Ark Event Notification Engine
- CyberArk Hardened Windows Firewall
- Remote Agent
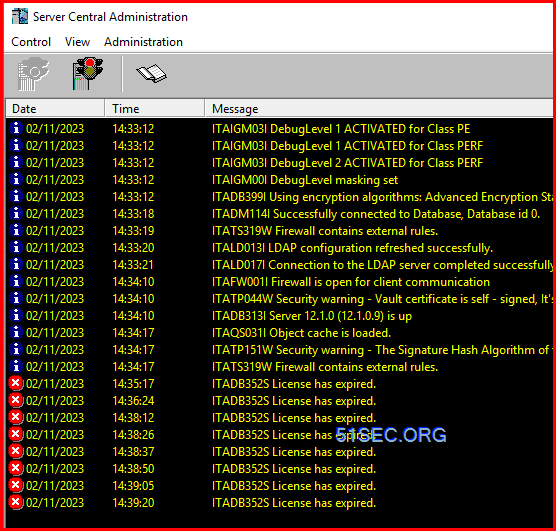
Check that the CyberArk Digital Vault started successfully.


Make sure that the following message appears:
|
Manual Hardening Process
CyberArk vault hardening overview
The Vault hardening process is a critical part of the Vault installation. CyberArk strongly recommends full Vault hardening for all production level environments. The Vault Security Standards are documented on the CyberArk documentation portal .The hardening process includes changes to vault OS in the registry, security policy, network properties and also the takeover of the windows firewall. After the install the hardening log can be found here, but as it is in temp it could be deleted at a later date so it is advised to move it to a safe location: %windir%\Temp\Hardening.log
CyberArk does not recommend installing 3rd party software on the Vault, as these programs expand the attack surface and expose the Vault to increased risk. With this in mind, occasionally customers will choose to install 3rd party software to meet certain business requirements, accepting the increased risk.
Examples of 3rd party software CyberArk customers have installed on the Vault include:
- Hypervisor support tool such as VMWare tools
- Hardware management tools or SAN tools/drivers.
There are four main steps listed in the file: "Hardening.ini" that can be found here by default: "<vault installation path>\server\hardening\hardening.ini" and are explained in more detail in the sections below. These can be set to 'No' if required/needed.
hardening.ini
HardenNetworkDevice=Yes
HardenWindowsSecurity=Yes
HardenWindowsLocalSecurity=Yes
HardenWindowsFireWall=Yes
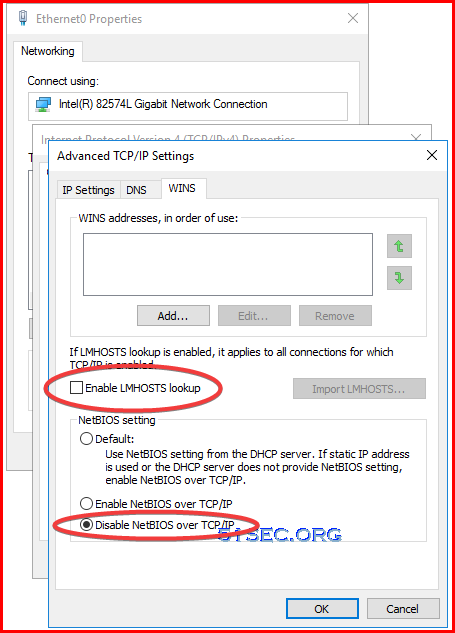
Network Cards/Adapters Hardening
IPv4
- Disable 'NetBIOS' setting
- Disable 'LMHOSTS lookup'
- Disable 'Register this connection's addresses in DNS'
IPv6
- Disable 'Register this connection's addresses in DNS'
Windows Security Hardening
There are three files that can be used for this part: server 2008, server 2012 and server 2016 (in later versions). These can be found on the installation CD/media and also in the 'Hardening' folder within the vault local install path (C:\Program Files (x86)\PrivateArk\Server\Hardening\StandaloneVault). The files 'Windows2008Security.inf', 'Windows2012Security.inf' or 'Windows2016Security.inf' will be used depending on the operating system. A more detailed list can be found by opening the .inf file with a text editor.
Windows Audit Policy Hardening
As with the ‘Windows Security’ hardening there are three files, 'Windows2008Audit.csv', ‘Windows2012Audit.csv', and ‘Windows2016Audit.csv' depending on the operating system. These can be found in the same location as the files used for the hardening of the Windows security.
Windows Local Security Hardening
The following changes are made:
- local users disabled apart from the user that is logged in during the install
- Users removed from the local groups apart from the local admin users and the user that is logged in (should be the same user).
- Registry value deleted: LMachine/Software/Microsoft/Windows/CurrentVersion/Run/VMware User Process
- Daylight saving enabled
Windows Firewall Hardening
During the install all the firewall rules are deleted, then from this point firewall rules will be dynamically added and removed when required. A log can be seen within the windows event logs here:
- Event Viewer (Local) > Applications and Services Logs > Microsoft > Windows > Windows Firewall With Advanced Security > Firewall
Static rules will also be added however these are still managed by the vault and depend on rules that have been added the DBParm.ini file.
Re-execute Vault Hardening process:
1 Stop the Vault services
2 running the steps below.
The command to run vault hardening is "CAVaultHarden" which is located in %InstallDir%/Server/Hardening.
Note: The %InstallDir% is the top level directory of the vault installation. By default, this is C:\Program Files (x86)\PrivateArk
The CAVaultHarden command has two mandatory parameters:
* Configuration folder: This is the folder that contains the configuration files which can be HAVault or StandaloneVault
* Log folder: Where it writes the log file to
You can run it as such
CAVaultHarden <Configuration Folder> <Log Folder>
To get output of the script:
CAVaultHarden <Configuration Folder> <Log Folder> > .\Hardening.log
The Hardening log will point to the specific log file that was generated by the actual Windows hardening commands
3 Note: If the vault hardening was already done, the log file may contain error messages related to components that were already hardened by the previous command.
Note 2: If RDP is to be allowed to the vault, the command must be run with the /allowRDP switch, as below:
CAVaultHarden.exe StandAloneVault "[Full Path of Current Directory]" /AllowRDP [RDP Station IP]
Note 3: A reboot of the server is required after running the hardening steps
HSM Integration
Contact support for further professional support.Multiple Vaults
Network access to port 1858 is required between all Vaults. Run the following Powershell command from each Vault to all of your other Vaults:
Test-NetConnection <IP Address> -port 1858 | findstr "TcpTestSucceeded"
- Install DR application on Primary vault server
Right-click Setup.exe, then select Run as Administrator.
The DR Vault wizard starts automatically and the CyberArk Installation window is displayed.

Click Next.
You can exit the Disaster Recovery application installation at any time by clicking Cancel.
You can return to the previous installation window by clicking Back, where applicable.
Read and accept the terms of the license agreement.

Click Yes.
Enter your user information:
In the Name field, enter your first and last name.
In the Company field, enter the name of your organization.

Click Next.
Select the folder on the server in which the DR Vault files will be located.

Click Next to accept the default location
or,
Click Browse to select another location, and then click Next to proceed to the next step of the installation.

You must create a unique DR user for each Vault (the Primary Vault server and DR Vault server must have different user names).
The DR user contains a credentials file with the specified user name and an encrypted version of the specified password. For more information about DR users, see Disaster Recovery Users.
Click Next.
Specify the IP address and the port of the Primary Vault.

Click Next.
Click Yes, I want to restart my computer now.

Click Finish to complete the setup and restart the machine.
- Install Vault Server / Client and DR application on DR vault server
3 Distributed Vault Implementation
Perform the PVWA installation against the Primary Vault. For details, see Install PVWA.
In a Distributed Vaults environment, first install all PVWAs against the Primary Vault, and then configure those PVWAs that will work against the Satellite Vault, as described in Configure a list of prioritized Vaults in Distributed Vaults environment for CyberArk clients.
You must install PVWA and CPM according to the following order. First, install all PVWAs that will be connected to the Primary Vault, then all CPMs, and only then install all PVWAs that, after the installation against the Primary Vault, will be configured to work against the Satellite Vault.
Troubleshooting
- Connect to the Primary or Standalone Vault.
- Log on to the Vault machine as the Administrator user.
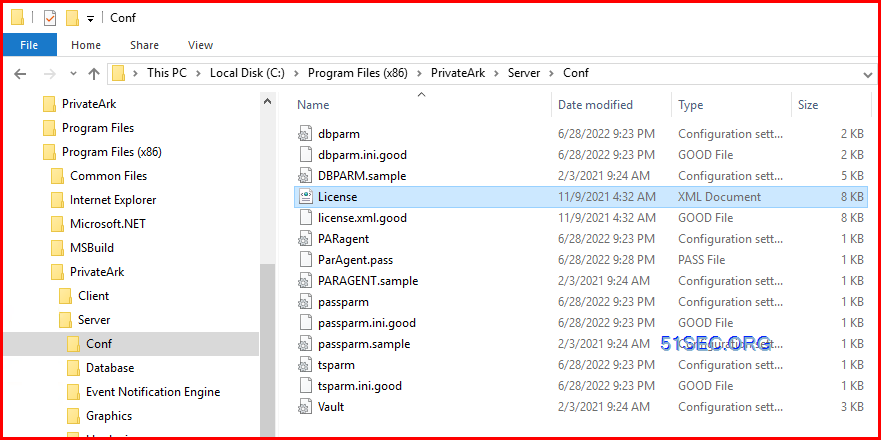
- Copy the new license file (license.xml) to the Server\Conf folder (<Drive>:\Program Files (x86)\PrivateArk\Server\Conf).
Restart the Vault application.
Troubleshooting
Issue 1:
(Diagnostic information: 520,513,10054)
The same can be seen in the PALog.
In the vault trace.dx log we can see the following error for the user logon operation:
ITAPE287E System error (Code: 287, Diagnostic information: userid, 1, 0).
Try a PrivateArk authentication without "Use pre-authentication secured session" selected in the Advanced PA client authentication settings:
Possible Resolutions:
- Ensure the vault certificate is valid (if using a CA signed certificate)
- Ensure the PA Client version matches the vault version
If you are using a Self-Signed Certificate on your Vault Server, please do the following to update the self-signed certificate:
Open an administrative command prompt at the /Server location on the vault server. Then run the following command:
CACert.exe Uninstall
This will uninstall the old self-signed certificate and install a new one.
Note: After the command has been run, you will need to restart the PrivateArk Vault service.


![[5 Mins Docker] Deploy FreshRSS Using Docker Run Command and Deploy To Fly.io](https://lh3.googleusercontent.com/blogger_img_proxy/AEn0k_thHgY1VwvL97ouu9a46P4M4FxmpePn_FTyl2E4dJw3p8Bap_EOFRsSjw60p_kI_T47DQLeKsFXatQibmK0cboDDUK8NtyOp0z_tR4YLQWwUQ)


No comments:
Post a Comment