High level steps:
- Create a virtual network
- Create a VPN gateway
- Create a local network gateway
- Create a VPN connection
- Verify the connection
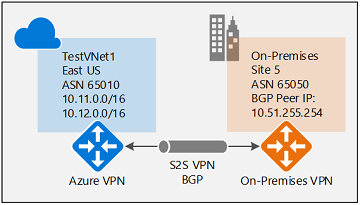
Diagram
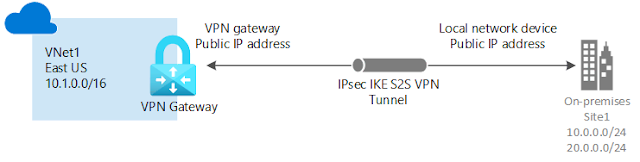
- Site-to-site: VPN connection over IPsec (IKE v1 and IKE v2). This type of connection requires a VPN device or RRAS. For more information, see Site-to-site.
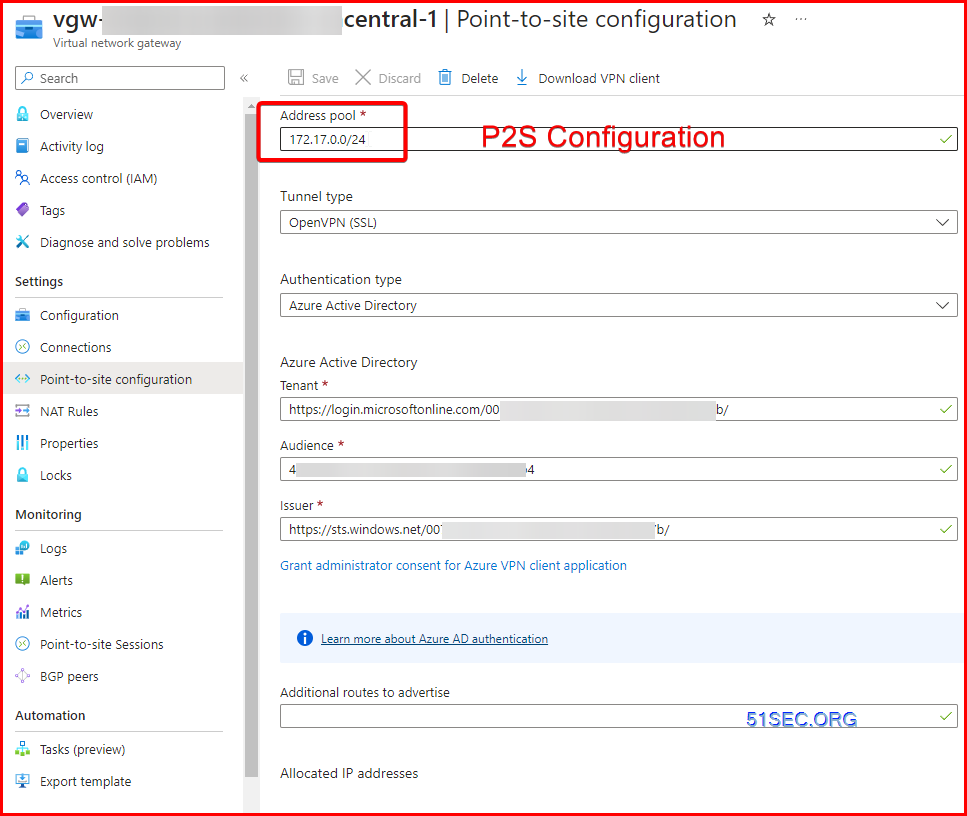
- Point-to-site: VPN connection over SSTP (Secure Socket Tunneling Protocol) or IKE v2. This connection doesn't require a VPN device. For more information, see Point-to-site.
- VNet-to-VNet: This type of connection is the same as a site-to-site configuration. VNet to VNet is a VPN connection over IPsec (IKE v1 and IKE v2). It doesn't require a VPN device. For more information, see VNet-to-VNet.
- Multi-Site: This is a variation of a site-to-site configuration that allows you to connect multiple on-premises sites to a virtual network. For more information, see Multi-Site.
- ExpressRoute: ExpressRoute is a private connection to Azure from your WAN, not a VPN connection over the public Internet. For more information, see the ExpressRoute Technical Overview and the ExpressRoute FAQ.
Prerequisites
- An Azure account with an active subscription. If you don't have one, create one for free.
- Make sure you have a compatible VPN device and someone who is able to configure it. For more information about compatible VPN devices and device configuration, see About VPN Devices.
- Verify that you have an externally facing public IPv4 address for your VPN device.
- If you're unfamiliar with the IP address ranges located in your on-premises network configuration, you need to coordinate with someone who can provide those details for you. When you create this configuration, you must specify the IP address range prefixes that Azure will route to your on-premises location. None of the subnets of your on-premises network can over lap with the virtual network subnets that you want to connect to.
Steps
1. Create a virtual network (VNet)
2. Create a VPN gateway
The virtual network gateway uses specific subnet called the gateway subnet. The gateway subnet is part of the virtual network IP address range that you specify when configuring your virtual network. It contains the IP addresses that the virtual network gateway resources and services use.
When you create the gateway subnet, you specify the number of IP addresses that the subnet contains. The number of IP addresses needed depends on the VPN gateway configuration that you want to create. Some configurations require more IP addresses than others. We recommend that you create a gateway subnet that uses a /27 or /28.

3. Create a local network gateway
The local network gateway is a specific object that represents your on-premises location (the site) for routing purposes. You give the site a name by which Azure can refer to it, then specify the IP address of the on-premises VPN device to which you'll create a connection. You also specify the IP address prefixes that will be routed through the VPN gateway to the VPN device. The address prefixes you specify are the prefixes located on your on-premises network. If your on-premises network changes or you need to change the public IP address for the VPN device, you can easily update the values later.

4. Configure your VPN device
Site-to-site connections to an on-premises network require a VPN device. In this step, you configure your VPN device. When configuring your VPN device, you need the following values:
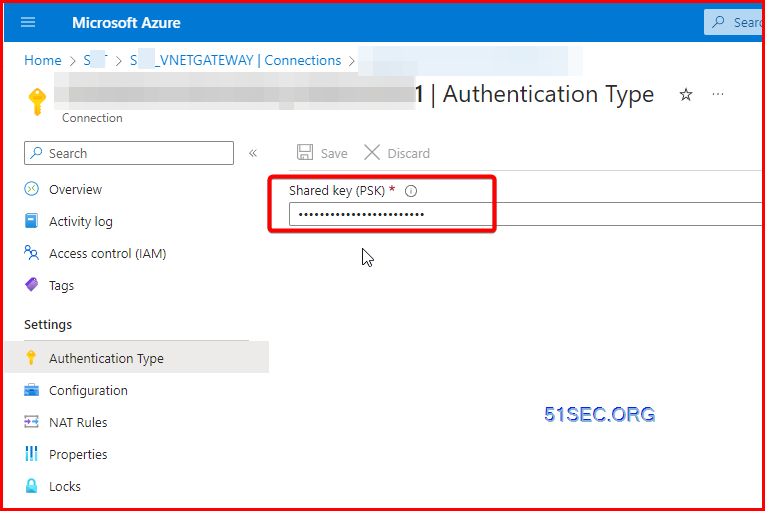
- A shared key. This is the same shared key that you specify when creating your site-to-site VPN connection. In our examples, we use a basic shared key. We recommend that you generate a more complex key to use.
- The Public IP address of your virtual network gateway. You can view the public IP address by using the Azure portal, PowerShell, or CLI. To find the Public IP address of your VPN gateway using the Azure portal, go to Virtual network gateways, then select the name of your gateway.
To download VPN device configuration scripts:
Depending on the VPN device that you have, you may be able to download a VPN device configuration script. For more information, see Download VPN device configuration scripts.
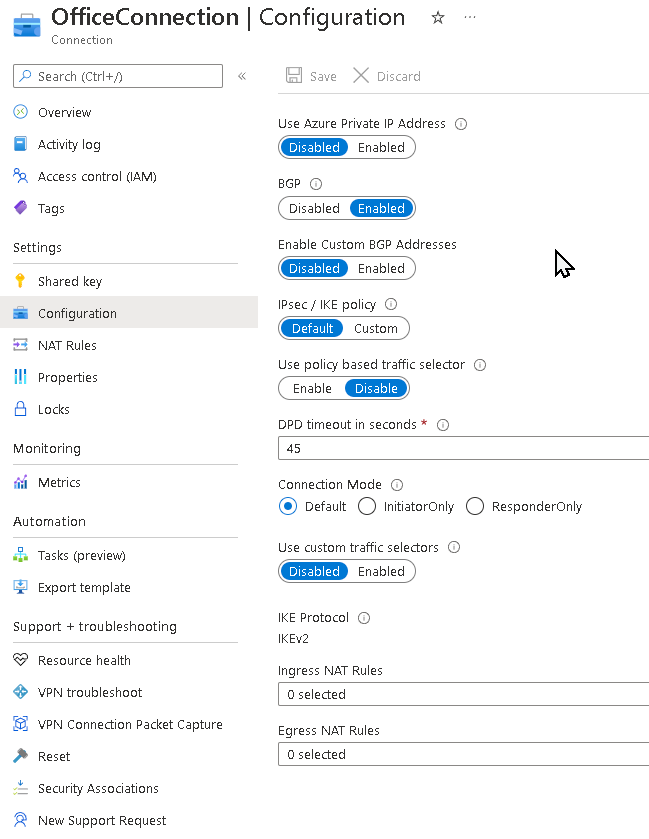
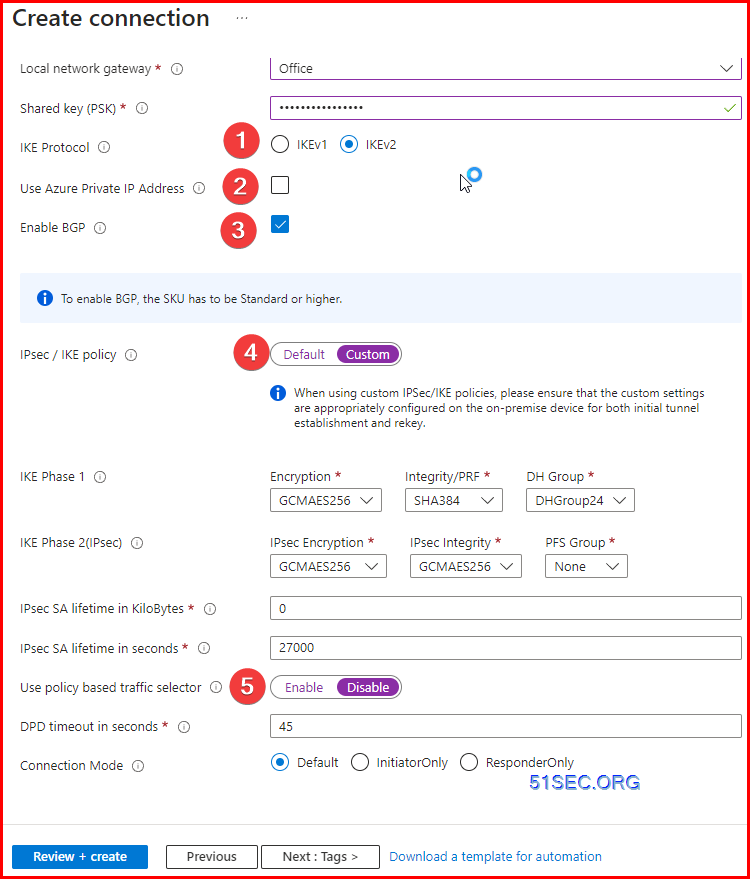
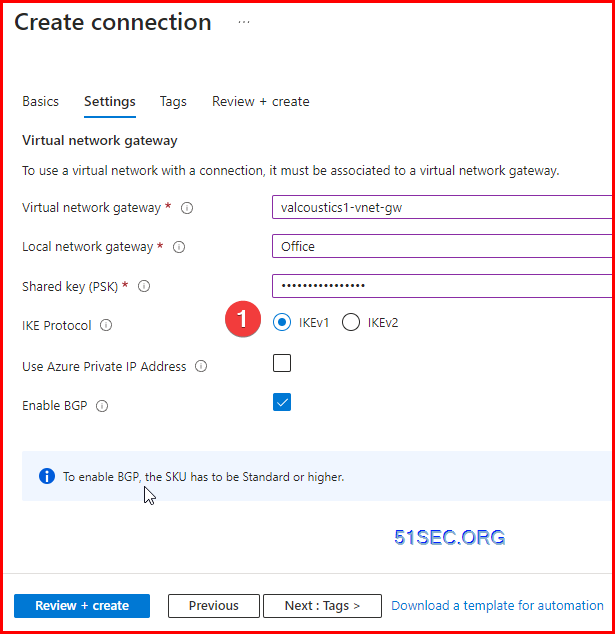
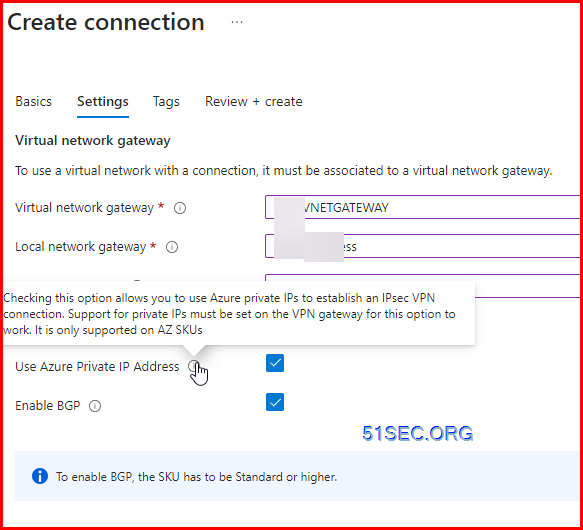
5. Create VPN connections
Create a site-to-site VPN connection between your virtual network gateway and your on-premises VPN device.

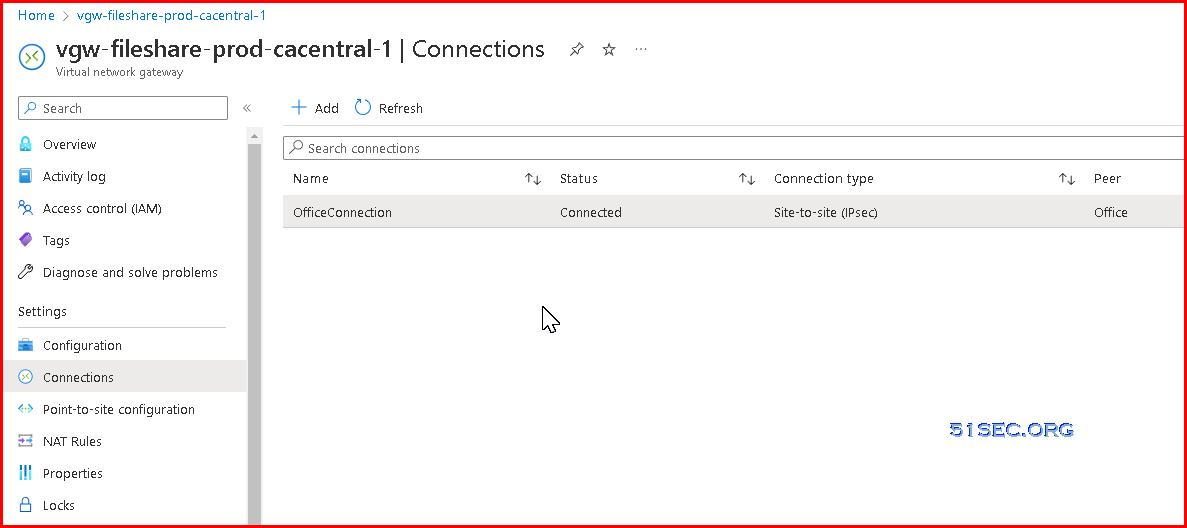
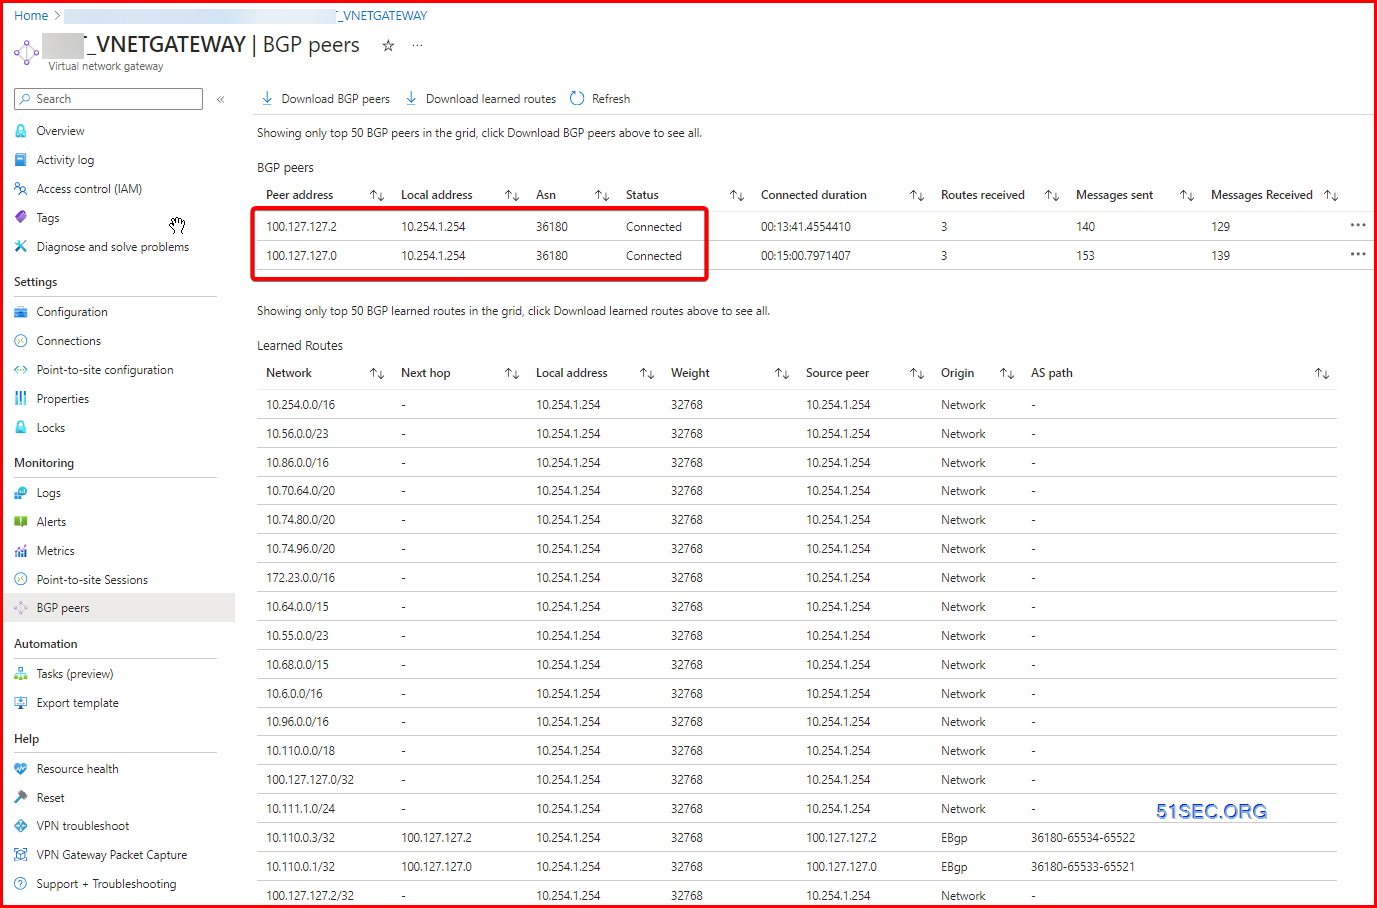
6. Verify the VPN connection
In the Azure portal, you can view the connection status of a VPN gateway by navigating to the connection. The following steps show one way to navigate to your connection and verify.
- In the Azure portal menu, select All resources or search for and select All resources from any page.
- Select to your virtual network gateway.
- On the blade for your virtual network gateway, click Connections. You can see the status of each connection.
- Click the name of the connection that you want to verify to open Essentials. In Essentials, you can view more information about your connection. The Status is 'Succeeded' and 'Connected' when you have made a successful connection.
Troubleshooting
If you're having trouble connecting to a virtual machine over your VPN connection, check the following:
Verify that your VPN connection is successful.
Verify that you're connecting to the private IP address for the VM.
If you can connect to the VM using the private IP address, but not the computer name, verify that you have configured DNS properly. For more information about how name resolution works for VMs, see Name Resolution for VMs.
For more information about RDP connections, see Troubleshoot Remote Desktop connections to a VM.
S2S configurations can be customized in a variety of ways. For more information, see the following articles:
- For information about BGP, see the BGP Overview and How to configure BGP.
- For information about forced tunneling, see About forced tunneling.
- For information about Highly Available Active-Active connections, see Highly Available cross-premises and VNet-to-VNet connectivity.
- For information about how to limit network traffic to resources in a virtual network, see Network Security.
- For information about how Azure routes traffic between Azure, on-premises, and Internet resources, see Virtual network traffic routing.
BGP Configuration for Azure VPN Gateway
Now, If you use BGP for a connection, leave the Address space field empty for the corresponding local network gateway resource. Azure VPN Gateway adds a host route internally to the on-premises BGP peer IP over the IPsec tunnel.
Important configuration considerations
- The ASN and the BGP peer IP address must match your on-premises VPN router configuration.
- You can leave the Address space empty only if you're using BGP to connect to this network. Azure VPN gateway will internally add a route of your BGP peer IP address to the corresponding IPsec tunnel. If you're NOT using BGP between the VPN gateway and this particular network, you must provide a list of valid address prefixes for the Address space.
- You can optionally use an APIPA IP address (169.254.x.x) as your on-premises BGP peer IP if needed. But you'll also need to specify an APIPA IP address as described earlier in this article for your VPN gateway, otherwise the BGP session can't establish for this connection.
- The custom Azure APIPA BGP address is needed when your on premises VPN devices use an APIPA address (169.254.0.1 to 169.254.255.254) as the BGP IP. VPN Gateway will choose the custom APIPA address if the corresponding local network gateway resource (on-premises network) has an APIPA address as the BGP peer IP. If the local network gateway uses a regular IP address (not APIPA), VPN Gateway will revert to the private IP address from the GatewaySubnet range.
- You can enter the BGP configuration information during the creation of the local network gateway, or you can add or change BGP configuration from the Configuration page of the local network gateway resource.
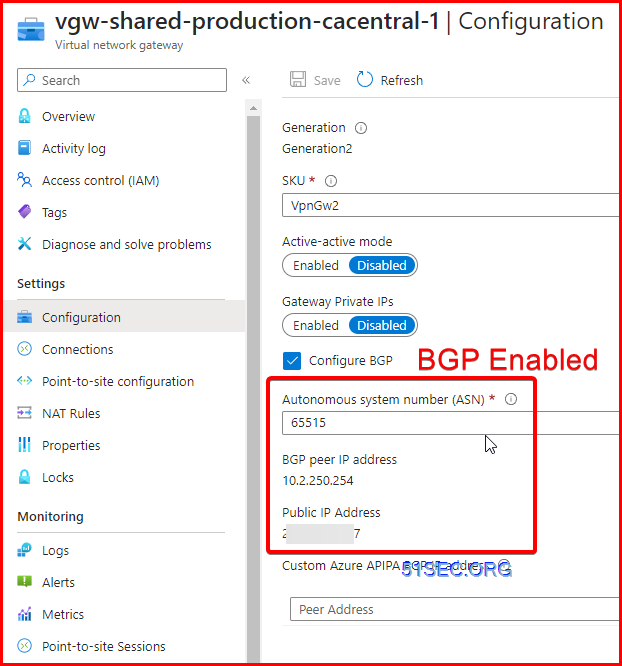
Virtual Network Gateway configure BGP
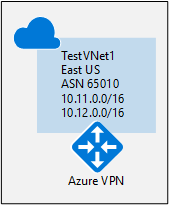
Virtual network example values:
- Resource Group: TestRG1
- VNet: TestVNet1
- Location/Region: EastUS
- Address space: 10.11.0.0/16, 10.12.0.0/16
- Subnets:
- FrontEnd: 10.11.0.0/24
- BackEnd: 10.12.0.0/24
- GatewaySubnet: 10.2.250.0/24
Instance Details:
- Name: VNet1GW
- Region: EastUS
- Gateway type: VPN
- VPN type: Route-based
- SKU: VpnGW1 or higher
- Generation: select a generation
- Virtual network: TestVNet1
Public IP address
- Public IP address Type: Basic or Standard
- Public IP address: Create new
- Public IP address name: VNet1GWIP
- Enable active-active: Disabled
- Configure BGP: Enabled
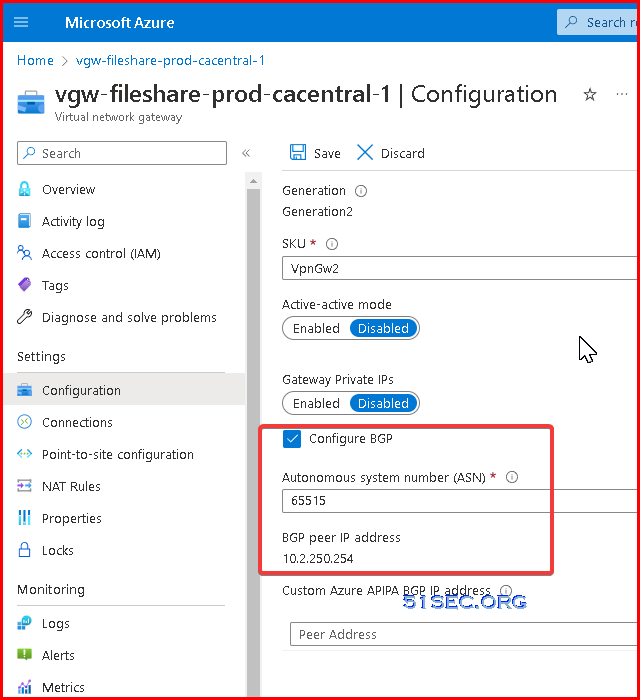
- Enter ASN # (Autonomous System Number): Default is 65515. It should be different from your BGP peer's ASN #.
- BGP peer IP address: 10.2.250.254. In this example, the GatewaySubnet is 10.2.250.0/24. By default, Azure assigns a last private IP address from the GatewaySubnet prefix range automatically as the Azure BGP IP address on the VPN gateway.
- This address is needed to configure your on-premises or your peer VPN device to establish BGP session with your Azure VPN gateway.
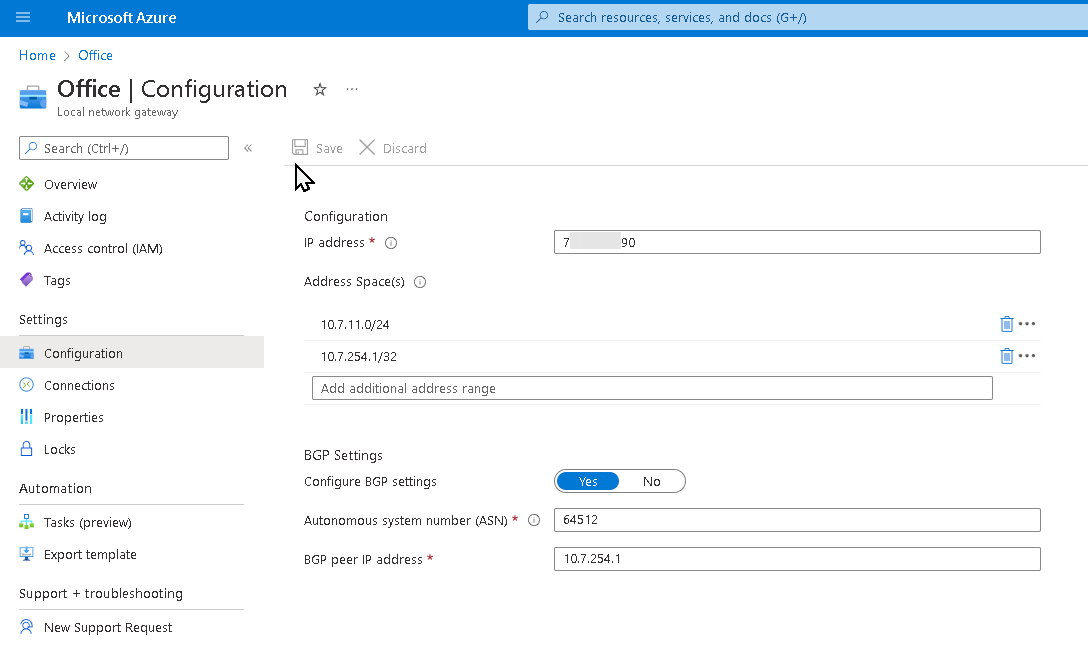
Create Local Network Gateway for your cross-premises S2S connections
- Name: Site5
- IP address: The public IP address of your local gateway, which is the IP address of the on-premises gateway endpoint you want your Azure VPN gateway to connect to. Example: 66.27.21.29
- Address spaces: If BGP is enabled, no address space is required.
- Configure BGP settings: Yes
- Autonomous system number (ASN): 65050
- BGP peer IP address: The address of the on-premise VPN Device. Example: 10.7.254.1 (in the following example screenshot) or 10.51.255.254 (in the above example topology)
To Configure BGP on Cross-Premises S2S Connections:
On-premises device example configuration
- Site5 ASN : 65050
- Site5 BGP IP : 10.51.255.254
- Site5 Prefixes to announce : (for example) 10.51.0.0/16
- Azure VNet ASN : 65010
- Azure VNet BGP IP : 10.12.255.30 (ip from 10.12.255.0/27)
- Static route : Add a route for 10.12.255.30/32, with nexthop being the VPN tunnel interface on your on-premises VPN device
- eBGP Multihop : Ensure the "multihop" option for eBGP is enabled on your device if needed
S2S BGP Example (P2S Network included) - Azure Side
Diagram
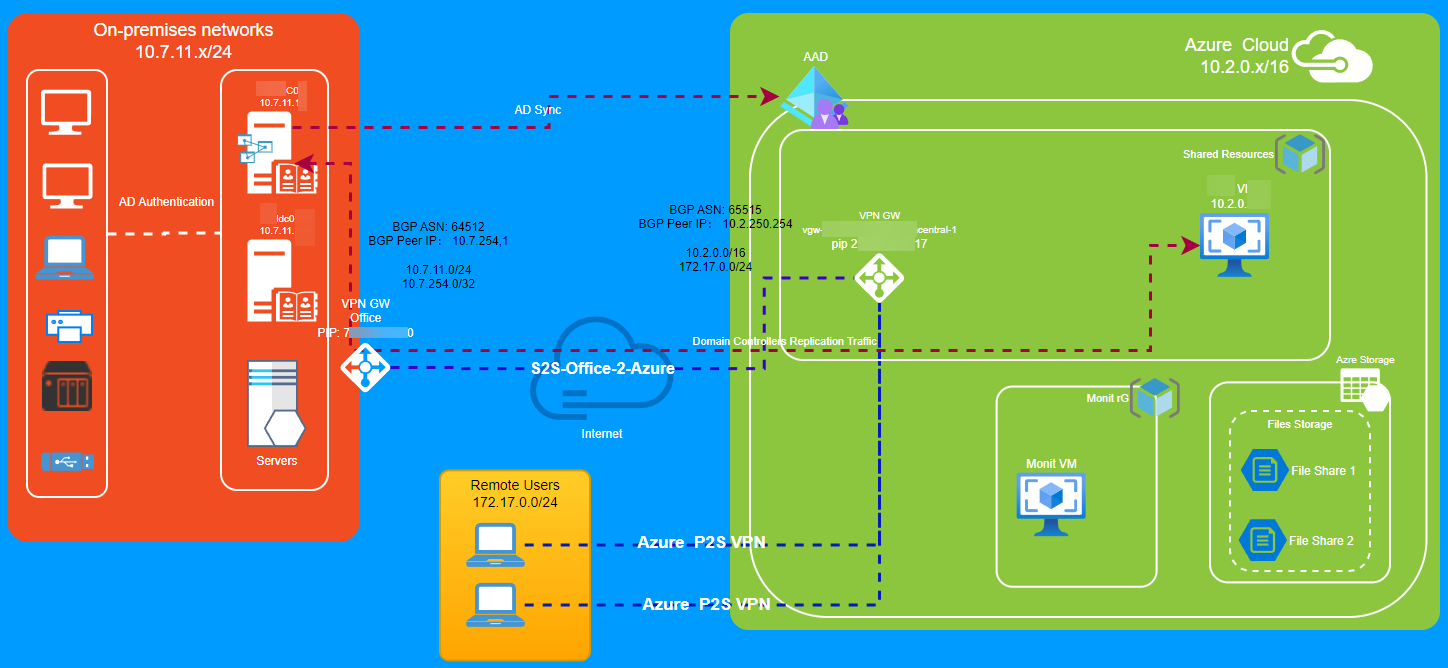
Azure VPN GW Configuraiton:
BGP Peer IP: 10.2.250.254
10.2.0.0/16
172.17.0.0/24
Remote Office VPN Gateway Configuration (Local Network gateway)

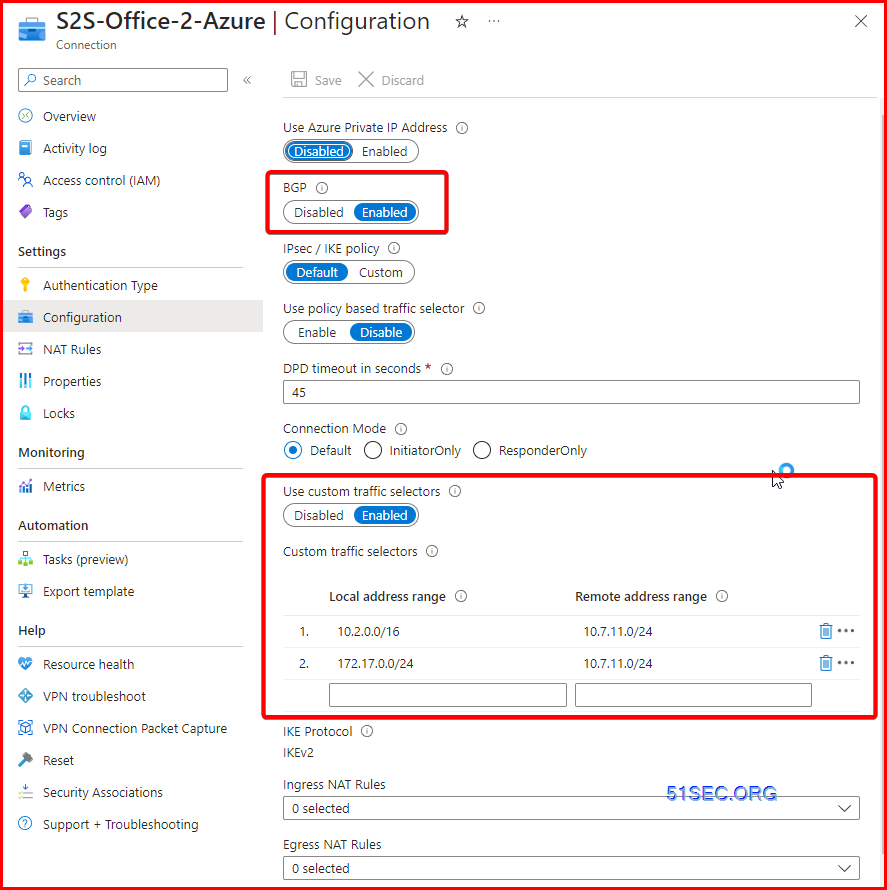
S2S Connection
P2S Configuration:
Monitoring
Troubleshooting
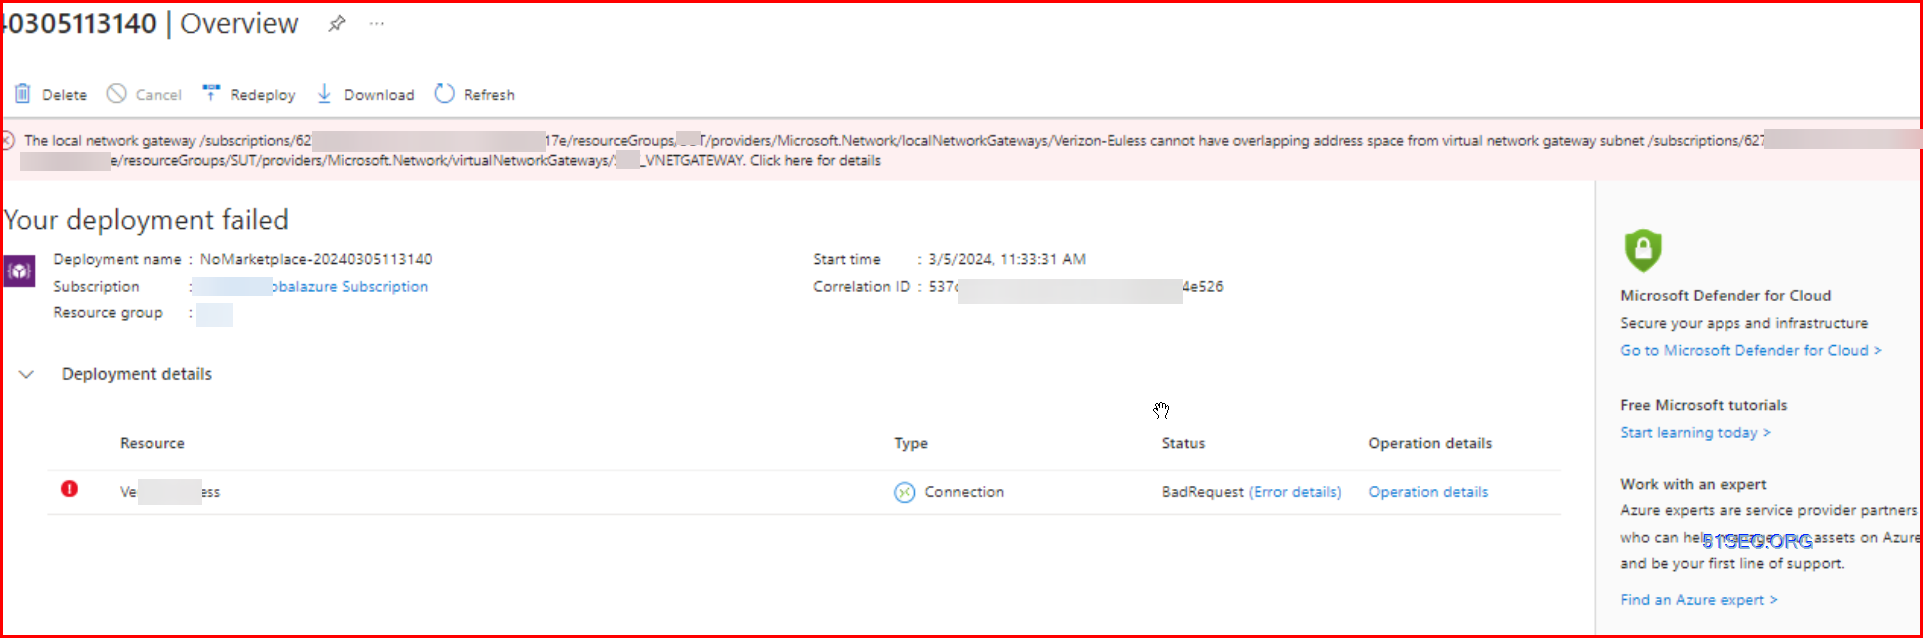
In this case, using FortiGate to create a new VPN gateway will be a choice.
References
- Tutorial: Create a site-to-site VPN connection in the Azure portal
- Zyxel : How to Configure Site-to-site IPSec VPN with Microsoft (MS) Azure
- USG/Zywall Series - How to Configure Route-based IPsec VPN to Azure (BGP over IKEv2/IPSec)
- https://learn.microsoft.com/en-us/azure/vpn-gateway/bgp-howto


No comments:
Post a Comment