With Azure Active Directory (Azure AD) self-service password reset (SSPR), users can update their password or unlock their account using a web browser. We recommend this video on How to enable and configure SSPR in Azure AD. In a hybrid environment where Azure AD is connected to an on-premises Active Directory Domain Services (AD DS) environment, this scenario can cause passwords to be different between the two directories.
Password writeback can be used to synchronize password changes in Azure AD back to your on-premises AD DS environment. Azure AD Connect provides a secure mechanism to send these password changes back to an existing on-premises directory from Azure AD.
Prerequisites
To complete this task, you need the following resources and privileges:
- A working Azure AD tenant with at least an Azure AD Premium P1 or trial license enabled.
- If needed, create one for free.
- For more information, see Licensing requirements for Azure AD SSPR.
- An account with Hybrid Identity Administrator.
- Azure AD configured for self-service password reset.
- An existing on-premises AD DS environment configured with a current version of Azure AD Connect.
1. Configure account permissions for Azure AD Connect
Azure AD Connect lets you synchronize users, groups, and credential between an on-premises AD DS environment and Azure AD. You typically install Azure AD Connect on a Windows Server 2016 or later computer that's joined to the on-premises AD DS domain.
To correctly work with SSPR writeback, the account specified in Azure AD Connect must have the appropriate permissions and options set. If you're not sure which account is currently in use, open Azure AD Connect and select the View current configuration option. The account that you need to add permissions to is listed under Synchronized Directories. The following permissions and options must be set on the account:
- Reset password
- Write permissions on
lockoutTime - Write permissions on
pwdLastSet - Extended rights for "Unexpire Password" on the root object of each domain in that forest, if not already set.

If you don't assign these permissions, writeback may appear to be configured correctly, but users encounter errors when they manage their on-premises passwords from the cloud. When setting "Unexpire Password" permissions in Active Directory, it must be applied to This object and all descendant objects, This object only, or All descendant objects, or the "Unexpire Password" permission can't be displayed.
To set up the appropriate permissions for password writeback to occur, complete the following steps:
In your on-premises AD DS environment, open Active Directory Users and Computers with an account that has the appropriate domain administrator permissions.
From the View menu, make sure that Advanced features are turned on.
In the left panel, right-select the object that represents the root of the domain and select Properties > Security > Advanced.
From the Permissions tab, select Add.
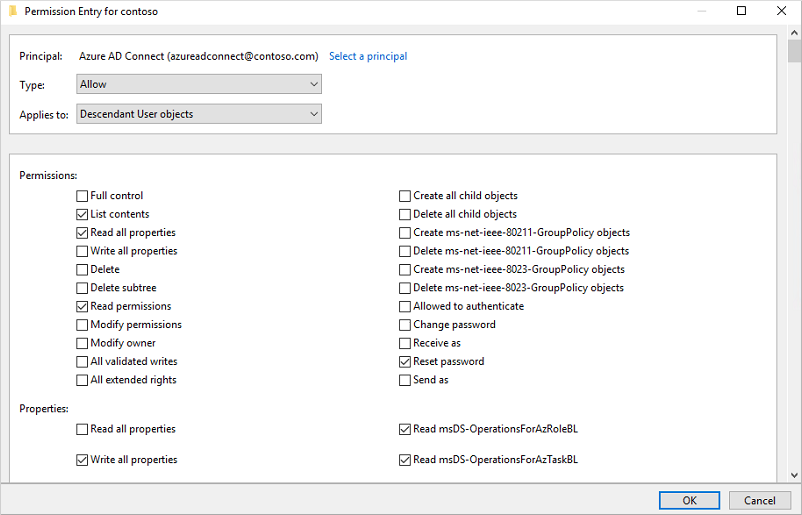
For Principal, select the account that permissions should be applied to (the account used by Azure AD Connect).
In the Applies to drop-down list, select Descendant User objects.
Under Permissions, select the box for the following option:
- Reset password
Under Properties, select the boxes for the following options. Scroll through the list to find these options, which may already be set by default:
- Write lockoutTime
- Write pwdLastSet
When ready, select Apply / OK to apply the changes.
From the Permissions tab, select Add.
For Principal, select the account that permissions should be applied to (the account used by Azure AD Connect).
In the Applies to drop-down list, select This object and all descendant objects
Under Permissions, select the box for the following option:
- Unexpire Password
When ready, select Apply / OK to apply the changes and exit any open dialog boxes.

When you update permissions, it might take up to an hour or more for these permissions to replicate to all the objects in your directory.
Password policies in the on-premises AD DS environment may prevent password resets from being correctly processed. For password writeback to work most efficiently, the group policy for Minimum password age must be set to 0. This setting can be found under Computer Configuration > Policies > Windows Settings > Security Settings > Account Policies within gpmc.msc.
If you update the group policy, wait for the updated policy to replicate, or use the gpupdate /force command.
2. Enable password writeback in Azure AD Connect
One of the configuration options in Azure AD Connect is for password writeback. When this option is enabled, password change events cause Azure AD Connect to synchronize the updated credentials back to the on-premises AD DS environment.
To enable SSPR writeback, first enable the writeback option in Azure AD Connect. From your Azure AD Connect server, complete the following steps:
Sign in to your Azure AD Connect server and start the Azure AD Connect configuration wizard.
On the Welcome page, select Configure.
On the Additional tasks page, select Customize synchronization options, and then select Next.
On the Connect to Azure AD page, enter a global administrator credential for your Azure tenant, and then select Next.
On the Connect directories and Domain/OU filtering pages, select Next.
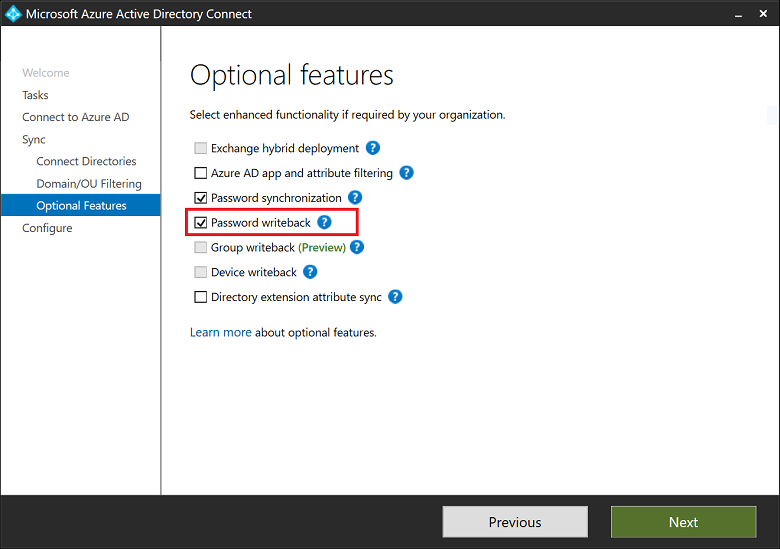
On the Optional features page, select the box next to Password writeback and select Next.
On the Directory extensions page, select Next.
On the Ready to configure page, select Configure and wait for the process to finish.
When you see the configuration finish, select Exit.
3. Enable password writeback for SSPR
With password writeback enabled in Azure AD Connect, now configure Azure AD SSPR for writeback. SSPR can be configured to writeback through Azure AD Connect sync agents and Azure AD Connect provisioning agents (cloud sync). When you enable SSPR to use password writeback, users who change or reset their password have that updated password synchronized back to the on-premises AD DS environment as well.To enable password writeback in SSPR, complete the following steps:
Sign in to the Azure portal using a Hybrid Identity Administrator account.
Search for and select Azure Active Directory, select Password reset, then choose On-premises integration.
Check the option for Write back passwords to your on-premises directory .
(optional) If Azure AD Connect provisioning agents are detected, you can additionally check the option for Write back passwords with Azure AD Connect cloud sync.
Check the option for Allow users to unlock accounts without resetting their password to Yes.

If there is an error, it might relate to the insufficent privilege or license AAD P1 or P2.
When ready, select Save.


No comments:
Post a Comment