Recently some Oracle Cloud Free Tier users received a email regarding their compute instances identified as idle. And the those identified idle instances will be stopped in one week. Also Orcle Cloud Infrastructure (OCI) suggested to convert the account to Pay As You Go (PAYG) to avoid stopping.
Here is the email content from Reddit
Oracle Cloud Infrastructure Customer,
Oracle Cloud Infrastructure (OCI) will be reclaiming idle Always Free compute resources from Always Free customers. Reclaiming idle resources allows OCI to efficiently provide services to Always Free customers. Your account has been identified as having one or more compute instances that have been idle for the past 7 days. These idle instances will be stopped one week from today, January 30,2023. If your idle Always Free compute instance is stopped, you can restart it as long as the associated compute shape is available in your region. You can keep idle compute instances from being stopped by converting your account to Pay As You Go (PAYG). With PAYG, you will not be charged as long as your usage for all OCI resources remains within the Always Free limits.
History
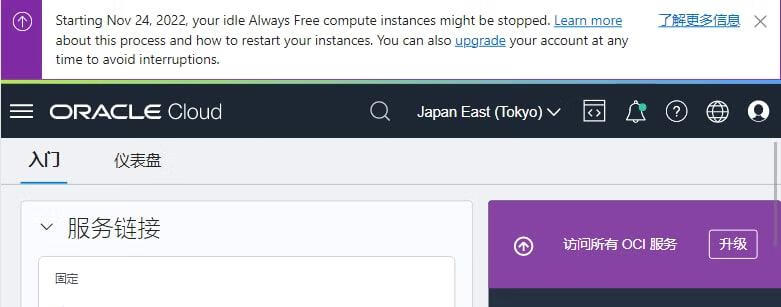
从 2022 年 11 月 24 日开始,您闲置的 Always Free 计算实例可能会停止。 详细了解此过程以及如何重启您的实例。 您还可以随时升级您的帐户以避免中断。
仅限未付费的免费套餐帐户。Idle Always未付费免费套餐帐户的免费资源可以随时回收,恕不另行通知。回收包括停止或终止等操作。
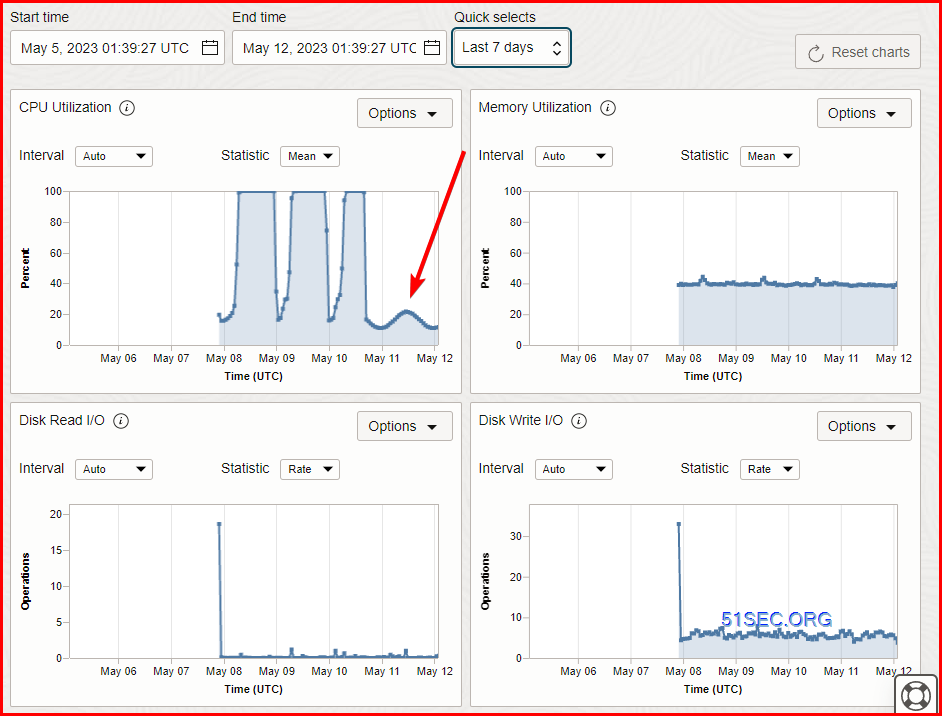
Idle Compute Instances threshold was 10% at the beginning of 2023:
Reclamation of Idle Compute Instances
Idle Always Free compute instances may be reclaimed by Oracle. Oracle will deem virtual machine and bare metal compute instances as idle if, during a 7-day period, the following are true:
- CPU utilization for the 95th percentile is less than 10%
- Network utilization is less than 10%
- Memory utilization is less than 10% (applies to A1 shapes only)
Reclamation of Idle Compute Instances
Idle Always Free compute instances may be reclaimed by Oracle. Oracle will deem virtual machine and bare metal compute instances as idle if, during a 7-day period, the following are true:
- CPU utilization for the 95th percentile is less than 15%
- Network utilization is less than 15%
- Memory utilization is less than 15% (applies to A1 shapes only)
NeverIdle Github Project Method - Optional
1 install dependencies
You might need to install wget and screen those two applications:
Based on your OS , this is command
- yum install -y wget screen
- apt install -y wget screen
2 Download script
# AMD Server
- wget https://github.com/layou233/NeverIdle/releases/download/0.1/NeverIdle-linux-amd64 -O NeverIdle
# ARM Server
- wget https://github.com/layou233/NeverIdle/releases/download/0.1/NeverIdle-linux-arm64 -O NeverIdle
3 Change file permission
- chmod 777 NeverIdle
4 Run Command
- screen -R baohuo
./NeverIdle -c 2h1m2s -m 2 -n 4h
-c : for cpu consumption. every 2 hour 1 minute 2 second (format is 2h1m2s), it will waste CPU once
-m : enable memory occupation. 2 means 2GB
-n : execute once to waste network for Ookla Speed Test. It will show the output on your screen.
5 Detaching and Reattaching screen session
To detach from screen and leave the window running in the background, use the keystroke:Detach: Ctrl + a + d
Reattach: screen -r
Other screen commands:
- Ctrl + a and c – Open a new screen window.
- Ctrl + a and " – List all open windows.
- Ctrl + a and 0 – Switch to window 0 (or any other numbered window).
- Ctrl + a and A – Rename the current window.
- Ctrl + a and S - Split the screen horizontally, with the current window on top.
- Ctrl + a and | - Split the screen vertically, with the current window on the left.
- Ctrl + a and tab – Switch focus between areas of the split screen.
- Ctrl + a and Ctrl + a – Switch between current and previous windows.
- Ctrl + a and n – Switch to the next window.
- Ctrl + a and p – Switch to the previous window.
- Ctrl + a and Q – Quit all other windows except the current one..
- Ctrl + a and X – Lock the current window.
- Ctrl + a and H – Create a running log of the session.
- Ctrl + a and M – Monitor a window for output (a notification pops up when that window has activity).
- Ctrl + a and _ - Watch a window for absence of output (such as when a file finishes downloading or a compiler finishes).
Issue with Neveridle project
Install Lookbusy - Recommended
Website: http://www.devin.com/lookbusy/apt -y update apt -y install curl build-essential curl -L http://www.devin.com/lookbusy/download/lookbusy-1.4.tar.gz -o lookbusy-1.4.tar.gz tar -xzvf lookbusy-1.4.tar.gz cd lookbusy-1.4/ ./configure make make install
Create a new lookbusy systemd service:
systemctl edit --full --force lookbusy.service
service configuration
[Unit]
Description=lookbusy service

[Service]
Type=simple
ExecStart=/usr/local/bin/lookbusy -c 20 -m 5120MB
Restart=always
RestartSec=10
KillSignal=SIGINT

[Install]
WantedBy=multi-user.target
Parameters: -c is for cpu percet usage,-m is for memory usage. You will need to change this accordingly.
Start the service right away and put lookbusy servce also started when system booted:
systemctl enable --now lookbusy.service
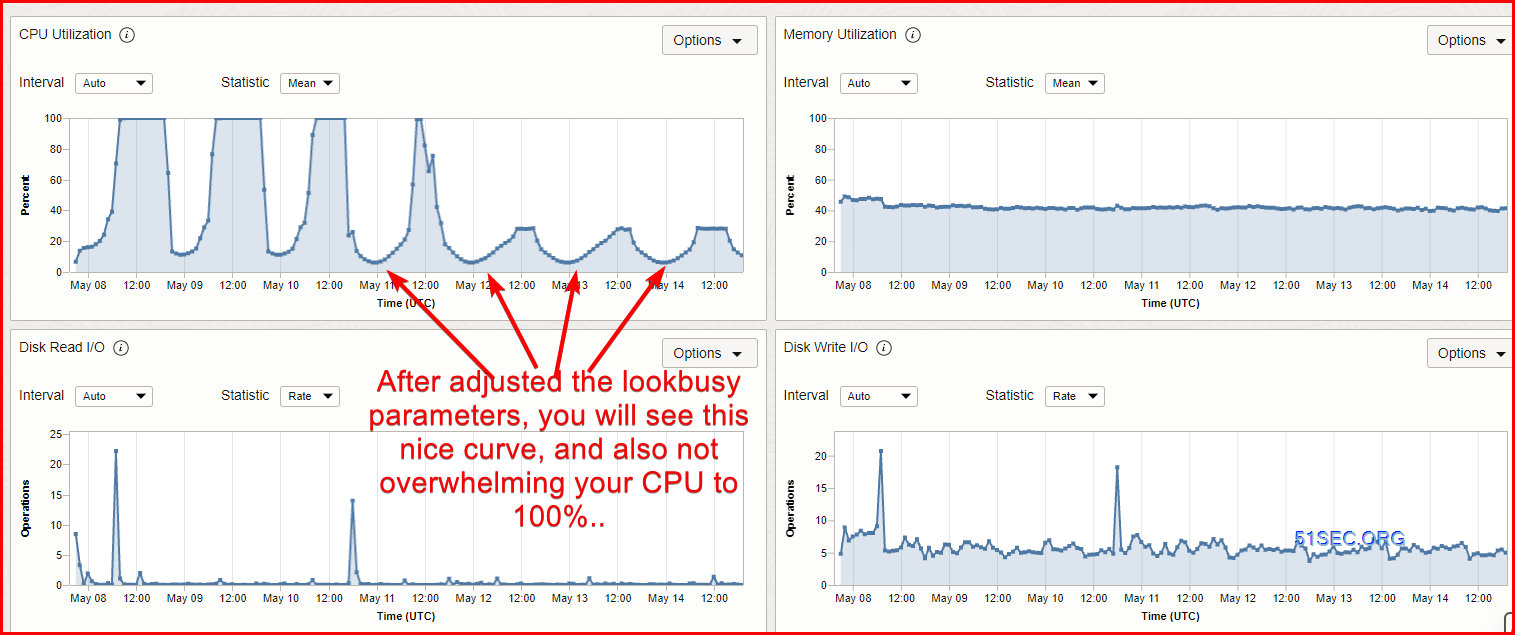
Make the cpu running between 5% and 20% randomly.
- screen -R lookbusy
- lookbusy -c 5-25 -r curve
- ctrl+a+d
root@ubuntu-docker-1:~/lookbusy-1.4# lookbusy -c 5-20 -r curve
cpu_spin (14166): starting 2 spinner(s) for 5%-20% usage
lookbusy (14166): CPU spinner started, PID 14167
lookbusy (14166): CPU spinner started, PID 14168
cpu_spin (14168): measuring CPU
cpu_spin (14167): measuring CPU
cpu_spin (14168): est. 5% util at 12266928 cycles, 95000 usec sleep
cpu_spin (14167): est. 5% util at 11876484 cycles, 95000 usec sleep
root@ubuntu-docker-1:~/lookbusy-1.4# screen -ls
There are screens on:
        14354.pts-0.ubuntu-docker-1     (05/07/23 21:18:44)     (Attached)
        14136.lookbusy  (05/07/23 21:17:21)     (Detached)
        3935.baohuo     (05/07/23 20:42:26)     (Detached)
3 Sockets in /run/screen/S-root.
root@ubuntu-docker-1:~/lookbusy-1.4#
- https://on.51sec.org/report/uptime/a1ca629c7b6353a3c7f697199b06b725/
- You can set the date at least 30 days to see how CPU and RAM used.
Install Lookbusy Docker
DockerHub:
https://hub.docker.com/r/fogforest/lookbusy
Update system and install softwares
apt update -y && apt upgrade -y && apt install -y curl wget sudo socat
Install docker
curl -fsSL https://get.docker.com | sh
Install script:
https://github.com/kejilion/docker/blob/main/fogforest
docker run -itd --name=lookbusy --restart=always \
    -e TZ=Asia/Shanghai \
    -e CPU_UTIL=10-20 \
    -e CPU_CORE=1 \
    -e MEM_UTIL=15 \
    -e SPEEDTEST_INTERVAL=120 \
    fogforest/lookbusy
docker部署参数说明
- CPU_UTIL=10-20 # CPU占用,单位%,不可省略,支持固定值或范围
- CPU_CORE=1 # CPU占用核心数,不指定默认跑全核,出现CPU打满的情况可以指定为1核
- MEM_UTIL=15 # 内存占用,单位%,不跑内存可省略
- SPEEDTEST_INTERVAL=120 # 网络测速间隔,单位分钟,不跑网络可省略
Other Methods to Keep Your Idle Resources
Shell Scripts
Source:https://hostloc.com/thread-1131732-1-1.html
lookbusy - Installation is at next section
Calculate Pi
Source:https://hostloc.com/thread-1131769-1-1.html


No comments:
Post a Comment