CentOS uses the Red Hat source code base to create a product similar to RHEL. So CentOS is very close to being RHEL without the branding and support. In particular, the library versions are the same, so binaries that work on one will work on the other. The administration tools are the same and configured in similar ways. However, there are a few differences, as the two distributions sometimes apply different minor patches.
RedHat Subscription
1 If you signed up to the no-cost developer license or have an actual license with Redhat, then you need to subscribe the server to RHN, using the subscription-manager command. |
subscription-manager register --username <username> --password <password> --auto-attach[root@html5 ~]# yum -y update && yum -y upgrade
Loaded plugins: product-id, search-disabled-repos, subscription-manager
This system is not registered with an entitlement server. You can use subscription-manager to register.
There are no enabled repos.
Run "yum repolist all" to see the repos you have.
To enable Red Hat Subscription Management repositories:
subscription-manager repos --enable <repo>
To enable custom repositories:
yum-config-manager --enable <repo>
[root@html5 ~]# yum repolist all
Loaded plugins: product-id, search-disabled-repos, subscription-manager
This system is not registered with an entitlement server. You can use subscription-manager to register.
repolist: 0
[root@html5 tmp]# subscription-manager register --username [email protected] --password p@ssworD1 --auto-attach
Registering to: subscription.rhsm.redhat.com:443/subscription
The system has been registered with ID: 11e911ab-a948-413b-b294-22fd25ef2721
The registered system name is: html5.51sectest.dev
Installed Product Current Status:
Product Name: Red Hat Enterprise Linux Server
Status:       Subscribed
After you register your RedHat with your development account, now all software becomes available now.
[root@html5 tmp]# yum repolist
Loaded plugins: product-id, search-disabled-repos, subscription-manager
rhel-7-server-rpms                                                                                                                                         | 3.5 kB  00:00:00
(1/3): rhel-7-server-rpms/7Server/x86_64/group                                                                                                             | 631 kB  00:00:00
(2/3): rhel-7-server-rpms/7Server/x86_64/updateinfo                                                                                                        | 3.7 MB  00:00:01
(3/3): rhel-7-server-rpms/7Server/x86_64/primary_db                                                                                                        |  71 MB  00:00:10
repo id                                                                           repo name                                                                                 status
rhel-7-server-rpms/7Server/x86_64                                                 Red Hat Enterprise Linux 7 Server (RPMs)                                                  29,218
repolist: 29,218
[root@html5 tmp]# yum -y update && yum -y upgrade
Loaded plugins: product-id, search-disabled-repos, subscription-manager
Resolving Dependencies
--> Running transaction check
---> Package ca-certificates.noarch 0:2019.2.32-76.el7_7 will be updated
---> Package ca-certificates.noarch 0:2020.2.41-70.0.el7_8 will be an update
....
Differences between Ubuntu and CentOS:
- The biggest difference between the two Linux distributions is that Ubuntu is based on the Debian architecture while CentOS is forked from Red Hat Enterprise Linux.
- In Ubuntu, you can download DEB packages using the apt-get package manager. Meanwhile, in CentOS, you have to use the yum command to download and install RPM packages from the central repository.
- CentOS is considered to be a more stable distribution compared to Ubuntu. Mainly because package updates are less frequent. This can also prove to be a disadvantage of CentOS. If you want the latest version of a certain application or software, you will have to install them manually.
| Ubuntu | CentOS |
| Based on Debian | Based on RHEL |
| Updated frequently | Updated scarcely |
| No cPanel support (has alternatives) | Supports cPanel/WHM |
| Larger user and developer community | Smaller user and developer community |
| Greater amount of help available in the form of tutorials and free guides | Lesser amount of help available |
| Easier to learn for beginners that have used Ubuntu desktop in the past | Harder to learn for beginners as there are not many famous desktop distros released by RHEL |
| .deb packages installed using the apt-getpackage manager | .rpm packages installed using the yum package manager |
Install CentOS 8 / 7
CentOS 8
- Download CentOS8 ISO file from CentOS Download page or CentOS 8 official ISO mirror page.
- Boot ISO file and select Install CentOS Linux 8.0.xxxx and press enter to continue
- Choose your language and click on Continue.
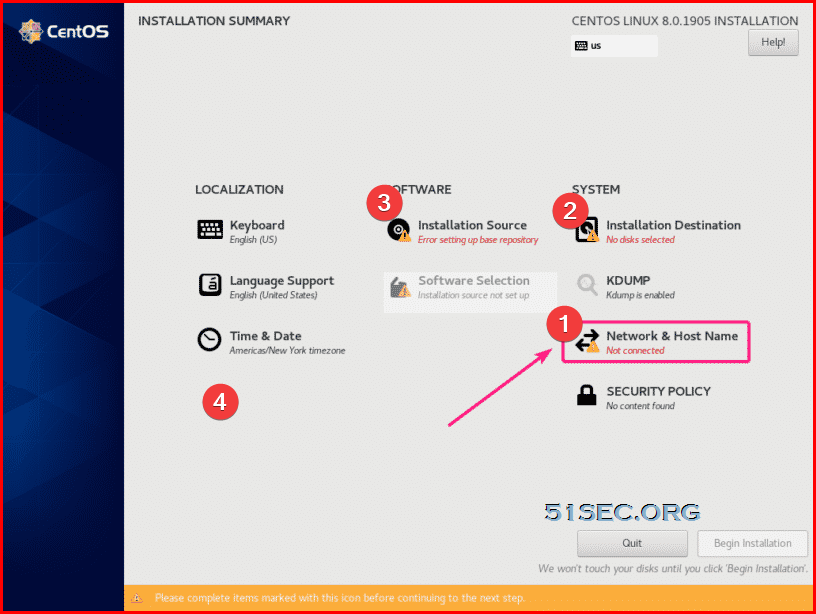
- Enable Network & Host Name. You should be able to get your DHCP ip or manually set ip address for your CentOS virtual machine
- For Installation Destination, choose the right disk for your installation.
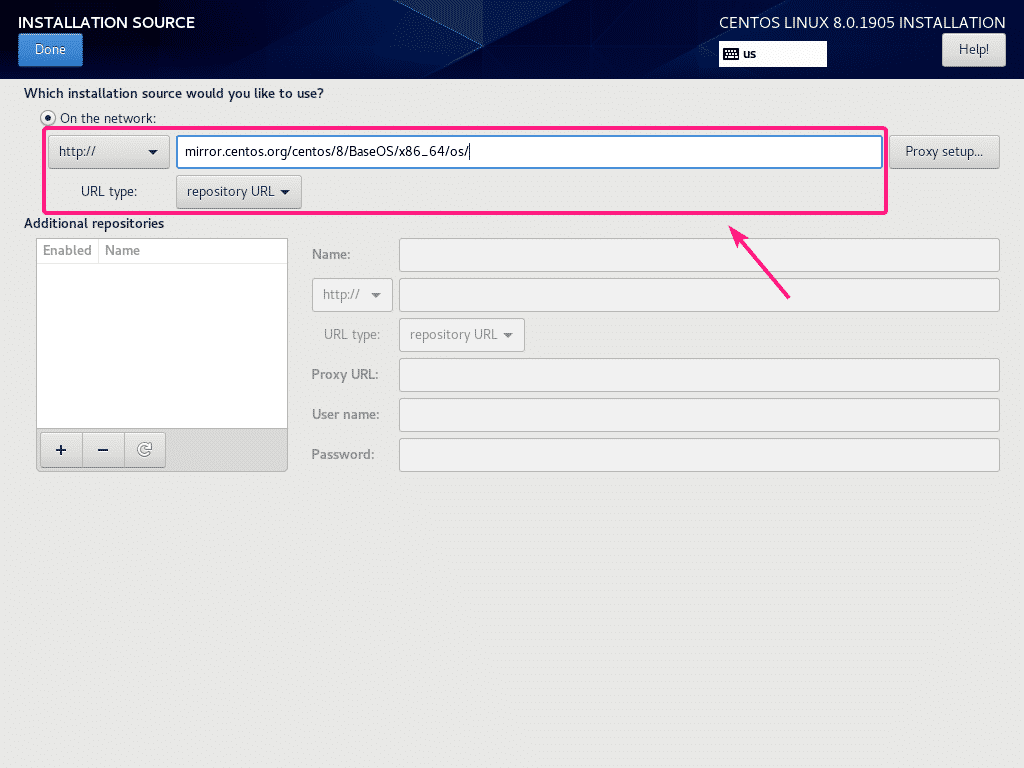
- For installation source: I am going to use the official CentOS 8 repository using the HTTP repository URL http://mirror.centos.org/centos/8/BaseOS/x86_64/os/

- For Software selection, just choose server or minimal install if you do not want to use GUI.
CentOS 7
Installation steps are pretty easy to follow.
YouTube Video : VMWare Workstation Easy Install CentOS 7
This installation is using VMWare Workstation Easy Install method to complete the installation.
- Reboot CentOS: init 6 , reboot, shutdown -r now
- ShutdownCentOS: init 0, poweroff
- Sync time: ntpdate time.windows.com
- change to root: sudo -i
- “nmcli d” command in your terminal for quick list ethernet card installed on your machine:
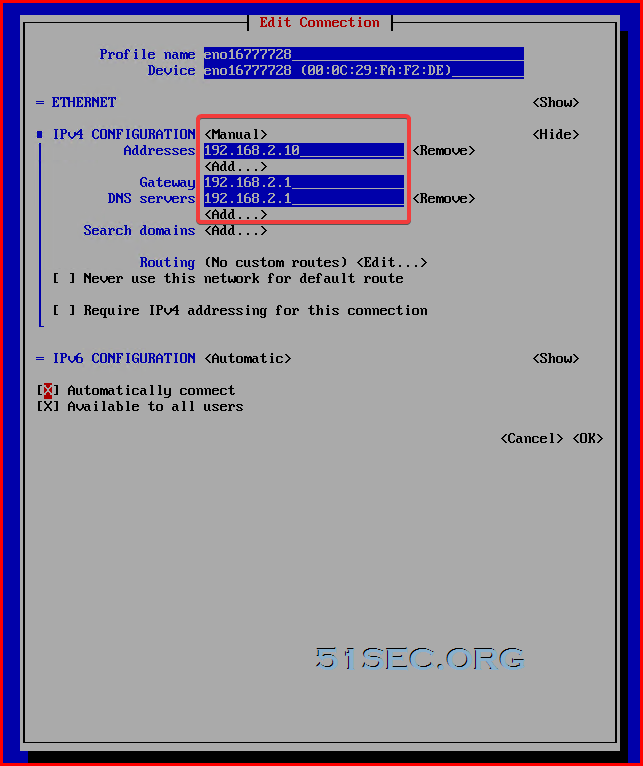
- “nmtui” command in your terminal to open Network manager.
- IPv4 configuration <Automatic>
- [x] Automatically connect
- service network restart
- ip a

Network Interface Configuration
Check Network Interface Commands (CentOS):- ip a
- ip l
- nmcli d
- nmtui
nmtui command line interface:
change to root: sudo -i
DHCP or Static:
Step 1 » Check the network interface name by typing below command
[root@linux1 ~]# ip a
1: lo: <LOOPBACK,UP,LOWER_UP> mtu 65536 qdisc noqueue state UNKNOWN link/loopback 00:00:00:00:00:00 brd 00:00:00:00:00:00 inet 127.0.0.1/8 scope host lo valid_lft forever preferred_lft forever inet6 ::1/128 scope host valid_lft forever preferred_lft forever 2: eth0: <BROADCAST,MULTICAST,UP,LOWER_UP> mtu 1500 qdisc pfifo_fast state UP qlen 1000 link/ether 9a:4a:27:66:a4:4c brd ff:ff:ff:ff:ff:ff inet 10.9.1.26/24 brd 10.91.128.255 scope global eth0 valid_lft forever preferred_lft forever inet6 fe80::984a:27ff:fe66:a44c/64 scope link valid_lft forever preferred_lft forever |
Step 2 » you can see the file named ifcfg-eth0 ( Interface name ) in the location “/etc/sysconfig/network-scripts/” , open the file and you can see the lines as below, which is static ip 10.9.1.26 assigned to interface eth0
Just modify the lines like this
Step 3 » Start the network service and you can see the status as below .
DEVICE="eth0"
HWADDR="00:22:19:09:4D:3C" NM_CONTROLLED="yes" ONBOOT="yes" # Interface enabled BOOTPROTO="dhcp" #Assigning IP from DHCP |
[root@linux1~]# service network start
Bringing up loopback interface:                [  OK  ]
Bringing up interface p4p1:
Determining IP information for p4p1... done.   [  OK  ]
Some other similar commands:
- service network restart
- systemctl restart network.service
Change CentOS host name command:
- hostnamectl set-hostname CentOS-test1
System Update and Package Mgmt Commands
- sudo -i
- yum check-update
- yum update
- yum list | less
- yum info firefox
- yum search vsftpd
- yum list openssh
- yum update mysql
- yum -y remove firefox
- yum clean all
- yum install epel-release
[john@linux1 /]$ rpm -qa |less
plymouth-0.8.9-0.24.20140113.el7.centos.x86_64
libsoup-2.48.1-3.el7.x86_64
libaio-0.3.109-13.el7.x86_64
dmidecode-2.12-9.el7.x86_64
passwd-0.79-4.el7.x86_64
bind-libs-lite-9.9.4-29.el7_2.2.x86_64
sed-4.2.2-5.el7.x86_64
grub2-2.02-0.34.el7.centos.x86_64
libcom_err-1.42.9-7.el7.x86_64
rsyslog-7.4.7-12.el7.x86_64
biosdevname-0.6.2-1.el7.x86_64
dracut-config-rescue-033-360.el7_2.x86_64
libacl-2.2.51-12.el7.x86_64
openssh-clients-6.6.1p1-23.el7_2.x86_64
xe-guest-utilities-6.5.0-1432.x86_64
libgcrypt-1.5.3-12.el7_1.1.x86_64
libpcap-1.5.3-8.el7.x86_64
cronie-1.4.11-14.el7.x86_64
iwl6050-firmware-41.28.5.1-43.el7.noarch
iwl4965-firmware-228.61.2.24-43.el7.noarch
iwl3160-firmware-22.0.7.0-43.el7.noarch
libunistring-0.9.3-9.el7.x86_64
iwl100-firmware-39.31.5.1-43.el7.noarch
perl-parent-0.225-244.el7.noarch
newt-0.52.15-4.el7.x86_64
perl-Pod-Escapes-1.04-286.el7.noarch
gdbm-1.10-8.el7.x86_64
perl-libs-5.16.3-286.el7.x86_64
.......
[john@linux1 /]$ rpm -qa |grep syslog
rsyslog-7.4.7-12.el7.x86_64
|
System Performance and Monitoring Commands
- uptime
- top
- iostat
- vmstat
- ps and pstree
- sar
- crontab
- free
- pmap
Disable IPv6
change to root: sudo -i
5.1 Edit Sysctl.conf file
vi /etc/sysctl.conf
Add following two lines:
net.ipv6.conf.all.disable_ipv6 =1
net.ipv6.conf.default.disable_ipv6 =1
if only want to disable IPv6 for specific network card, such as enp0s3, add following line instead:
net.ipv6.conf.enp0s3.disable_ipv6 =1
Save and exit VI.
Run following command to make the change effect:
sysctl -p
5.2
echo 1>/proc/sys/net/ipv6/conf/all/disable_ipv6echo 1>/proc/sys/net/ipv6/conf/default/disable_ipv6
5.3
sysctl -w net.ipv6.conf.all.disable_ipv6=1sysctl -w net.ipv6.conf.default.disable_ipv6=1
Note: Some caveats to be aware from How to disable IPv6 on Linux.
Firewall
6.1 Iptables (CentOS 7 not installed it by default)
Here are some commands to install it to replace default firewall :
- yum install policycoreutils iptables-services -y
- systemctl stop firewalld.service
- systemctl disable firewalld.service
- service iptables restart
6.2 Firewalld Commands (CentOS 7)
- systemctl stop firewalld //Turn off the firewall
- systemctl start firewalld //Turn on the firewall
- systemctl status firewalld //Check firewall status
- systemctl stop firewalld.service #停止firewall
- systemctl disable firewalld.service #禁止firewall开机启动
- firewall-cmd --state #查看默认防火墙状态(关闭后显示notrunning,开启后显示running)
Mask the FirewallD service which will prevent the firewall from being started by other services:
sudo systemctl mask --now firewalld
Netfilter
Install Other Useful Tools
- Vim
- lrzsz
- bind-utils / net-tools
- Git
- Ansible
- Docker
- sudo -i
- sudo yum update
- sudo yum install docker
- sudo systemctl enable docker.service # Enable the service
- sudo systemctl start docker # Start the Docker daemon.
- sudo docker images # Show local images
- sudo docker pull tutum/wordpress # pull the image
- sudo docker run -d -p 80:80 tutum/wordpress # Run container
- sudo curl http://localhost/ # Test container
- sudo docker stop # Stop container
- sudo docker ps -a # Show container list
- sudo docker export 633748a43e01 > blog.tar # Export container
- cat blog.tar | sudo docker import - tutum/wordpress blog.tar # Import container
- docker pull ubuntu
- docker exec -it ubuntu /bin/bash
- docker cp /home/msg/name.tar 5ed1587b3923:/home/software #Copy file from host to container folder
- docker exec -ti 5ed1587b3923 /bin/bash # run command in the container
- docker run -dt -p 7000-8000:7000-8000 -v /usr/local/home:/usr/local/container/home centos/java8 /bin/bash #map port range and mount local folder to container
- vsftp
- yum install -y vsftpd
- vi /etc/vsftpd/vsftpd.conf
- anonymous_enable=YES #allow anonymous to visit
- anon_upload_enable=YES
- anon_mkdir_write_enable=YES
- systemctl enable vsftpd # enablevsftpd service when system started
- systemctl disable vsftpd
- systemctl start vsftpd
- systemctl status vsftpd
- Create user
- useradd ftpadmin //create user ftpadmin
- passwd ftpadmin //create password
- mkdir -p /home/app/ftpdir
- usermod -d /home/app/ftpdir ftpadmin // change user ftpadmin's home folder to that new created folder
- Samba
- rpm -qa | grep 'samba' // Check Samba service if installed already
- yum -y install samba samba-common samba-client
- samba-3.6.9-151.el6.x86_64 //服务器端软件,主要提供samba服务器的守护程序,共享文档,日志的轮替
- samba-common-3.6.9-151.el6.x86_64 //主要提供samba服务器的设置文件与设置文件语法检验程序testparm
- samba-client-3.6.9-151.el6.x86_64 //客户端软件,主要提供linux主机作为客户端时,所需要的工具指令集
- service smb status //查看samba服务状态
- service smb start //启动samba服务
- service smb restart //重启samba服务
- vi /etc/samba/smb.conf //add following sharing information
[share]
path = /home/sambauser1/share
comment = sambauser1_share
public = yes
writable = yes
browseable = yes
guest ok = yes
valid users = sambauser1,root
available = yes
- smbpasswd -a sambauser1 //为sambauser1 用户增加共享用户,并设定samba密码
- pure-ftpd
- yum install -y pure-ftpd
- cd /etc/yum.repos.d
- yum install -y epel-release
- vim /etc/pure-ftpd/pure-ftpd.conf
- remove # sign at the head of line pureftpd.pdb
- systemctl start pure-ftpd // You will need to stop vsftpd to avoid port conflict
- mkdir /data/ftp
- useradd -u 1010 pure-ftp1
- chown -R pure-ftp1:pure-ftp1 /data/ftp // give permission to the folder
- pure-pw useradd ftp_usera -u pure-ftp1 -d /data/ftp
- 用pure-pw创建用户,用-u指定系统用户是谁。-d,指定虚拟用户的家目录,设置密码
- touch /data/ftp/1.txt
- pure-pw mkdb
- lftp [email protected]
- chown pure-ftp1:pure-ftp1 /data/ftp/1.txt
Notes:
For those services or software, if there is any problem to access from remotely, it might be SELinux issue. SELinux is Security Enhanced Linux. We can use following two commands to check status and make a temporary setting change.
- getenforce //Check SELinux status, either enforcing, permissive or disabled
- setenforce [Enforcing | Permissive | 1 | 0]
SELinux
To change SELinux permanently, we will need to edit /etc/sysconfig/selinux.
vi /etc/sysconfig/selinux
# This file controls the state of SELinux on the system.
# SELINUX= can take one of these three values:
# enforcing - SELinux security policy is enforced.
# permissive - SELinux prints warnings instead of enforcing.
# disabled - No SELinux policy is loaded.
SELINUX=disabled
# SELINUXTYPE= can take one of three values:
# targeted - Targeted processes are protected,
# minimum - Modification of targeted policy. Only selected processes are protected.
# mls - Multi Level Security protection.12 SELINUXTYPE=targeted
Docker
For RedHat:- Type the following command to install Docker via yum provided by Red Hat:
sudo yum install docker - Type the following command to install the latest version of Docker CE (community edition):
sudo yum remove docker docker-common docker-selinux docker-engine
sudo yum-config-manager --add-repo https://download.docker.com/linux/centos/docker-ce.repo
sudo yum install docker-ce
Youtube Video:
References:


No comments:
Post a Comment