This post is to collect some commands to operate Ubuntu.
- sudo apt-get update : In a nutshell, apt-get update doesn't actually install new versions of software. Instead, it updates the package lists for upgrades for packages that need upgrading, as well as new packages that have just come to the repositories.
- sudo apt-get upgrade : will fetch new versions of packages existing on the machine if APT knows about these new versions by way of apt-get update. An update must be performed first so that apt-get knows that new versions of packages are available.
- sudo apt-get dist-upgrade: will do the same job which is done by apt-get upgrade, plus it will also intelligently handle the dependencies, so it might remove obsolete packages or add new ones.
Note: we can combine commands with && signs, such as:
- sudo apt-get update && sudo apt-get dist-upgrade
2. Install and start SSH service
- sudo apt-get install openssh-server
- sudo service ssh start
Verify with netstat command:
-t: tcp
-u: udp
-l: listening
-p: program/pid
-n: numeric
test@ubuntu:~$ netstat -tulpn
(Not all processes could be identified, non-owned process info
 will not be shown, you would have to be root to see it all.)
Active Internet connections (only servers)
Proto Recv-Q Send-Q Local Address           Foreign Address         State       PID/Program name
tcp        0      0 0.0.0.0:22              0.0.0.0:*               LISTEN      -
tcp6       0      0 :::22                   :::*                    LISTEN      -
udp        0      0 0.0.0.0:68              0.0.0.0:*                           -
test@ubuntu:~$
3. Allow Root log in and set Root password
set up root password
Set Static IP before Ubuntu 18.04
Edit DNS Configuration File:
/etc/systemd/resolved.conf
Find the DNS section and add your DNS server ip addresses:
DNS= 1.1.1.1 8.8.4.4 192.168.2.1
Set Static IP for Ubuntu 18.04 +
To configure a static IP address on your Ubuntu 18.04 server you need to modify a relevant netplan network configuration file within
/etc/netplan/ directory.For example you might find there a default netplan configuration file called
50-cloud-init.yaml(default file) or01-netcfg.yaml with a following content instructing the networkd deamon to configure your network interface via DHCP:# This file describes the network interfaces available on your system
# For more information, see netplan(5).
network:
version: 2
renderer: networkd
ethernets:
enp0s3:
dhcp4: yes
enp0s3 to static IP address 192.168.1.222 with gateway 192.168.1.1 and DNS server as 8.8.8.8 and 8.8.4.4 replace the above configuration with the one below.WARNING:
You must adhere to a correct code indent for each line of the block. In other words the prefix number of spaces for each line is important. Othersiwe you may end up with an error message similar to: Invalid YAML at //etc/netplan/01-netcfg.yaml line 7 column 6: did not find expected key. Also, it can not have tab key in the file. You will have to use space.
You must adhere to a correct code indent for each line of the block. In other words the prefix number of spaces for each line is important. Othersiwe you may end up with an error message similar to: Invalid YAML at //etc/netplan/01-netcfg.yaml line 7 column 6: did not find expected key. Also, it can not have tab key in the file. You will have to use space.
# This file describes the network interfaces available on your system
# For more information, see netplan(5).
network:
  version: 2
  renderer: networkd
  ethernets:
    enp0s3:
     dhcp4: no
     addresses: [192.168.1.222/24]
     gateway4: 192.168.1.1
     nameservers:
       addresses: [8.8.8.8,8.8.4.4]
$ sudo netplan applyIn case you run into some issues execute:
$ sudo netplan --debug apply
5. Configure apt sources
Here it has been set Aliyun source
Check time zone
Modify timezone
Verify
Note: command 'timedatectl'
7. Fix Broken Ubuntu Without Reinstalling it
$ sudo rm /var/lib/apt/lists/lock
$ sudo rm /var/lib/dpkg/lock
$ sudo rm /var/lib/dpkg/lock-frontend
$ sudo dpkg --configure -a
$ sudo apt clean
$ sudo apt update --fix-missing
$ sudo apt install -f
$ sudo dpkg --configure -a
$ sudo apt upgrade
$ sudo apt dist-upgrade
Last step, 'sudo reboot'
8. Check Ubuntu Version/CPU/Release information
root@Ubuntu:~# getconf LONG_BIT
64
root@Ubuntu:~#  lsb_release -a
No LSB modules are available.
Distributor ID: Ubuntu
Description:    Ubuntu 18.04.1 LTS
Release:        18.04
Codename:       bionic
root@Ubuntu:~# uname -a
Linux wan 4.15.0-29-generic #31-Ubuntu SMP Tue Jul 17 13:11:22 UTC 2017 x86_64
root@Ubuntu:~# cat /proc/cpuinfo
processor       : 0
vendor_id       : GenuineIntel
cpu family      : 6
model           : 142
model name      : Intel(R) Core(TM) i5-4300U CPU @ 2.10GHz
stepping        : 9
microcode       : 0x4e
cpu MHz         : 2712.050
cache size      : 3072 KB
physical id     : 0
siblings        : 2
core id         : 0
cpu cores       : 2
apicid          : 0
initial apicid  : 0
fpu             : yes
fpu_exception   : yes
cpuid level     : 22
wp              : yes
flags           : fpu vme de pse tsc msr pae mce cx8 apic sep mtrr pge mca cmov pat pse36 clflush mmx fxsr sse sse2 ss ht syscall nx pdpe1gb rdtscp lm constant_tsc arch_perfmon nopl xtopology tsc_reliable nonstop_tsc cpuid pni pclmulqdq ssse3 fma cx16 pcid sse4_1 sse4_2 x2apic movbe popcnt tsc_deadline_timer aes xsave avx f16c rdrand hypervisor lahf_lm abm 3dnowprefetch cpuid_fault invpcid_single pti fsgsbase tsc_adjust bmi1 avx2 smep bmi2 invpcid mpx rdseed adx smap clflushopt xsaveopt xsavec xsaves arat
bugs            : cpu_meltdown spectre_v1 spectre_v2 spec_store_bypass
bogomips        : 5424.10
clflush size    : 64
cache_alignment : 64
address sizes   : 43 bits physical, 48 bits virtual
power management:

processor       : 1
vendor_id       : GenuineIntel
cpu family      : 6
model           : 142
model name      : Intel(R) Core(TM) i5-4300U CPU @ 2.10GHz
stepping        : 9
microcode       : 0x4e
cpu MHz         : 2712.050
cache size      : 3072 KB
physical id     : 0
siblings        : 2
core id         : 1
cpu cores       : 2
apicid          : 1
initial apicid  : 1
fpu             : yes
fpu_exception   : yes
cpuid level     : 22
wp              : yes
flags           : fpu vme de pse tsc msr pae mce cx8 apic sep mtrr pge mca cmov pat pse36 clflush mmx fxsr sse sse2 ss ht syscall nx pdpe1gb rdtscp lm constant_tsc arch_perfmon nopl xtopology tsc_reliable nonstop_tsc cpuid pni pclmulqdq ssse3 fma cx16 pcid sse4_1 sse4_2 x2apic movbe popcnt tsc_deadline_timer aes xsave avx f16c rdrand hypervisor lahf_lm abm 3dnowprefetch cpuid_fault invpcid_single pti fsgsbase tsc_adjust bmi1 avx2 smep bmi2 invpcid mpx rdseed adx smap clflushopt xsaveopt xsavec xsaves arat
bugs            : cpu_meltdown spectre_v1 spectre_v2 spec_store_bypass
bogomips        : 5424.10
clflush size    : 64
cache_alignment : 64
address sizes   : 43 bits physical, 48 bits virtual
power management:
9.1 Install Samba
root@Ubuntu:~# apt-get install samba
9.2 Change Configuration file
root@Ubuntu:~# vi /etc/samba/smb.conf
Append following configuration at the end of smb.conf
[share]
        path = /Deepinfar
        available=yes
        browseable = yes
        public = yes
        writeable = yes
        guest ok = no
9.3 Add root user into Samba user list
root@Ubuntu:~# smbpasswd -a root
9.4 Restart Samba service and test from windows
root@Ubuntu:~# smbd start
10. Disable apt-daily.service and apt-daily-upgrade.service
One of my cloud VM is having intermittent CPU high causing outage issue. From what syslog shows, at exactly time, Daily apt download activities caused system CPU goes too high and system service kind of crushed.
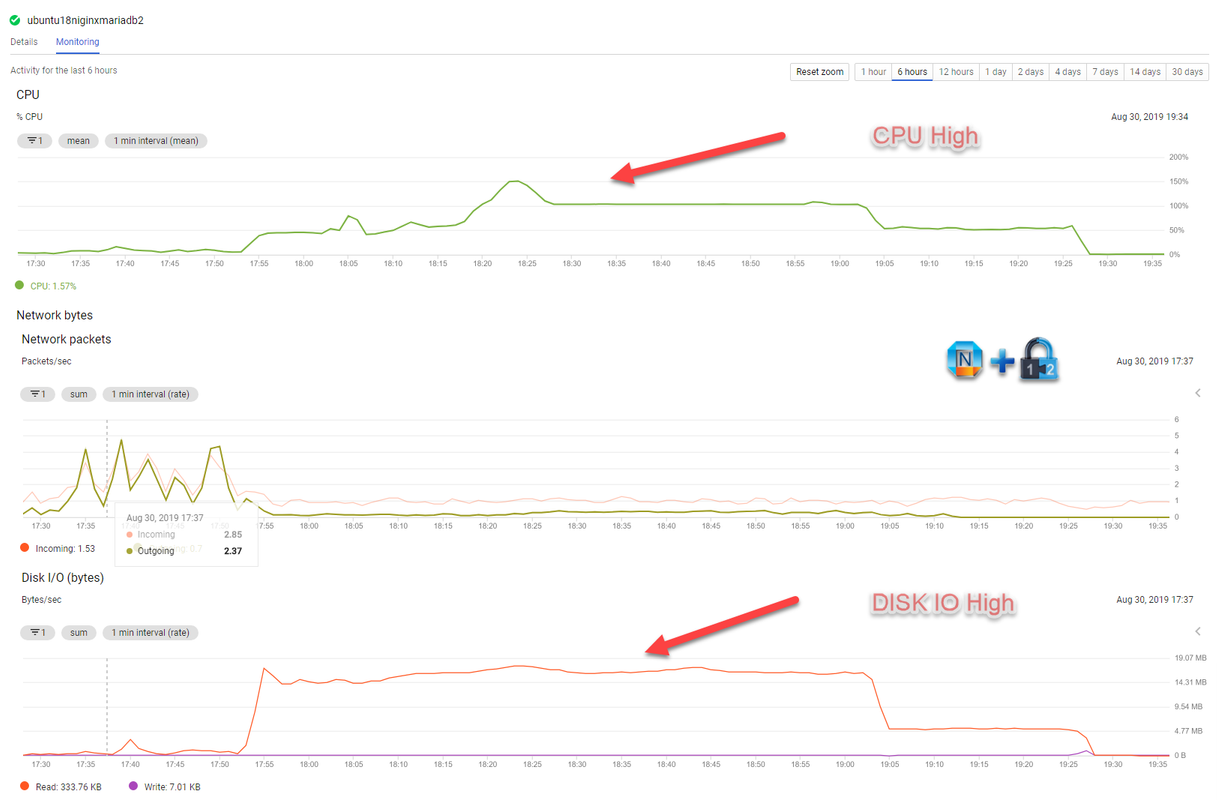
jon_netsec@ubuntu18niginxmariadb2:/var/log$more /var/log/syslog
Aug 30 17:39:08 ubuntu18niginxmariadb2 systemd[1]: Started Clean php session files.
Aug 30 17:53:27 ubuntu18niginxmariadb2 systemd[1]: Starting Daily apt download activities...
Aug 30 18:06:08 ubuntu18niginxmariadb2 mysqld[1321]: 2019-08-30 18:05:52 20017 [Warning] Aborted connection 20017 to db: 'wp_db' user: 'wp_db_user' host: 'localhost' (Got timeout reading communication packets)
Aug 30 18:07:34 ubuntu18niginxmariadb2 mysqld[1321]: 2019-08-30 18:07:10 20015 [Warning] Aborted connection 20015 to db: 'wp_db' user: 'wp_db_user' host: 'localhost' (Got timeout reading communication packets)
Aug 30 18:13:58 ubuntu18niginxmariadb2 systemd-networkd[687]: ens4: Could not set DHCPv4 address: Connection timed out
Aug 30 18:28:14 ubuntu18niginxmariadb2 systemd-networkd[687]: ens4: Failed
Aug 30 18:46:47 ubuntu18niginxmariadb2 mysqld[1321]: 2019-08-30 18:19:37 20014 [Warning] Aborted connection 20014 to db: 'wp_db' user: 'wp_db_user' host: 'localhost' (Got timeout reading communication packets)
Aug 30 19:01:31 ubuntu18niginxmariadb2 mysqld[1321]: 2019-08-30 18:21:29 20016 [Warning] Aborted connection 20016 to db: 'wp_db' user: 'wp_db_user' host: 'localhost' (Got timeout reading communication packets)
Aug 30 19:25:22 ubuntu18niginxmariadb2 kernel: [168290.564611] ip invoked oom-killer: gfp_mask=0x14200ca(GFP_HIGHUSER_MOVABLE), nodemask=(null), order=0, oom_score_adj=0
Aug 30 19:25:22 ubuntu18niginxmariadb2 kernel: [168290.564614] ip cpuset=/ mems_allowed=0
Aug 30 19:25:22 ubuntu18niginxmariadb2 kernel: [168290.564626] CPU: 0 PID: 22356 Comm: ip Not tainted 4.15.0-1040-gcp #42-Ubuntu
Aug 30 19:25:22 ubuntu18niginxmariadb2 kernel: [168290.564627] Hardware name: Google Google Compute Engine/Google Compute Engine, BIOS Google 01/01/2011
Based on systemctl's outputs, we can find out two related services, apt-daily-upgrade.timer and apt-daily.timer
jon_netsec@ubuntu18niginxmariadb2:/var/log$ systemctl
.....
.....
timers.target                     loaded active active    Timers
apt-daily-upgrade.timer           loaded active waiting   Daily apt upgrade and clea
apt-daily.timer                   loaded active waiting   Daily apt download activit
fstrim.timer                      loaded active waiting   Discard unused blocks once
motd-news.timer                   loaded active waiting   Message of the Day
phpsessionclean.timer             loaded active waiting   Clean PHP session files ev
systemd-tmpfiles-clean.timer      loaded active waiting   Daily Cleanup of Temporary

LOAD   = Reflects whether the unit definition was properly loaded.
ACTIVE = The high-level unit activation state, i.e. generalization of SUB.
SUB    = The low-level unit activation state, values depend on unit type.

176 loaded units listed. Pass --all to see loaded but inactive units, too.
To show all installed unit files use 'systemctl list-unit-files'.
jon_netsec@ubuntu18niginxmariadb2:/var/log$ systemctl | grep timer
timers.target                  loaded active active    Timers
apt-daily-upgrade.timer        loaded active waiting   Daily apt upgrade and clean activities
apt-daily.timer                loaded active waiting   Daily apt download activities
fstrim.timer                   loaded active waiting   Discard unused blocks once a week
motd-news.timer                loaded active waiting   Message of the Day
phpsessionclean.timer          loaded active waiting   Clean PHP session files every 30 mins
systemd-tmpfiles-clean.timer   loaded active waiting   Daily Cleanup of Temporary Directories
jon_netsec@ubuntu18niginxmariadb2:/var/log$
I do understand those two services are keeping my Ubuntu packages updated and secure. But I am more concerning system reliability. In this case, I would more like those two services disabled, and I will run manually apt update and upgrade at right time in a more controlled way using commands "sudo apt update & sudo apt -y upgrade".
Here are four commands to disable those two timer and services.
sudo systemctl disable apt-daily.service
sudo systemctl disable apt-daily.timer

sudo systemctl disable apt-daily-upgrade.timer
sudo systemctl disable apt-daily-upgrade.service
sudo systemctl mask apt-daily.servicesudo systemctl daemon-reloadjon_netsec@ubuntu18niginxmariadb2:/var/log$ sudo systemctl disable apt-daily.service
jon_netsec@ubuntu18niginxmariadb2:/var/log$ sudo systemctl disable apt-daily.timer
Removed /etc/systemd/system/timers.target.wants/apt-daily.timer.
jon_netsec@ubuntu18niginxmariadb2:/var/log$
jon_netsec@ubuntu18niginxmariadb2:/var/log$ sudo systemctl disable apt-daily-upgrade.timer
Removed /etc/systemd/system/timers.target.wants/apt-daily-upgrade.timer.
jon_netsec@ubuntu18niginxmariadb2:/var/log$ sudo systemctl disable apt-daily-upgrade.service
jon_netsec@ubuntu18niginxmariadb2:/var/log$
jon_netsec@ubuntu18niginxmariadb2:~$ sudo systemctl mask apt-daily.service
Created symlink /etc/systemd/system/apt-daily.service → /dev/null.
jon_netsec@ubuntu18niginxmariadb2:~$ sudo systemctl daemon-reload
jon_netsec@ubuntu18niginxmariadb2:~$ sudo systemctl status apt-daily.service
● apt-daily.service
   Loaded: masked (/dev/null; bad)
   Active: inactive (dead)
jon_netsec@ubuntu18niginxmariadb2:~$
Some Common Tasks in Ubuntu 20.04
Open firewall ports 8888, 80, 443
Turn on BBR
Install BT
Install Applications using BT
Free Up Port 53, Used By systemd-resolved
Ubuntu has systemd-resolved listening on port 53 by default. In case you want to run your own DNS server, you can't because port 53 is already in use, so you'll get an error similar to this: "listen tcp 0.0.0.0:53: bind: address already in use".
$ sudo lsof -i :53

COMMAND   PID            USER   FD   TYPE DEVICE SIZE/OFF NODE NAME
systemd-r 610 systemd-resolve   12u  IPv4  19377      0t0  UDP localhost:domain
systemd-r 610 systemd-resolve   13u  IPv4  19378      0t0  TCP localhost:domain (LISTEN)
1. Edit
/etc/systemd/resolved.conf with a text editor (as root), e.g. open it with Nano console text editor:sudo nano /etc/systemd/resolved.confAnd uncomment (remove # from the front of the line) the DNS= line and the DNSStubListener= line. Next, change the DNS= value in this file to the DNS server you want to use (e.g. 127.0.0.1 to use a local proxy, 1.1.1.1 to use the Cloudflare DNS, etc.), and also change the DNSStubListener= value from yes to no.
This is how the file should look after you've made these changes (I'm using 1.1.1.1 as the DNS server here, which is the Cloudflare DNS):
[Resolve]
DNS=127.0.0.1,1.1.1.1
#FallbackDNS=
#Domains=
#LLMNR=no
#MulticastDNS=no
#DNSSEC=no
#DNSOverTLS=no
#Cache=no
DNSStubListener=no
#ReadEtcHosts=yes
2. Create a symbolic link for
/run/systemd/resolve/resolv.conf with /etc/resolv.conf as the destination:sudo ln -sf /run/systemd/resolve/resolv.conf /etc/resolv.confHere,
3. Reboot your system.
Port 53 should now be free on your Ubuntu system, and you shouldn't be getting errors like "listen tcp 127.0.0.1:53: bind: address already in use" anymore.
You can check to see if port 53 is in use or not by running
-s is for creating a symbolic and not hard link, and -f is for removing any existing destination files (so it removes /etc/resolv.conf if it exists).3. Reboot your system.
Port 53 should now be free on your Ubuntu system, and you shouldn't be getting errors like "listen tcp 127.0.0.1:53: bind: address already in use" anymore.
You can check to see if port 53 is in use or not by running
sudo lsof -i :53 - if port 53 is not in use, this command shouldn't show any output.Note: https://www.linuxuprising.com/2020/07/ubuntu-how-to-free-up-port-53-used-by.html


No comments:
Post a Comment