GIM - Guardium Installation Manager
Key Terms:
Agent - Collection of perl scripts run on each managed server allowing for centralized management
GIM Server - Guardium appliance used for deployment of GIM bundles and modules
Bundle - A package of software that can be deployed with GIM. File extension .gim.
Module - Components of a bundle. A .gim file containing one or more modules or sub-modules.
- such as : CAS, S-TAP, FAM, UTILS, ATAP, supervisor
Listener Mode - GIM Agent not yet associated with a GIM Server
Standard Mode - GIM Agent associated with a GIM server
Dynamic Updating - Fail-over mode
Common GIM Deployment Models:
1. Central Manager acting as GIM server
2. Aggregator acting as GIM Server
3. Collector acting as GIM server
4. Dedicated appliance as GIM server.
GIM & S-Tap Download
YouTube Video for GIM Download and Installation:
YouTube Video for s-tap Download and Installation:
Here are steps:
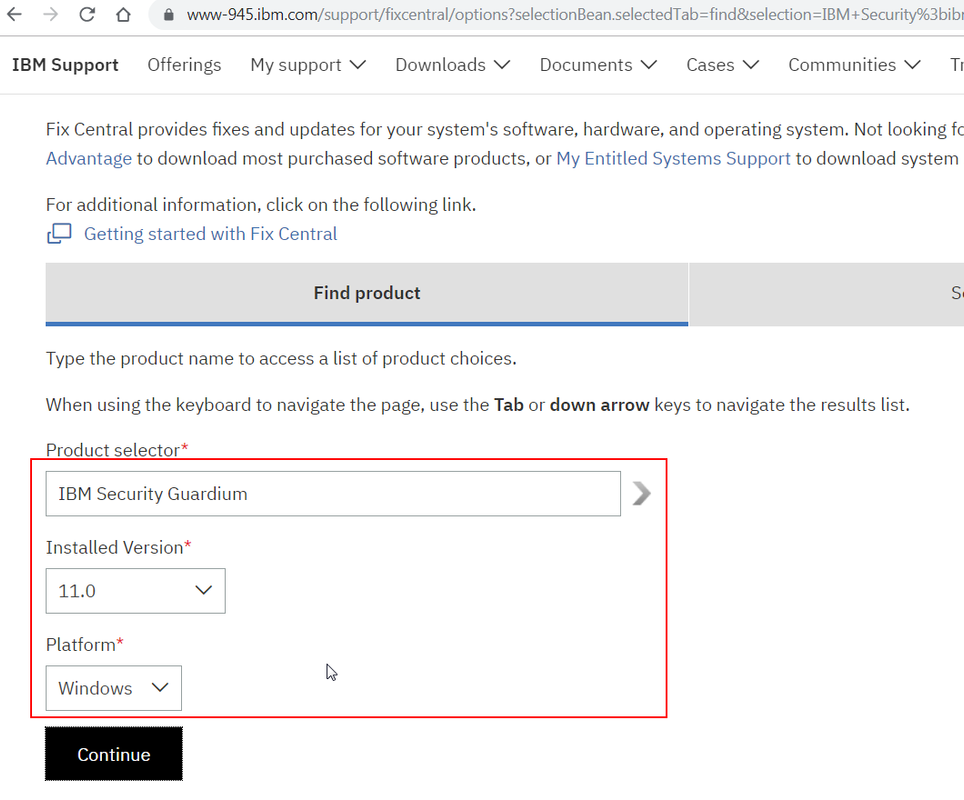
- Download GIM to Assigned Database servers from https://www-945.ibm.com/support/fixcentral/
- Select
the current/correct Fix Pack.
This
implementation is Guardium v11 GIM, S-TAP, GIM AIX & S-TAP AIX
For Example: Guardium_11.0.1.46_S-TAP_Windows_v11.0.1.46.zip (429.42 MB)
Guardium_11.0.1.46_GIM_Windows_v11.0.1.46.zip (905.7 MB)
For Example: Guardium_11.0.1.46_S-TAP_Windows_v11.0.1.46.zip (429.42 MB)
Guardium_11.0.1.46_GIM_Windows_v11.0.1.46.zip (905.7 MB)
GIM & S-Tap Installation on Windows
Requirements:1. GIM Agent must be installed directly on DB server
2. GIM agent is a set of Perl scripts that run on each DB server
3. 300 MB minimum free space. Perl version 5.8.x or 5.10.x ( Windows Perl is installed as part of GIM agent installtion)
4. Firewall Requirements
- 8445 - GIM client listener, both direction TCP
- 8446 - GIM authenticated TLS, both directions. TCP
- 8081 - To use 8081 for the GIM client to connect to the GIM server, there is a need to disable the GIM_USE_SSL parameter.
References:
Installing the GIM client on a Windows server
Windows: Install, Upgrade, and Uninstall the S-TAP agent
For GIM:
Procedure
- Place the GIM client installer on the database server, in any folder.
- Run the setup.exe file to start the wizard that installs the GIM client. The setup.exe file is located in the GIM-Installer-<version> folder.
- Follow and answer the questions in the installation wizard.
For S-TAP:
After installing a GIM client on the database server, installation of the S-TAP for Windows is scheduled from the Guardium system. The only required parameter is WINSTAP_INSTALL_DIR. It cannot be modified after the installation. All other parameters can be modified after installation.
Procedure
- On the Guardium system, navigate to .
- Click Choose File and select the S-TAP module you want to install.
- Click Upload to upload the module to the Guardium system. After uploading, the module is listed in the Import Uploaded Modules table.
- In the Import Uploaded Modules table, click the check box next to the S-TAP module you want to install. The module is imported and made available for installation. After the module is imported, the Upload Modules page is reset and the Import Uploaded Modules table is empty.
- While the default parameters are acceptable for most installations, you are required to provide a WINSTAP_INSTALL_DIR value. The default value is C:/Program Files/IBM/Windows S-TAP. This is the only required parameter.
- If WINSTAP_TAP_IP (equivalent to the -taphost command line parameter) is not specified, the GIM_CLIENT_IP value is used.
- If WINSTAP_SQLGUARD_IP (equivalent to the -appliance command line parameter) is not specified, the GIM_URL value is used.
- Optionally enable enterprise load balancing. See the parameter description in Windows: S-TAP GIM installation parameters.
- To enable auto_discovery of database instances, set WINSTAP_NOAUTODISCOVERY to 0.
3. In the Success popup, click Show Status to open the Status window to monitor the software install/upgrade. Click  to refresh the results. If an install/upgrade has a failed status, click Uninstall if you see the button, otherwise, click Reset connection.You can also view the status of the module installation by reviewing the report at .
4. Verify that the S-TAP is communicating with the Guardium system by navigating to and reviewing the S-TAPs status and configuration.
YouTube Videos Part1:
Youtube Videos Part 2:
GIM/S-TAP Installation on *NIX
3.)
Install
only GIM Client on database server (.sh)
Note: require root and executable permission
a)
Log onto LPAR
b)
Sudo to Root
c)
Upload
guard-bundle-GIM-9.0.0_r73521_v90_1-aix-6.1-aix-powerpc.gim.sh to temp dir
d)
chmod +x guard-bundle-GIM-9.0.0_r73521_v90_1-aix-6.1-aix-powerpc.gim.sh
e)
Install script using following command,
./guard-bundle-GIM-9.0.0_r73521_v90_1-aix-6.1-aix-powerpc.gim.sh -- --dir
/usr/local/guardium –-tapip <IP
Address of LPAR being installed on> --sqlguardip CollecterIP
4.)
Once
install script complete run following command ps -ef| grep module
5.)
Check
to see if GIM client is running: ps -ef
| grep gim
5.)
6.)
Check
to see if GIM is connected to Guardium appliance
(a)
log
into Guardium appliance
(b)
Go
to the Admin Console -> Module installation -> process monitoring
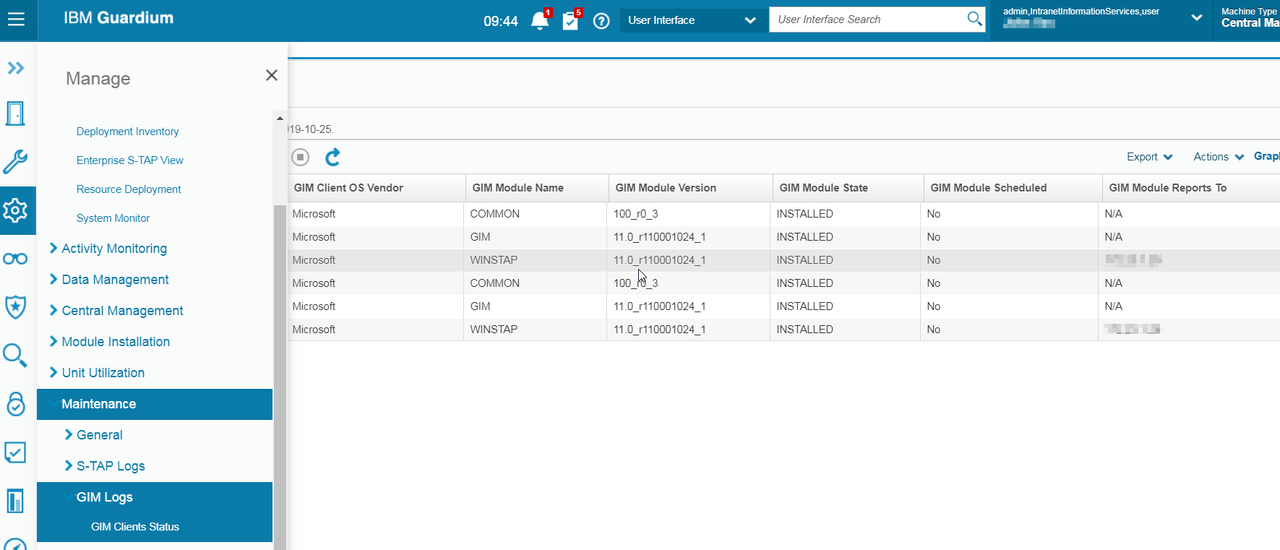
7)
Upload
GIM and STAP server and Discovery agent (gim)
7)
a)
Locate
the current/correct gim/stap from fix central and download (See Item 2)
b)
Log
into Central Manager.
c)
Go
to the Admin Console -> Module installation -> upload -> browse
(select .gim files) for STAP, GIM and Discovery
d)
Check
and click upload
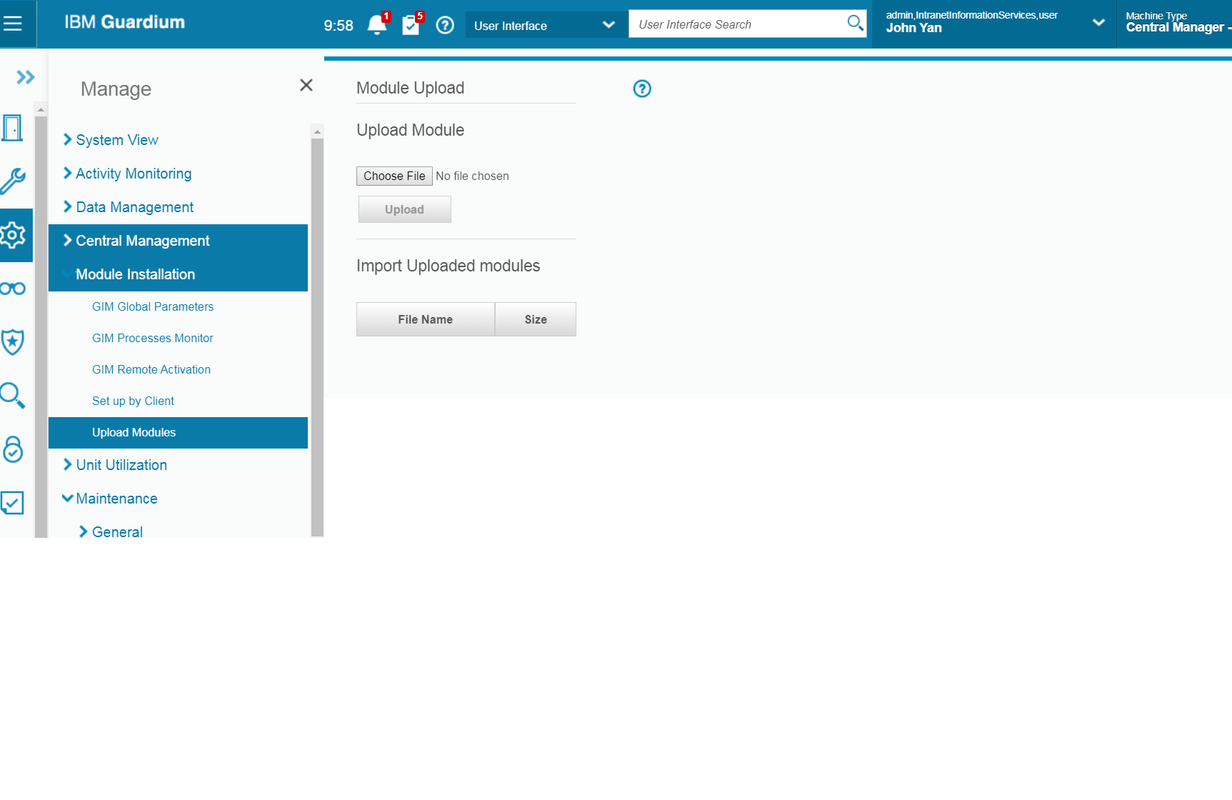
8) Distribute GIM modules to all collectors
a.
Log
into Central Manager.
b.
Go
to Admin Console -> Central Management ->
Central Management -> select all collectors

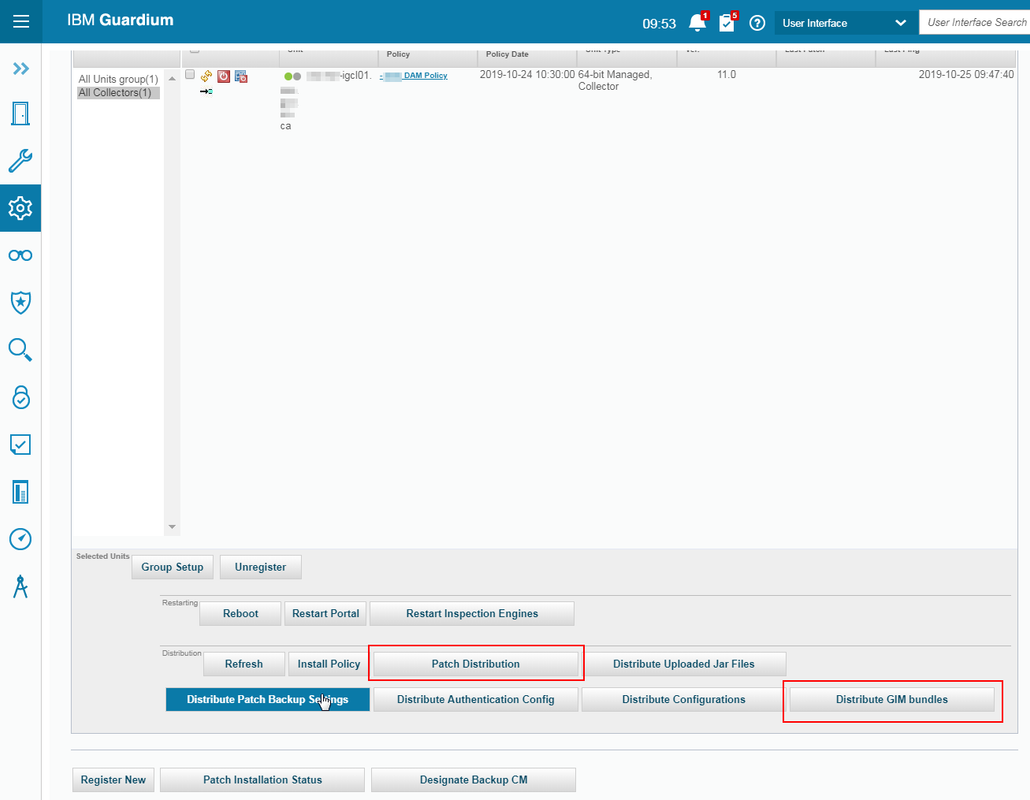
c.
Click
on 'Distribute GIM Bundles
9.)
Install
S-Tap from GIM (push down to database server)
a)
Log
into Collector
b)
Go
to the Admin console -> module installation - > Setup by Client ->
Search -> select the database you want to install STAP -> choose Next
10.)
Select
'BUNDLE_STAP_xxxxx', Select STAP
11.)
Click
Next
12.)
Apply
the following parameters
a.
ktap_enabled
= 1,
b.
KTAP_ALLOW_MODULE_COMBOS = Y,
c.
KTAP_LIVE_UPDATE
= Y,
d.
STAP_TAP_IP
= database ip,
e.
STAP_SQLGUARD_IP
= collector ip
13.)
Click
“Apply to Clients”
14.)
Click
“Install/Update”
15.)
Type “Now”
16.)
Click
“apply’ & Install
17.)
Verify
if S-TAP is installed on database
18.)
Click
“Refresh” and status to be “Installed”.
19). Go to “Tap Monitor”->STAP Events
19). Go to “Tap Monitor”->STAP Events
Go to “Tap Monitor”->STAP Status
Note: This will be on Collector, not Aggregator. 
19.)
Instance
Discovery install:
a)
Go
to the Admin console -> module installation - > Setup by Client ->
Search -> select the database you want to install Discovery-> choose Next
b)
Select
“Bunder-Discovery_xxxxx” and click “next”
c)
Apply
the following parameters:
·
DISCOVERY_JAVA_DIR is set to Database java path(example
/usr/java6_64/jre)
·
DISCOVERY_TAP_IP is set to Database IP (example 10.49.235.89)
·
DISCOVERY_SQLGUARD_IP is set to Collector IP (example:
10.49.136.11)
d)
Click “Apply to Clients” and Click “Install/Update”.
e)
Enter
“now” and click “apply”
19.)
Check
the install status as mentioned below by clicking the information box
20.)
Instilation Status information Box
Installation of the
Discovery Agent on Guardium appliances
1.)
Add
“Inspection engine” from database instance discovery
2.)
Go
to “Daily Monitor” and select “Discovered instances”
3.)
Double
click on the discovered instances for each row and select “Invoke”
4.)
Select
“Create_stap_inspection_engine”
5.)
Click
“Invoke now”
6.)
Click
“Close”
7.)
Verify
successful inspection installation from the instance discovery on the STAPS
a)
Go
to “administration console”->Local Taps->S-TAP Control
b)
Select
each installed S-TAP and click + on the Inspection Engines
iLab LDAP setting:
1.)
Login
as admin and set the following:
2. Login as accessmgr and set the following:
Login
to Guardium with admin role
On
Admin Console tab select Portal
GIM Update
IBM Security Guardium V10 – How to upgrade GIM (Guardium Installation Manager) Client from GUI ?
1. Download new GIM bundle and unzip (.gim format)2. Central Manager - Manage - Module Installation - Upload Modules
Donot forgot to import module use that small green check mark button.
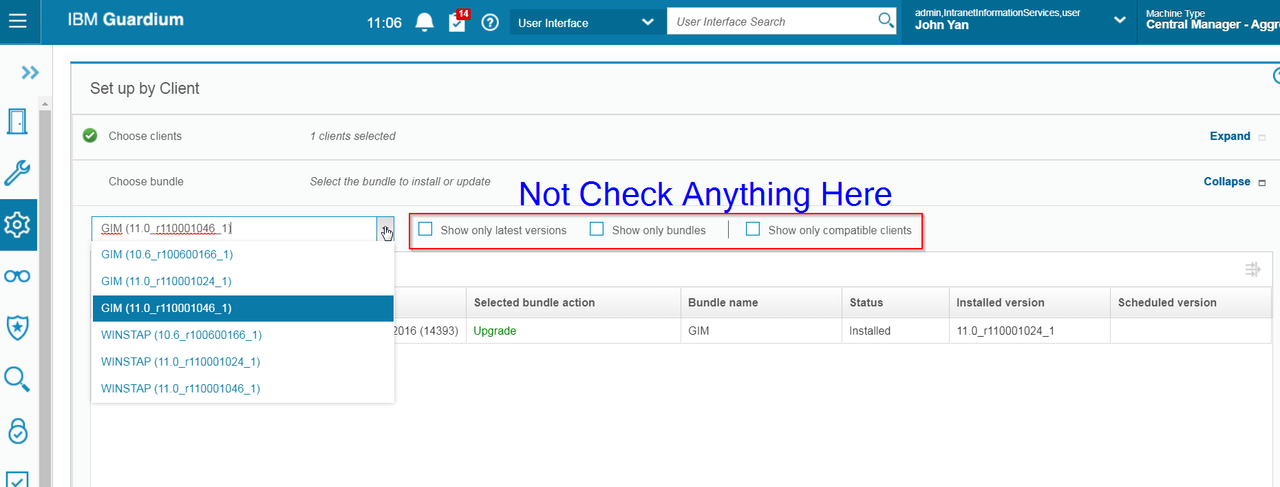
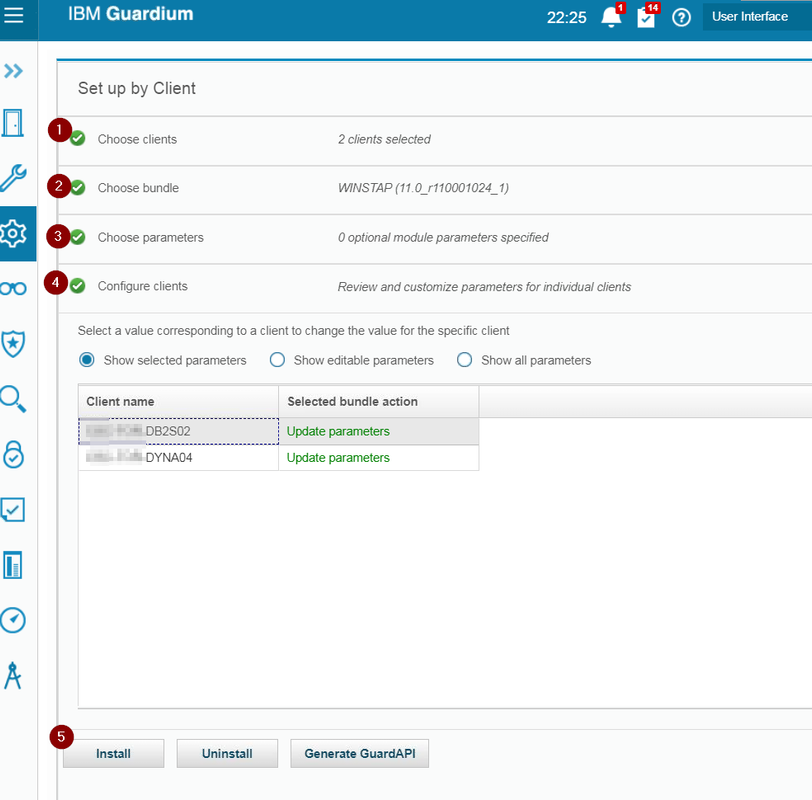
3. Update Old GIM version to new GIM. Manage - Module Installation - Set up by client
Choose clients - Choose bundle (stap and GIM) - choose parameters (just next) - configure clients - click Install button
YouTube Video:
References





No comments:
Post a Comment