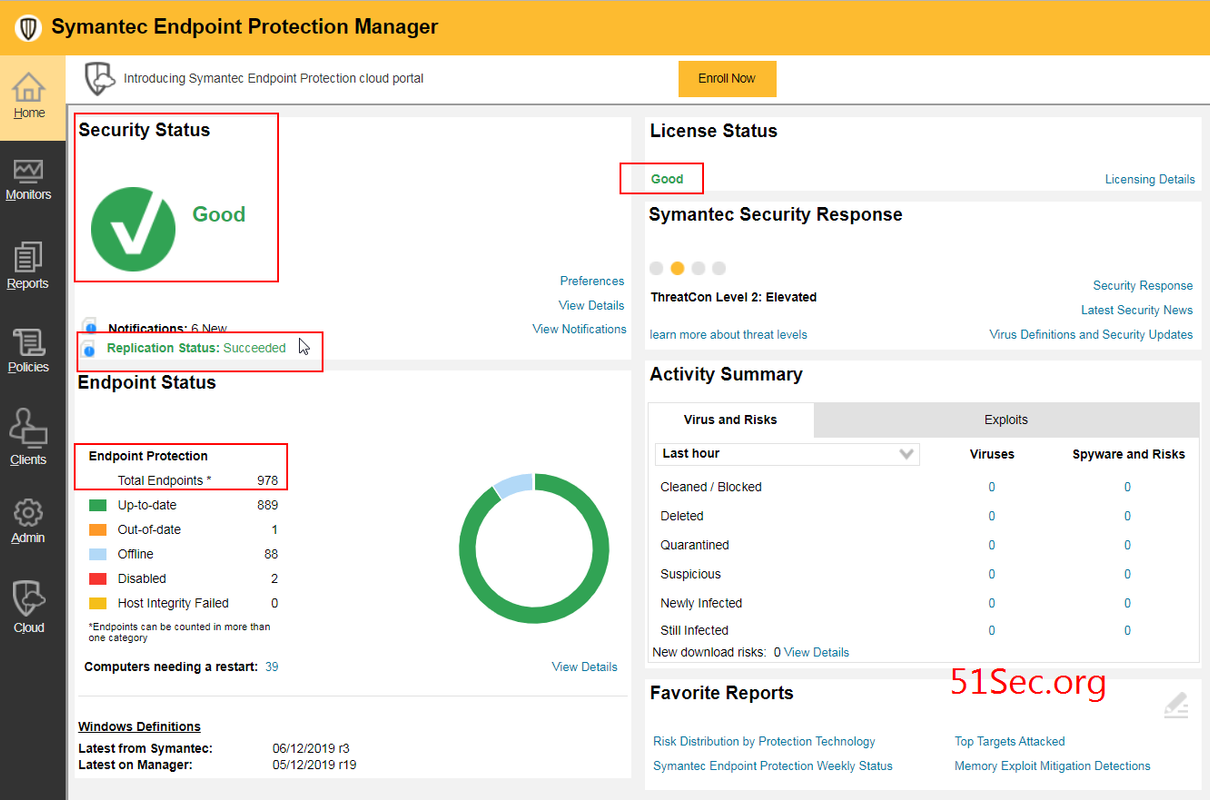
Here are some of my notes for configuring SEPM (Symantec Endpoint Protection Manager) and SEP (Symantec Endpoint Protection) Client. It only records some of my working experience which I met during Symantec Project. M ost of notes is just for reminding me how to complete this task. It might not fit into all situations since it is only specific for my environment. The version I am using is 14.2.1 (14.2 RU1). One SEPM installed at main site, and another SEPM installed at DR site. They are replicated to each other through configuration. We are using MS SQL Express since the environment is not that big size , less than 1000 users.
- Import Client Packages
- Check Exception List at Endpoint
- Change SEP Client Feature Set
- Limited Administrator Log In Issue
- Disable/Enable SEP Client
- Create Windows File Exceptions
- Configure Failover Server List
- SEPM Preferences
- SEPM Clean Expired clients
- Change SEP Client Control
- SEPM DB Scheduled Backup
- Change SEPM Data or Backup Folder
- Backup/Restore SEPM
- Test SEPM Functionality
Import Client Packages
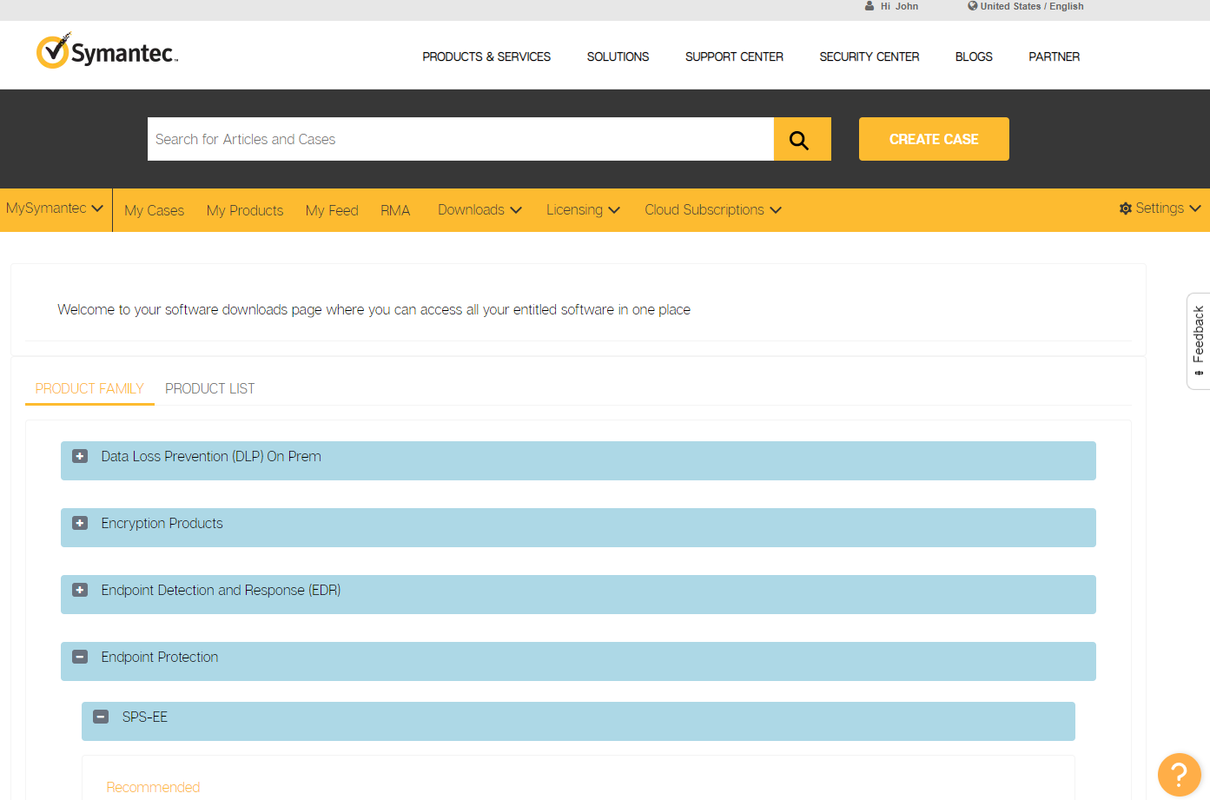
1. Download Full Installation Package from MySymantec website
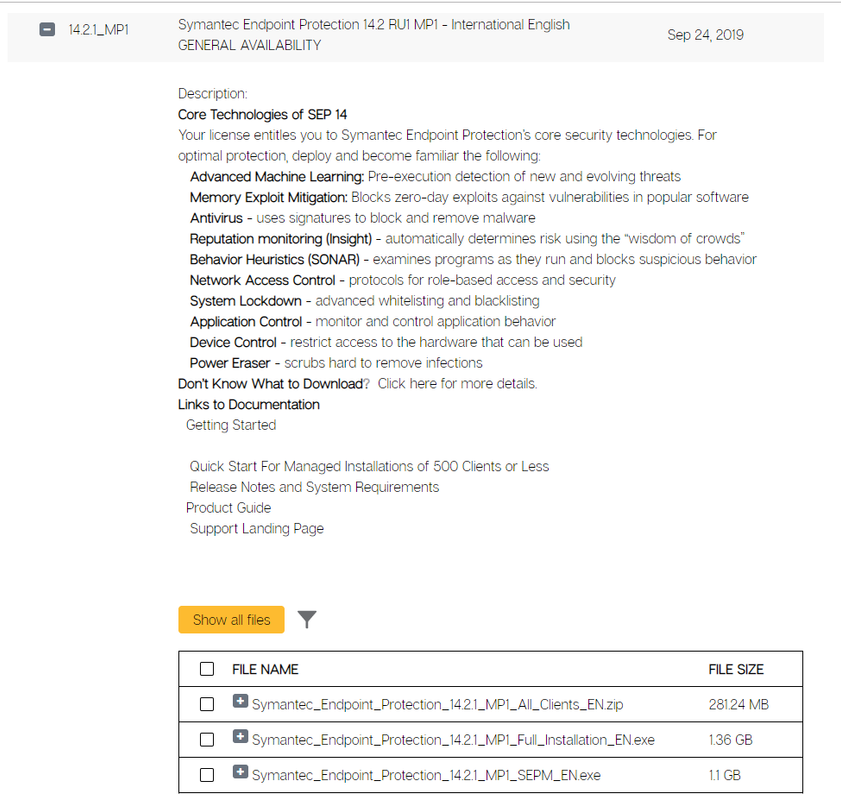
It will be Symantec_Endpoint_Protection_14.2.1_MP1_Full_Installation_EN.exe file. Not All_Client_EN.zip file.
2. Extract it
You will need to use unzip software to extract it to a folder, although it is a exe file.
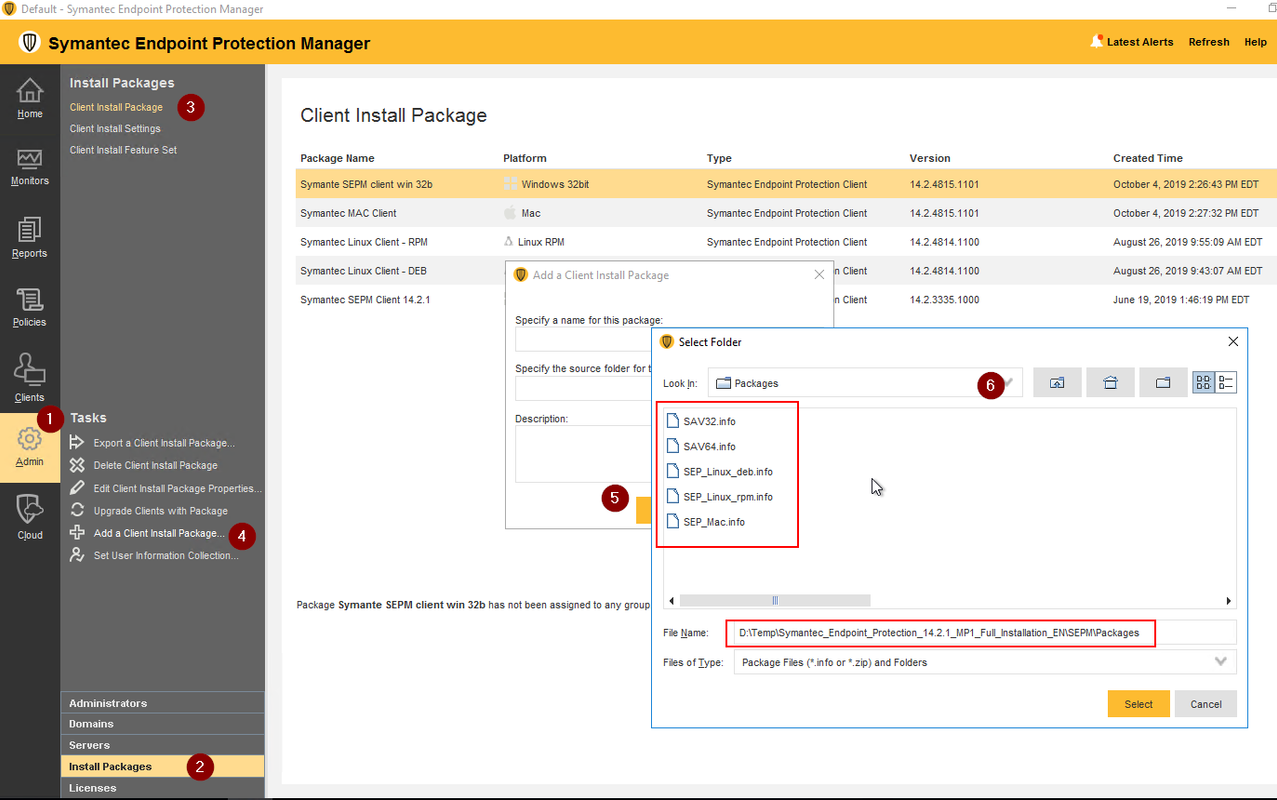
3. Log into SEPM Server from RDP session
Strongly recommend to log into SEPM server to do importing steps. Using Web GUI, sometimes, it will fail to import the client.
4. Launch Mgmt Console from SEPM Server local
5. Import
The clients info files will be found following extracted folder: such as , D:\Temp\Symantec_Endpoint_Protection_14.2.1_MP1_Full_Installation_EN\SEPM\Packages
Check Exception List at Endpoint
- On SEPM management console:
- 1. Put all machines which will have specific exception rules into separate folder
- 2. Make sure policy inheritance is off
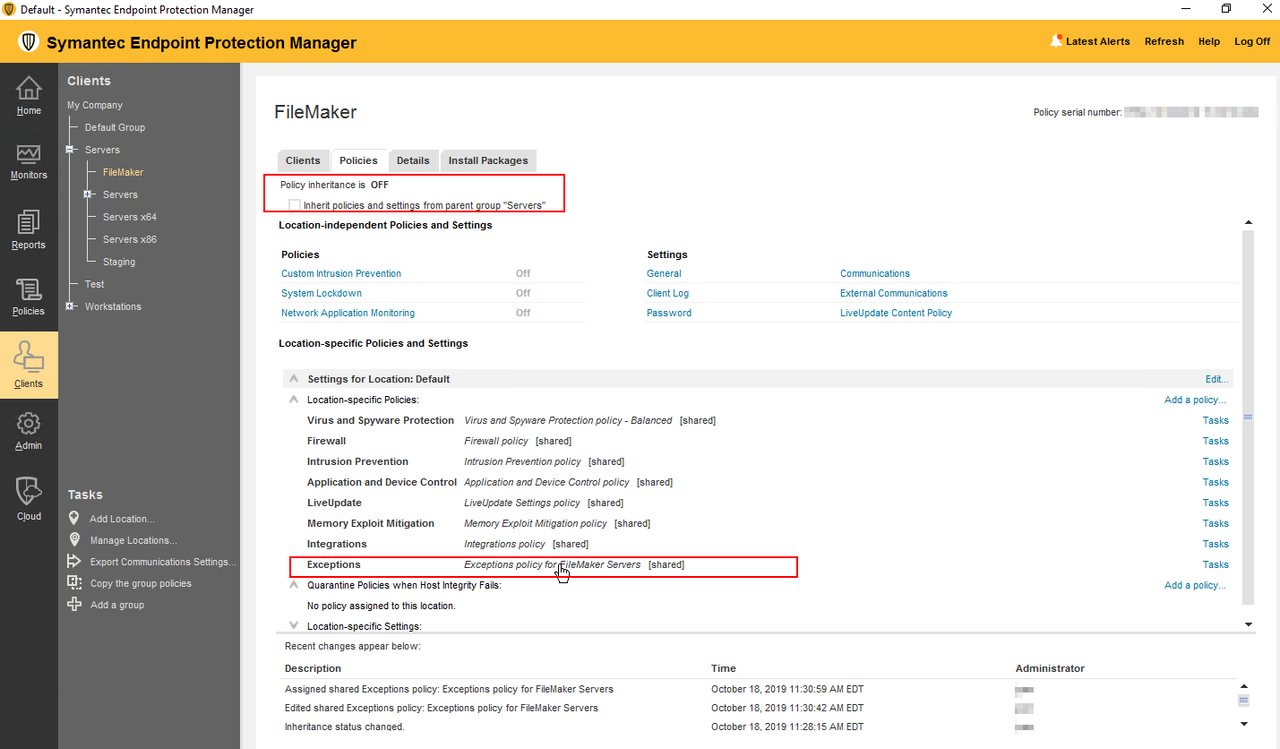
- 3. Copy existing global exception policy to a new one. Add a new exception rule in to new exception policy then assign it to this folder
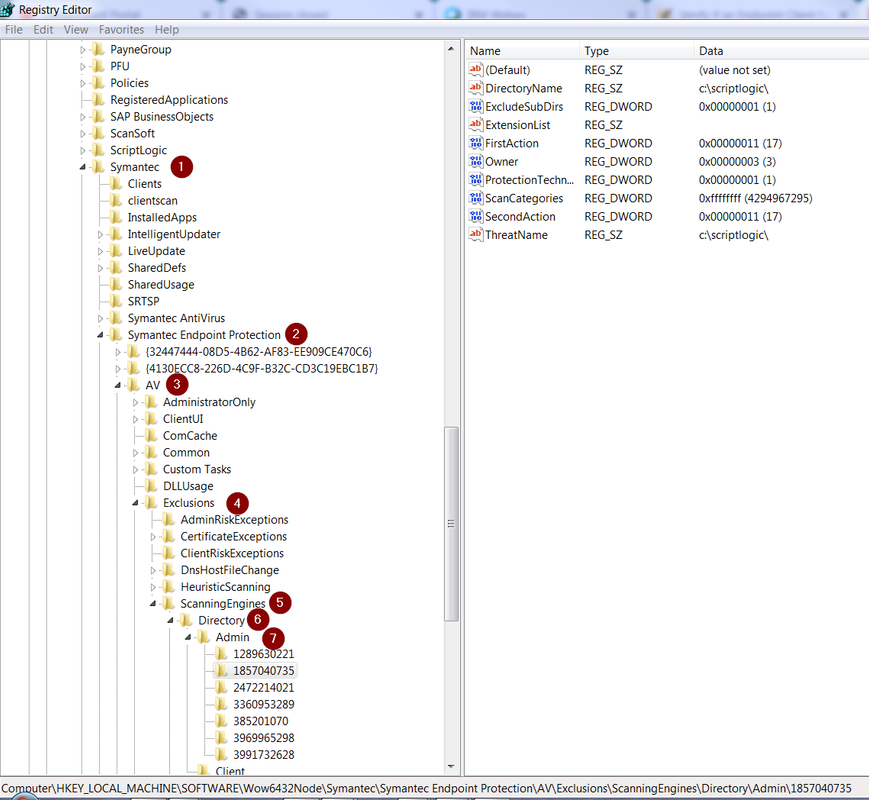
- Browse to the registry key:
- HKEY_LOCAL_MACHINE\SOFTWARE\SYMANTEC\SYMANTEC ENDPOINT PROTECTION\AV\EXCLUSIONS
Note: On 64bit window machines the registry path is:
HKEY_LOCAL_MACHINE\Software\WOW6432Node\Symantec\Symantec Endpoint Protection\AV\Exclusions
- HKEY_LOCAL_MACHINE\SOFTWARE\SYMANTEC\SYMANTEC ENDPOINT PROTECTION\AV\EXCLUSIONS
- Expand the key to view the various applications listed there.
- Mostly, you will just need to check ScanningEngines
On SEP client machine to verify policy:

Change SEP Client Feature Set
For managed clients, the installation features can be modified for an entire group through the Symantec Enpoint Protection Manager (SEPM) (enterprise edition only).
- In the SEPM console, click Admin.
- Click Install Packages on the bottom.
- Click Client Install Feature Set on the top.
- If a feature set that meets the required needs does not exist, then choose Add Client Install Feature Set.
- Give the feature set a unique name.
- Select the features needed: Antivirus/Antispyware, Network Threat Protection, Proactive Threat Protection.
- Choose OK.
- On the left, click Clients.
- Select the group with the SEP clients in it, and then click the Install Packages tab in the right pane.
- Under Tasks, choose Add Client Install Package.
- In that screen, select the correct package in the drop-down menu for use with this group (32 bit or 64 bit base install files). Both packages can be separately assigned to the same group.
- Uncheck Maintain existing client features when updating.
- Below that, select the feature set needed from the drop down menu.
- If Upgrade Schedule is not selected, then clients will receive the instructions to change their installation when they check in with the manager. This launches MSIEXEC on the client.
- After the installation completes restart the machine if prompted.

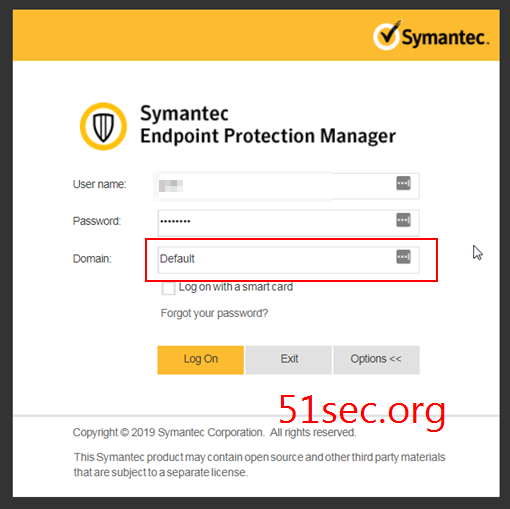
Limited Administrator Log In Issue
While working on SEPM, I found an issue, I am not sure how to log in with a limited local administrator. Creating a limit administrator is fine, but when I tried to log in, the log in windowWhat I found is , Limited Administrator only can log in to default domain. In my case, it is Default. It is not your sepm server computer name, it is not your domain name.
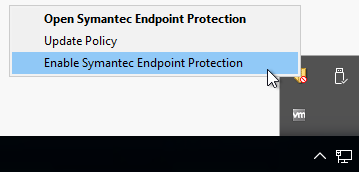
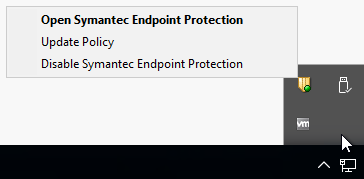
Disable/Enable SEP Client
From Command line:
Instead of "smc -stop" and "smc -start", use the commands "start smc -stop" and "start smc -start".
 |
| Disabled SEP Client |
 |
| Enabled SEP Client |
Once system rebooted, SEP service will start it again. To complete disable service even after rebooted, the only way is to remove the SEP program.
Create Windows File Exceptions
Recently received a report, SEP might interfere with Docker containers on Windows Server 2016 based on kb Endpoint Protection interfering with Docker containers on Windows Server 2016
Here is the step how to add those exceptions in:
TBC
Configure Failover Server List
My environment has two SEPM servers. One is acting as main, and second is at DR site. Both installed SEPM with embedded MSSQL (MSSQL Express).Both sites configured as bidirectional replication site for each other.
Since I am not use normal ms sql database, my environment doesn't support failover and load balancing. But it does support redundancy for SEPM client to communicate with SEPM servers.
The following screenshot shows default configuration for management server list. Priority 1 is having main SEPM. Priority 2 is having DR site SEPM.
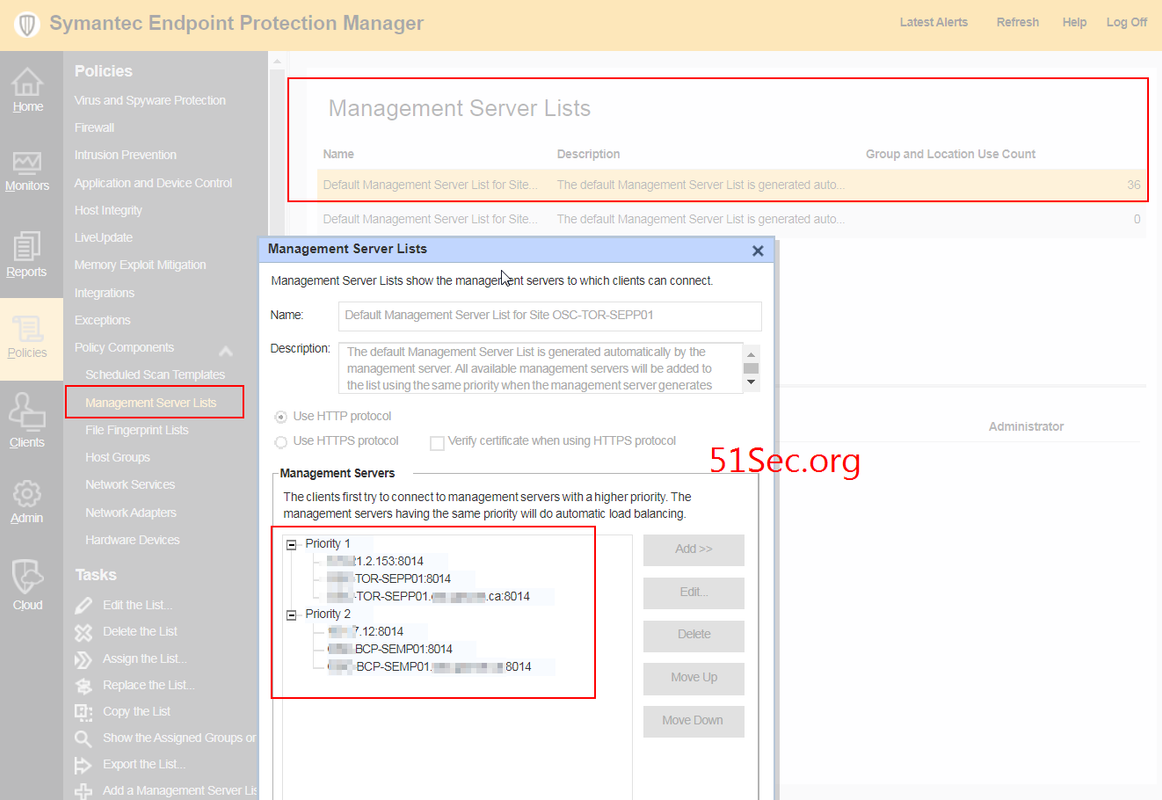
Note: if you would like to edit this default settings, you will have to create a new list and assign it to all groups. Default list is not editable. Those default lists were created when you installed your replication site server.
SEPM Preferences
SEPM Console Web GUI preference will show some settings to control how the security status will show on the SEP agent.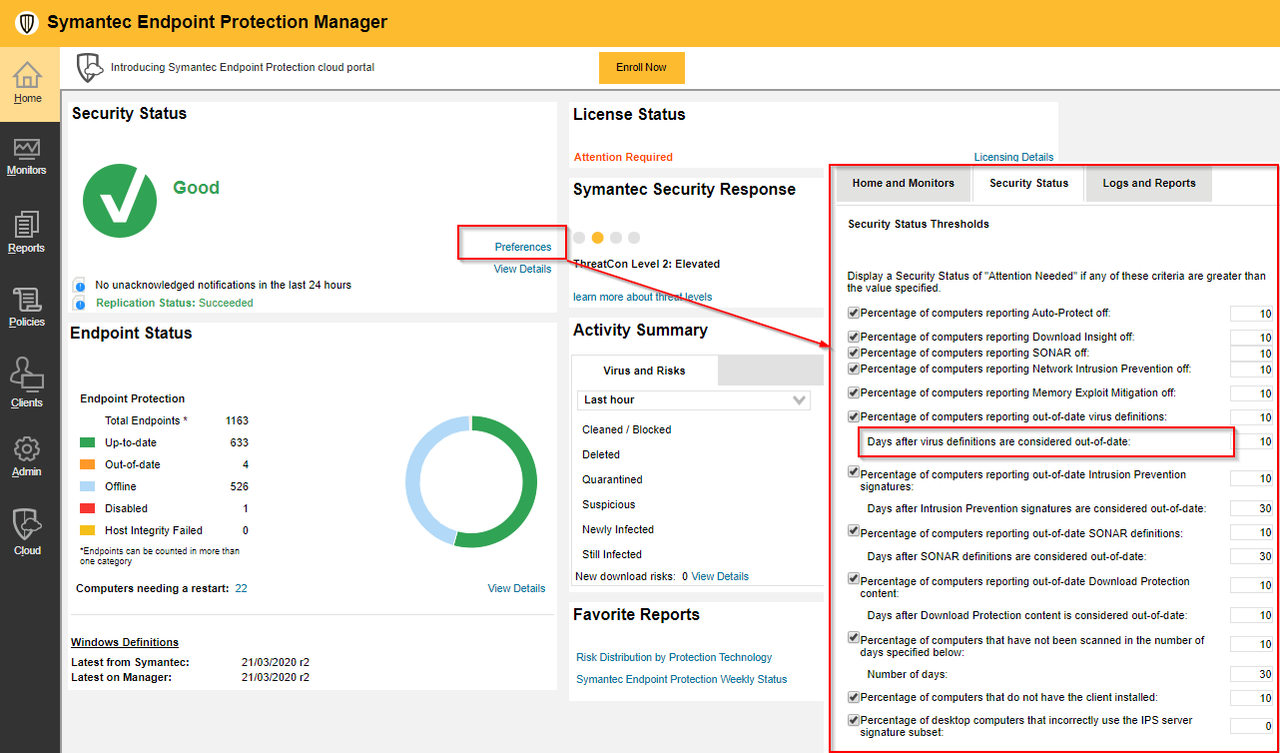
SEPM Clean Expired clients
Following settings show SEPM will clean up those clients did not connected to SEPM server in 15 days.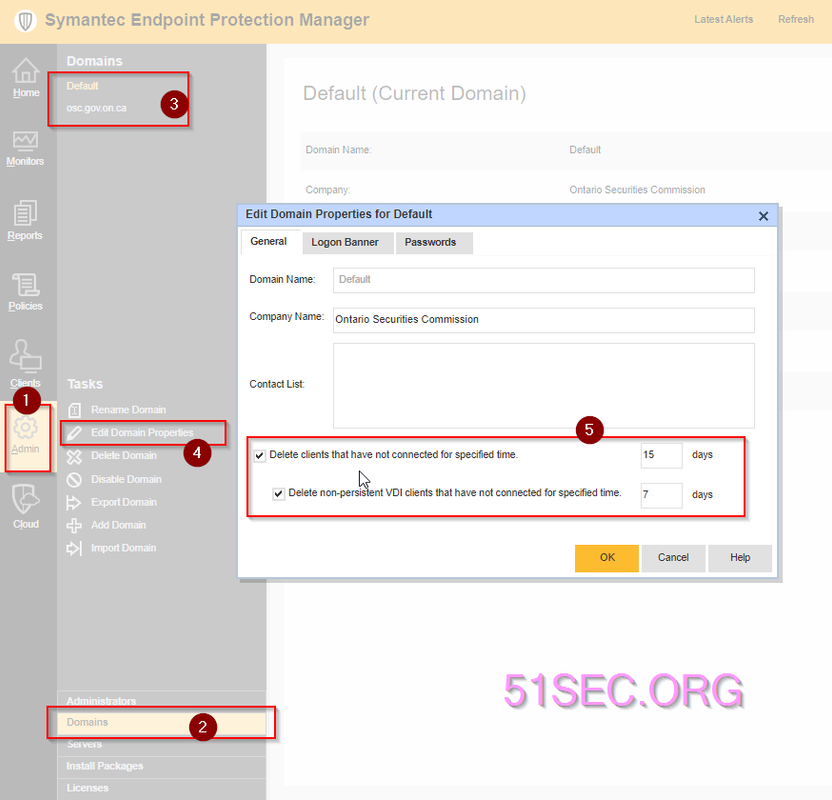
Change SEP Client Control
When you want to configure settings on a client but get the message, "Your Administrator has locked this feature" , here is the way to unlock it.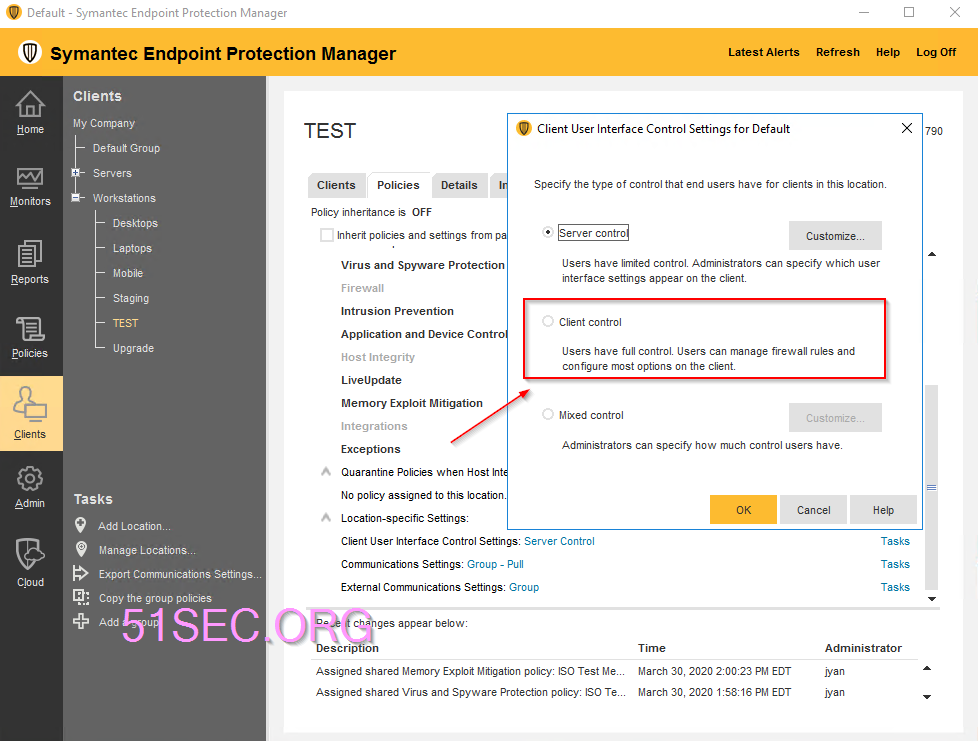
Logon to the Symantec Endpoint Protection Manager Console
Browse to Clients
Select the Group
Click Policies
Expand Location-specific Settings
Click on Tasks to the right of Client User Interface Control Settings
Click on Edit Settings
Click on Customize to the right of Client Control ( and select the options accordingly )
Click OK
Click OK to save changes to the location specific settings policy
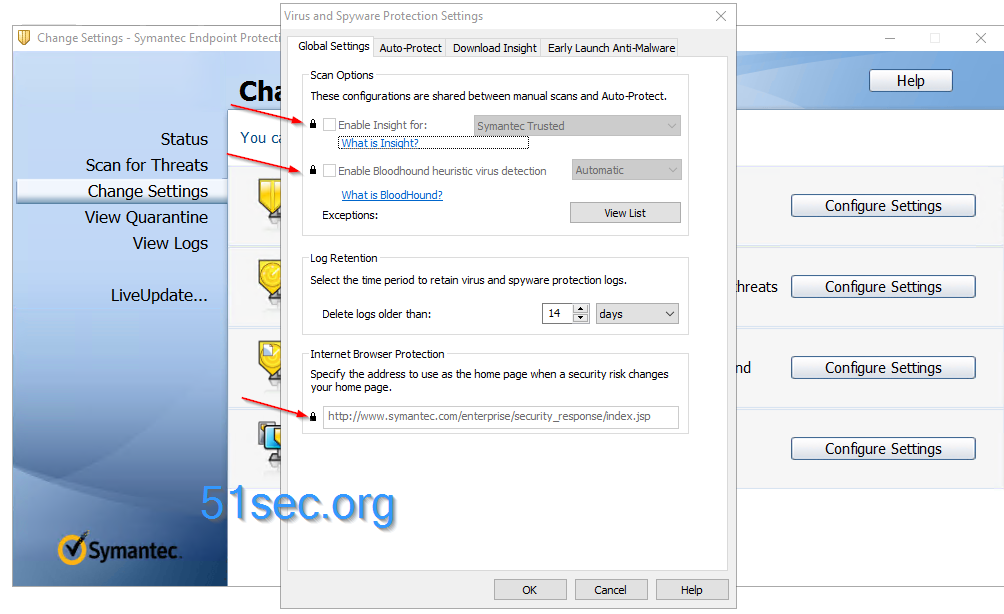
As you can see, as long as you set as server control from SEPM Location-specific settings, your end point user will not be able to select the option to Change Settings for your SEP features.

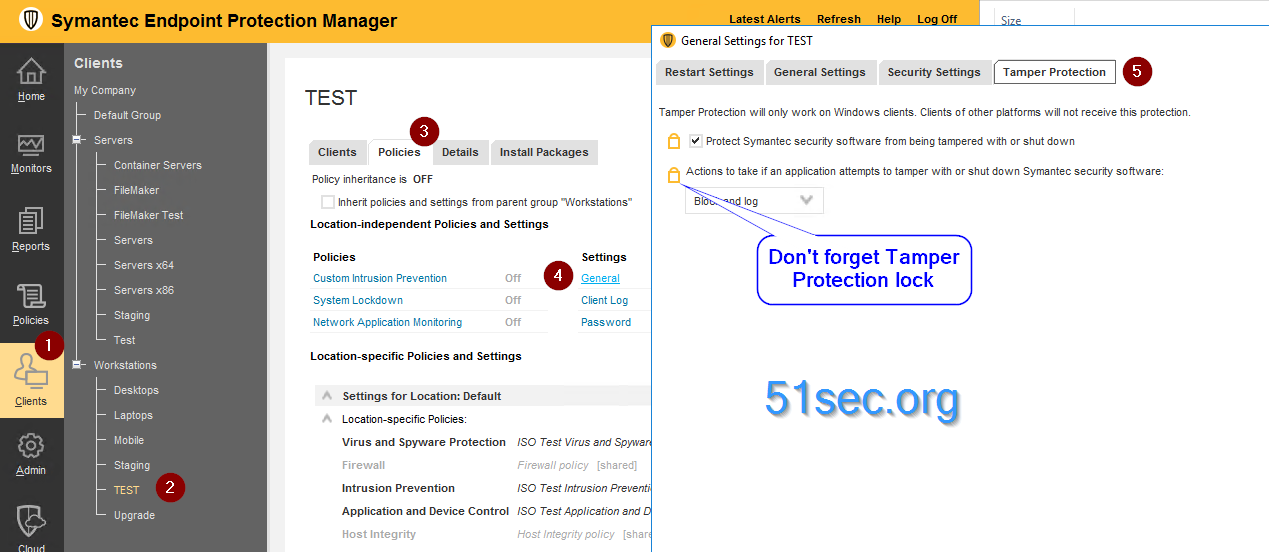
Don't forget the tamper protection lock.
SEPM DB Scheduled Backup
Manual backup can be performed at any moment by stopping Symantec Endpoint Protection Manager service and launching Backup and Restore from Start – All Programs – Symantec Endpoint Protection Manager. Please mind that backup may take some time so be patient – it depends on your database’s size and your computer’s speed. Actually, I found without stopping SEPM service, backup is still successful, but the DB might have issue later when do restoring.Another way to start backup is to open the console, go to Admin panel and click on servers. Then choose your database and under tasks click on Back Up Site Now.
After the backup is finished, in the backup folder you will find .zip file containing the backup with date and time of backup in a file’s name.
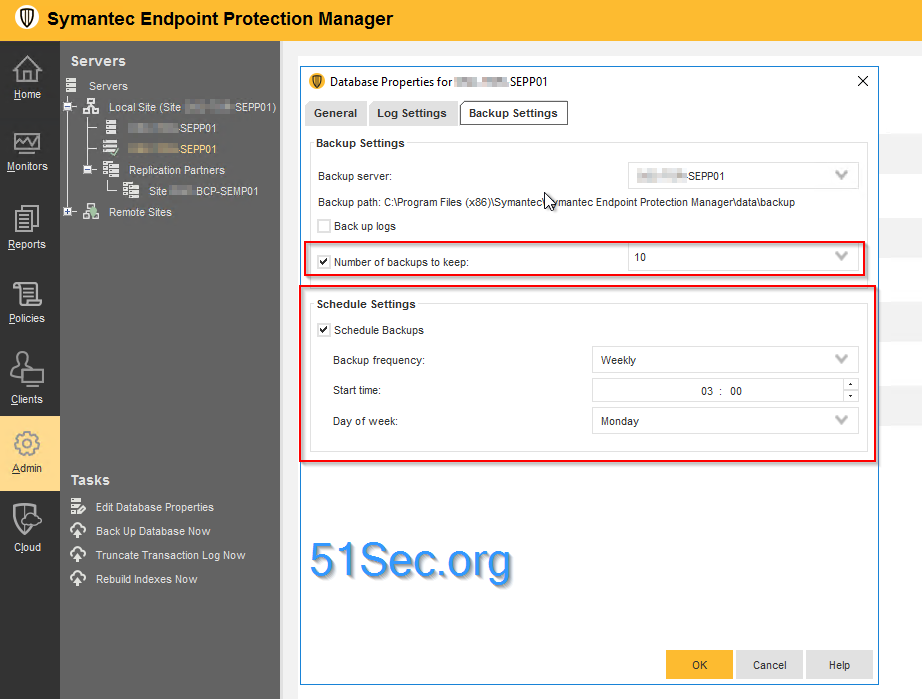
Automatic backup is set through Symantec Endpoint Protection Manager console. Go to Admin panel and click on Servers. Select your database and under Tasks choose Edit Backup Settings. Set the schedule for backups and number of copies to keep (if this number is exceeded, the oldest copy is removed).
Change SEPM Data or Backup Folder
Database backups created by the Symantec Endpoint Protection Manager (SEPM) Database Backup and Restore Wizard are stored in a non-cofigurable location under the SEPM data folder. Though the backup folder location cannot be directly configured, the SEPM data folder can be configured to be stored in an alternate location.
Note: Be aware of the following before making any changes to the location of the SEPM data folder:
Note: Be aware of the following before making any changes to the location of the SEPM data folder:
- To prevent I/O bandwidth starvation, the SEPM data folder needs to be housed on a fast, local drive
- A copy of the data folder at the time of reconfiguration is left in the default location after the reconfiguration is completed. This is for archival purposes
- Customers updating their SEPMs Antivirus/Antispyware definitions via the .jdb will need to make sure they are placing the .jdb into the new data directory and not the archive
Modifying the SEPM data folder location:
Please make note of the following information before making any configuration changes to the SEPM: SEPM database type (SQL or Embedded), SQL Server location, instance name and port number (if applicable), SQL Authentication type and SQL credentials.
- Start the SEPM Management Server Configuration Wizard
- Select the Reconfigure the management server radio button then click the Next button
- Accept the defaults for Server name, Server port and Web console port
- Modify the Server data folder text box as required and click the Next button
- Select the correct database type (Microsoft SQL Server or Embedded database) and click the Next button
- For Embedded database:
- Verify the default Database server port
- Enter the correct password
- Click the Next button
- For Microsoft SQL Server:
- Verify the Database server name (including the instance name if the SEPM database is in a named instance)
- Verify the SQL server port
- Verify the Database name
- Verify the Authentication method and provide credentials
- Click the Next button
- After the Management Server Configuration Wizard completes, click the Finish button to complete the wizard.
The Management Server Configuration Wizard will create a copy of the original data folder in the location specified and configure the SEPM's conf.properties file to point to this new location. After these modifications, the SEPM will keep the original data folder for archival purposes, but all new data will be written to and read from the new data folder location.
Backup/Restore SEPM
Backup:
1. Stop the SEPM and Symantec Embedded database service.
2. Copy the db, Server Private Key folder, server.xml and keystore.jks
Default locations:
c:\Program Files\Symantec\Symantec Endpoint Protection Manager\db
c:\Program Files\Symantec\Symantec Endpoint Protection Manager\Server Private Key
c:\Program Files\Symantec\Symantec Endpoint Protection Manager\tomcat\conf\server.xml
c:\Program Files\Symantec\Symantec Endpoint Protection Manager\tomcat\etc\keystore.jks
3. Start the SEPM and Symantec Embedded database service.
4. Perform the Data sources ODBC test
Reason : dba password is required to restore the database
Steps:
If the Database is on-line, run appropriate ODBC test for your SEPM and 32/64-bit Operating System:
Verify communication to the embedded (Sybase) database.
Verify that the "Symantec Embedded Database" service is running and that the "dbsrv9.exe" process is listening on TCP port 2638.
Test the ODBC connection.
Click Start> Control Panel
Open Administrator Tools
Double-click Data Sources (ODBC)
Select the System DSN tab
Double-click the SymantecEndpointSecurityDSN and go through the wizard to ensure the following settings:
Name: SymantecEndpointSecurityDSN
Description: <Anything>
Server: Servername\InstanceName (Can be blank as it is localized, otherwise specify default "sem5")
Login ID: dba
Password: <password>
Note: If the "Encrypt password" box on the Login tab is not checked, your password will be stored as plain text in the Windows registry.
Leave the default settings for the remaining items and click Finish
Click Test Data Source, and verify that it states "Success"
Click OK
Verify communication to the Remote (SQL) Database.
Verify that you have specified a named instance during installation and configuration. Example: \\<server name>\<instance name>
Verify SQL Server is running and properly configured.
Verify the network connections between Symantec Endpoint Protection Manager and the SQL database.
Test the ODBC connection.
Click Start> Control Panel
Open Administrator Tools
Double-click Data Sources (ODBC)
Select the System DSN tab
Double-click SymantecEndpointSecurityDSN and go through the wizard to ensure the following settings:
Name: SymantecEndpointSecurityDSN
Description: <Anything>
Server: Servername\InstanceName (Only enter the server name or IP address if using the default instance)
Login ID: sa
Password: <password>
Leave the defaults for the rest of the items and click Finish
Click Test Data Source on the next page and ensure it states "Success"
Click OK
For 64bit ODBC communication follow the link below.
http://service1.symantec.com/SUPPORT/ent-security.nsf/docid/2008021900094548
Test SEPM Functionality
- Antivirus and AntiSpyware
- Download Insight
- Firewall
- Sonar
- Auto Protect
- IPS
Please download the cloudcar file HERE
Check these articles:
Testing a Virus and Spyware Protection policy
How to test SEP 12.1 components for functionality
How to check if download insight work properly ?
In the policy, just select the notification:

Video:
Symantec Download Insight in Symantec Endpoint Protection 12.1
References:
https://knowledge.broadcom.com/external/article/154226/testing-and-validating-symantec-security.html
References
- Verify if an Endpoint Client has Automatically Excluded an Application or Directory
- Manually import client packages into Endpoint Protection Manager


No comments:
Post a Comment