- Vault Server1: 192.168.2.21
- Vault Server2: 192.168.2.22
- PVWA/CPM/PSM 1 : 192.168.2.23
- PVWA/CPM/PSM 2 : 192.168.2.24
- PSMP-PSM Gateway
- PTA
- PSM-HTML5 GW
- Domain Controller
- Radius Server
- Test machines, windows and linux

As my record, I put all simplified installation steps together as shown below:
PAM ROI Example
Key Economic Benefits (from Delinea ROI Calculations report)Anytown Manufacturing Corporation:
Industry: Manufacturing
Annual revenue: $1.4 b
Total employees: 1376
IT security personnel: 18
Four key areas of cost reductions:
- Cyber insurance compliance
- Regulatory compliance
- Data breach damages
- Privileged account managment support
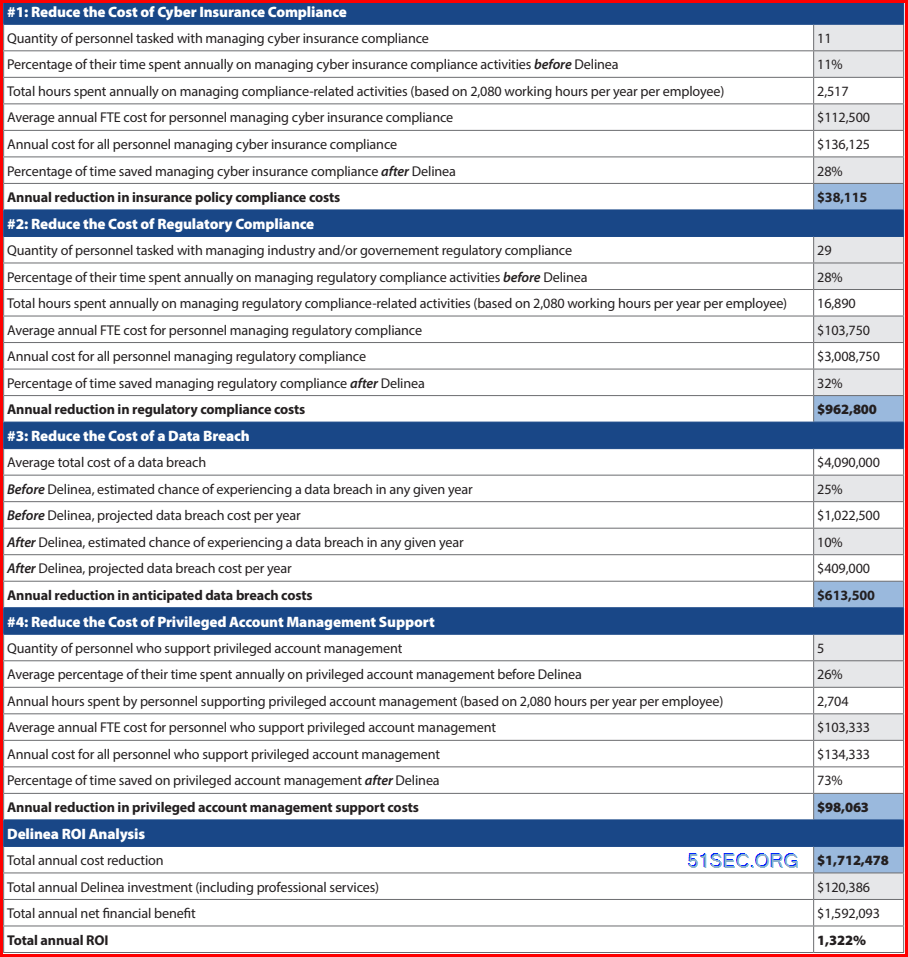
Cells in grey depict average statistics provided by all interviewed customers. cells in blue depict annual cost reductions.
AMC (Anytown Manufacturing Corporation) achieves ROI of 1,322% or 12.22x its PAM first-year investment. In other words, for every $1 AMC spends with PAM, it achieves $12.22 in return.
a. Remove unnecessary TCP/IP protocols and only left TCP/IP v4 enabled, and TCP/IP v6 disabled. No DNS and No WINS.
b. Right click setup.exe under C:\CyberArkInstallationFiles\Vault Install Files\Server to run as administrator
c. Same process to install PrivateArk client on the vault server.
 Verification:
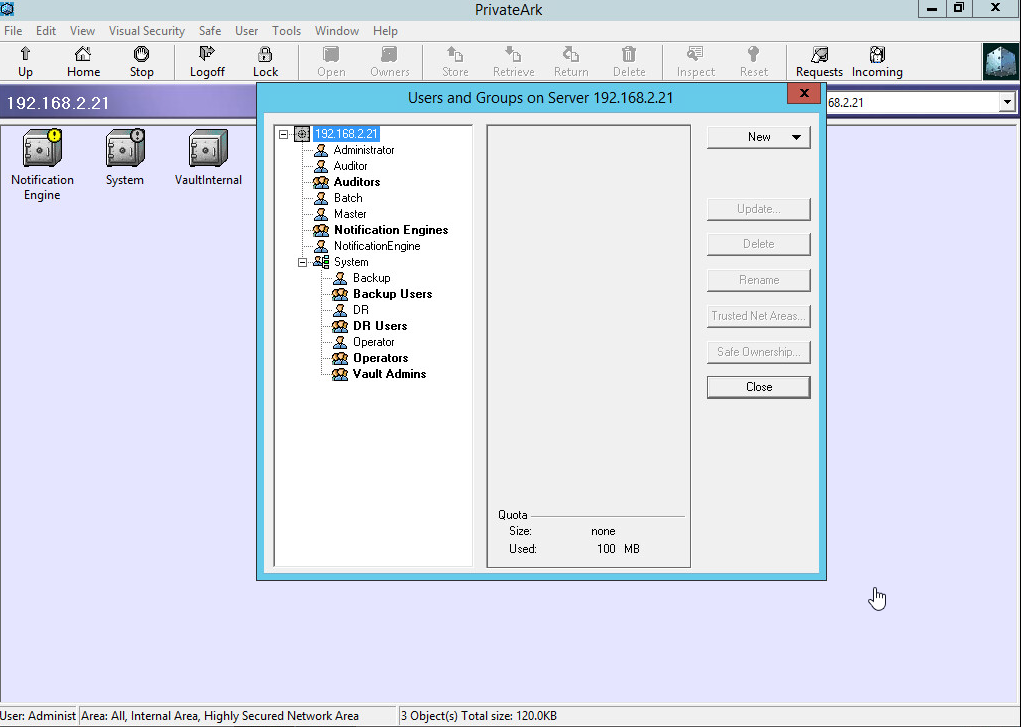
a. Make sure 3 safes existing in the vault.
b. Users / groups are listing in the vault as well
c. Open Windows Services and check that the following services have been installed and started.
PrivateArk Client (located in the system safe)
• dbparm.ini
• Italog.log
• license.xml
• paragent.log
• passparm.ini
• tsparm.ini
a. Navigate to “C:\CyberArkInstallationFiles\Password Vault Web Access\InstallationAutomation”. Open Windows PowerShell as an Administrator in the folder specified in step 3 and execute the following PowerShell commands.
b. Using File Explorer, navigate to folder “C:\CyberArkInstallationFiles\Password Vault Web Access\”. Right click setup.exe and “run as Administrator”.
c. IIS configuration:
Verification:
a. Open Chrome and confirm that the PVWA login page is displayed. This step validates that the PasswordVault application is communicating with the PrivateArk Server. Use URL https://comp01A.cyber-ark-demo.local/PasswordVault/v10/logon.
b. Login to the PVWA using CyberArk Authentication as Administrator. Validate tabs Policies, Accounts, Applications, Reports and Administration display correctly.
a. Using File Explorer, navigate to “C:\CyberArkInstallationFiles\Central Policy Manager\InstallationAutomation”. Open Windows PowerShell as an Administrator in the folder specified in step 4 and execute the following PowerShell commands.
Verification:
Confirm that the CPM services are installed and running.
a. CyberArk Password Manager Service.
b. CyberArk Central Policy Manager Scanner.
a. Extract the folder “Privileged Session Manager” from “PSM CD Image-Rls-v10.9.zip” by double clicking and opening the zip file without initially extracting the files, then copy and paste the “PSM CD Image\Privileged Session Manager” folder to the root of C:\.
b. In File Explorer, navigate to “C:\Privileged Session Manager\InstallationAutomation\Prerequisites”. Edit PrerequisitesConfig.xml using “Notepad ++” search for and set all Enable= steps to YES. Save the file and exit.
c. Open Windows PowerShell as Administrator. Change directories to “C:\Privileged Session Manager\InstallationAutomation”. Execute the following commands.
d. When prompted in PowerShell, restart the server. After the server restarts, sign in with the same credentials used in step a to continue installation, The PowerShell script will launch immediately to complete the prerequisite installation. Allow the script to complete, then exit PowerShell.
e. A final step before PSM Installation is to assign an appropriate Domain Group access to the Session Collection.
Verification:
a. Open PowerShell as administrator frp, “C:\Privileged Session Manager\InstallationAutomation” and Execute the following 2 commands.
b. Open the PrivateArk client and login to the DRVault as administrator. Note that the only Safes in the Vault are the three built-in Safes.
DR failover and failback process is listed at post: CyberArk PAS HA, Backup, Failover and Failback Process
for example: for pvwa, it is C:\CyberArkInstallationFiles\Password Vault Web Access\InstallationAutomation\
b. Open Windows PowerShell as an Administrator in the folder specified in step 1 and execute the following PowerShell commands. Select Yes when prompted.
Vault Installation
Installation:a. Remove unnecessary TCP/IP protocols and only left TCP/IP v4 enabled, and TCP/IP v6 disabled. No DNS and No WINS.
b. Right click setup.exe under C:\CyberArkInstallationFiles\Vault Install Files\Server to run as administrator
c. Same process to install PrivateArk client on the vault server.
Verification:a. Make sure 3 safes existing in the vault.
b. Users / groups are listing in the vault as well
c. Open Windows Services and check that the following services have been installed and started.
- Cyber-Ark Event Notification Engine
- Cyber-Ark Hardened Windows Firewall (After Completed Harderning)
- CyberArk Logic Container
- PrivateArk Database
- PrivateArk Remote Control Agent
- PrivateArk Server
PrivateArk Client (located in the system safe)
• dbparm.ini
• Italog.log
• license.xml
• paragent.log
• passparm.ini
• tsparm.ini
PVWA Installation
Installation:a. Navigate to “C:\CyberArkInstallationFiles\Password Vault Web Access\InstallationAutomation”. Open Windows PowerShell as an Administrator in the folder specified in step 3 and execute the following PowerShell commands.
- Set-ExecutionPolicy Bypass
- .\PVWA_Prerequisites.ps1
b. Using File Explorer, navigate to folder “C:\CyberArkInstallationFiles\Password Vault Web Access\”. Right click setup.exe and “run as Administrator”.
c. IIS configuration:
- http redirecting to https
- Error page 403 redirect to PVWA web site
- IISRESET
Verification:
a. Open Chrome and confirm that the PVWA login page is displayed. This step validates that the PasswordVault application is communicating with the PrivateArk Server. Use URL https://comp01A.cyber-ark-demo.local/PasswordVault/v10/logon.
b. Login to the PVWA using CyberArk Authentication as Administrator. Validate tabs Policies, Accounts, Applications, Reports and Administration display correctly.
CPM Installation
Installation:a. Using File Explorer, navigate to “C:\CyberArkInstallationFiles\Central Policy Manager\InstallationAutomation”. Open Windows PowerShell as an Administrator in the folder specified in step 4 and execute the following PowerShell commands.
- Set-ExecutionPolicy Bypass
- .\CPM_Preinstallation.ps1
Verification:
Confirm that the CPM services are installed and running.
a. CyberArk Password Manager Service.
b. CyberArk Central Policy Manager Scanner.
PSM Installation
Installation:a. Extract the folder “Privileged Session Manager” from “PSM CD Image-Rls-v10.9.zip” by double clicking and opening the zip file without initially extracting the files, then copy and paste the “PSM CD Image\Privileged Session Manager” folder to the root of C:\.
b. In File Explorer, navigate to “C:\Privileged Session Manager\InstallationAutomation\Prerequisites”. Edit PrerequisitesConfig.xml using “Notepad ++” search for and set all Enable= steps to YES. Save the file and exit.
c. Open Windows PowerShell as Administrator. Change directories to “C:\Privileged Session Manager\InstallationAutomation”. Execute the following commands.
- Set-ExecutionPolicy Bypass.
- .\Execute-Stage.ps1 C:\Privileged Session Manager\InstallationAutomation\Prerequisites\prerequisitesConfig.xml
d. When prompted in PowerShell, restart the server. After the server restarts, sign in with the same credentials used in step a to continue installation, The PowerShell script will launch immediately to complete the prerequisite installation. Allow the script to complete, then exit PowerShell.
e. A final step before PSM Installation is to assign an appropriate Domain Group access to the Session Collection.
- Open Server Manager and navigate to Remote Desktop Services -> Collections -> PSM-RemoteApp.
- In Properties, select TASKS -> Edit Properties -> User Groups.
- Add CYBER-ARK-DEMO\CyberArk Vault Admins and remove CYBER-ARK-DEMO\Domain Users,
Verification:
a. Open PowerShell as administrator frp, “C:\Privileged Session Manager\InstallationAutomation” and Execute the following 2 commands.
- Set-ExecutionPolicy Bypass.
- Execute-Stage.ps1 “C:\Privileged Session Manager\InstallationAutomation\PostInstallation\PostInstallationConfig.xml”
DR Vault Installation
a. Same process to install PrivateArk server and client. Create your first vault , DRVault.b. Open the PrivateArk client and login to the DRVault as administrator. Note that the only Safes in the Vault are the three built-in Safes.
DR failover and failback process is listed at post: CyberArk PAS HA, Backup, Failover and Failback Process
Post-Installation and Hardening
a. Sign in to the Comp01A server as Administrator. Navigate to C:\CyberArkInstallationFiles\(Components Name such as pvwa, psm, cpm)\InstallationAutomation\for example: for pvwa, it is C:\CyberArkInstallationFiles\Password Vault Web Access\InstallationAutomation\
b. Open Windows PowerShell as an Administrator in the folder specified in step 1 and execute the following PowerShell commands. Select Yes when prompted.
- Set-ExecutionPolicy Bypass
- .\PVWA_Hardening.ps1


No comments:
Post a Comment