This process is good for both Ubuntu and CentOS.
Performance Issue on Low Memory Cloud VM
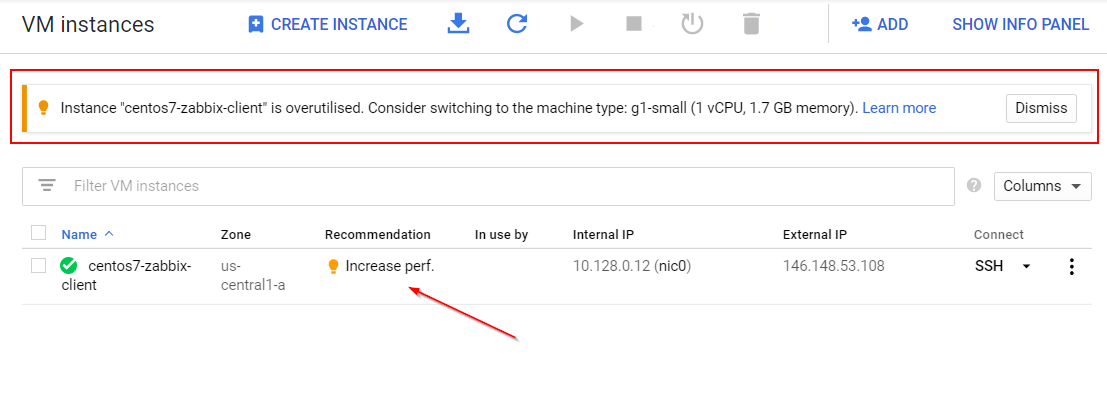
You might experience this because of either CPU or Memory, or both. One way to improve system reliability to avoid system crush is to increase our swap file size. This post is to summarize some steps to configure swap file and swappiness value.
One Command to Add/Delete SWAP File Size
Adjusting the Swappiness Value
Swappiness is a Linux kernel property that defines how often the system will use the swap space. It can have a value between 0 and 100. A low value will make the kernel to try to avoid swapping whenever possible, while a higher value will make the kernel to use the swap space more aggressively.
On Ubuntu, the default swappiness value is set to 60. You can check the current value by typing the following command:
cat /proc/sys/vm/swappiness60
For example, to set the swappiness value to 10, run:
sudo sysctl vm.swappiness=10vm.swappiness=10
root@ubuntu-test1:~# sudo sysctl vm.swappiness=10
vm.swappiness = 10
root@ubuntu-test1:~# echo 'vm.swappiness=10' | sudo tee -a /etc/sysctl.conf
vm.swappiness=10
root@ubuntu-test1:~# sudo sysctl vm.vfs_cache_pressure=50
vm.vfs_cache_pressure = 50
root@ubuntu-test1:~# echo 'vm.vfs_cache_pressure=100' | sudo tee -a /etc/sysctl.conf
vm.vfs_cache_pressure=100
root@ubuntu-test1:~# sudo sysctl vm.overcommit_memory =1
vm.overcommit_memory = 0
sysctl: malformed setting "=1"
root@ubuntu-test1:~# echo 'vm.overcommit_memory =1' | sudo tee -a /etc/sysctl.conf
vm.overcommit_memory =1
root@ubuntu-test1:~#
Command List
sudo sysctl vm.swappiness=10
echo 'vm.swappiness=10' | sudo tee -a /etc/sysctl.conf
sudo sysctl vm.vfs_cache_pressure=50
echo 'vm.vfs_cache_pressure=100' | sudo tee -a /etc/sysctl.conf
sudo sysctl vm.overcommit_memory=1
echo 'vm.overcommit_memory=1' | sudo tee -a /etc/sysctl.conf
Manually Change SWAP File Size
Linux provides for two types of swap space. By default, most Linux installations create a swap partition, but it is also possible to use a specially configured file as a swap file. A swap partition is just what its name implies—a standard disk partition that is designated as swap space by the mkswap command. If you don’t have enough memory, swap will be used quite often and noticeably more during any memory requirement spikes. If you don’t have enough memory and no swap space, this will often cause failure to allocate memory for requests needing more memory pages. As a last resort, the Kernel will deploy OOM killer to nuke high-memory processes (usually MySQL, java, etc), which shows in my previous post - Linux Virtual Machine PHP Invoked OOM-killer (Out of Memory) Issue.
Amount of system RAM
|
Recommended swap space
|
Recommended swap with hibernation
|
|---|---|---|
less than 2 GB
|
2 times the amount of RAM
|
3 times the amount of RAM
|
2 GB - 8 GB
|
Equal to the amount of RAM
|
2 times the amount of RAM
|
8 GB - 64 GB
|
0.5 times the amount of RAM
|
1.5 times the amount of RAM
|
more than 64 GB
|
workload dependent
|
hibernation not recommended
|
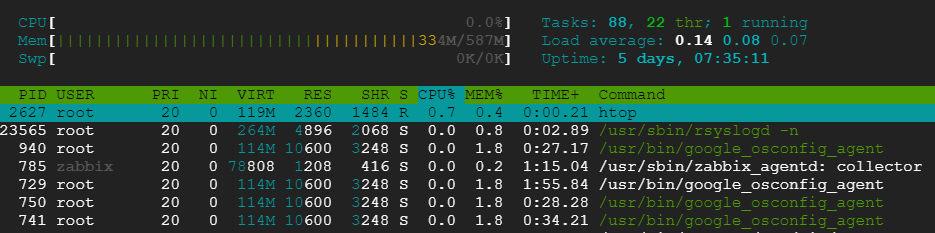
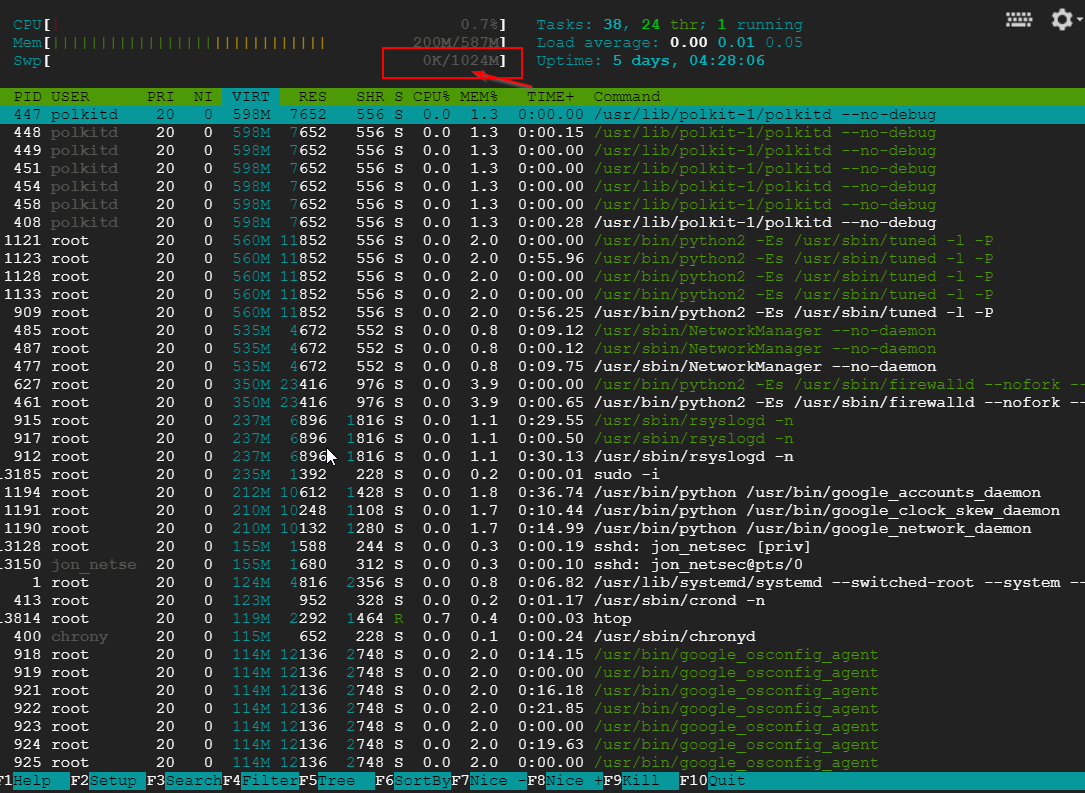
In my case, my VM is only having 587M memory with 0K swap file size.
Based on recommendation, I am adding a 1GB swap file for it.
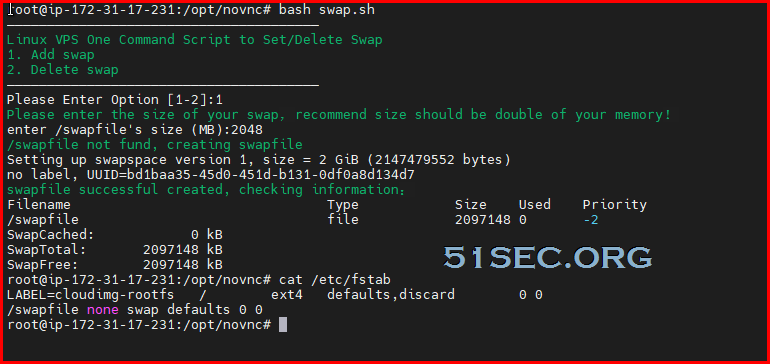
[root@centos7-zabbix-client ~]# sudo fallocate -l 1G /swapfile
[root@centos7-zabbix-client ~]# sudo dd if=/dev/zero of=/swapfile bs=1024 count=1048576
1048576+0 records in
1048576+0 records out
1073741824 bytes (1.1 GB) copied, 27.5052 s, 39.0 MB/s
[root@centos7-zabbix-client ~]# sudo chmod 600 /swapfile
[root@centos7-zabbix-client ~]# sudo mkswap /swapfile
Setting up swapspace version 1, size = 1048572 KiB
no label, UUID=d126e13f-162d-4a1d-998c-f8e4152e4f8b
[root@centos7-zabbix-client ~]# sudo swapon /swapfile
[root@centos7-zabbix-client ~]# vi /etc/fstab
Command Explanation:- create a file which will be used as swap space: sudo dd if=/dev/zero of=/swapfile bs=1024 count=1048576
- Ensure that only the root user can read and write the swap file by setting the correct permissions:sudo chmod 600 /swapfile
- set up a Linux swap area on the file:sudo mkswap /swapfile
- Run the following command to activate the swap: sudo swapon /swapfile
- Make the change permanent by opening the /etc/fstab file: sudo vi /etc/fstab
Add a new line into /etc/fstab file:
/swapfile swap swap defaults 0 0

Notes: How do I allocate memory to work as swap space in an Amazon EC2 instance by using a swap file?
Note: No need to reboot system
Verification by using commands:
- top
- htop
- free -h
To Sum up all commands again:
- sudo fallocate -l 1G /swapfile ##it won't work if fallocate is not installed. using dd if=/dev/zero of=/swapfile bs=1024 count=1048576 command instead
- sudo chmod 600 /swapfile
- sudo mkswap /swapfile
- sudo swapon /swapfile
- echo '/swapfile none swap sw 0 0' | sudo tee -a /etc/fstab
Performance Testing
With the methods posted in my post : VPS Bench Comparison for AWS,Azure,Google Cloud and Oracle Cloud (Free Tier & Regular Tier)I could not tell much difference from before and after swap increase change, but it definitely improves reliability to reduce system crush risk. It might be will tell difference when there are some applications heavyly using memory.
|
Before SWAP Increase |
After SWAP Increase |
|
nench.sh v2019.07.20 --
https://git.io/nench.sh |
nench.sh v2019.07.20 --
https://git.io/nench.sh |
|
benchmark
timestamp: 2020-03-18 21:17:43 UTC |
benchmark
timestamp: 2020-03-18 21:36:09 UTC |
|
------------------------------------------------- |
------------------------------------------------- |
|
|
|
|
Processor:
Intel(R) Xeon(R) CPU @ 2.30GHz |
Processor:
Intel(R) Xeon(R) CPU @ 2.30GHz |
|
CPU
cores: 1 |
CPU
cores: 1 |
|
Frequency:
2300.000 MHz |
Frequency:
2300.000 MHz |
|
RAM:
587M |
RAM:
587M |
|
Swap:
- |
Swap:
1.0G |
|
Kernel:
Linux 3.10.0-1062.12.1.el7.x86_64 x86_64 |
Kernel:
Linux 3.10.0-1062.12.1.el7.x86_64 x86_64 |
|
|
|
|
Disks: |
Disks: |
|
sda
10G HDD |
sda
10G HDD |
|
|
|
|
CPU: SHA256-hashing 500
MB |
CPU: SHA256-hashing 500
MB |
|
1.719
seconds |
1.731
seconds |
|
CPU: bzip2-compressing
500 MB |
CPU: bzip2-compressing
500 MB |
|
CPU:
AES-encrypting 500 MB |
CPU:
AES-encrypting 500 MB |
|
1.052
seconds |
1.059
seconds |
|
|
|
|
ioping: seek rate |
ioping: seek rate |
|
min/avg/max/mdev = 452.8 us / 5.33 ms / 51.9 ms / 8.48 ms |
min/avg/max/mdev = 338.6 us / 4.13 ms / 68.9 ms / 6.66 ms |
|
ioping: sequential read speed |
ioping: sequential read
speed |
|
generated 2.46 k requests in 5.00 s, 614 MiB, 490 iops, 122.7 MiB/s |
generated 2.46 k requests in 5.00 s, 615.5 MiB, 492 iops, 123.1 MiB/s |
|
|
|
|
dd: sequential write
speed |
dd: sequential write
speed |
|
1st
run: 35.86 MiB/s |
1st
run: 35.86 MiB/s |
|
2nd
run: 36.05 MiB/s |
2nd
run: 36.05 MiB/s |
|
3rd
run: 36.05 MiB/s |
3rd
run: 36.05 MiB/s |
|
average: 35.99 MiB/s |
average: 35.99 MiB/s |
|
|
|
|
IPv4 speedtests |
IPv4 speedtests |
|
your
IPv4: 35.226.94.xxxx |
your
IPv4: 35.226.94.xxxx |
|
|
|
|
Cachefly CDN: 110.45 MiB/s |
Cachefly CDN: 101.90 MiB/s |
|
Leaseweb (NL): 17.40 MiB/s |
Leaseweb (NL): 17.43 MiB/s |
|
Softlayer DAL (US): 60.76 MiB/s |
Softlayer DAL (US): 60.28 MiB/s |
|
Online.net (FR): 17.77 MiB/s |
Online.net (FR): 17.80 MiB/s |
|
OVH
BHS (CA): 44.79 MiB/s |
OVH
BHS (CA): 32.00 MiB/s |
|
|
|
|
No IPv6 connectivity
detected |
No IPv6 connectivity
detected |
|
------------------------------------------------- |
------------------------------------------------- |
In the following example, we’ll extend the swap space available in the /swapfile from 0 GB to 1 GB.
Turn off all swap processes
- sudo swapoff -a
fallocate -l 1G /swapfile
Resize the swap
- sudo dd if=/dev/zero of=/swapfile bs=128M count=8
if = input file
of = output file
bs = block size
count = multiplier of blocks
Make the file usable as swap
- sudo mkswap /swapfile
- sudo swapon /swapfile
- grep SwapTotal /proc/meminfo
To make the change permanent open the
/etc/fstab file:sudo nano /etc/fstab/swapfile swap swap defaults 0 0If you want to set the swap priority to 100, the command will changed to :


No comments:
Post a Comment