In this post, I lists some of usages how Cloudflare Workers is working on my projects. Before you can start creating your Cloudflare Workers, at least, you will need to have a free Cloudflare account created. It will be better if your own domain integrated with Cloudflare since you can integrate your own domain with workers URL.
Other Cloudflare posts:
Return HTML example page: https://developers.cloudflare.com/workers/examples
2 Copy example code into Workers app
3 Save and deploy example app
4 Get HTML code using WYSIWYG HTML Editor
I used a Blogger HTML Editor to create a page then toggle it to HTML view to get code. Then copy it back to Workers app code area between <body> and </body>
====================================================
Github: https://github.com/sleepwood/CF-Worker-Dir/
Hosting a Serverless Static Web Page
1 Check Cloudflare examples
Return HTML example page: https://developers.cloudflare.com/workers/examples
2 Copy example code into Workers app
3 Save and deploy example app
4 Get HTML code using WYSIWYG HTML Editor
I used a Blogger HTML Editor to create a page then toggle it to HTML view to get code. Then copy it back to Workers app code area between <body> and </body>
const html = `<!DOCTYPE html>
<body>
"copy your html code here"
</body>`

async function handleRequest(request) {
  return new Response(html, {
    headers: {
      "content-type": "text/html;charset=UTF-8",
    },
  })
}

addEventListener("fetch", event => {
  return event.respondWith(handleRequest(event.request))
})
YouTube video:

====================================================================
Another Code Example:
addEventListener('fetch', event => {
  event.respondWith(handleRequest(event.request))
})

// HTML Code
let html = `
<!DOCTYPE html>
<html>
  <head><title>51Sec Test</title></head>
  <body><div>Hello 51Sec world!</div></body>
</html>
`;

/**
 * Respond to the request
 * @param {Request} request
 */
async function handleRequest(request) {
  return new Response(html, {
    headers: {
      'Content-Type': 'text/html; charset=UTF-8'
    },
    status: 200
  })
}
Using your own domain for your Workers
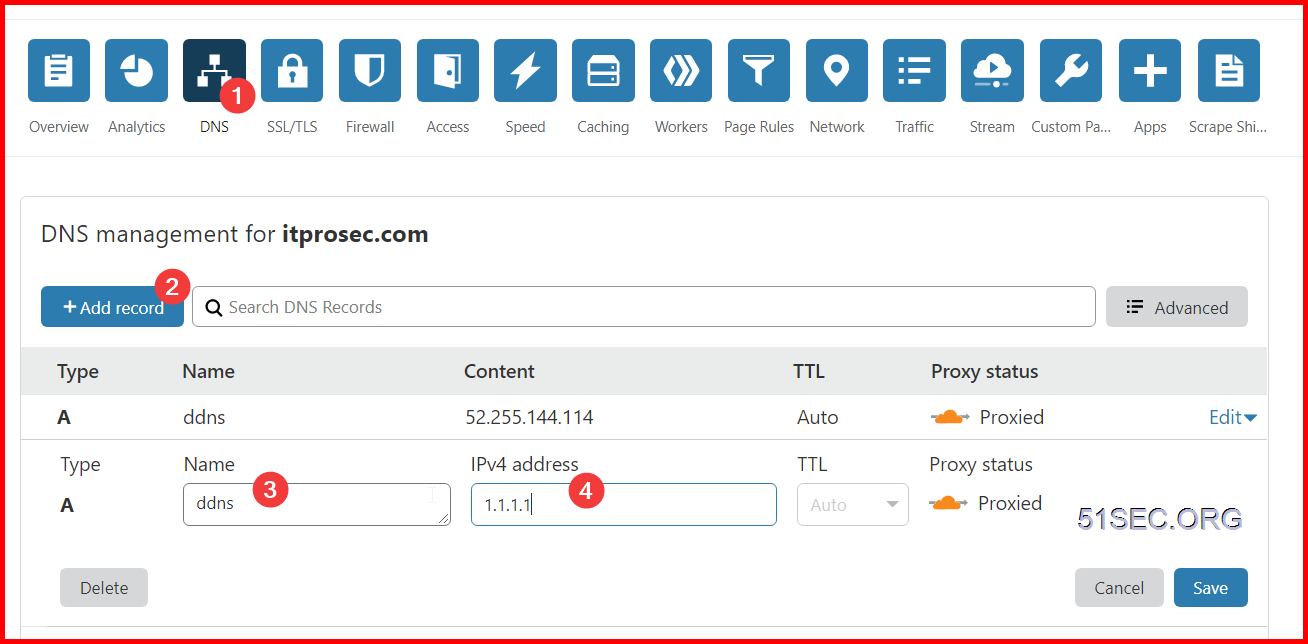
1 Create a sub-domain name
As mentioned earlier, domain names, such as
51sec,org must be hosted on or pointing to CloudFlare, and other DNS registrars will result in various weird errors.Domain hosting or pointing to CloudFlare is easy, create a dns A record and point to any valid ip address.
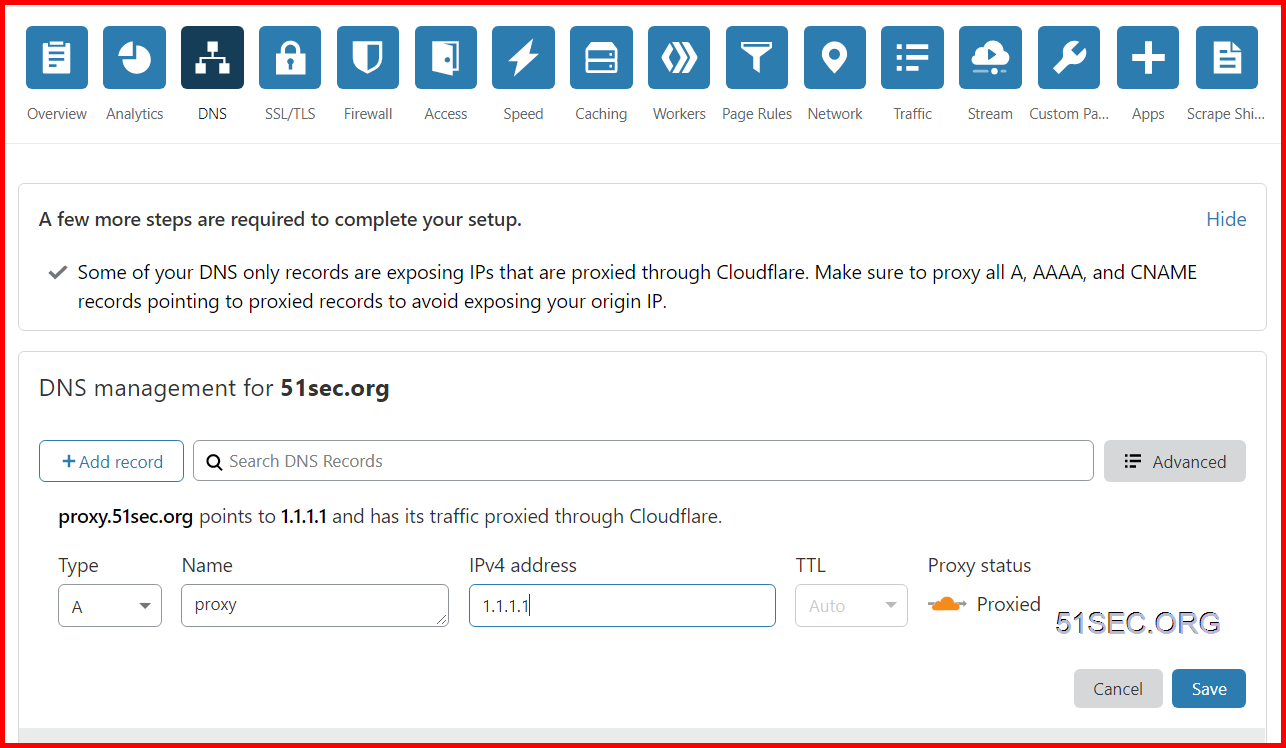
After a new DNS record is added, this A record name will be used for our Workers App's sub-domain. When adding this A record, name is the subdomain to be customized (such as proxy.itprosec.com). The value of IPv4 address does not matter, but the key is to enable the
Proxied.2 Associated domain names to Workers
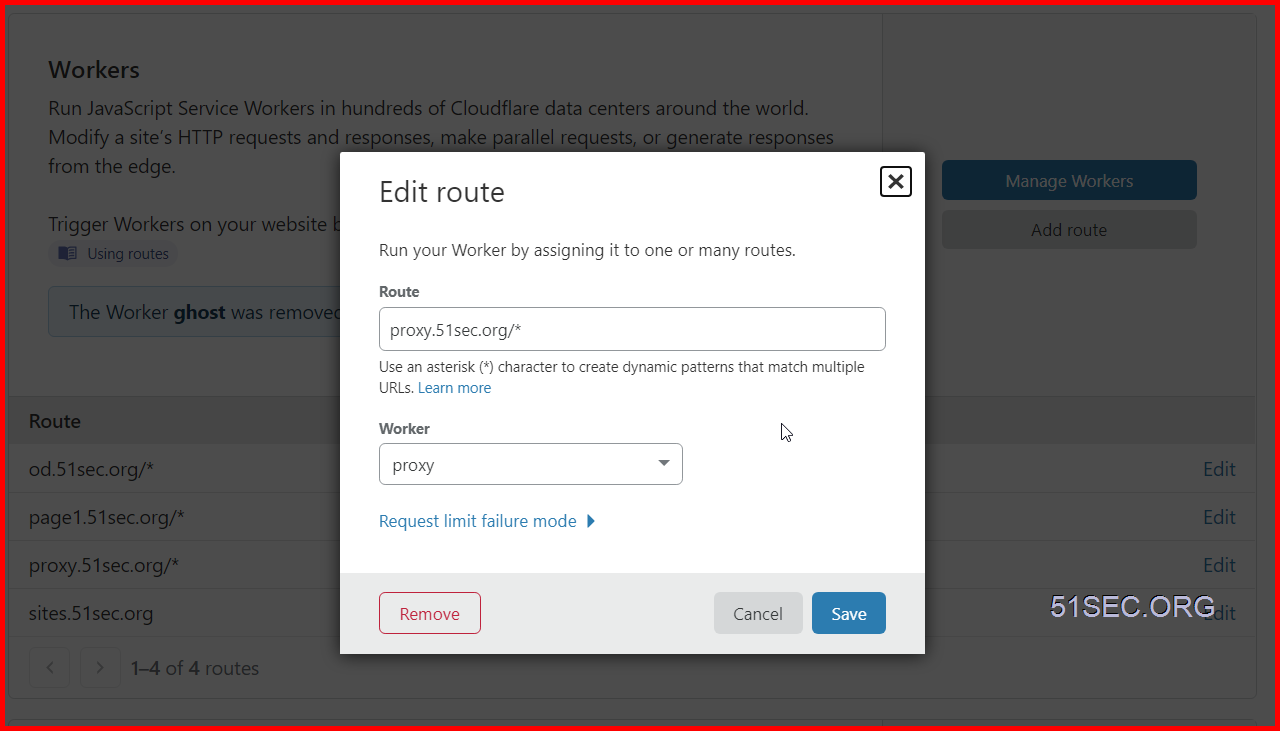
After you create
Workers switch to your domain's Workers tab for the domain name (note that the domain name is here, where in Workers you won't find a place to associate it with your domain and then add the association to Add route3 Create a Workers Route
Route fills in the subdomain with /*, (proxy.itprosec.com/*) ,Worker selects the worker application we created before, who needs to customize the domain name access, so you need to create a Worker and then associate , to represent access to the Worker service through this custom domain name: proxy.itprosec.com/*When you’re done, you can access the Worker service through a custom domain name, such as https://proxy.itprosec.com
API to Set Up DDNS
CloudFlare DDNS
CloudFlare itself does not have official DDNS support, but it can be implemented using CloudFlare API. GitHub Project Cloudflare-ddns provides a nice script to update your CloudFlare DNS IP using API. I have forked it to my repository to use.
Example : Ubuntu 18.04
Sudo -iapt-get update -y & apt-get upgrade -y
First clone code from GitHub
git clone https://github.com/51sec/cloudflare-ddns.git
Enter the catalog
cd cloudflare-ddns/
Installation Pip
apt-get install python-pip
Installation dependencies
pip install -r requirements.txt
Rename the config.yaml.template file
mv config.yaml.template config.yaml
Modify config.yaml
nano config.yaml
It's almost like this:
%YAML 1.2
# CloudFlare DDNS updater script config.
---
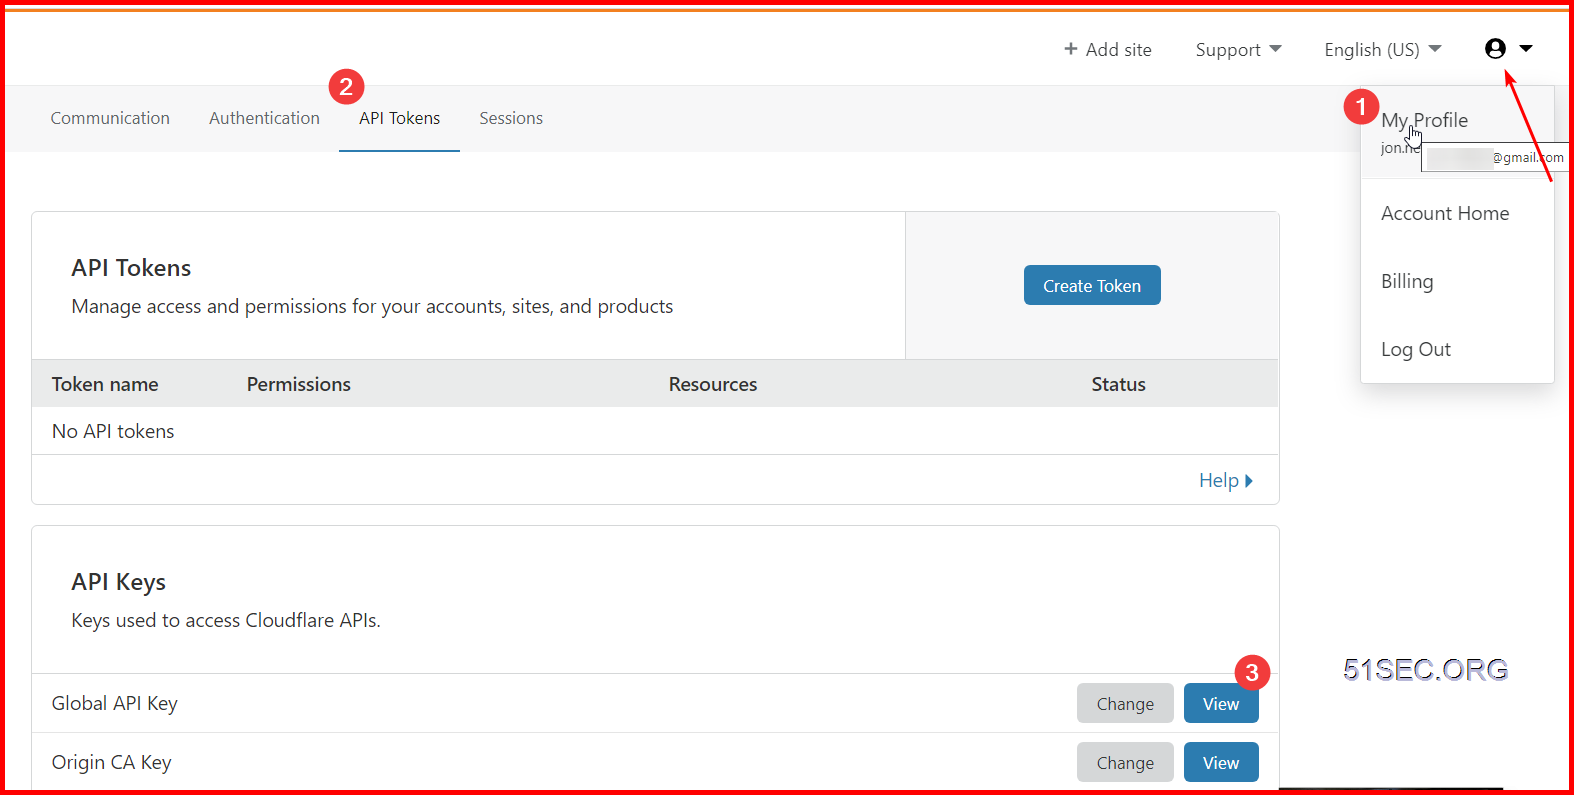
# CloudFlare API key
# You can find this under Account > My account after logging into CloudFlare.
cf_key: '<CLOUDFLARE GLOBAL API KEY>'
# Email address for your CloudFlare account.
cf_email: '<CLOUDFLARE ACCOUNT EMAIL ADDRESS>'
# Domain you're using CloudFlare to manage.
# If the host name you're updating is "ddns.domain.com", make this "domain.com".
cf_domain: 'root domain'
# The subdomain you're using for your DDNS A record.
# If the host name you're updating is "ddns.domain.com", make this "ddns".
# However, if you're updating the A record for the naked domain (that is, just
# "domain.com" without a subdomain), then set cf_subdomain to an empty value.
cf_subdomain: 'sub domain'
# CloudFlare service mode. This enables/disables CF's traffic acceleration.
# Enabled (orange cloud) is 1. Disabled (grey cloud) is 0.
cf_service_mode: 0
# If set to true, prints a message only when the record changes or when
# there's an error. If set to 'false', prints a message every time even if
# the record didn't change.
quiet: false
# If set to true then we call the ec2metadata service for the instance
# public ip address rather than an external service.
aws_use_ec2metadata: false
# If set to true dig will be used to fetch the public IP which is better
# but not available on all systems.
use_dig: false
Get API key
Create subdomain
Run script
python cloudflare_ddns.py config.yaml
Add a scheduled task
crontab -e
Fill in the following
# Every 15 minutes, check the current public IP, and update the A record on CloudFlare.
*/15 * * * * /root/cloudflare-ddns/cloudflare_ddns.py /root/cloudflare-ddns/config.yaml >> /var/log/cloudflare_ddns.log
After scheduled job configuration completed, the IP will be updated to Cloudflare every 15 minutes
Reverse Proxy for Any Website
// Website you intended to retrieve for users.
const upstream = '51sec.org'

// Custom pathname for the upstream website.
const upstream_path = '/'

// Website you intended to retrieve for users using mobile devices.
const upstream_mobile = '51sec.org'

// Countries and regions where you wish to suspend your service.
const blocked_region = ['KP', 'SY', 'PK', 'CU']

// IP addresses which you wish to block from using your service.
const blocked_ip_address = ['0.0.0.0', '127.0.0.1']

// Whether to use HTTPS protocol for upstream address.
const https = true

// Whether to disable cache.
const disable_cache = false

// Replace texts.
const replace_dict = {
    '$upstream': '$custom_domain',
    '//sunpma.com': ''
}

addEventListener('fetch', event => {
    event.respondWith(fetchAndApply(event.request));
})

async function fetchAndApply(request) {
    const region = request.headers.get('cf-ipcountry').toUpperCase();
    const ip_address = request.headers.get('cf-connecting-ip');
    const user_agent = request.headers.get('user-agent');

    let response = null;
    let url = new URL(request.url);
    let url_hostname = url.hostname;

    if (https == true) {
        url.protocol = 'https:';
    } else {
        url.protocol = 'http:';
    }

    if (await device_status(user_agent)) {
        var upstream_domain = upstream;
    } else {
        var upstream_domain = upstream_mobile;
    }

    url.host = upstream_domain;
    if (url.pathname == '/') {
        url.pathname = upstream_path;
    } else {
        url.pathname = upstream_path + url.pathname;
    }

    if (blocked_region.includes(region)) {
        response = new Response('Access denied: WorkersProxy is not available in your region yet.', {
            status: 403
        });
    } else if (blocked_ip_address.includes(ip_address)) {
        response = new Response('Access denied: Your IP address is blocked by WorkersProxy.', {
            status: 403
        });
    } else {
        let method = request.method;
        let request_headers = request.headers;
        let new_request_headers = new Headers(request_headers);

        new_request_headers.set('Host', upstream_domain);
        new_request_headers.set('Referer', url.protocol + '//' + url_hostname);

        let original_response = await fetch(url.href, {
            method: method,
            headers: new_request_headers
        })

        connection_upgrade = new_request_headers.get("Upgrade");
        if (connection_upgrade && connection_upgrade.toLowerCase() == "websocket") {
            return original_response;
        }

        let original_response_clone = original_response.clone();
        let original_text = null;
        let response_headers = original_response.headers;
        let new_response_headers = new Headers(response_headers);
        let status = original_response.status;

        if (disable_cache) {
            new_response_headers.set('Cache-Control', 'no-store');
        }

        new_response_headers.set('access-control-allow-origin', '*');
        new_response_headers.set('access-control-allow-credentials', true);
        new_response_headers.delete('content-security-policy');
        new_response_headers.delete('content-security-policy-report-only');
        new_response_headers.delete('clear-site-data');

        if (new_response_headers.get("x-pjax-url")) {
            new_response_headers.set("x-pjax-url", response_headers.get("x-pjax-url").replace("//" + upstream_domain, "//" + url_hostname));
        }

        const content_type = new_response_headers.get('content-type');
        if (content_type != null && content_type.includes('text/html') && content_type.includes('UTF-8')) {
            original_text = await replace_response_text(original_response_clone, upstream_domain, url_hostname);
        } else {
            original_text = original_response_clone.body
        }

        response = new Response(original_text, {
            status,
            headers: new_response_headers
        })
    }
    return response;
}

async function replace_response_text(response, upstream_domain, host_name) {
    let text = await response.text()

    var i, j;
    for (i in replace_dict) {
        j = replace_dict[i]
        if (i == '$upstream') {
            i = upstream_domain
        } else if (i == '$custom_domain') {
            i = host_name
        }

        if (j == '$upstream') {
            j = upstream_domain
        } else if (j == '$custom_domain') {
            j = host_name
        }

        let re = new RegExp(i, 'g')
        text = text.replace(re, j);
    }
    return text;
}


async function device_status(user_agent_info) {
    var agents = ["Android", "iPhone", "SymbianOS", "Windows Phone", "iPad", "iPod"];
    var flag = true;
    for (var v = 0; v < agents.length; v++) {
        if (user_agent_info.indexOf(agents[v]) > 0) {
            flag = false;
            break;
        }
    }
    return flag;
}
Another DDNS example
1. Download DDNS script
curl https://raw.githubusercontent.com/aipeach/cloudflare-api-v4-ddns/master/cf-v4-ddns.sh > /root/cf-v4-ddns.sh && chmod +x /root/cf-v4-ddns.sh
2. Modify script with your own information
vim cf-v4-ddns.sh
# incorrect api-key results in E_UNAUTH error
# Your CloudflareGlobal API Key
CFKEY=

# Username, eg: [email protected]
# Your CloudFlare login email address
CFUSER=

# Zone name, eg: example.com
# Fill in DDNS first level domain
CFZONE_NAME=

# Hostname to update, eg: homeserver.example.com
# Fill in DDNS second level domain name (Only prefix)
CFRECORD_NAME=
3. test the scrip
./cf-v4-ddns.sh
4. Set up schedule to run the script
crontab -e
*/2 * * * * /root/cf-v4-ddns.sh >/dev/null 2>&1

# 如果需要日志,替换上一行代码
*/2 * * * * /root/cf-v4-ddns.sh >> /var/log/cf-ddns.log 2>&1
Load Balancing to Multiple Sites
1 GitHub Porject address: https://github.com/51sec/CF-Herokus
2 Code:
// odd days
const SingleDay = 'abc.herokuapp.com'
// plural days
const DoubleDay = 'xyz.herokuapp.com'
// Using CF to do porxy? true/false
const CFproxy = true

// Heroku only has 550 hours/month for free plan by default.
// This CloudFlare Workers code can let use different Heroku app based on odd or even number's day.
// Please change above code for your Heroku's app in either SingleDay or Doubleday parameter.

addEventListener('fetch', event => {
    let nd = new Date();
    if (nd.getDate()%2) {
        host = SingleDay
    } else {
        host = DoubleDay
    }
    if (!CFproxy) {
        let url=new URL(event.request.url);
        if (url.protocol == 'http:') {
            url.protocol = 'https:'
            response = Response.redirect(url.href);
            event.respondWith( response );
        } else {
            url.hostname=host;
            let request=new Request(url,event.request);
            event.respondWith( fetch(request) )
        }
    } else {
        event.respondWith( fetchAndApply(event.request) );
    }
})

async function fetchAndApply(request) {
    let response = null;
    let url = new URL(request.url);
    if (url.protocol == 'http:') {
        url.protocol = 'https:'
        response = Response.redirect(url.href);
        return response;
    }
    url.host = host;

    let method = request.method;
    let body = request.body;
    let request_headers = request.headers;
    let new_request_headers = new Headers(request_headers);

    new_request_headers.set('Host', url.host);
    new_request_headers.set('Referer', request.url);

    let original_response = await fetch(url.href, {
        method: method,
        body: body,
        headers: new_request_headers
    });

    response = new Response(original_response.body, {
        status: original_response.status,
        headers: original_response.headers
    })

    return response;
}
Create a Serverless Bookmark site
Post: https://blog.51sec.org/2020/05/build-serverless-bookmark-website-use.html
In this case, this work will redirect all root url access (for example: https://proxy.itprosec.eu.org) to a new site https://proxy.itprosec.com
Reroute to another website
Here is an example to redirect to a heroku app url.
addEventListener(
  "fetch",event => {
     let url=new URL(event.request.url);
     url.hostname="od-51sec.herokuapp.com";
     let request=new Request(url,event.request);
     event. respondWith(
       fetch(request)
     )
  }
)
A Complicated Redirect Example
// A Worker which:
// 1. Redirects visitors to the home page ("/") to a
//    country-specific page (e.g. "/US/").
// 2. Blocks hotlinks.
// 3. Serves images directly from Google Cloud Storage.
addEventListener('fetch', event => {
  event.respondWith(handle(event.request))
})

async function handle(request) {
  let url = new URL(request.url)
  if (url.pathname == "/") {
    // This is a request for the home page ("/").
    // Redirect to country-specific path.
    // E.g. users in the US will be sent to "/US/".
    let country = request.headers.get("CF-IpCountry")
    url.pathname = "/" + country + "/"
    return Response.redirect(url, 302)

  } else if (url.pathname.startsWith("/images/")) {
    // This is a request for an image (under "/images").
    // First, block third-party referrers to discourage
    // hotlinking.
    let referer = request.headers.get("Referer")
    if (referer &&
        new URL(referer).hostname != url.hostname) {
      return new Response(
          "Hotlinking not allowed.",
          { status: 403 })
    }

    // Hotlink check passed. Serve the image directly
    // from Google Cloud Storage, to save serving
    // costs. The image will be cached at Cloudflare's
    // edge according to its Cache-Control header.
    url.hostname = "example-bucket.storage.googleapis.com"
    return fetch(url, request)
  } else {
    // Regular request. Forward to origin server.
    return fetch(request)
  }
}
It also can be simplified to a simple url redirect worker such as :
replace
return Response.redirect(url, 302)with
return Response.redirect(https://proxy.itprosec.com, 302)


No comments:
Post a Comment