This post is to summarize some interesting but special usage which is out of normal linux commands. For basic Linux commands, you can find it from my previous post.

Related Posts:
DNS Server
server
List All Running Services
systemctl --type=service --state=running
Add user into sudo / wheel
adduser newuser
passwd newuser
On Ubuntu:
usermod -aG sudo newuser
On CentOS:
usermod -aG wheel newuser
Manually Change IP
Ubuntu:
- Before version 17.10, edit file /etc/network/interfaces
- Starting with 17.10, Netplan is the default network management tool
- ip link
- nano /etc/netplan/01-netcfg.yaml
- netplan apply
CentOS
- “nmcli d” command in your terminal for quick list ethernet card installed on your machine:
- “nmtui” command in your terminal to open Network manager.
- IPv4 configuration <Automatic>
- [x] Automatically connect
- service network restart
- ip a
Check Your Public IP Address from CLI
- curl -s checkip.dyndns.org|sed -e 's/.*Current IP Address: //' -e 's/<.*$//'
- curl icanhazip.com
- curl http://ipv4.icanhazip.com
- telnet www.checkmyip.com 80 | grep confidence | grep -Eo '([0-9]{1,3}\.){3}[0-9]{1,3}'
- wget -O - -q icanhazip.com
- wget http://ipinfo.io/ip -qO -
- curl ifconfig.me
Keep Terminal Running in background (Screen)
- Install screen (Depends on the Linux Distribution if it came pre installed or not) : yum install screen
- Initiate a Screen : screen or screen -S <screen name> <command to execute>
- Detach from the screen : "CTRL+A,D" not "CTRL+A+D"
- List all the screen currently working : screen -ls
- Reattach to a screen : screen -r <session number> or screen -r <screen name>
- Kill specific screen: screen -X -S <screen name> quit
- Kill all screens : pkill screen
Build SSH Trust Relationship Between Linux Machines
su nsm
Go to the /home/nsm directory:
cd /home/nsm
Create the keys: (Path should be /home/nsm/.ssh/id_rsa. Leave the passphrase blank.)
- or Go to the remote server. The command below will add the key that is in temp1 file to the end of the authorized_keys file.
- Repeat steps 2-6 on deviceB. On deviceB, become root: (from user nsm, exit to root). Move the authorized_keys file that was copied to admin into nsm/.ssh:
- Change ownership of authorized_keys:
- At this point, you will be able to SSH between both servers without it asking for a password.
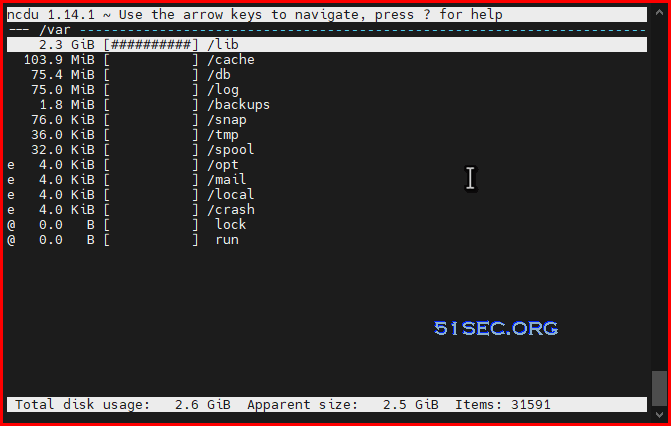
Find Large Folders
2. Check your application
- /root/etc-pihole/pihole-FTL.db
You can diminish the size of the journal by means of these commands:
sudo journalctl --vacuum-size=100M
This will retain the most recent 100M of data.
sudo journalctl --vacuum-time=10d
will delete everything but the last 10 days.
Find Big Files in Linux File System
bitnami@ip-172-26-0-136:/opt$ du -shc /opt/bitnami/apps/wordpress/htdocs/wp-content/*
1.8G    /opt/bitnami/apps/wordpress/htdocs/wp-content/ai1wm-backups
24K     /opt/bitnami/apps/wordpress/htdocs/wp-content/backup-migration
4.0K    /opt/bitnami/apps/wordpress/htdocs/wp-content/blogs.dir
24K     /opt/bitnami/apps/wordpress/htdocs/wp-content/cache
4.0K    /opt/bitnami/apps/wordpress/htdocs/wp-content/index.php
6.3M    /opt/bitnami/apps/wordpress/htdocs/wp-content/languages
132M    /opt/bitnami/apps/wordpress/htdocs/wp-content/plugins
27M     /opt/bitnami/apps/wordpress/htdocs/wp-content/themes
152K    /opt/bitnami/apps/wordpress/htdocs/wp-content/updraft
4.0K    /opt/bitnami/apps/wordpress/htdocs/wp-content/upgrade
512M    /opt/bitnami/apps/wordpress/htdocs/wp-content/uploads
68K     /opt/bitnami/apps/wordpress/htdocs/wp-content/w3tc-config
2.4G    total
- find . -type f -size +10000 -exec ls -lh {} \;
- find . -type f -size +50000k -exec ls -lh {} \; | awk '{ print $9 ": " $5 }'
- Find large files (>10M) in current folder find . -type f -size +10000k
a. Juniper Firewall
Sample output:root@FW% find . -type f -size +10000 -exec ls -lh {} \;
-rw-r--r-- 1 930 929 134M Jan 5 17:34 ./cf/packages/junos-11.4R6.6-domestic
-rw-r--r-- 1 root wheel 139M Sep 8 2011 ./cf/var/log/junos-srxsme-11.2R2.4-domestic.tgz
-rw-r----- 1 root wheel 4.9M Feb 11 17:12 ./cf/var/db/idpd/db/secdb_02.db
-rw-r----- 1 root wheel 6.7M Feb 11 17:13 ./cf/var/db/idpd/db/secdb_03.db
-rw-r----- 1 root wheel 64M Feb 11 17:13 ./cf/var/db/idpd/db/secdb_06.db
-rwxr-xr-x 1 admin 20 24M May 23 08:38 ./cf/var/db/idpd/nsm-download/SignatureUpdate.xml
.....
b. Checkpoint Firewall gateway:
[Expert@CP]# find . -type f -size +50000k -exec ls -lh {} \; | awk '{ print $9 ": " $5 }'./sysimg/CPwrapper/linux/CPEndpointSecurity/EndpointSecurityServer.bin: 145M
./sysimg/CPwrapper/linux/windows/SmartConsole.exe: 194M
./sysimg/CPwrapper/linux/CPrt/CPrt-R75.40-00.i386.rpm: 53M
./sysimg/CPwrapper/linux/CPportal/CPportal-R75.40-00.i386.rpm: 59M
./var/log/db: 336M
....
df -h   //check disk usage
du -sh /* | sort -nr   // check each folder's usage
du -sh /var/* | sort -nr    //check internal folder usage inside folder /var

du -h --max-depth=1
lsof | grep deleted   //check if there is deleted file locked by process.


cat /dev/null > filename    //clear up logs
rm -rf filename

//clean up /var/log/journal files
journalctl --vacuum-time=1w   //keep one week log
journalctl --vacuum-size=500M  //keep only 500MB logs
rm -rf /var/log/journal/f9d400c5e1e8c3a8209e990d887d4ac1  //delete /var/log/journal log files
Clean all Linux History
sudo journalctl --rotate --vacuum-size=100Mecho > /var/log/wtmp
echo > /var/log/btmp
echo >/var/log/lastlog
echo > /var/log/secure
echo > /var/log/messages
echo >/var/log/syslog
echo >/var/log/xferlog
echo >/var/log/auth.log
echo >/var/log/user.log
cat /dev/null > /var/adm/sylog
cat /dev/null > /var/log/maillog
cat /dev/null > /var/log/openwebmail.log
cat /dev/null > /var/log/mail.info
echo >/var/run/utmp
echo > ~/.bash_history
history -c
echo > .bash_history
history -cw
cat /dev/null > /var/log/boot.log
cat /dev/null > /var/log/btmp
cat /dev/null > /var/log/cron
cat /dev/null > /var/log/dmesg
cat /dev/null > /var/log/dracut.log
cat /dev/null > /var/log/lastlog
cat /dev/null > /var/log/maillog
cat /dev/null > /var/log/messages
cat /dev/null > /var/log/secure
cat /dev/null > /var/log/spooler
cat /dev/null > /var/log/tallylog
cat /dev/null > /var/log/wtmp
cat /dev/null > /var/log/yum.log
For CentOS 7:
cat /dev/null > /var/log/boot.log
cat /dev/null > /var/log/btmp
cat /dev/null > /var/log/cron
cat /dev/null > /var/log/dmesg
cat /dev/null > /var/log/firewalld
cat /dev/null > /var/log/grubby
cat /dev/null > /var/log/lastlog
cat /dev/null > /var/log/mail.info
cat /dev/null > /var/log/maillog
cat /dev/null > /var/log/messages
cat /dev/null > /var/log/secure
cat /dev/null > /var/log/spooler
cat /dev/null > /var/log/syslog
cat /dev/null > /var/log/tallylog
cat /dev/null > /var/log/wpa_supplicant.log
cat /dev/null > /var/log/wtmp
cat /dev/null > /var/log/yum.log
Use ssh key to encrypt / decrypt files
echo ‘This is a sekret’ >/tmp/msg.txt
Export public key:
openssl rsa -in ~/private.pem -out /tmp/public.pub -outform PEM -pubout
Encrypt file with public key (anyone can have this key):
openssl rsautl -encrypt -inkey /tmp/public.pub -pubin -in /tmp/msg.txt -out /tmp/file.enc
Decrypt the file with private key (only you should have the private key):
openssl rsautl -decrypt -inkey ~/private.pem -in /tmp/file.enc -out /tmp/decrypted.txt
Check decoded message:
cat /tmp/decrypted.txt
AWS Amazon Linux Instance Commands
sudo yum install -y httpd24 php70 mysql56-server php70-mysqlnd
sudo service httpd star
sudo chkconfig httpd on
chkconfig --list httpd
curl http://localhost
groups
sudo chown -R ec2-user:apache /var/www
sudo chmod 2775 /var/www
find /var/www -type d -exec sudo chmod 2775 {} \;
find /var/www -type f -exec sudo chmod 0664 {} \;
echo "<?php phpinfo(); ?>" > /var/www/html/phpinfo.php
sudo yum list installed httpd24 php70 mysql56-server php70-mysqlnd
sudo service mysqld start
sudo chkconfig mysqld on
sudo service httpd restart
Validate UDP ports reachability
Ensure, that your ports are reachable through your external IP.
To validate UDP connection the simplest way, run this on your server:
nc -ul 52101And this on your local client:
nc -u [server ip] 52101Then try to type on one end, you should see characters on the other side.
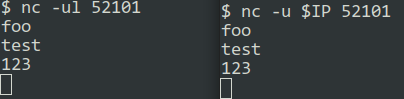
If it does not work for you, then most likely your port forwarding is not working correctly. Or your ISP is blocking traffic.
If you get Command 'nc' not found. error, you can install netcat package using:
sudo apt-get install netcat


No comments:
Post a Comment