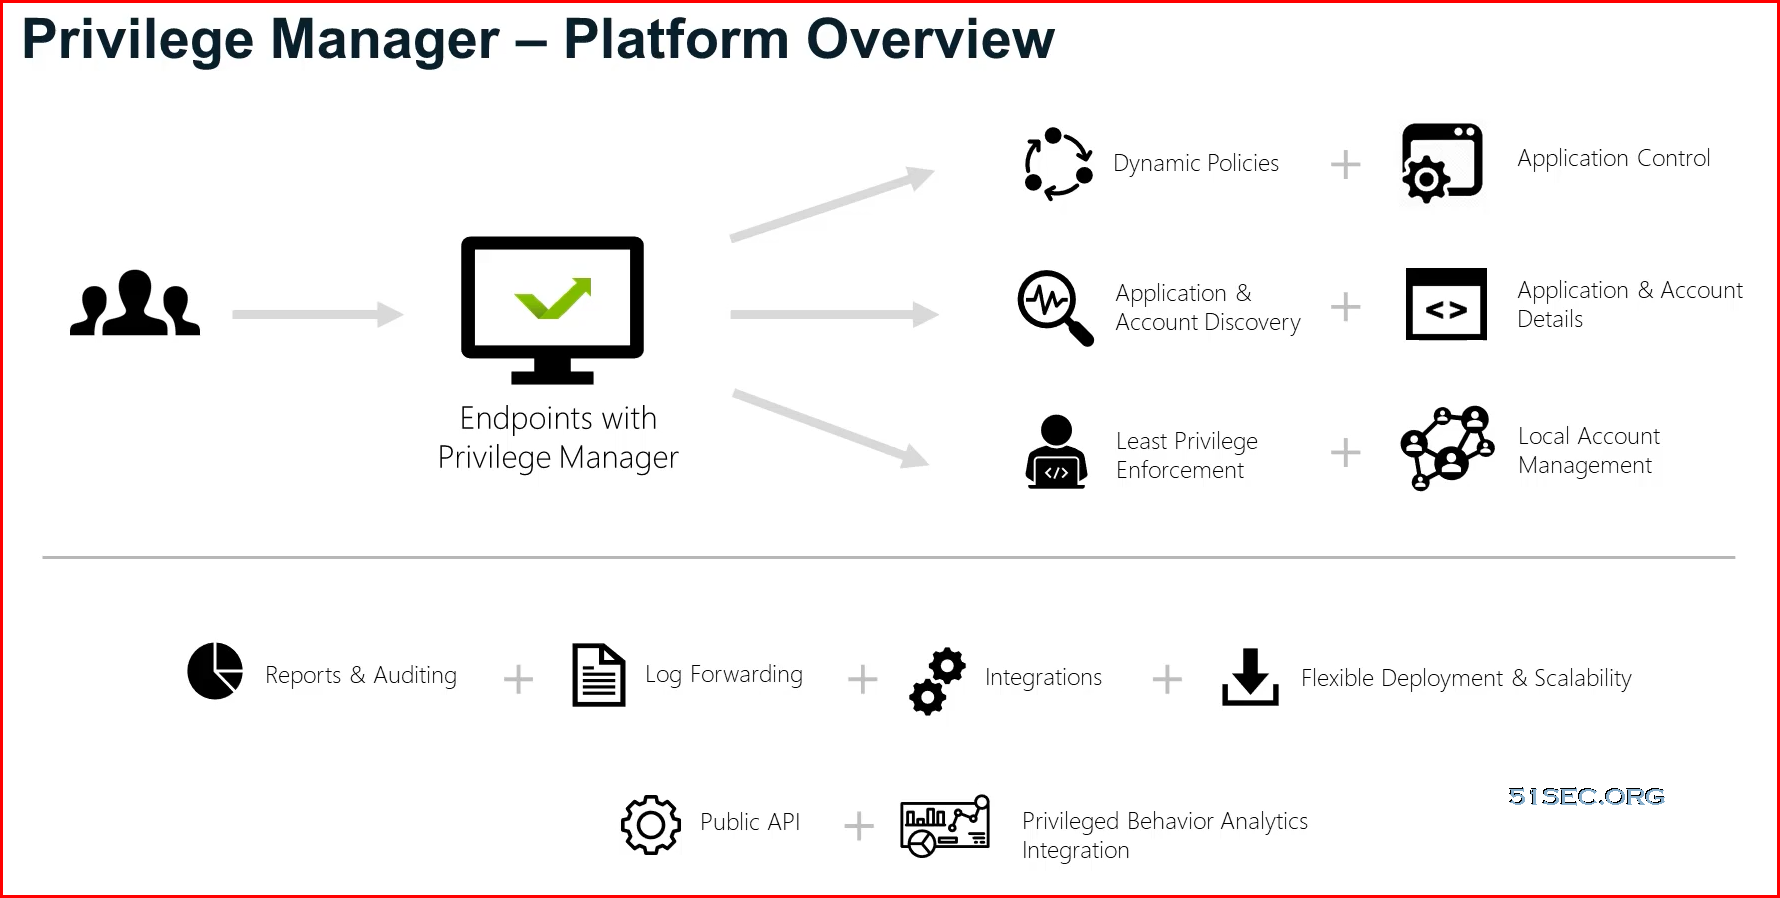
Privilege Manager is an endpoint least privilege and application control solution for Windows and macOS, capable of supporting enterprises and fast-growing organizations at scale. Mitigate malware and modern security threats from exploiting applications by removing local administrative rights from endpoints. The two major components are Local Security and Application Control.
Using Privilege Manager, administrators can automatically discover local administrator privileges and enforce the principle of least privilege through policy-driven actions. Those policy-driven actions include
- blocking, elevating, monitoring, allowing
- application quarantine, sandbox, and isolation,
- application privilege elevation, and
- endpoint monitoring
All this is seamless for users, reduce IT/desktop support workload, and support compliance obligations.
Privilege Manager does not require Secret Server or any other Thycotic product to run. Secret Server’s vaulting and workflow capabilities can be extended to privileged endpoint accounts when the two products are used together.
The typical Privilege Manager user is part of an IT team that is tasked with implementing and overseeing a company’s security business requirements and framework. In the Privilege Manager product this role is known as the Privilege Manager Administrator. Although there are a few other kinds of Privilege Manager user roles that may use Privilege Manager now and then for minor tasks, the Privilege Manager Administrator is the main user of Privilege Manager.
It is useful (although not necessary) for Privilege Manager Administrators to be familiar with the basics of IT administration, such as the Group Policy feature from Microsoft.
Platform Overview
Privilege Manager’s dashboard is completely interactive and actionable so you can quickly gain visibility into all your endpoints. You'll see what your users are doing, and discover what top applications are in your environment. Privilege Manager is agent-based which means you can deploy agents to discover endpoints, apps, and capture all processes.
Agent Port:
- Inbound (port 5593): The is the default and only port that the agent listens on. This port is not required and you can block port 5593. If you block the port, the agents pull updates from the server based on a set schedule.
Quick Installation: Server
Download Trial version : https://thycotic.com/products/privilege-manager/Download Agent: https://docs.thycotic.com/privman/10.8.2/install/sw-downloads.md
Server Installation::
Running the Installer
Double-click the downloaded setup.exe to run the installer. The installer opens on the Welcome tab:

Verify that the Privilege Manager box is checked.
Note: Privilege Manager as a standalone product comes with three roles Administrator, Basic User, and Help Desk User roles. Please refer to Application Roles.
On the Database tab you can choose to either install SQL Express or connect to an existing SQL Server. SQL Express requires a internet access for the installer to download the installation package for SQL Express.

Note: For production environments Thycotic recommends installing a licensed edition of SQL before installing Thycotic products. The Express edition is only recommended for trial and sandbox environments.
- If Internet access is not available a link to download SQL Server Express will be presented to the user. At that point, they are expected to install SQL Server Express and then restart the installer.
- If Internet Access is available SQL Server Express will be installed.
- After SQL is installed select Connect to an existing SQL Server.
The Pre-Requisites tab makes sure everything that is required to install Privilege Manager is setup correctly. Everything on this page can be installed outside of the installer, but if not, the installer will install and configure them for the user. Think of this page as the non-Thycotic configuration. If there are issues with this page it is very likely that the Internet will be able to help as these are not installation features that are specific to Thycotic. Click Fix Issues to automatically install the necessary pre-requisites. When Successful, click Next.

If you chose the “Connect to an existing SQL Server” option on the Database page, the Database Connection tab will now prompt you for the connection information that Privilege Manager will use. The Test Connection button must be run successfully before installation can continue. Once connection is established, click Next.
Note: If you are not using a default InstanceName on the SQL Server for the Privilege Manager database, provide the SQLServerName\InstanceName for ServerName or IP.


- If you choose SQL Server Authentication, next the Account tab will prompt for the server location where your SQL database is currently installed. Provide the Server Name or IP address for your Database server and Authenticate with Administrator SQL credentials. If your Secret Server database does not yet exist when you click “Test Connection” the Installer will create it. When the connection has been tested successfully, click Next.
The Email Server tab opens, here the connection information for the email server can be entered. This is also optional and can be skipped to be configured later in the application by clicking Skip Email. This page will configure email for Privilege Manager.

On the Review tab, most settings are defaulted for a user and they can choose to modify settings at this step. Certain validations will occur on these settings before the install can begin. Click Install to proceed.

The Install page will show the status from log files as Secret Server and/or Privilege Manager are installed. Installs vary depending on your environment, most installs last between 20-60 minutes.

The Log Files tab is available after the applications are installed. The installer provides the link to open a web browser to the product login page. At this point, everything is installed and ready for you to begin using your new Thycotic product. If the installation failed or you wish you view the logs from the installation you can click the View Log Files button.

On the Finish tab, when the install has successfully completed, click the provided Privilege Manager URL to navigate directly to your setup landing page or open a browser and navigate to where your Privilege Manager is located, for example: http://localhost/TMS/PrivilegeManager.

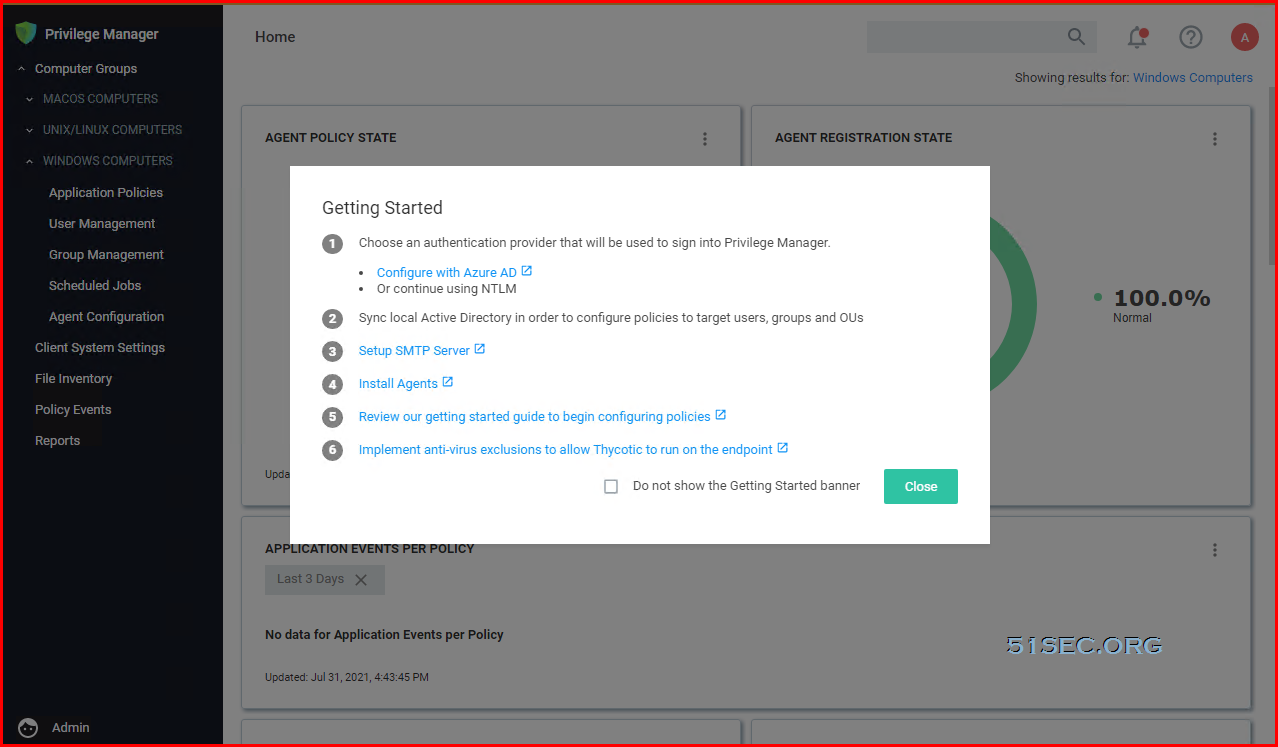
Getting Started Checklist
Quick Installation: Agent
There are three agents available for Windows endpoints:
- Thycotic Agent: The core agent is responsible for all reporting and monitoring communication on the endpoint. It can be considered the managing agent, while the Application Control and Local Security Agents are the worker agents.
- Application Control Agent (ACS): This agent is responsible for monitoring processes executing the Privilege Manager Application Control Functions on the endpoint.
- Local Security Agent (LSS): This agent is responsible for monitoring and executing Local Security functions.
- Core Thycotic Agent (x64): https://tmsnuget.thycotic.com/software/Agents/ThycoticAgent_x64_10_8_1150.msi
- Application Control Agent (x64): https://tmsnuget.thycotic.com/software/Agents/Thycotic_ApplicationControlAgent_x64_10_8_2185.msi
- Local Security Solution Agent (x64): https://tmsnuget.thycotic.com/software/Agents/Thycotic_LocalSecurityAgent_x64_10_8_2183.msi
Download Agent: https://docs.thycotic.com/privman/10.8.2/install/sw-downloads.md
The agent uses the install code to prove to the server that it is an authorized install. Once the agent is installed, the install code is deleted and the agent certificate is used to communicate with the server. The server needs either an install code or agent trust (a certificate) to accept communication from an agent. Multiple install codes can be created for bundling with different installers, if the last install code is revoked, a new one is generated automatically. Revoking an install code prevents new installations with that install code but does not affect previous installations since those agents now use their own certificates to authenticate.
Navigate to the agent settings under Admin | Agents.
On the Installation Codes tab you may Generate New codes, Refresh code information, Revoke, or Copy Codes to the clipboard to use in the installer.

If deploying with msiexec, the following command shows an example for how to set the Install Code:
msiexec.exe /i ThycoticTmsSetup_x64.msi INSTALLCODE=1234XXXXABCD AMSURL=https://DOMAIN/Name/Where:
- ThycoticTmsSetup_x64 is the install file used.
- INSTALLCODE is argument taking the install code value.
- AMSURL is the argument taking the base URL to the TMS installation.
If installing via a bundled installer, the install code is placed in the Enter the Install Code field (dashes in the install code are for readability and are optional).

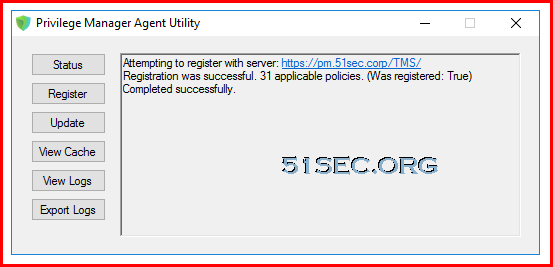
Agent Utility
Windows Agent Utility
Most endpoint troubleshooting will begin with the agent. There is an Agent Utility that is installed with the agent, used to troubleshoot issues from the endpoint. To open the utility, navigate to the C:\Program Files\Thycotic\Agents\Agent folder on the endpoint, and run the Agent Utility.exe application. That will launch the utility, and it will look like the screenshot below.
Notes: https://docs.thycotic.com/privman/10.8.2/agents/win/utility.md
Using the SetAMSServer.ps1 Script
If it becomes necessary to set the install code after the agent is installed, an install code can be set using a PowerShell script that must be run as an Administrator. This script, along with other useful agent scripts, will be located in the C:\Program Files\Thycotic\Powershell\Arellia.Agent folder on any machine with the Thycotic agent installed and it is called SetAMSServer.ps1.
The script will request parameters, as follows:
- The first parameter the script will request is the URL of the server you wish to connect to; its value should be
https://PrivilegeManagerURL/TMS/. - The second parameter it will ask for is the install code.
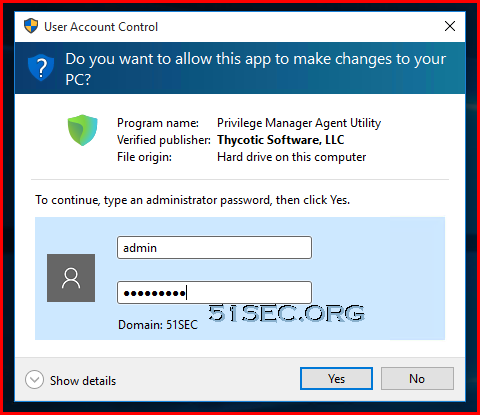
Some screenshots when Thycotic Privilege Manager Agent Utility pops up:

Troubleshooting
1. Stop the Thycotic Agent and Thycotic Application Control services
2. Delete the client database files located in the c:\programdata\arellia\clientitems folder
3. Delete the PMAgent certificate
3a. Open mmc.exe
3b. File menu -> Add Snap-in -> Select Certificates -> Add
3c. Select Computer Account -> Select Local Computer -> Finish -> Ok
3d. Go to Certificates\PM Agent\Certificates
3e. Delete the certificate
4. Start the Thycotic Agent service and then the Thycotic Application Control service
5. Open Powershell
6. Run the 'c:\program files\thycotic\powershell\Arellia.Agent\SetupAgent.ps1' script
7. Run the 'c:\program files\thycotic\powershell\Arellia.Agent\SetAmsServer.ps1' script
Issue 2 : Unsigned Driver Issue
After installed the bundled agent, we might have this A digitally signed driver is required issue. Windows blocked Arellia Application Control Driver's installation because it is unsigned driver.
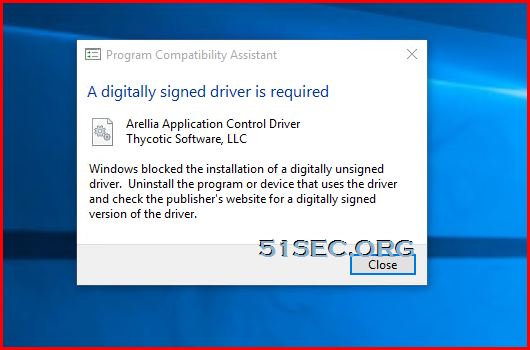
Here is the fix to let Windows 10 ignore unsigned drivers.
1) Press Win+R (Windows key and R key) at the same time. A Run dialog box will appear.
2) Type gpedit.msc in the run box and click OK button.
3) Click User Configuration in left pane and double-click on Administrative Templates in the right pane.
4) Double-click on System.
5) Double-click on Driver Installation.
6) Double-click on Code signing for device drivers.
7) Select Enabled change it to Ignore from the drop-down menu. Then click OK button.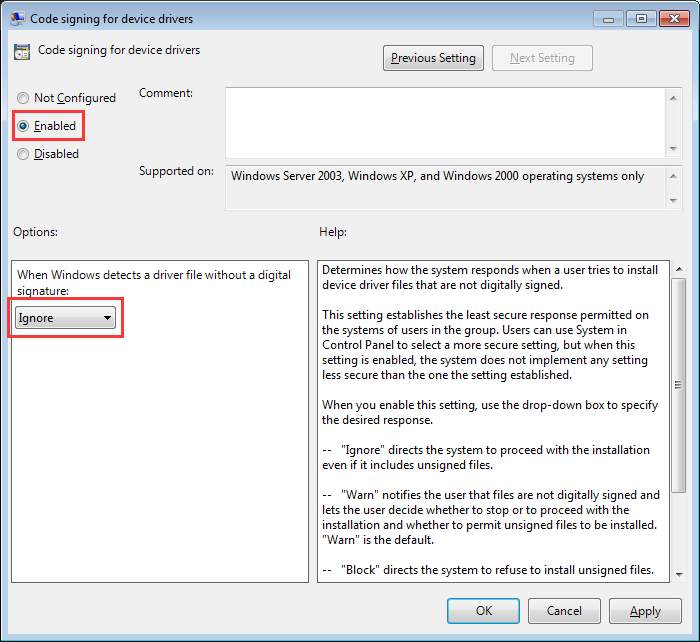
After disabling the code signing for device drivers, install the driver and it should work this time.


No comments:
Post a Comment