Here is a guide to set up your Raspberry Pi as a picture frame to show pictures stored on your local Raspberry pi's disk.
Disable Low Voltage Warning
I am using a general USB adapter (5V 2A) to provide power which does not have enough (5V, 2.5A) and it will cause a notification to warm low voltage. This notification can be disabled using following configuration steps.
1.To disable the low voltage warning, we will need to modify the boot config file.
You can begin modifying this file by running the following command on your device.
This config file is available on the boot partition when you plug the SD Card on your Raspberry Pi.
2. Within this file, you will need to add the following line to the bottom of the file. By setting this value to 1, we are telling it to disable all warning overlays.
Please note this means you will no longer receive any more warnings about your Pi not receiving enough voltage.
3. Once you have added this line, save the file by pressing CTRL + X, then Y, followed by the ENTER key.
4. We also need to remove the “battery monitor” plugin. This plugin is responsible for showing the notification you may see in the top-right corner of your screen.
You can remove this LXPanel plugin by using the following command on your device.
5. For this change to take effect, you will need to restart your Raspberry Pi.
You can restart by using the command "sudo reboot" in the terminal.
Fix Raspberry Pi Apt update issue
By default, there is no valid source to get update.
1.Let’s begin modifying this file by running the following command on the Raspberry Pi.
2. Within this file, you will see the following text.
This text defines which repository the package manager will connect to when updating.
Uncomment last line will allow apt update to get source list.
Turn Off Screen Blanking
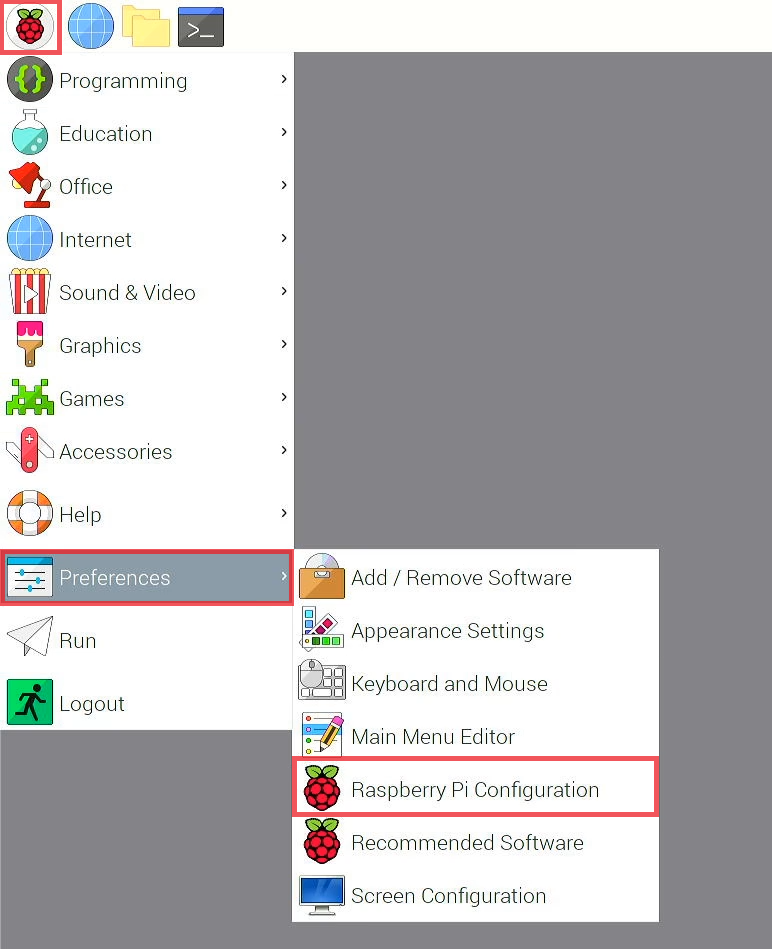
The turning off of the display when there is no activity (10 minutes) in Raspberry Pi is called Screen Blanking. By default this is enabled. Screen Blanking or sleeping is good if you want to save power, but distracting (sometimes annoying) if you are doing something in the Raspberry Pi. To turn this feature off you do not have to install xscreensaver, you only need to disable it in the Raspberry Pi Configuration.Click on the Menu button on the upper right (Raspberry Pi Icon) >> Preferences >> Raspberry Pi Configuration.

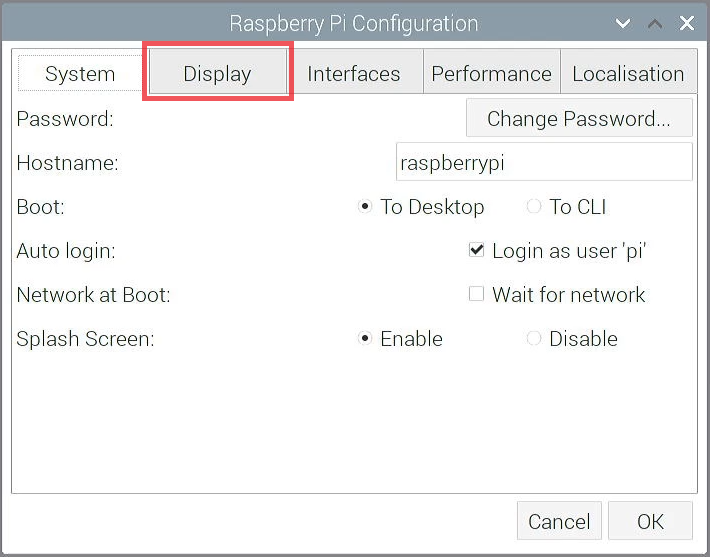
In Raspberry Pi Configuration Window, click on Display Tab.

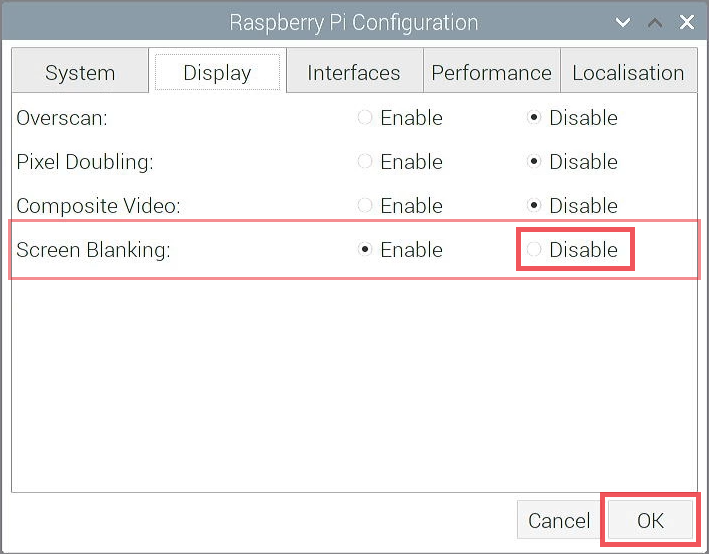
Look for the Screen Blanking row, click Disable.
Then click OK.

Apt Update and Install Package
Now, we are getting to the step to install actual program to do slideshow your pictures.
pi@raspberrypi:~ $ sudo -i
root@raspberrypi:~# apt update
Command line tool, feh, can show different size photos to your LCD.
1. To install the package, use the following line:
2. Now to test that it works enter the following line. Replace /media/NASHDD1/test with the directory that contains all your image (/home/pi/Pictures).
3. Now we can use short tags to make this command a lot shorter. You can read more about all the flags you can use over at the feh manual page.
4. Now as you will notice this locks up the command line bar. To fix this, add the & after the command and the script/process will launch in the background.
5. So now let’s store this in a simple script file. This way you can add or change it later. To make the file enter the following command:
6. In here, enter the following lines.
7. Now that’s done you can test it by running the following command.
8. Finally, let’s have it start at boot. Now it is important that you have SSH enabled so you can access the Pi remotely as you will lose access to the GUI/Screen. So make sure you have done this before setting it to launch at boot up.
9. To do this open up the rc.local file by entering the following command.
10. Add the following before the exit 0 line in this folder.
11. If you ever need to kill the process as you may want to be able to access the desktop, simply enter the following line.
You should now have your very own slideshow of pictures going. If you end up with any troubles, then double check all the steps and look for any errors. If you’re still having trouble, then be sure to seek help on our forums.
My final command to run in the start-picture-frame.sh
DISPLAY=:0.0 XAUTHORITY=/home/pi/.Xauthority /usr/bin/feh -q -p -z -r -F -R 60 -Y -D 15.0 --info "date +%%Y-%%m-%%d,%%H:%%M" /media/usb/pictures
- -q: quiet
- -p: preload
- -z: randomize
- -Z: auto-zoom
- -r: recursive
- -F: full screen
- -R: preload
- -Y: hide pointer
- --info : show date and time at bottom left.
- /mdeia/usb/pictures: the folder stores all photos
Autostart Slideshow
Depend on your LCD screen resolution, image size will be vary. For my LCD screen 3.5 inch, it is 480 x 320 pixels.
Autostart is the best way to run GUI-based Raspberry Pi programs on startup. It works by ensuring that both the X Window system and the LXDE desktop environment are available before the system runs any of the scheduled programs.
If you have a script that runs in the windowed mode, or you want to run any of the GUI-based programs/applications at startup on your Raspberry Pi, you should schedule them to run using autostart. Here are the steps to do this.
- First, open the terminal and enter the following command to create a .desktop file in the autostart directory: sudo nano /etc/xdg/autostart/display.desktop. We've used display.desktop as file name, but you can name your desktop file anything you want.
- In the .desktop file, add the following lines of code:
[Desktop Entry]
Name=Slideshow
Exec=bash /home/pi/start-picture-frame.sh - In this file, replace the value for the Name field with your project/script name. Similarly, we've added our display.py program to run every time the Raspberry Pi boots up.
- However, you can replace it with any program that you want to run. In fact, you can even schedule to run a third-party program, like the Chrome browser; in which case, the .desktop file should include the following code:
[Desktop Entry]
Name=Chrome
Exec=chromium-browser - After that, hit CTRL + O to save the file, and then enter sudo reboot to restart the Pi
Use External USB Disk in Raspberry Pi
It had better to store all of your images to your external USD disk. Here are steps to configure your Raspberry Pi to use your external USB disk.
1. – Plug In The Device
The first step is to plug in your USB stick. If you are using a mouse and keyboard you will need a decent USB hub at this point. (e.g. the PiHub by Pimoroni).
2. – Identify The Devices Unique ID
In order to find the unique reference (UUID) for your drive run the following command in the terminal :
ls -l /dev/disk/by-uuid/
This will give you an output that should list your drive :
The line will usually refer to “/sda” and in this example it is “sda1”. My ID is “18A9-9943”. Note down yours.
You would need to repeat this step if you wanted to use a different device as the UUID would be different.
3. – Create a Mount Point
A mount point is a directory that will point to the contents of your flash drive. Create a suitable folder :
sudo mkdir /media/usb
I’m using “usb” but you can give it whatever name you like. Keep it short as it saves typing later on. Now we need to make sure the Pi user owns this folder :
sudo chown -R pi:pi /media/usb
You will only need to do this step once.
4. – Manually Mount The Drive
To manually mount the drive use the following command :
sudo mount /dev/sda1 /media/usb -o uid=pi,gid=pi
This will mount the drive so that the ordinary Pi user can write to it. Omitting the “-o uid=pi,gid=pi” would mean you could only write to it using “sudo”.
Now you can read, write and delete files using “/media/usb” as a destination or source without needing to use sudo.
5. – Un-mounting The Drive
You don’t need to manually un-mount if you shutdown your Pi but if you need to remove the drive at any other time you should un-mount it first. Only the user that mounted the drive can un-mount it.
umount /media/usb
If you used the fstab file to auto-mount it you will need to use :
sudo umount /media/usb
If you are paying attention you will notice the command is “umount” NOT “unmount”!
6. – Auto Mount
When you restart your Pi your mounts will be lost and you will need to repeat Step 4. If you want your USB drive to be mounted when the system starts you can edit the fstab file :
sudo nano /etc/fstab
Then add the following line at the end :
UUID=18A9-9943 /media/usb vfat auto,nofail,noatime,users,rw,uid=pi,gid=pi 0 0
Note: 18A9-9943 is just an example. You will need to use the UUID you got from step 2 to replace this example UUID.
The “nofail” option allows the boot process to proceed if the drive is not plugged in. The “noatime” option stops the file access time being updated every time a file is read from the USB stick. This helps improve performance.
You can find out my UUID from following terminal output and how my fstab file looks like:
root@raspberrypi:/mnt# ls -l /dev/disk/by-uuid/
total 0
lrwxrwxrwx 1 root root 10 Jan 13 16:05 081B-C63A -> ../../sda1
lrwxrwxrwx 1 root root 15 Jan 12 14:06 1232a209-2596-48f0-a078-731d10b918ad -> ../../mmcblk0p2
lrwxrwxrwx 1 root root 15 Jan 12 14:06 E183-6233 -> ../../mmcblk0p1
root@raspberrypi:/mnt# mkdir /media/usb
root@raspberrypi:/mnt# chown -R pi:pi /media/usb
root@raspberrypi:/mnt# nano /etc/fstab
root@raspberrypi:/mnt# mount /dev/sda1 /media/usb -o uid=pi,gid=pi
root@raspberrypi:/mnt# cd /media/usb
root@raspberrypi:/media/usb# mkdir pictures
root@raspberrypi:/media/usb# ls
pictures
root@raspberrypi:/media/usb# reboot
FSTAB file:
pi@raspberrypi:~ $ cat /etc/fstab
proc            /proc           proc    defaults          0       0
PARTUUID=180bcbb8-01  /boot           vfat    defaults          0       2
PARTUUID=180bcbb8-02  /               ext4    defaults,noatime  0       1
# a swapfile is not a swap partition, no line here
#   use  dphys-swapfile swap[on|off]  for that
UUID=081B-C63A /media/usb vfat auto,nofail,noatime,users,rw,uid=pi,gid=pi 0 0
pi@raspberrypi:~ $
Make sure you set the correct UUID. Use CTRL-X followed by Y to save and exit the nano editor.
Now reboot :
sudo reboot
Your USB drive should be auto-mounted and available as “/media/usb”.
An Extra Note About File Systems
In the examples above I specified “vfat” as the file system of the device as it was formatted as FAT32. If you need to change the file system replace references of “vfat” with “ntfs-3g”, “ext3” or “ext4”.
If you are using NTFS you will also need to install the following package :
sudo apt-get install ntfs-3g
feh open http files from Internet
You can also view images over any http or ftp URL by giving the URL as an argument, like so:
$ feh http://www.glerl.noaa.gov/pubs/photogallery/Scenic/images/0534.jpg
If you have a file that contains a list of image URLs, you can have feh display them in a random-order slideshow, with a delay of 30 seconds each, with this command:
$ cat image-urls | xargs feh -z -D30
Using feh open https files from Internet
For one https url:
curl -sk https://domain.tld/path/to/image.png | feh -
The dash here will have feh read the image data from the standard input. With this trick, you can let the "downloading" part to curl (which is what feh uses internally anyway) and pipe everything to feh for display. You're basically splitting what feh combines back into two parts, in order to enjoy the full set of options and features of each component.
For multiple URLs
feh will not be able to distinguish between several images sent on its standard input, unless some kind of "protocol" is implemented.
If you don't want to use temporary files, you could maybe use a loop:
for url in 'url1' 'url2'; do
    curl -skb token "$url" | feh -
done
This will download and display each image one after the other. If you'd rather have several viewers opened at the "same time", add a little ampersand to it:
for url in 'url1' 'url2'; do
    (curl -skb token "$url" | feh - &)
done
Note that you can put everything on a single line, or maybe define a function:
$ for url in 'url1' 'url2'; do curl -skb token "$url" | feh -; done
$ for url in 'url1' 'url2'; do (curl -skb token "$url" | feh - &); done

function feh_urls
{
    for url; do
        curl -skb token "$url" | feh -
    done
}

$ feh_urls 'url1' 'url2'
Be careful with your quotes, as there may be some annoying spaces in your URLs or paths (... and I hope I didn't make such a mistake in the above examples...). If you go for a function, maybe add it to your .bashrc so you can use it in your shell without redefining it manually everytime.
For the sake of completeness, here is a little script (which could be made a function of course) involving some temporary files, saving a few curl and feh processes on the way. I am using wget instead of curl because depending on your version, you might not be able to grab remote filenames properly (you could give your images different names of course).
#!/bin/bash

img_dir=$(mktemp -d)
cd $img_dir
wget -q --no-check-certificate --load-cookie token "$@"
feh $img_dir/*
rm -r $img_dir
Usage:
$ ./feh_urls.sh 'url1' 'url2'
Note that the advantage here is that feh doesn't get spawned several times, and can load all the images at once (use the arrow keys to browse them).


No comments:
Post a Comment