- Register Free Qualys Community Edition For Your Own Cloud Vulnerability Scan
- Register Free Nessus Scanner Essentials and Execute a Vulnerability Scan
- OpenVAS Virtual Appliance / GreenBone Installation
- Install OpenVAS on Ubuntu
- Metasploit Installation on Windows 7 and 10
- AWVS (Acunetix Web Vulnerability Scanner) Docker Installation
Features
Nessus Essentials is designed to be used by students, professors and people who are starting their cybersecurity careers to help the next generation to quickly and easily master vulnerability assessment and hone their skills. Every feature makes vulnerability assessment simple, easy and intuitive. With Nessus, you’ll spend less time and effort assessing, prioritizing and remediating vulnerabilities so you can stay one step ahead of attackers.Nessus Essentials does not allow you to perform compliance checks or content audits, Live Results or use the Nessus virtual appliance.
- Unlimited IT assessments
- Use anywhere
- Configuration assessment
- Live results
- Configurable reports
- Community support
- Advanced support (available as an option)
- On-demand training available
External Attack Surface ScanningAbility to add domainsScan Cloud Infrastructure500 prebuilt scanning policies
- https://greenbone.github.io/docs/latest/
- https://app.greenbone.cloud/ui/extern/register/free
Register for an Activation Code
Note: The Activation code provided for Nessus Essentials is for one time use only. If Nessus needs to be reinstalled, a new activation code must be obtained. Offline activation and plugin updates are supported.
Dwonload and Installation
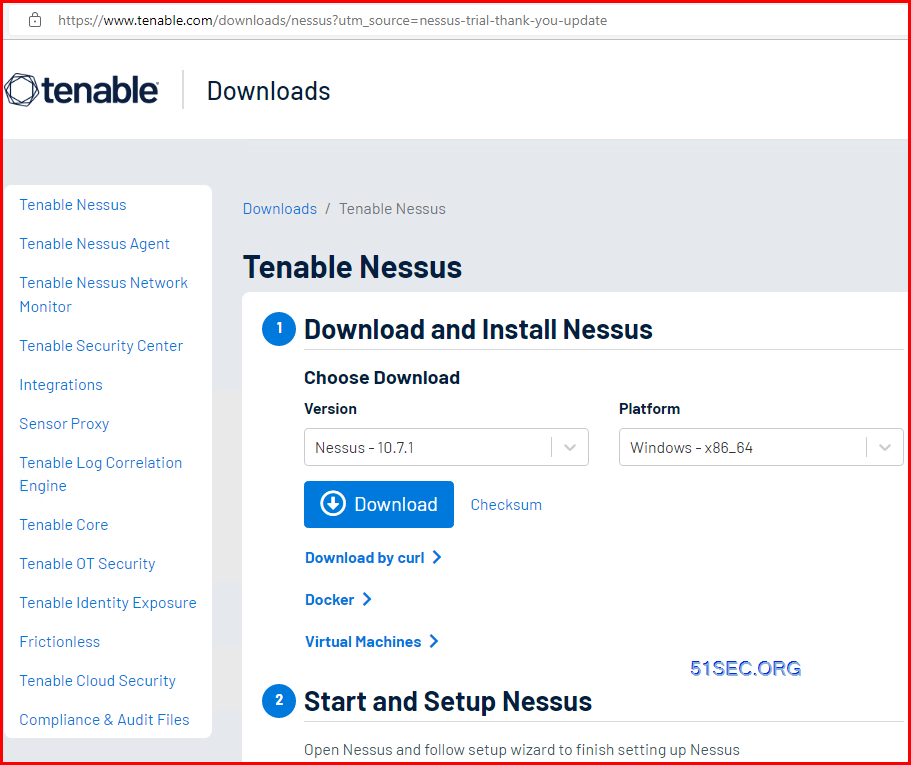
- Navigate to the folder where you downloaded the Nessus installer.
- Next, double-click the file name to start the installation process.
Complete the Windows InstallShield Wizard
- First, the Welcome to the InstallShield Wizard for Tenable, Inc. Nessus screen appears. Select Next to continue.
- On the License Agreement screen, read the terms of the Tenable, Inc. Nessus software license and subscription agreement.
- Select the I accept the terms of the license agreement option, and then click Next.
- On the Destination Folder screen, select the Next button to accept the default installation folder. Otherwise, select the Change button to install Nessus to a different folder.
- On the Ready to Install the Program screen, select the Install button.
The Installing Tenable, Inc. Nessus screen appears and a Status indication bar shows the installation progress. The process may take several minutes.
After the InstallShield Wizard completes, the Welcome to Nessus page loads in your default browser.
Configure Nessus
When you access Nessus in a browser, a warning appears to regard a connection privacy problem, an untrusted site, an unsecure connection, or a related security certificate issue. This is normal behavior. Nessus provides a self-signed SSL certificate.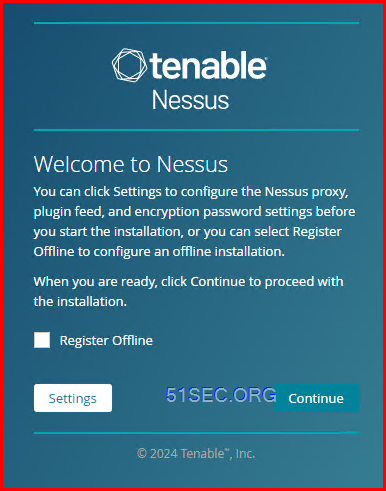
On the Welcome to Nessus screen, select how you want to install Nessus:
- Nessus Essentials — The free version of Nessus for educators, students, and hobbyists.
- Nessus Professional — The de-facto industry standard vulnerability assessment solution for security practitioners.
- Nessus Expert — The industry leading vulnerability assessment solution for the modern attack surface.
- Nessus Manager — The enterprise solution for managing Nessus Agents at scale.
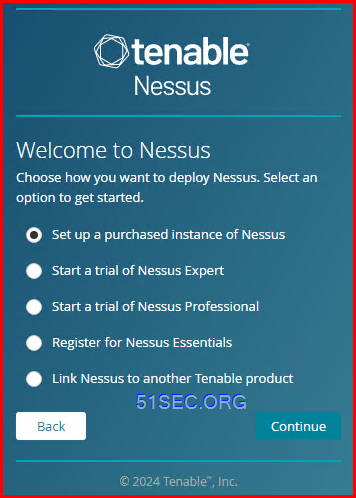
Click Continue.
If you selected Nessus Professional, Nessus Expert, or Nessus Manager, the Register Nessus screen appears.
If you selected Nessus Essentials, the Get an activation code screen appears.
If you selected Nessus Essentials, do one of the following:
- If you need an activation code:
- On the Get an activation code screen, type your name and email address.
- Click Email.
- Check your email for your free activation code.
- If you already have an activation code, click Skip.
- If you need an activation code:
On the Register Nessus screen, type your Activation Code.
The Activation Code is the code you obtained from your activation email or from the Tenable Downloads Page.
Click Continue.
The Create a user account screen appears.
- Create a Nessus administrator user account that you use to log in to Nessus:
- In the Username box, enter a username.
In the Password box, enter a password for the user account.
Note: Passwords cannot contain Unicode characters.
Click Submit.
Nessus finishes the configuration process, which may take several minutes.
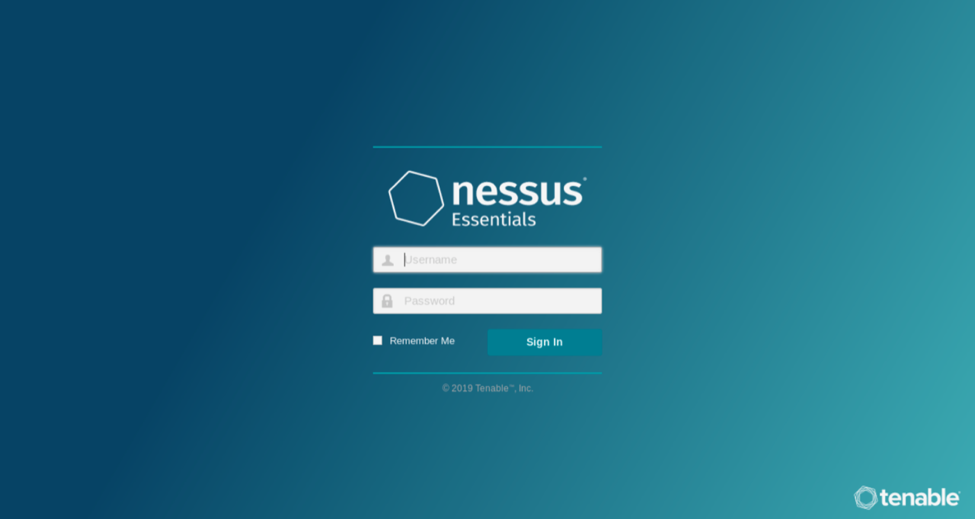
Using the administrator user account you created, Sign In to Nessus.
Note: When you sign in to Nessus for the first time, you receive the following message: "Plugins are compiling. Nessus functionality will be limited until compilation is complete." You cannot create scans, view policies or plugin rules, or use the upgrade assistant while Nessus compiles plugins.
Others

GCE 6.0.10:
- Download Greenbone Community Edition - gsm-ce-6.0.10.iso
- Installation Guide: https://infosecindustries.com/downloads/GCE-Instructions-for-Installation.pdf
Nessus Profession / Expert
- Tenable Vulnerability Management - Subscription - based license
- Tenable Nessus Professional
- Tenable Nessus Expert
- Tenable Nessus Manager (no longer sold after Feb 1, 2018)
- https://www.tenable.com/downloads/nessus?utm_source=nessus-trial-thank-you-update&loginAttempted=true
- https://docs.tenable.com/nessus/Content/GettingStarted.htm
Upgarde Nessus to Professional version
Note:同时对于新版本的Nessus,Tenable在软件及插件包中均加入了暗桩,导致即便用户进行破解后,软件也会自动删除插件包,使得用户无法正常进行主机扫描;因此需要进行一定的权限设置,阻止其进行此操作。Install Nessus
Nessus 安装
下载好安装包Nessus-8.8.0-x64.msi后,windows系统直接双击安装即可。
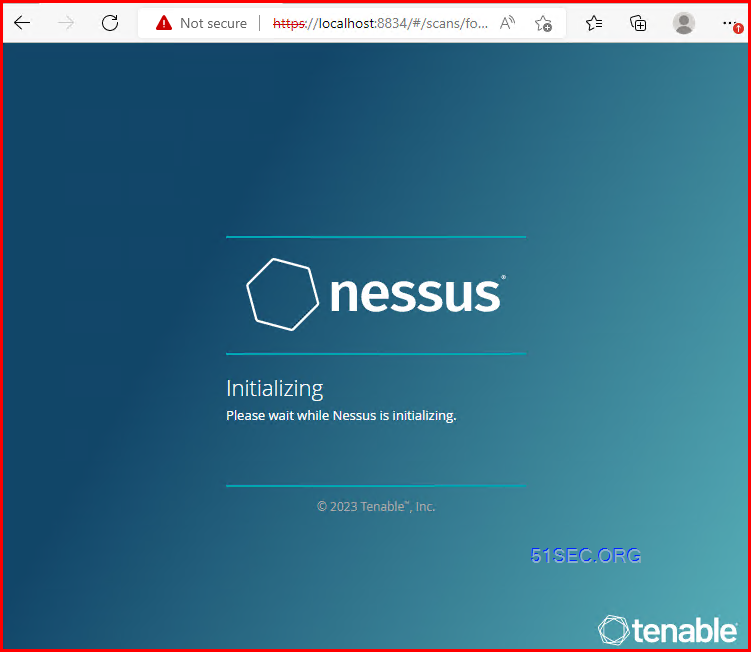
安装完成后进行系统设置,打开访问网址 https://127.0.0.1:8834,初始化扫描器。
根据提示步骤,选择 Managed Scanner
再选择 Tenable.sc
最后,点击继续,创建账号密码即可登录。
更新漏洞库
首先注册Nessus账号
之后会收到一封邮箱邮件,复制邮件里的 Activation Code 值
C:\Program Files\Tenable\Nessus>nessuscli.exe update all-2.0.tar.gz

[info] Copying templates version 202305231342 to C:\ProgramData\Tenable\Nessus\nessus\templates\tmp
[info] Finished copying templates.
[info] Moved new templates with version 202305231342 from plugins dir.
[info] Moved new pendo client with version 21691 from plugins dir.
 * Update successful.  The changes will be automatically processed by Nessus.
由于本人仅在Windows使用,因此只介绍Win版本方案,其他OS同理。
- 前往官网下载对应的安装包并进行安装即可。
- 下载安装完毕后打开对应的网址,选择
Managed Scanner,再选择Tenable.sc,接下来设置你的用户名和密码,等待短暂的校验后进行主页面。 - 以管理员身份打开
CMD,输入net stop "Tenable Nessus"结束服务。 - 前往官网申请用于普通用户的激活码。
- 在
CMD中键入"C:\Program Files\Tenable\Nessus\nessuscli.exe" fetch --challenge获取申请码。 - 访问官网分别填入上一步获取到的申请码与邮箱收到的激活码,获取下载链接并下载插件包。
- 将下载到的插件包放入
C:\ProgramData\Tenable\Nessus\nessus目录下。 - CMD执行以下命令:
- 待执行完成后,打开
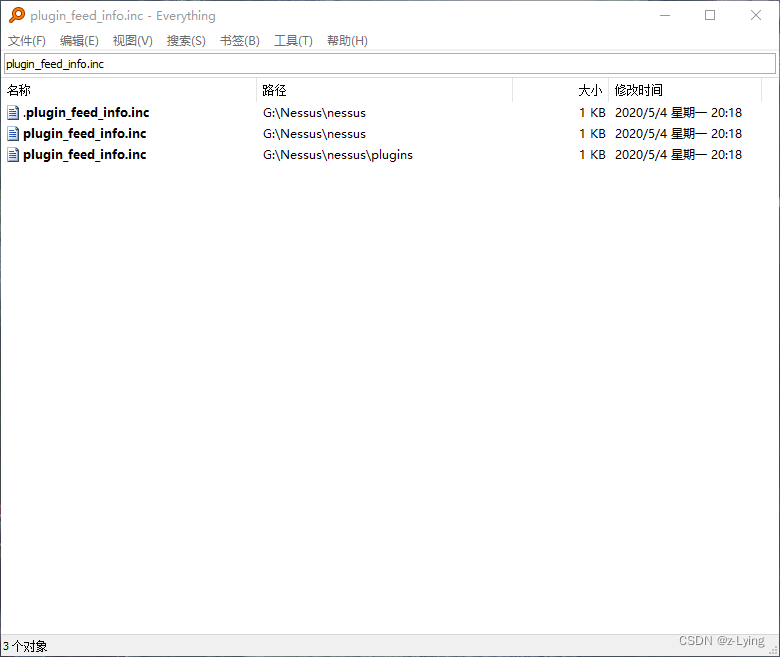
C:\ProgramData\Tenable\Nessus\nessus\目录,将plugin_feed_info.inc中的PLUGIN_FEED = "HomeFeed (Non-commercial use only)";替换为PLUGIN_FEED = "ProfessionalFeed (Direct)";并保存。 CMD中执行以下命令:
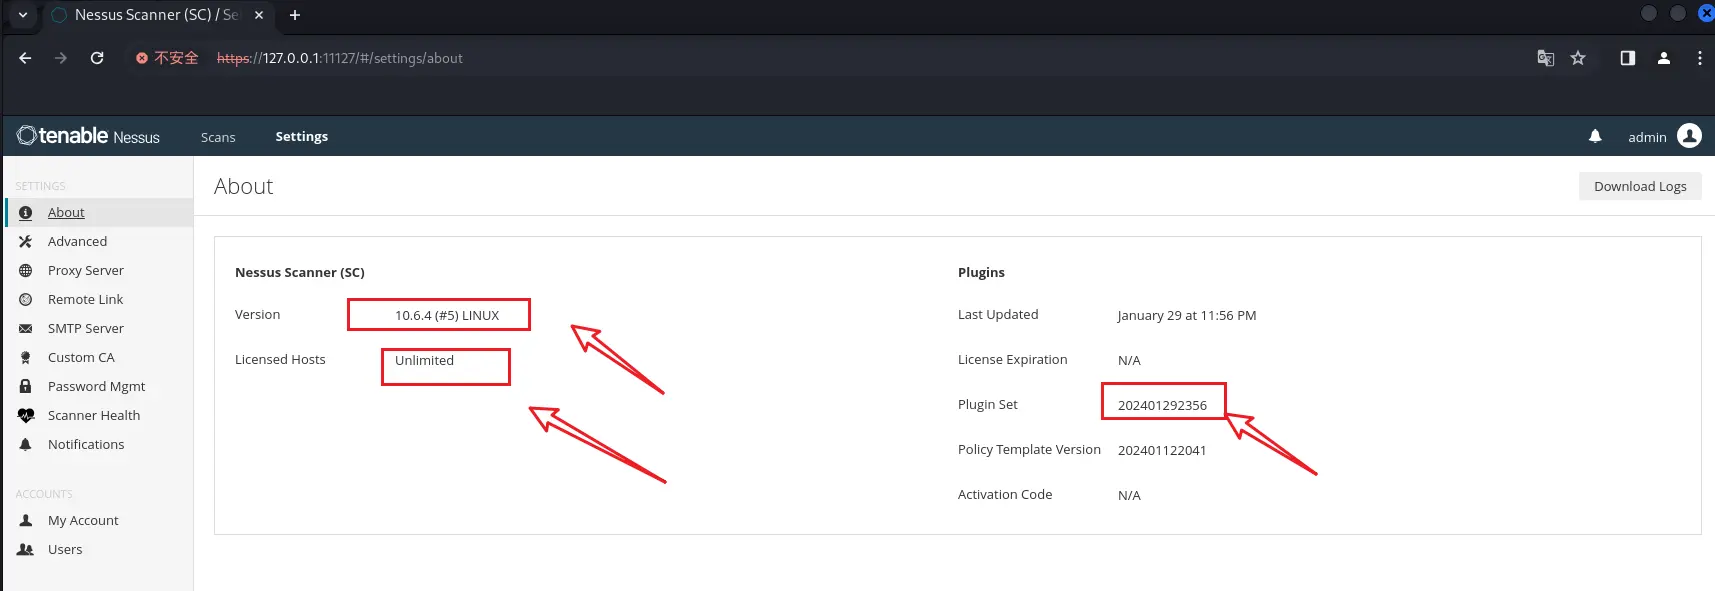
- 打开Nessus面板,待插件编译完成后,进入
Settings,Licensed Hosts为Unlimited即已成功。 - 后续更新插件包时重复3-11操作即可。
Nessus 破解
- C:\ProgramData\Tenable\Nessus\nessus\plugin_feed_info.inc
- C:\ProgramData\Tenable\Nessus\nessus\plugins\plugin_feed_info.inc
- PLUGIN_SET = "202305231342";
- PLUGIN_FEED = "ProfessionalFeed (Direct)";
- PLUGIN_FEED_TRANSPORT = "Tenable Network Security Lightning";
attrib +s +r +h “E:\software\nessus\nessus\plugins\*.*”
attrib +s +r +h “E:\software\nessus\nessus\plugin_feed_info.inc”
attrib -s -r -h “E:\software\nessus\nessus\plugins\plugin_feed_info.inc”
解决办法为:
首先nessus.license在安装目录,
以管理员权限开启cmd跳转至安装目录
使用命令:
nessuscli.exe fetch --register-offline nessus.license
激活Nessus
注意事项
Videos
Nessus 破解版+2024插件
安装脚本适用于debian系统,可在kali linux上成功安装。适用于Ubuntu系统的可在文章末尾下载。
Nessus版本:10.6.4
插件版本:202401292356
安装方法
【1】下载nessus.sh脚本。
下载地址:
nessus.sh
或直接复制如下代码保存为nessus.sh
#!/bin/bash
if [[ $(id -u) -ne 0 ]] ; then echo "请使用 root 用户运行" ; exit 1 ; fi
echo //==============================================================
echo   Nessus 最新版本下载、安装和破解   -Zen 20230819
echo   特别感谢 John Doe 在 Debian 上演示这一操作的有效性
echo   感谢 369 提供关于 "latest" 的提示
echo //==============================================================
echo " + 增加了防滑附加功能,移除所有 chattr 设置 20231013"
chattr -i -R /opt/nessus
echo " + 确保我们有先决条件.."
apt update &>/dev/null
apt -y install curl dpkg expect &>/dev/null
echo " + 停止旧的 nessusd 服务,以防存在一个!"
/bin/systemctl stop nessusd.service &>/dev/null
echo " + 下载 Nessus.."
curl -A Mozilla --request GET \
  --url 'https://www.tenable.com/downloads/api/v2/pages/nessus/files/Nessus-latest-debian10_amd64.deb' \
  --output 'Nessus-latest-debian10_amd64.deb' &>/dev/null
{ if [ ! -f Nessus-latest-debian10_amd64.deb ]; then
  echo " + Nessus 下载失败 :/ 退出。从 t.me/pwn3rzs 获取拷贝"
  exit 0
fi }
echo " + 安装 Nessus.."
dpkg -i Nessus-latest-debian10_amd64.deb &>/dev/null
# 看,我试图只是进行更改和运行,但它不起作用。如果你能优化我的操作,让我知道。但对我来说,这是唯一需要运行的 :/
echo " + 第一次初始化时启动服务(必须执行)"
/bin/systemctl start nessusd.service &>/dev/null
echo " + 让 Nessus 初始化,等待大约 20 秒..."
sleep 20
echo " + 停止 nessus 服务.."
/bin/systemctl stop nessusd.service &>/dev/null
echo " + 更改 nessus 设置为 Zen 偏好(自由战士模式)"
echo "   监听端口: 11127"
/opt/nessus/sbin/nessuscli fix --set xmlrpc_listen_port=11127 &>/dev/null
echo "   主题: 暗色"
/opt/nessus/sbin/nessuscli fix --set ui_theme=dark &>/dev/null
echo "   安全检查: 关闭"
/opt/nessus/sbin/nessuscli fix --set safe_checks=false &>/dev/null
echo "   日志: 性能"
/opt/nessus/sbin/nessuscli fix --set backend_log_level=performance &>/dev/null
echo "   更新: 关闭"
/opt/nessus/sbin/nessuscli fix --set auto_update=false &>/dev/null
/opt/nessus/sbin/nessuscli fix --set auto_update_ui=false &>/dev/null
/opt/nessus/sbin/nessuscli fix --set disable_core_updates=true &>/dev/null
echo "   遥测: 关闭"
/opt/nessus/sbin/nessuscli fix --set report_crashes=false &>/dev/null
/opt/nessus/sbin/nessuscli fix --set send_telemetry=false &>/dev/null
echo " + 添加一个用户,稍后可以更改(用户名:admin, 密码:ddosi)"
cat > expect.tmp<<'EOF'
spawn /opt/nessus/sbin/nessuscli adduser admin
expect "登录密码:"
send "ddosi\r"
expect "登录密码(再次输入):"
send "ddosi\r"
expect "*(可以上传插件等)? (y/n)*"
send "y\r"
expect "*(用户可以有一个空的规则集)"
send "\r"
expect "是否确定*"
send "y\r"
expect eof
EOF
expect -f expect.tmp &>/dev/null
rm -rf expect.tmp &>/dev/null
echo " + 下载新的插件.."
curl -A Mozilla -o all-2.0.tar.gz \
  --url 'https://plugins.nessus.org/v2/nessus.php?f=all-2.0.tar.gz&u=4e2abfd83a40e2012ebf6537ade2f207&p=29a34e24fc12d3f5fdfbb1ae948972c6' &>/dev/null
{ if [ ! -f all-2.0.tar.gz ]; then
  echo " + 插件 all-2.0.tar.gz 下载失败 :/ 退出。从 t.me/pwn3rzs 获取拷贝"
  exit 0
fi }
echo " + 安装插件.."
/opt/nessus/sbin/nessuscli update all-2.0.tar.gz &>/dev/null
echo " + 获取版本号.."
# 我曾经看到这个对于下载不正确。嗯,但对我来说它有效。
vernum=$(curl https://plugins.nessus.org/v2/plugins.php 2> /dev/null)
echo " + 构建插件 feed..."
cat > /opt/nessus/var/nessus/plugin_feed_info.inc <<EOF
PLUGIN_SET = "${vernum}";
PLUGIN_FEED = "ProfessionalFeed (Direct)";
PLUGIN_FEED_TRANSPORT = "Tenable Network Security Lightning";
EOF
echo " + 保护文件.."
chattr -i /opt/nessus/lib/nessus/plugins/plugin_feed_info.inc &>/dev/null
cp /opt/nessus/var/nessus/plugin_feed_info.inc /opt/nessus/lib/nessus/plugins/plugin_feed_info.inc &>/dev/null
echo " + 设置所有文件为不可变..."
chattr +i /opt/nessus/var/nessus/plugin_feed_info.inc &>/dev/null
chattr +i -R /opt/nessus/lib/nessus/plugins &>/dev/null
echo " + 但是取消关键文件的不可变性.."
chattr -i /opt/nessus/lib/nessus/plugins/plugin_feed_info.inc &>/dev/null
chattr -i /opt/nessus/lib/nessus/plugins  &>/dev/null
echo " + 启动服务.."
/bin/systemctl start nessusd.service &>/dev/null
echo " + 再等待 20 秒以便服务器有足够的时间启动!"
sleep 20
echo " + 监控 Nessus 进度。以下行每 10 秒更新一次直到 100%"
zen=0
while [ $zen -ne 100 ]
do
 statline=`curl -sL -k https://localhost:11127/server/status|awk -F"," -v k="engine_status" '{ gsub(/{|}/,""); for(i=1;i<=NF;i++) { if ( $i ~ k ){printf $i} } }'`
 if [[ $statline != *"engine_status"* ]]; then echo -ne "\n 问题:Nessus 服务器无法访问?再次尝试..\n"; fi
 echo -ne "\r $statline"
 if [[ $statline == *"100"* ]]; then zen=100; else sleep 10; fi
done
echo -ne '\n  o 完成!\n'
echo
echo "        访问 Nessus:  https://localhost:11127/ (或您的 VPS IP)"
echo "                             用户名: admin"
echo "                             密码: ddosi"
echo "                             随时可以更改"
echo
read -p "按 Enter 键继续"
【2】授予执行权限
chmod +x nessus.sh
【3】使用root账号执行nessus.sh(请耐心等待)大约10-15分钟。
./nessus.sh【4】安装完毕如图所示

【5】打开如下网页即可访问Nessus。
https://127.0.0.1:11127/ or https://<IP Address>:11127
【6】使用账号密码登录
| 账号 | 密码 |
| admin | ddosi |

Nessus启动与停止命令
启动
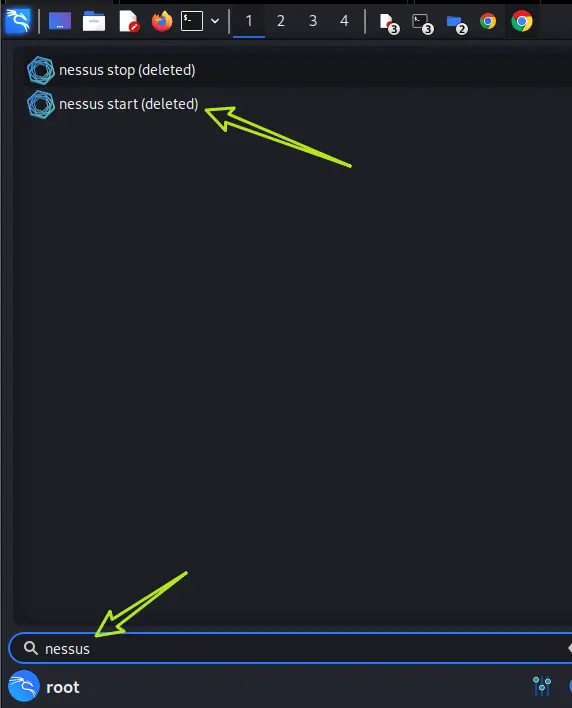
sudo systemctl start nessusd && systemctl --no-pager status nessusd或直接搜索Nessus,点击nessus start即可
停止
sudo systemctl stop nessusd && systemctl --no-pager status nessusd或直接搜索Nessus,点击nessus stop即可.
卸载方法
【1】停止Nessus服务。
sudo systemctl stop nessusd && systemctl --no-pager status nessusd【2】修改/opt/nessus/文件夹属性
chattr -i -R /opt/nessus/【3】卸载Nessus
apt remove nessus注意事项
问题:在系统或Nessus重启后,扫描按钮可能出现暂时不能用的情况。
原因:Nessus在重新配置插件。
解决办法:耐心等待3~5分钟即可。
Nessus破解版【适用于Ubuntu系统】
操作方法和上面的一样。
下载地址:
或直接复制如下代码保存为nessus_ubuntu.sh
#!/bin/bash
if [[ $(id -u) -ne 0 ]] ; then echo "Please run as root" ; exit 1 ; fi
echo //==============================================================
echo   Nessus latest DOWNLOAD, INSTALL, and CRACK   -Zen 20230819
echo   special thanks to John Doe for showing this works on Debian
echo   THANKS 369 for tip about LATEST as a version number
echo //==============================================================
echo " o antiskid extra thing added removing all chattr 20231013"
chattr -i -R /opt/nessus
echo " o making sure we have prerequisites.."
apt update &>/dev/null
apt -y install curl dpkg expect &>/dev/null
echo " o stopping old nessusd in case there is one!"
/bin/systemctl stop nessusd.service &>/dev/null
echo " o downloading Nessus.."
curl -A Mozilla --request GET \
  --url 'https://www.tenable.com/downloads/api/v2/pages/nessus/files/Nessus-latest-ubuntu1404_amd64.deb' \
  --output 'Nessus-latest-ubuntu1404_amd64.deb' &>/dev/null
{ if [ ! -f Nessus-latest-ubuntu1404_amd64.deb ]; then
  echo " o nessus download failed :/ exiting. get copy of it from t.me/pwn3rzs"
  exit 0
fi }
echo " o installing Nessus.."
dpkg -i Nessus-latest-ubuntu1404_amd64.deb &>/dev/null
# look I tried to just make changes and run but it doesnt work. if you can optimize
# what im doing here, let me know.  but this was it for me, it had to be run once :/
echo " o starting service once FIRST TIME INITIALIZATION (we have to do this)"
/bin/systemctl start nessusd.service &>/dev/null
echo " o let's allow Nessus time to initalize - we'll give it like 20 seconds..."
sleep 20
echo " o stopping the nessus service.."
/bin/systemctl stop nessusd.service &>/dev/null
echo " o changing nessus settings to Zen preferences (freedom fighter mode)"
echo "   listen port: 11127"
/opt/nessus/sbin/nessuscli fix --set xmlrpc_listen_port=11127 &>/dev/null
echo "   theme:       dark"
/opt/nessus/sbin/nessuscli fix --set ui_theme=dark &>/dev/null
echo "   safe checks: off"
/opt/nessus/sbin/nessuscli fix --set safe_checks=false &>/dev/null
echo "   logs:        performance"
/opt/nessus/sbin/nessuscli fix --set backend_log_level=performance &>/dev/null
echo "   updates:     off"
/opt/nessus/sbin/nessuscli fix --set auto_update=false &>/dev/null
/opt/nessus/sbin/nessuscli fix --set auto_update_ui=false &>/dev/null
/opt/nessus/sbin/nessuscli fix --set disable_core_updates=true &>/dev/null
echo "   telemetry:   off"
/opt/nessus/sbin/nessuscli fix --set report_crashes=false &>/dev/null
/opt/nessus/sbin/nessuscli fix --set send_telemetry=false &>/dev/null
echo " o adding a user you can change this later (u:admin,p:ddosi)"
cat > expect.tmp<<'EOF'
spawn /opt/nessus/sbin/nessuscli adduser admin
expect "Login password:"
send "ddosi\r"
expect "Login password (again):"
send "ddosi\r"
expect "*(can upload plugins, etc.)? (y/n)*"
send "y\r"
expect "*(the user can have an empty rules set)"
send "\r"
expect "Is that ok*"
send "y\r"
expect eof
EOF
expect -f expect.tmp &>/dev/null
rm -rf expect.tmp &>/dev/null
echo " o downloading new plugins.."
curl -A Mozilla -o all-2.0.tar.gz \
  --url 'https://plugins.nessus.org/v2/nessus.php?f=all-2.0.tar.gz&u=4e2abfd83a40e2012ebf6537ade2f207&p=29a34e24fc12d3f5fdfbb1ae948972c6' &>/dev/null
{ if [ ! -f all-2.0.tar.gz ]; then
  echo " o plugins all-2.0.tar.gz download failed :/ exiting. get copy of it from t.me/pwn3rzs"
  exit 0
fi }
echo " o installing plugins.."
/opt/nessus/sbin/nessuscli update all-2.0.tar.gz &>/dev/null
echo " o fetching version number.."
# i have seen this not be correct for the download.  hrm. but, it works for me.
vernum=$(curl https://plugins.nessus.org/v2/plugins.php 2> /dev/null)
echo " o building plugin feed..."
cat > /opt/nessus/var/nessus/plugin_feed_info.inc <<EOF
PLUGIN_SET = "${vernum}";
PLUGIN_FEED = "ProfessionalFeed (Direct)";
PLUGIN_FEED_TRANSPORT = "Tenable Network Security Lightning";
EOF
echo " o protecting files.."
chattr -i /opt/nessus/lib/nessus/plugins/plugin_feed_info.inc &>/dev/null
cp /opt/nessus/var/nessus/plugin_feed_info.inc /opt/nessus/lib/nessus/plugins/plugin_feed_info.inc &>/dev/null
echo " o let's set everything immutable..."
chattr +i /opt/nessus/var/nessus/plugin_feed_info.inc &>/dev/null
chattr +i -R /opt/nessus/lib/nessus/plugins &>/dev/null
echo " o but unsetting key files.."
chattr -i /opt/nessus/lib/nessus/plugins/plugin_feed_info.inc &>/dev/null
chattr -i /opt/nessus/lib/nessus/plugins  &>/dev/null
echo " o starting service.."
/bin/systemctl start nessusd.service &>/dev/null
echo " o Let's sleep for another 20 seconds to let the server have time to start!"
sleep 20
echo " o Monitoring Nessus progress. Following line updates every 10 seconds until 100%"
zen=0
while [ $zen -ne 100 ]
do
 statline=`curl -sL -k https://localhost:11127/server/status|awk -F"," -v k="engine_status" '{ gsub(/{|}/,""); for(i=1;i<=NF;i++) { if ( $i ~ k ){printf $i} } }'`
 if [[ $statline != *"engine_status"* ]]; then echo -ne "\n Problem: Nessus server unreachable? Trying again..\n"; fi
 echo -ne "\r $statline"
 if [[ $statline == *"100"* ]]; then zen=100; else sleep 10; fi
done
echo -ne '\n  o Done!\n'
echo
echo "        Access your Nessus:  https://localhost:11127/ (or your VPS IP)"
echo "                             username: admin"
echo "                             password: ddosi"
echo "                             you can change this any time"
echo
read -p "Press enter to continue"
References
- Install Nessus on Windows
- Nessus Tutorials :https://ithelp.ithome.com.tw/articles/10239827
- https://cloud.tencent.com/developer/article/2148812
- https://blog.csdn.net/qq_38135115/article/details/128373124
- https://www.iculture.cc/topics/nessus


No comments:
Post a Comment