Scenario
Earlier, you gathered all possible information about the target such as organization information (employee details, partner details, web links, etc.), network information (domains, sub-domains, sub sub-domains, IP addresses, network topology, etc.), and system information (OS details, user accounts, passwords, etc.).
Now, as an ethical hacker, or as a penetration tester (hereafter, pen tester), your next step will be to perform port scanning and network scanning on the IP addresses that you obtained in the information-gathering phase. This will help you to identify an entry point into the target network.
Scanning itself is not the actual intrusion, but an extended form of reconnaissance in which the ethical hacker and pen tester learns more about the target, including information about open ports and services, OSes, and any configuration lapses. The information gleaned from this reconnaissance helps you to select strategies for the attack on the target system or network.
This is one of the most important phases of intelligence gathering, which enables you to create a profile of the target organization. In the process of scanning, you attempt to gather information, including the specific IP addresses of the target system that can be accessed over the network (live hosts), open ports, and respective services running on the open ports and vulnerabilities in the live hosts.
Port scanning will help you identify open ports and services running on specific ports, which involves connecting to Transmission Control Protocol (TCP) and User Datagram Protocol (UDP) system ports. Port scanning is also used to discover the vulnerabilities in the services running on a port.
The labs in this module will give you real-time experience in gathering information about the target organization using various network scanning and port scanning techniques.
Objective
The objective of this lab is to conduct network scanning, port scanning, analyzing the network vulnerabilities, etc.
Network scans are needed to:
- Check live systems and open ports
- Identify services running in live systems
- Perform banner grabbing/OS fingerprinting
- Identify network vulnerabilities
Overview of Scanning Networks
Network scanning is the process of gathering additional detailed information about the target by using highly complex and aggressive reconnaissance techniques. The purpose of scanning is to discover exploitable communication channels, probe as many listeners as possible, and keep track of the responsive ones.
Types of scanning:
- Port Scanning: Lists open ports and services
- Network Scanning: Lists the active hosts and IP addresses
- Vulnerability Scanning: Shows the presence of known weaknesses
Lab Tasks
Ethical hackers and pen testers use numerous tools and techniques to scan the target network. Recommended labs that will assist you in learning various network scanning techniques include:
Perform host discovery
- Perform host discovery using Nmap
Perform port and service discovery
- Explore various network scanning techniques using Nmap
Perform OS discovery
- Perform OS discovery using Nmap Script Engine (NSE)
Scan beyond IDS and Firewall
- Scan beyond IDS/firewall using various evasion techniques
Perform network scanning using various scanning tools
- Scan a target network using Metasploit
Perform Network Scanning using AI
- Scan a Target using ShellGPT
Lab 1: Perform Host Discovery
Lab Objectives
- Perform host discovery using Nmap
Overview of Host Discovery
Host discovery is considered the primary task in the network scanning process. It is used to discover the active/live hosts in a network. It provides an accurate status of the systems in the network, which, in turn, reduces the time spent on scanning every port on every system in a sea of IP addresses in order to identify whether the target host is up.
The following are examples of host discovery techniques:
- ARP ping scan
- UDP ping scan
- ICMP ping scan (ICMP ECHO ping, ICMP timestamp, ping ICMP, and address mask ping)
- TCP ping scan (TCP SYN ping and TCP ACK ping)
- IP protocol ping scan
Task 1: Perform Host Discovery using Nmap
Nmap is a utility used for network discovery, network administration, and security auditing. It is also used to perform tasks such as network inventory, managing service upgrade schedules, and monitoring host or service uptime.
Here, we will use Nmap to discover a list of live hosts in the target network. We can use Nmap to scan the active hosts in the target network using various host discovery techniques such as ARP ping scan, UDP ping scan, ICMP ECHO ping scan, ICMP ECHO ping sweep, etc.
4.
-PU: performs the UDP ping scan.
The UDP ping scan sends UDP packets to the target host; a UDP response means that the host is active. If the target host is offline or unreachable, various error messages such as “host/network unreachable” or “TTL exceeded” could be returned.
-PE: performs the ICMP ECHO ping scan.
The ICMP ECHO ping scan involves sending ICMP ECHO requests to a host. If the target host is alive, it will return an ICMP ECHO reply. This scan is useful for locating active devices or determining if the ICMP is passing through a firewall.
7. Now, we will perform an ICMP ECHO ping sweep to discover live hosts from a range of target IP addresses. Run nmap -sn -PE [Target Range of IP Addresses] command (here, the target range of IP addresses is 10.10.1.10-23). The scan results appear, indicating the target Host is up, as shown in the screenshot.
In this lab task, we are scanning Windows 11, Windows Server 2022, Windows Server 2019, and Android machines. If Android machine is down, navigate to the Resources tab and select Android. Click Power and Display icon from the top section of the page, from the drop-down options, select Reset/Reboot and click Yes.
The ICMP ECHO ping sweep is used to determine the live hosts from a range of IP addresses by sending ICMP ECHO requests to multiple hosts. If a host is alive, it will return an ICMP ECHO reply.
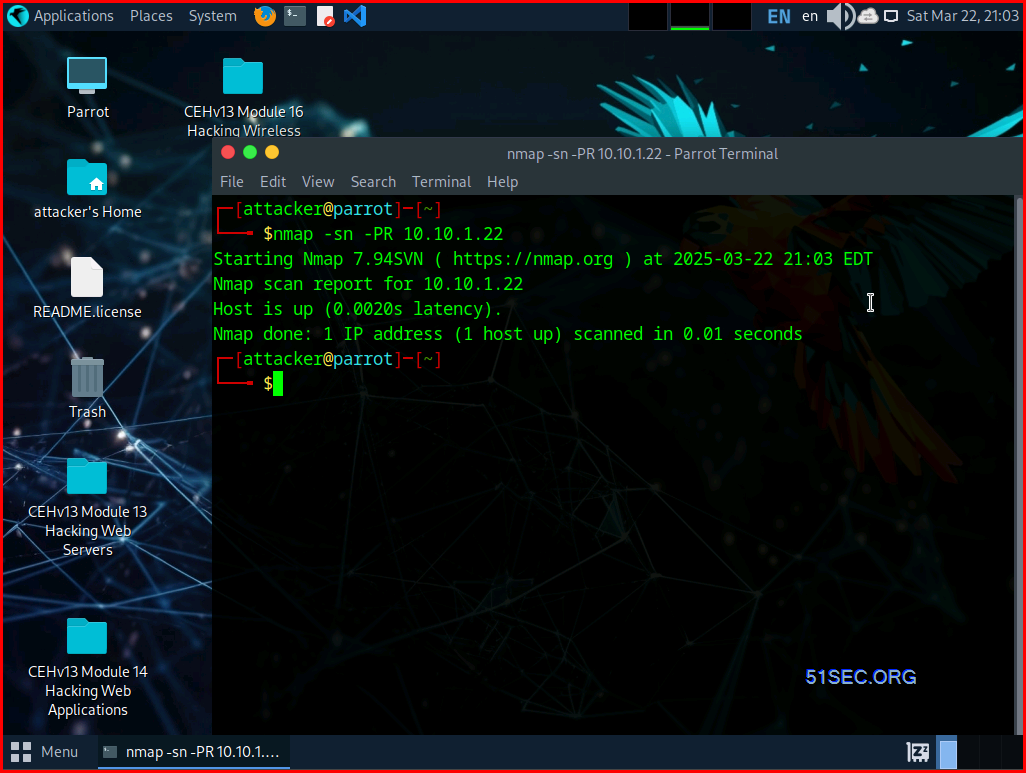
Run nmap -sn -PP [Target IP Address] command, (here, the target IP address is 10.10.1.22). The scan results appear, indicating the target Host is up, as shown in the screenshot.
-PP: performs the ICMP timestamp ping scan.
ICMP timestamp ping is an optional and additional type of ICMP ping whereby the attackers query a timestamp message to acquire the information related to the current time from the target host machine.
ICMP Address Mask Ping Scan: This technique is an alternative for the traditional ICMP ECHO ping scan, which are used to determine whether the target host is live specifically when administrators block the ICMP ECHO pings.
# nmap -sn -PM [target IP address]
TCP SYN Ping Scan: This technique sends empty TCP SYN packets to the target host, ACK response means that the host is active.
# nmap -sn -PS [target IP address]
TCP ACK Ping Scan: This technique sends empty TCP ACK packets to the target host; an RST response means that the host is active.
# nmap -sn -PA [target IP address]
IP Protocol Ping Scan: This technique sends different probe packets of different IP protocols to the target host, any response from any probe indicates that a host is active.
# nmap -sn -PO [target IP address]
This concludes the demonstration of discovering the target host(s) in the target network using various host discovery techniques.
Close all open windows and document all the acquired information.
Lab 2: Perform Port and Service Discovery
Lab Objectives
- Explore various network scanning techniques using Nmap
Overview of Port and Service Discovery
Port scanning techniques are categorized according to the type of protocol used for communication within the network.
- TCP Scanning
- Open TCP scanning methods (TCP connect/full open scan)
- Stealth TCP scanning methods (Half-open Scan, Inverse TCP Flag Scan, ACK flag probe scan, third party and spoofed TCP scanning methods)
- UDP Scanning
- SCTP Scanning
- SCTP INIT Scanning
- SCTP COOKIE/ECHO Scanning
- SSDP and List Scanning
- IPv6 Scanning
Task 1: Explore Various Network Scanning Techniques using Nmap
Nmap comes with various inbuilt scripts that can be employed during a scanning process in an attempt to find the open ports and services running on the ports. It sends specially crafted packets to the target host, and then analyzes the responses to accomplish its goal. Nmap includes many port scanning mechanisms (TCP and UDP), OS detection, version detection, ping sweeps, etc.
Here, we will use Nmap to discover open ports and services running on the live hosts in the target network.
Click Windows 11 to switch to the Windows 11 machine and login with Admin\Pa$$w0rd. Click windows Search icon (
 ) on the Desktop, search for zenmap in the search field and open the app.
The Zenmap appears; in the Command field, type nmap -sT -v [Target IP Address] (here, the target IP address is 10.10.1.22) and click Scan.
-sT: performs the TCP connect/full open scan and -v: enables the verbose output (include all hosts and ports in the output).
The scan results appear, displaying all the open TCP ports and services running on the target machine, as shown in the screenshot.
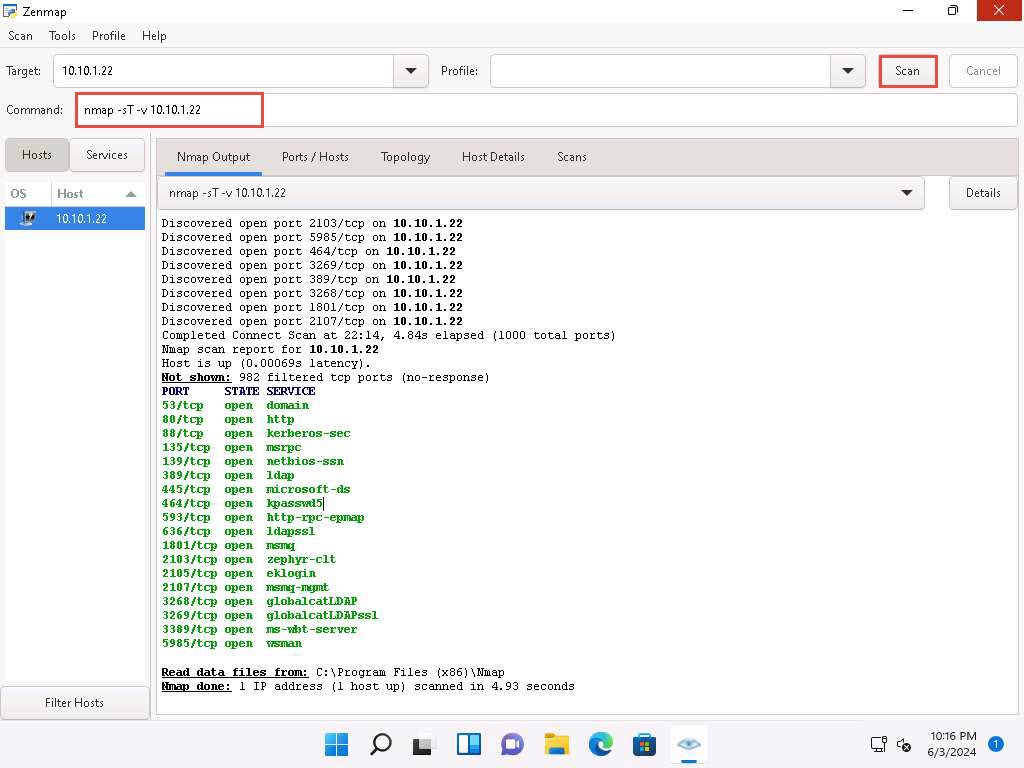
Click the Ports/Hosts tab to gather more information on the scan results. Nmap displays the Port, Protocol, State, Service, and Version of the scan.

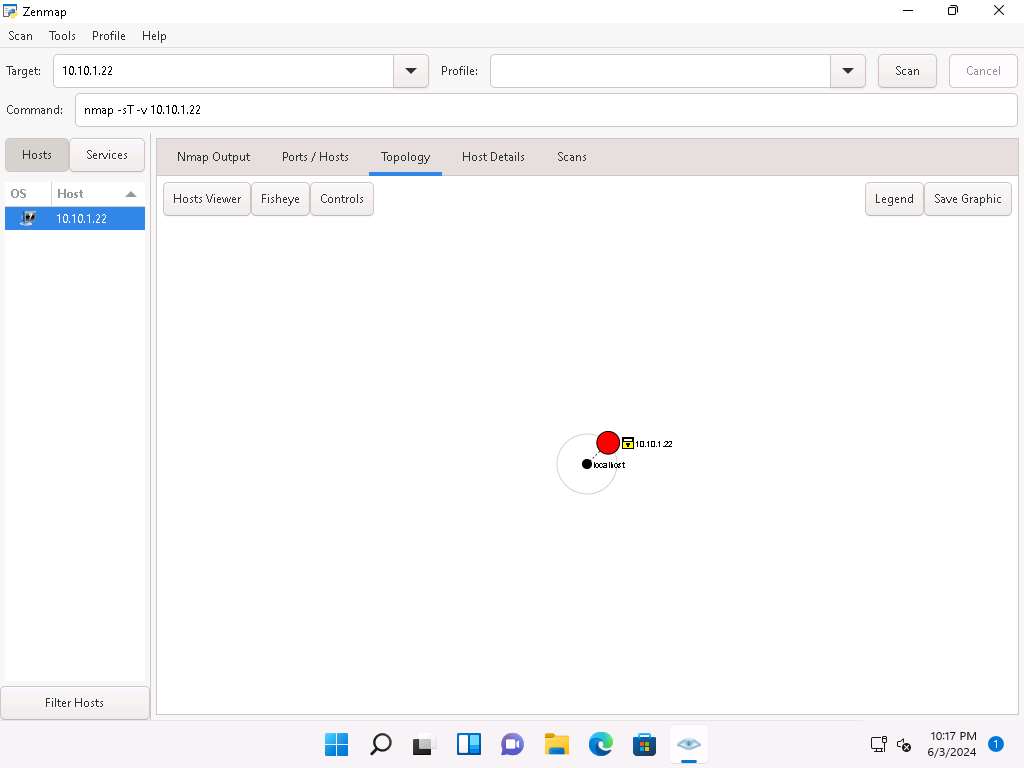
Click the Topology tab to view the topology of the target network that contains the provided IP address and click the Fisheye option to view the topology clearly.
In the same way, click the Host Details tab to view the details of the TCP connect scan.
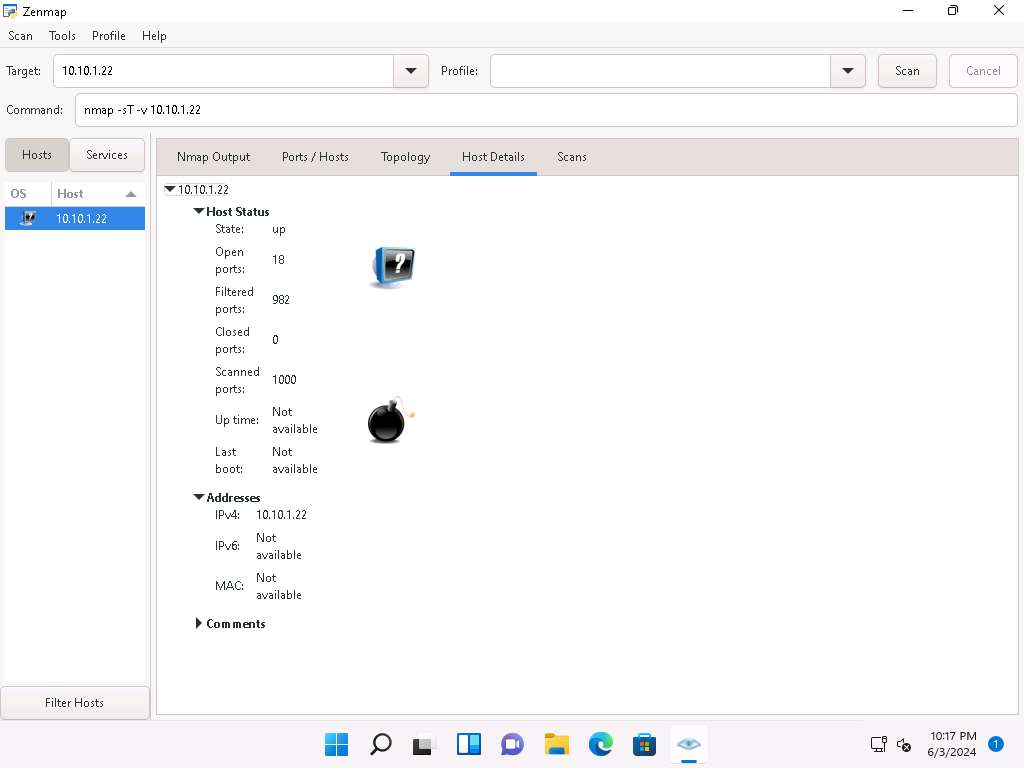
Click the Scans tab to view the command used to perform TCP connect/full open scan.
Click the Services tab located in the left pane of the window. This tab displays a list of services.
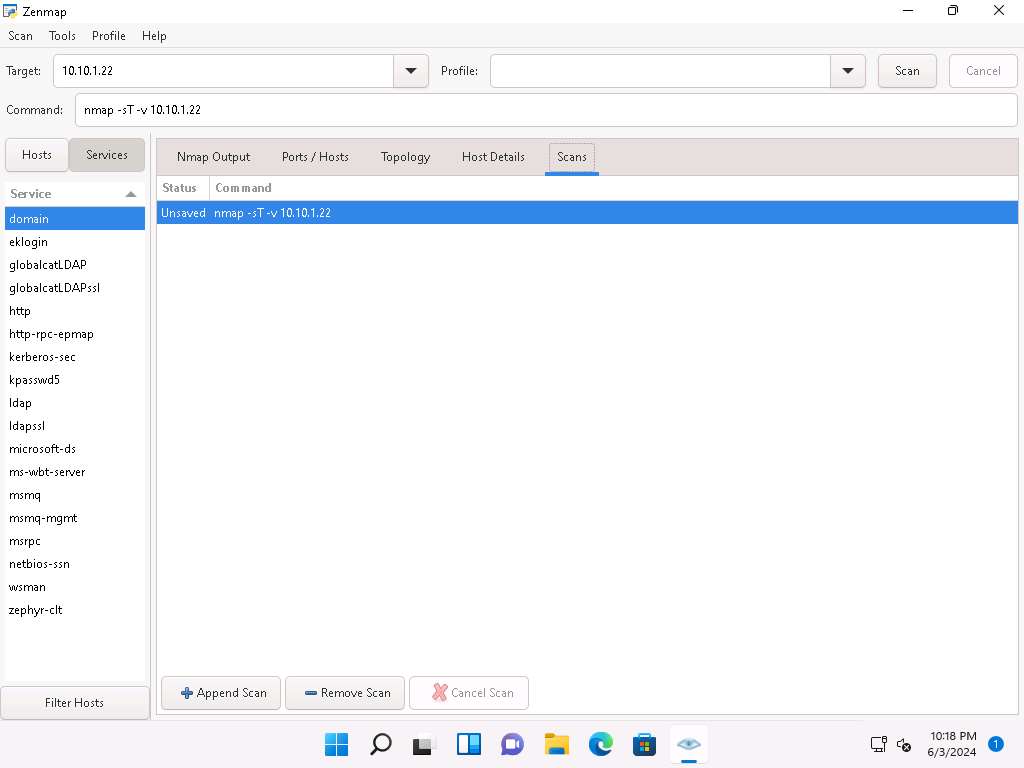
You can use any of these services and their open ports to enter into the target network/host and establish a connection.
In this sub-task, we shall be performing a stealth scan/TCP half-open scan, Xmas scan, TCP Maimon scan, and ACK flag probe scan on a firewall-enabled machine (i.e., Windows Server 2022) in order to observe the result. To do this, we need to enable Windows Firewall in the Windows Server 2022 machine.
Click Windows Server 2022 to switch to the Windows Server 2022 machine. Click Ctrl+Alt+Delete to activate the machine. Login with CEH\Administrator/Pa$$w0rd
Alternatively, you can also click Pa$$w0rd under Windows Server 2022 machine thumbnail in the Resources pane.
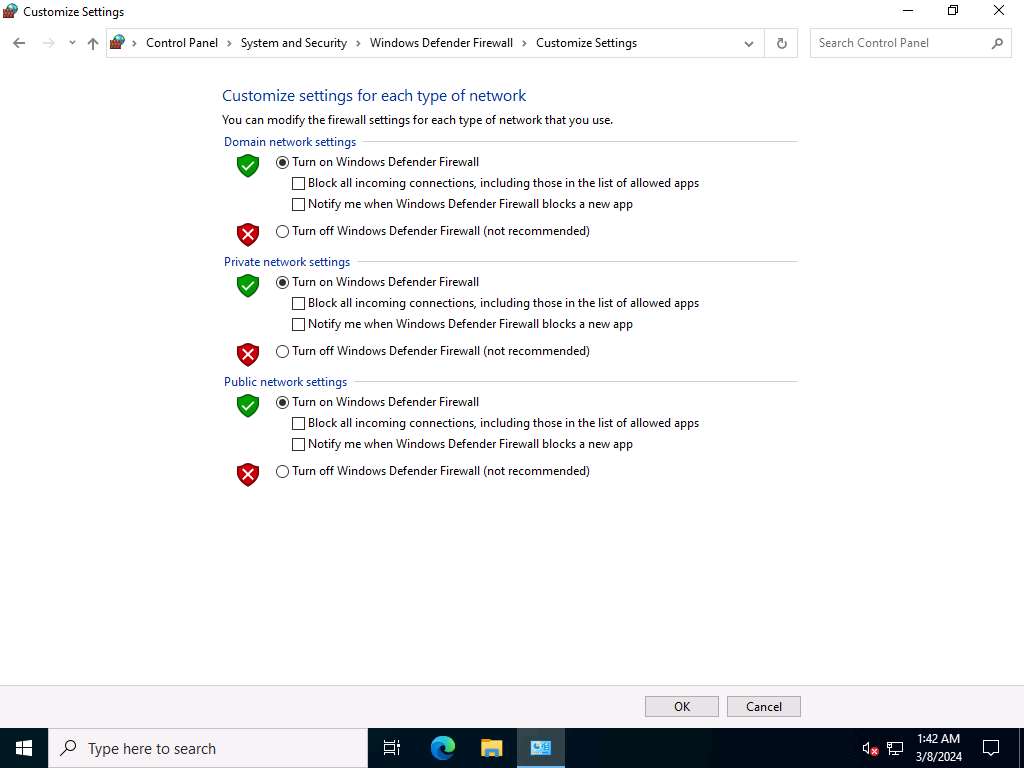
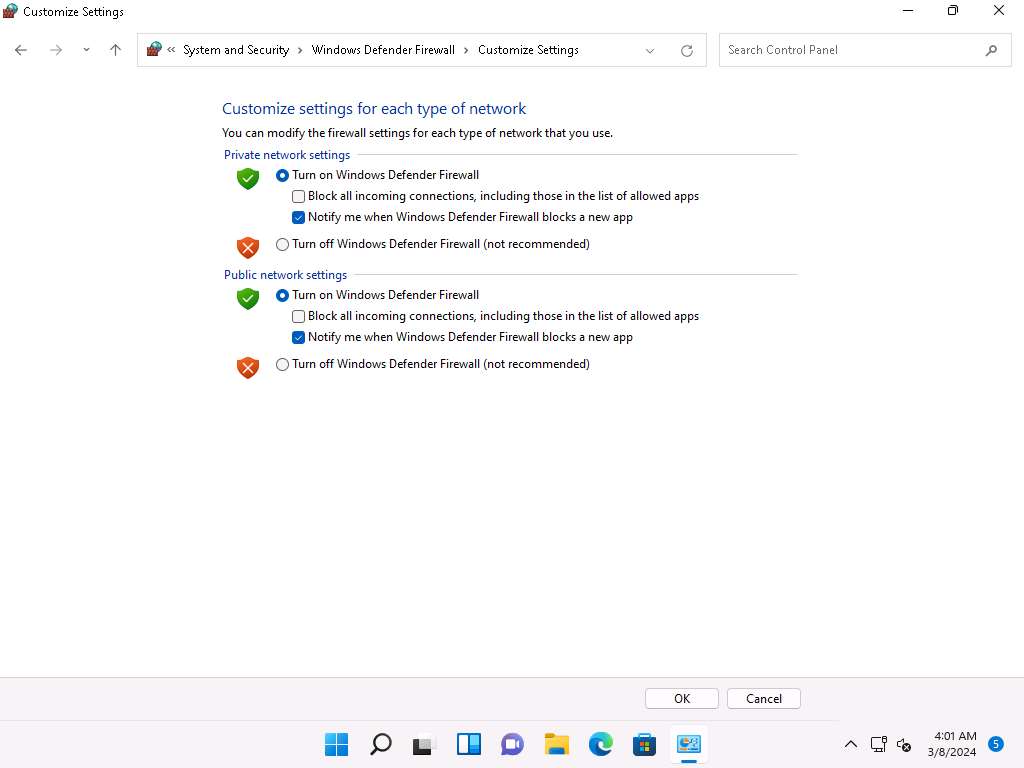
Navigate to Control Panel --> System and Security --> Windows Defender Firewall --> Turn Windows Defender Firewall on or off, enable Windows Firewall and click OK, as shown in the screenshot.
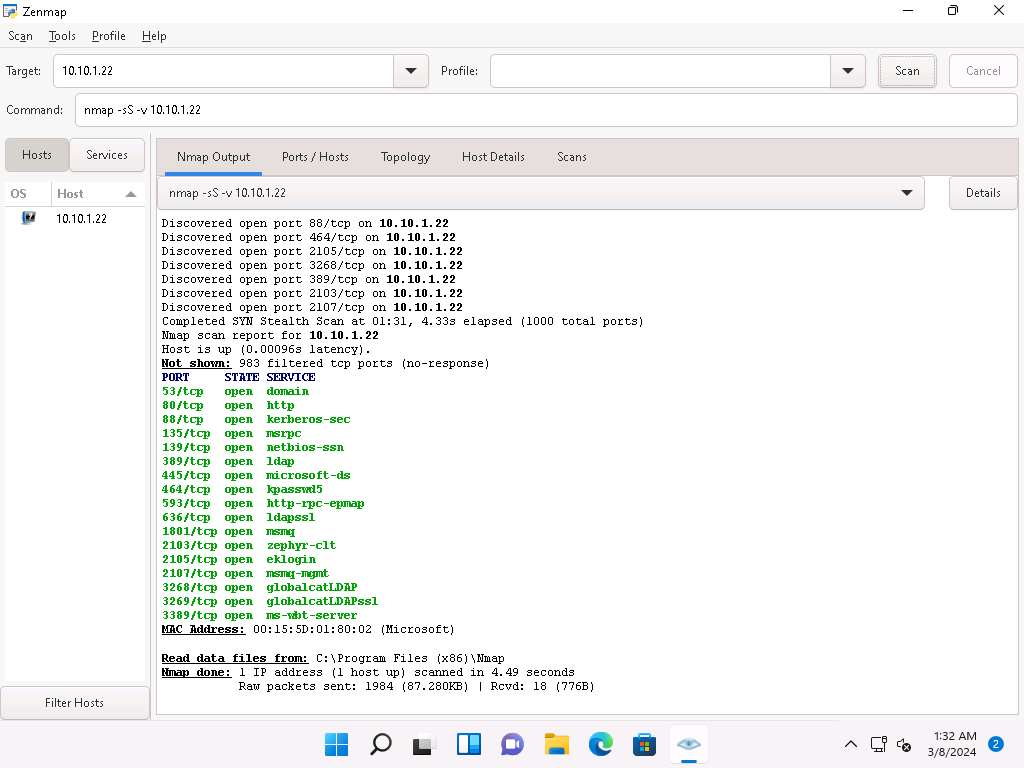
Now, click Windows 11 to switch to the Windows 11 machine. In the Command field of Zenmap, type nmap -sS -v [Target IP Address] (here, the target IP address is 10.10.1.22) and click Scan.
-sS: performs the stealth scan/TCP half-open scan and -v: enables the verbose output (include all hosts and ports in the output).
The scan results appear, displaying all open TCP ports and services running on the target machine, as shown in the screenshot.
As shown in the last task, you can gather detailed information from the scan result in the Ports/Hosts, Topology, Host Details, and Scan tab.
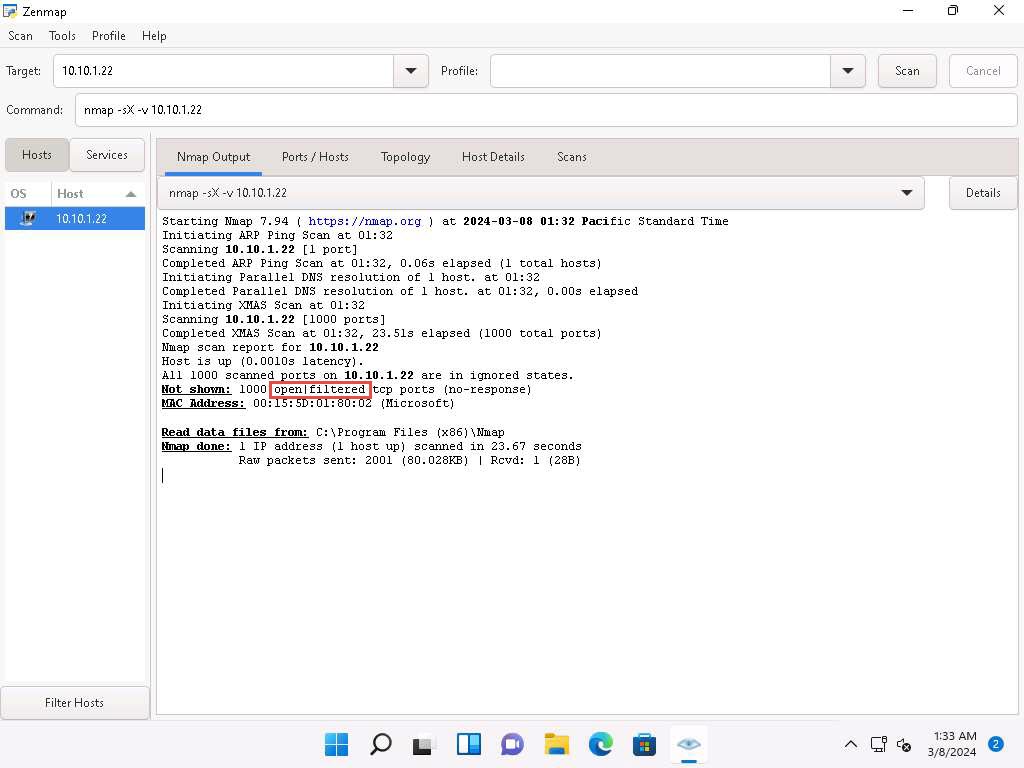
Similarly, type nmap -sX -v [Target IP Address] (here, the target IP address is 10.10.1.22) and click Scan.
-sX: performs the Xmas scan and -v: enables the verbose output (include all hosts and ports in the output).
The scan results appear, displaying that the ports are either open or filtered on the target machine, which means a firewall has been configured on the target machine.
In the Command field, type nmap -sM -v [Target IP Address] (here, the target IP address is 10.10.1.22) and click Scan.
-sM: performs the TCP Maimon scan and -v: enables the verbose output (include all hosts and ports in the output).
The scan results appear, displaying either the ports are open/filtered on the target machine, which means a firewall has been configured on the target machine.
In the TCP Maimon scan, a FIN/ACK probe is sent to the target; if there is no response, then the port is Open|Filtered, but if the RST packet is sent as a response, then the port is closed.

In the Command field, type nmap -sA -v [Target IP Address] (here, the target IP address is 10.10.1.22) and click Scan.
-sA: performs the ACK flag probe scan and -v: enables the verbose output (include all hosts and ports in the output).
The scan results appear, displaying that the ports are filtered on the target machine, as shown in the screenshot.
The ACK flag probe scan sends an ACK probe packet with a random sequence number; no response implies that the port is filtered (stateful firewall is present), and an RST response means that the port is not filtered.

Now, click Windows Server 2022 to switch to the Windows Server 2022 machine. Click Ctrl+Alt+Delete to activate the machine. Login with CEH\Administrator/Pa$$w0rd.
Alternatively, you can also click Pa$$w0rd under Windows Server 2022 machine thumbnail in the Resources pane.
Turn off the Windows Defender Firewall from Control Panel.
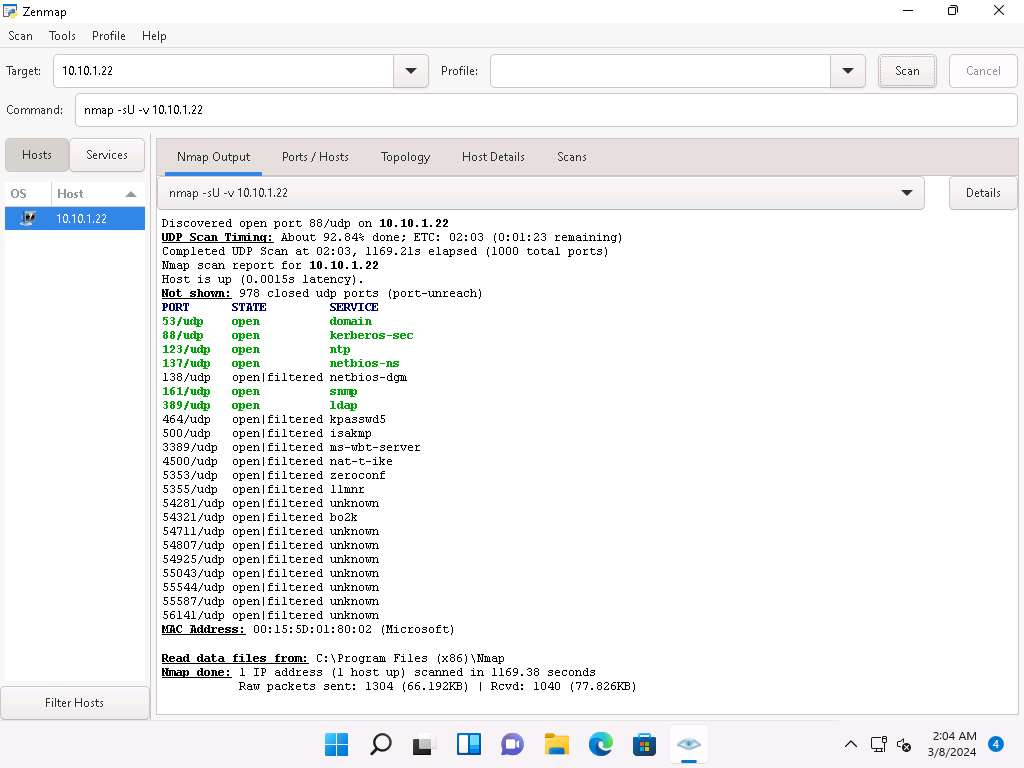
Now, click Windows 11 to navigate back to the Windows 11 machine. In the Command field of Zenmap, type nmap -sU -v [Target IP Address] (here, the target IP address is 10.10.1.22) and click Scan.
-sU: performs the UDP scan and -v: enables the verbose output (include all hosts and ports in the output). This scan could take approximately 15-20 minutes.
The scan results appear, displaying all open UDP ports and services running on the target machine, as shown in the screenshot.
This scan will take approximately 20 minutes to finish the scanning process and the results might differ in your lab environment.
The UDP scan uses UDP protocol instead of the TCP. There is no three-way handshake for the UDP scan. It sends UDP packets to the target host; no response means that the port is open. If the port is closed, an ICMP port unreachable message is received.
Apart from the aforementioned port scanning and service discovery techniques, you can also use the following scanning techniques to perform a port and service discovery on a target network using Nmap.
IDLE/IPID Header Scan: A TCP port scan method that can be used to send a spoofed source address to a computer to discover what services are available.
# nmap -sI -v [target IP address]
SCTP INIT Scan: An INIT chunk is sent to the target host; an INIT+ACK chunk response implies that the port is open, and an ABORT Chunk response means that the port is closed.
# nmap -sY -v [target IP address]
SCTP COOKIE ECHO Scan: A COOKIE ECHO chunk is sent to the target host; no response implies that the port is open and ABORT Chunk response means that the port is closed.
# nmap -sZ -v [target IP address]
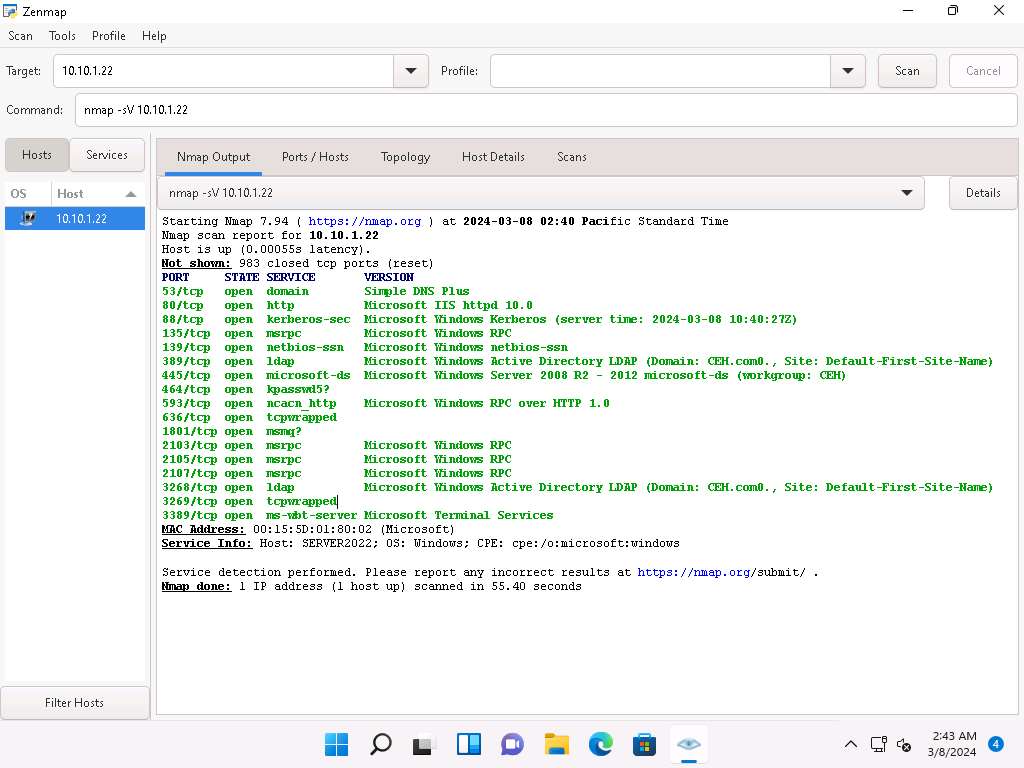
In the Command field, type nmap -sV [Target IP Address] (here, the target IP address is 10.10.1.22) and click Scan.
-sV: detects service versions.
The scan results appear, displaying that open ports and the version of services running on the ports, as shown in the screenshot.
Service version detection helps you to obtain information about the running services and their versions on a target system. Obtaining an accurate service version number allows you to determine which exploits the target system is vulnerable to.
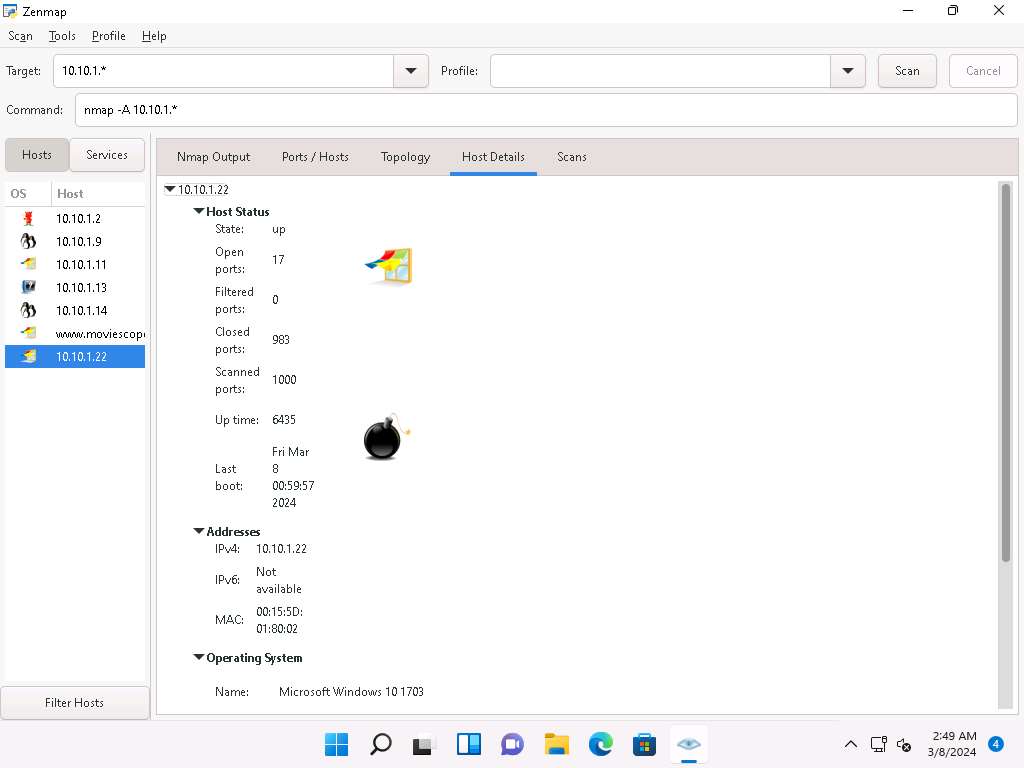
In the Command field, type nmap -A [Target Subnet] (here, target subnet is 10.10.1.* ) and click Scan. By providing the “*” (asterisk) wildcard, you can scan a whole subnet or IP range.
-A: enables aggressive scan. The aggressive scan option supports OS detection (-O), version scanning (-sV), script scanning (-sC), and traceroute (--traceroute). You should not use -A against target networks without permission.
Nmap scans the entire network and displays information for all the hosts that were scanned, along with the open ports and services, device type, details of OS, etc. as shown in the screenshot.
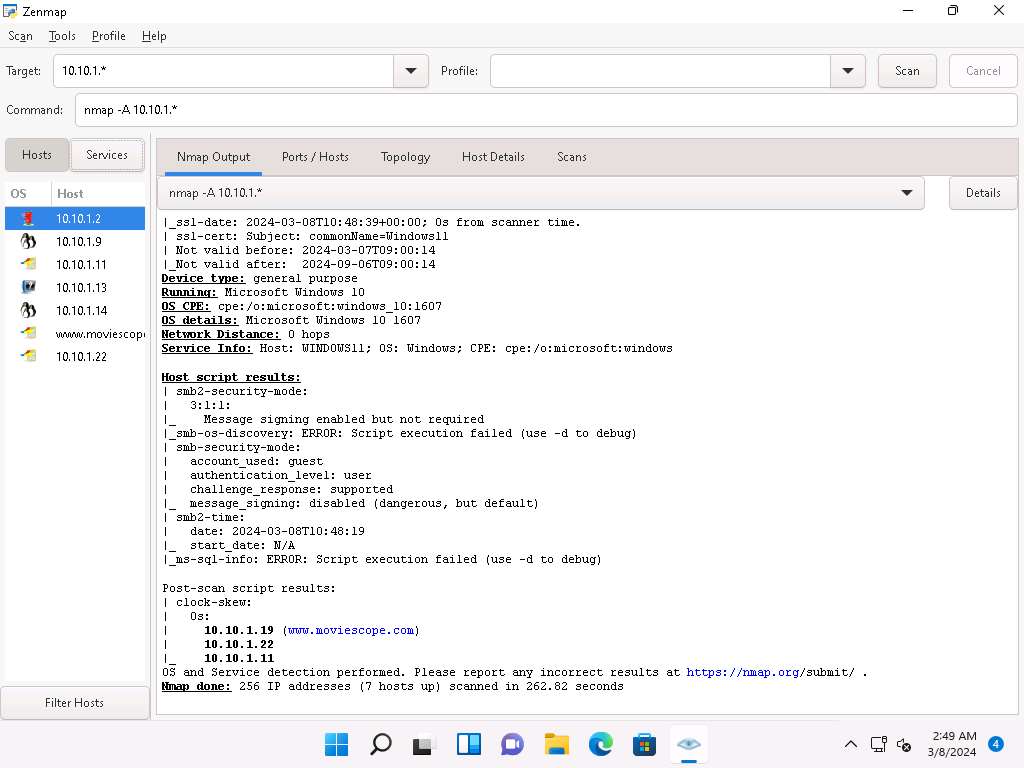
Choose an IP address 10.10.1.22 from the list of hosts in the left-pane and click the Host Details tab. This tab displays information such as Host Status, Addresses, Operating System, Ports used, OS Classes, etc. associated with the selected host.
This concludes the demonstration of discovering target open ports, services, services versions, device type, OS details, etc. of the active hosts in the target network using various scanning techniques of Nmap.
Close all open windows and document all the acquired information.
Question 3.2.1.1
Lab 3: Perform OS Discovery
Lab Objectives
- Perform OS discovery using Nmap Script Engine (NSE)
Overview of OS Discovery/ Banner Grabbing
Banner grabbing, or OS fingerprinting, is a method used to determine the OS that is running on a remote target system.
There are two types of OS discovery or banner grabbing techniques:
Active Banner Grabbing Specially crafted packets are sent to the remote OS, and the responses are noted, which are then compared with a database to determine the OS. Responses from different OSes vary, because of differences in the TCP/IP stack implementation.
Passive Banner Grabbing This depends on the differential implementation of the stack and the various ways an OS responds to packets. Passive banner grabbing includes banner grabbing from error messages, sniffing the network traffic, and banner grabbing from page extensions.
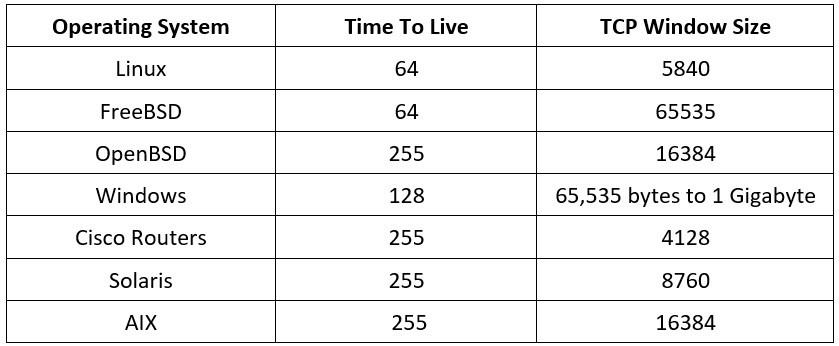
Parameters such as TTL and TCP window size in the IP header of the first packet in a TCP session plays an important role in identifying the OS running on the target machine. The TTL field determines the maximum time a packet can remain in a network, and the TCP window size determines the length of the packet reported. These values differ for different OSes: you can refer to the following table to learn the TTL values and TCP window size associated with various OSes.
Task 1: Perform OS Discovery using Nmap Script Engine (NSE)
Nmap, along with Nmap Script Engine (NSE), can extract considerable valuable information from the target system. In addition to Nmap commands, NSE provides scripts that reveal all sorts of useful information from the target system. Using NSE, you may obtain information such as OS, computer name, domain name, forest name, NetBIOS computer name, NetBIOS domain name, workgroup, system time of a target system, etc.
Here, we will use Nmap to perform OS discovery using -A parameter, -O parameter, and NSE.
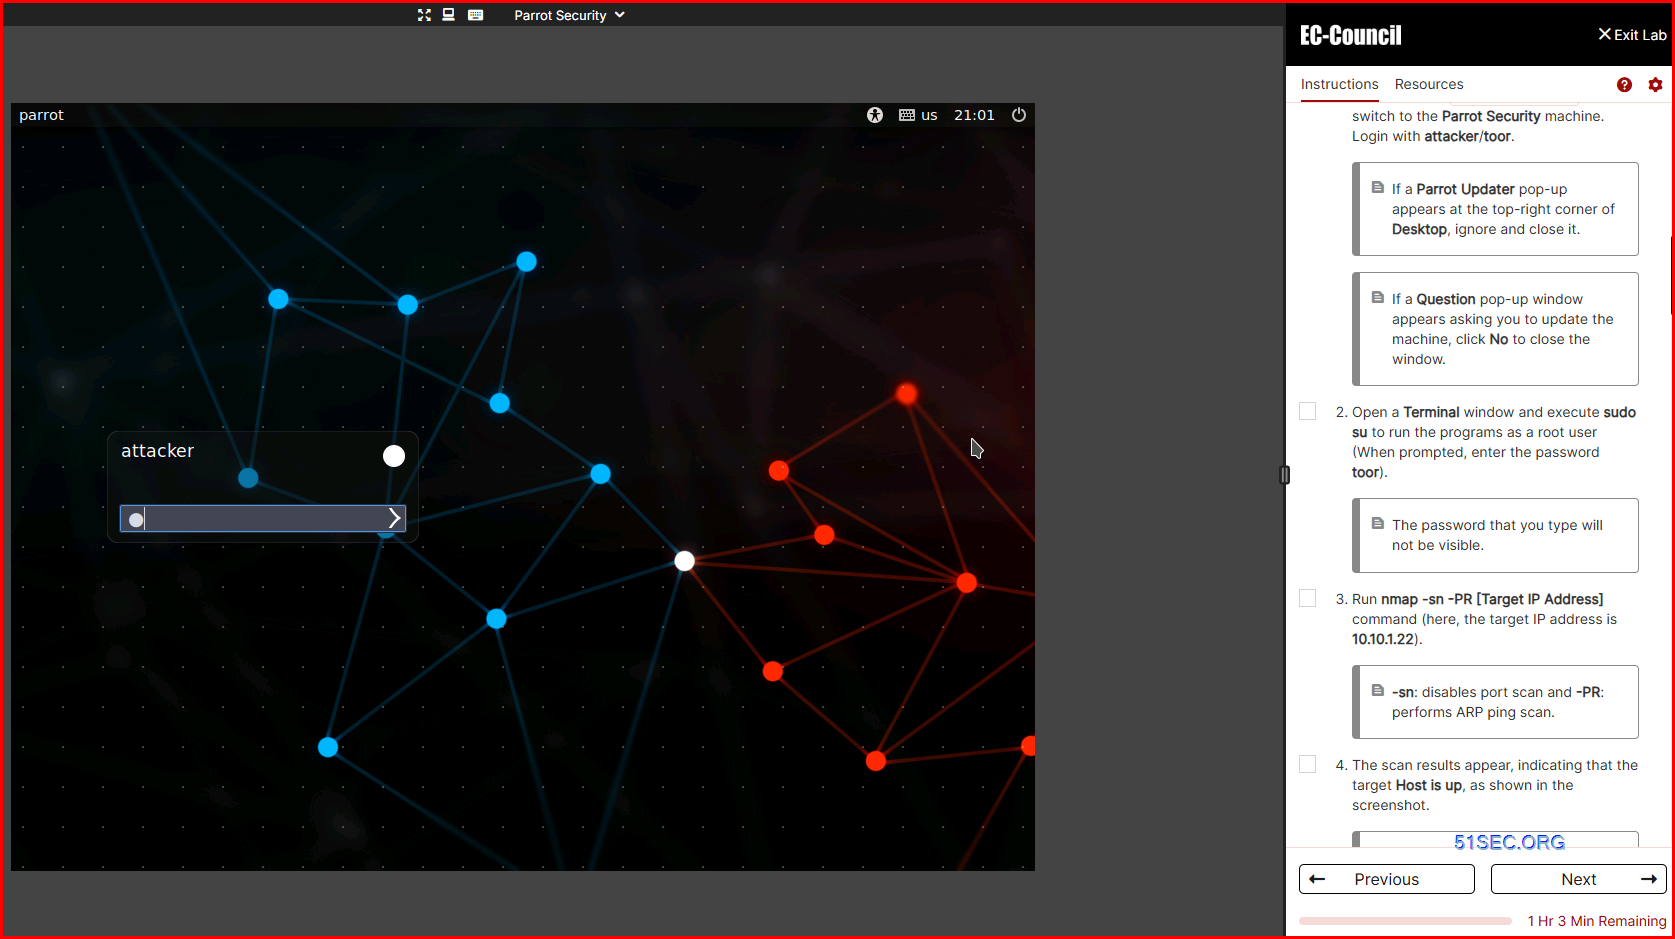
Click Parrot Security to switch to the Parrot Security machine and Login with attacker/toor.
If a Parrot Updater pop-up appears at the top-right corner of Desktop, ignore and close it.
If a Question pop-up window appears asking you to update the machine, click No to close the window.
Open a Terminal window and execute sudo su to run the programs as a root user (When prompted, enter the password toor).
The password that you type will not be visible.
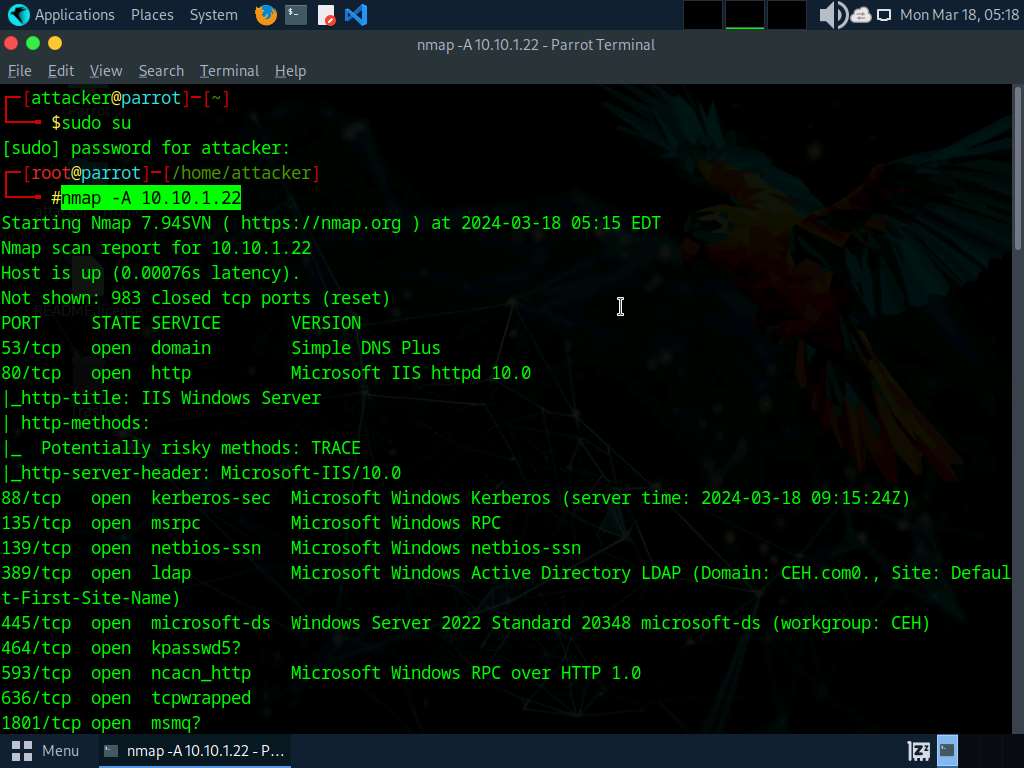
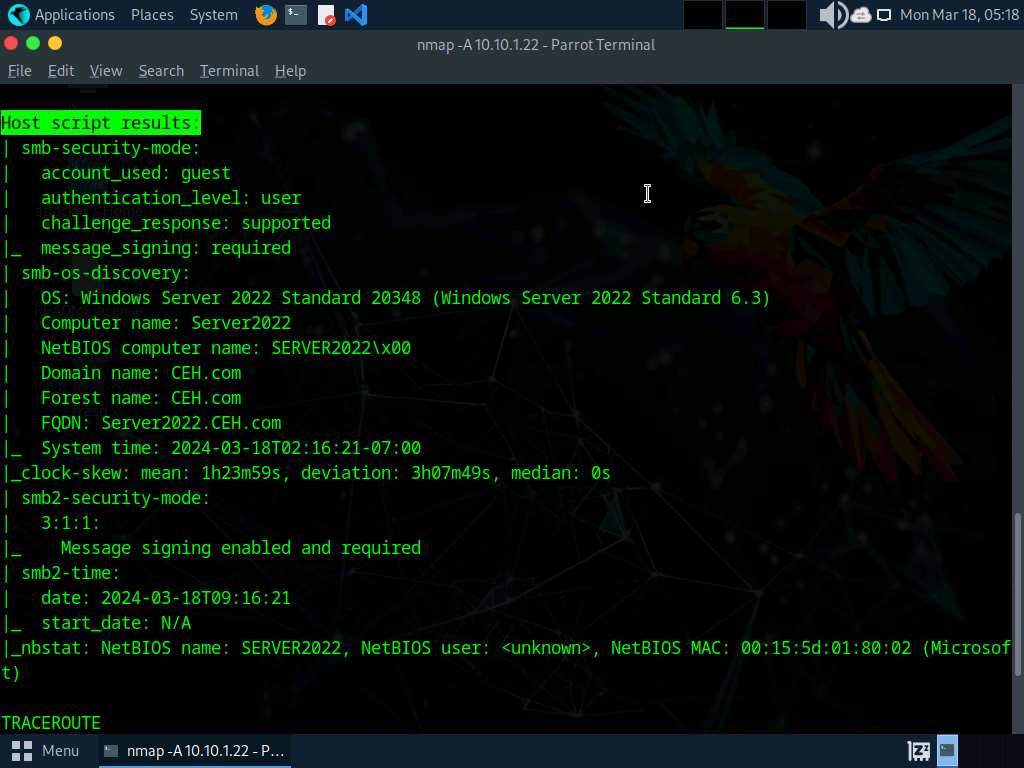
In the terminal window, run nmap -A [Target IP Address] command (here, the target machine is Windows Server 2022 [10.10.1.22]). The scan results appear, displaying the open ports and running services along with their versions and target details such as OS, computer name, NetBIOS computer name, etc. under the Host script results section.
-A: to perform an aggressive scan.
The scan takes approximately 10 minutes to complete.
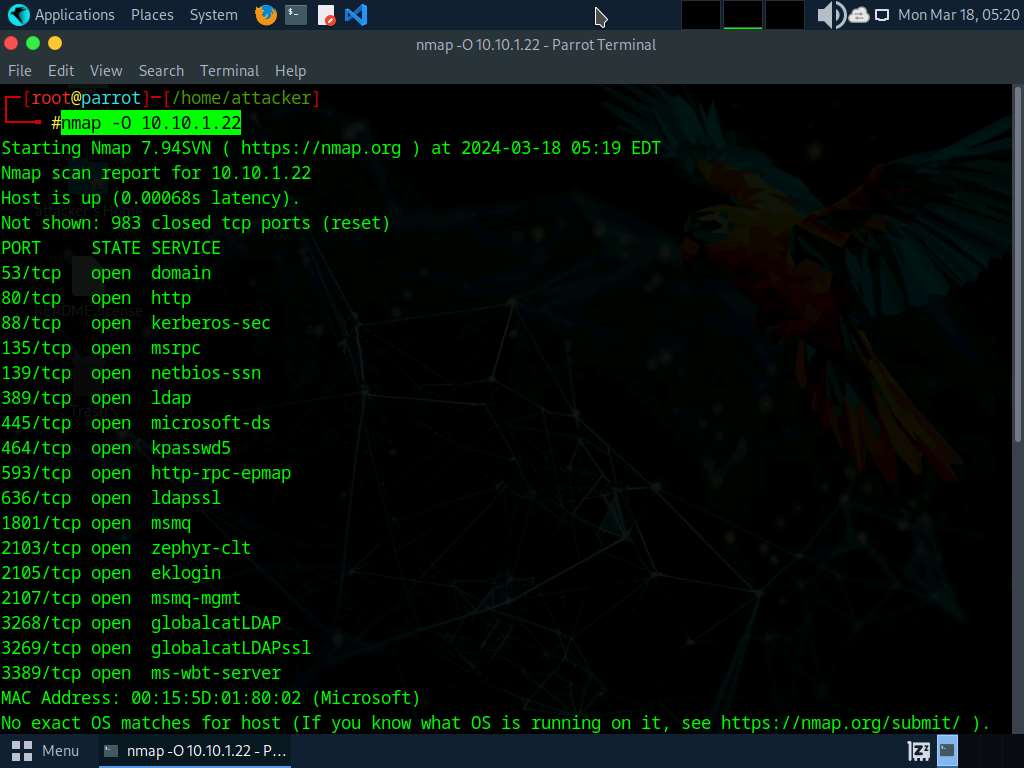
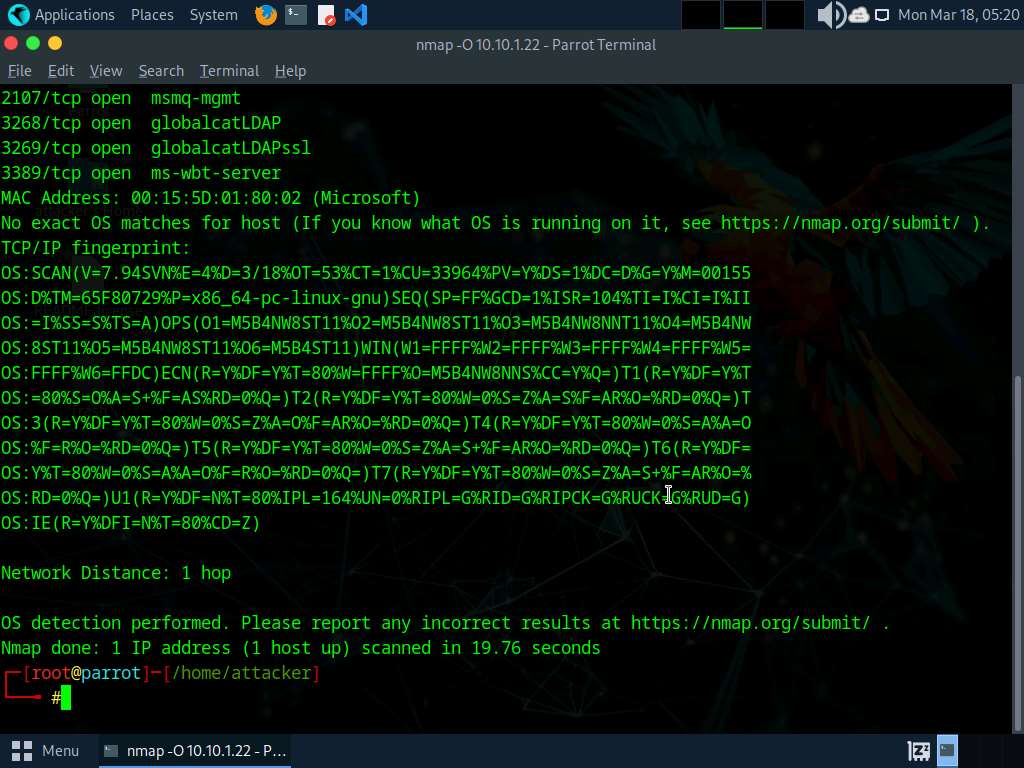
In the terminal window, run nmap -O [Target IP Address] command (here, the target machine is Windows Server 2022 [10.10.1.22]). The scan results appear, displaying information about open ports, respective services running on the open ports, and the name of the OS running on the target system.
-O: performs the OS discovery.
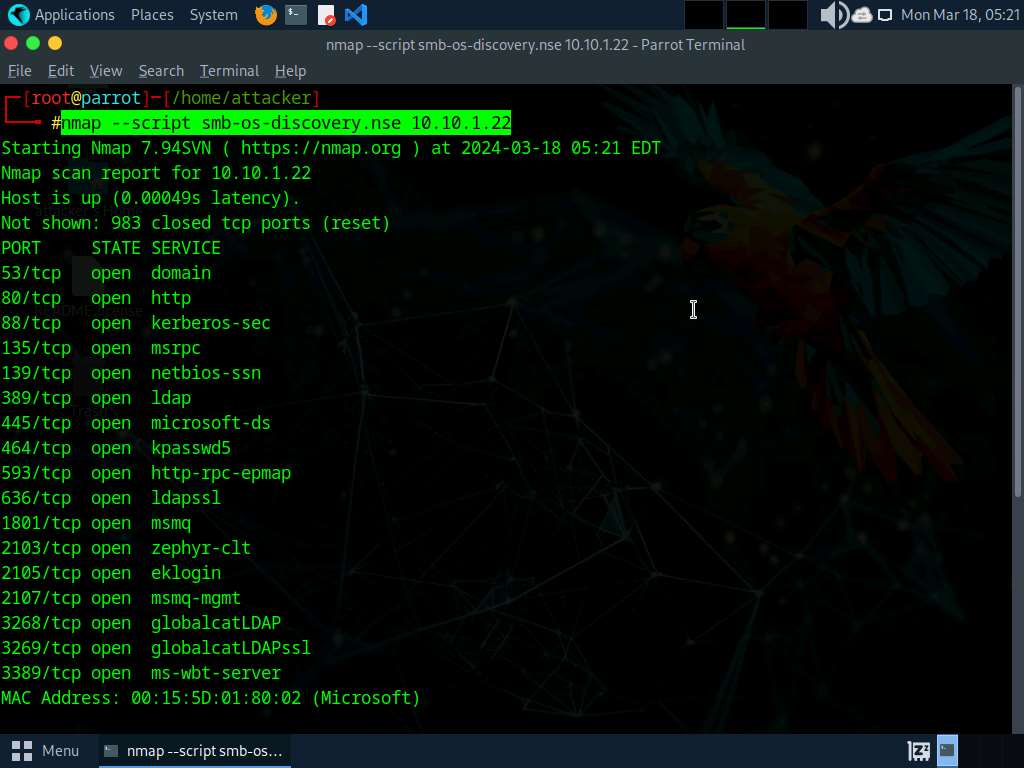
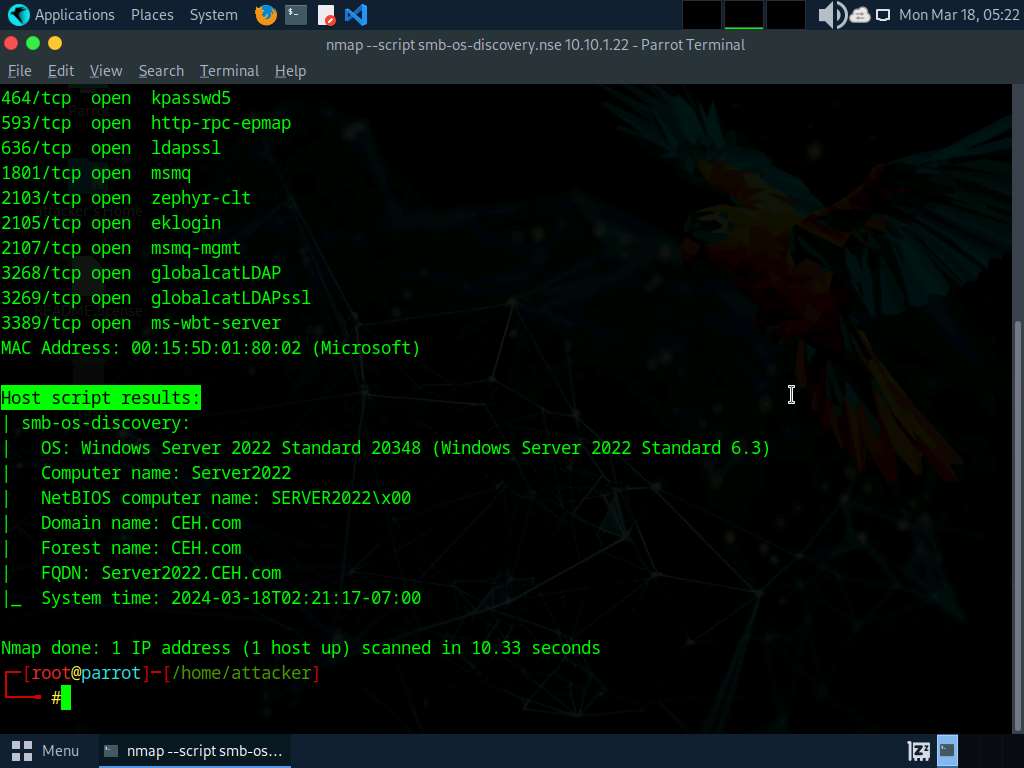
In the terminal window, run nmap --script smb-os-discovery.nse [Target IP Address] command (here, the target machine is Windows Server 2022 [10.10.1.22]). The scan results appear, displaying the target OS, computer name, NetBIOS computer name, etc. details under the Host script results section.
--script: specifies the customized script and smb-os-discovery.nse: attempts to determine the OS, computer name, domain, workgroup, and current time over the SMB protocol (ports 445 or 139).
This concludes the demonstration of discovering the OS running on the target system using Nmap.
Close all open windows and document all the acquired information.
Question 3.3.1.1
Lab 4: Scan beyond IDS and Firewall
Lab Scenario
As a professional ethical hacker or a pen tester, the next step after discovering the OS of the target IP address(es) is to perform network scanning without being detected by the network security perimeters such as the firewall and IDS. IDSs and firewalls are efficient security mechanisms; however, they still have some security limitations. You may be required to launch attacks to exploit these limitations using various IDS/firewall evasion techniques such as packet fragmentation, source routing, IP address spoofing, etc. Scanning beyond the IDS and firewall allows you to evaluate the target network’s IDS and firewall security.
Lab Objectives
- Scan beyond IDS/firewall using various evasion techniques
Overview of Scanning beyond IDS and Firewall
An Intrusion Detection System (IDS) and firewall are the security mechanisms intended to prevent an unauthorized person from accessing a network. However, even IDSs and firewalls have some security limitations. Firewalls and IDSs intend to avoid malicious traffic (packets) from entering into a network, but certain techniques can be used to send intended packets to the target and evade IDSs/firewalls.
Techniques to evade IDS/firewall:
- Packet Fragmentation: Send fragmented probe packets to the intended target, which re-assembles it after receiving all the fragments
- Source Routing: Specifies the routing path for the malformed packet to reach the intended target
- Source Port Manipulation: Manipulate the actual source port with the common source port to evade IDS/firewall
- IP Address Decoy: Generate or manually specify IP addresses of the decoys so that the IDS/firewall cannot determine the actual IP address
- IP Address Spoofing: Change source IP addresses so that the attack appears to be coming in as someone else
- Creating Custom Packets: Send custom packets to scan the intended target beyond the firewalls
- Randomizing Host Order: Scan the number of hosts in the target network in a random order to scan the intended target that is lying beyond the firewall
- Sending Bad Checksums: Send the packets with bad or bogus TCP/UDP checksums to the intended target
- Proxy Servers: Use a chain of proxy servers to hide the actual source of a scan and evade certain IDS/firewall restrictions
- Anonymizers: Use anonymizers that allow them to bypass Internet censors and evade certain IDS and firewall rules
Task 1: Scan beyond IDS/Firewall using various Evasion Techniques
Nmap offers many features to help understand complex networks with enabled security mechanisms and supports mechanisms for bypassing poorly implemented defenses. Using Nmap, various techniques can be implemented, which can bypass the IDS/firewall security mechanisms.
Here, we will use Nmap to evade IDS/firewall using various techniques such as packet fragmentation, source port manipulation, MTU, and IP address decoy.
Click Windows 11 to switch to the Windows 11 machine.
Navigate to Control Panel --> System and Security --> Windows Defender Firewall --> Turn Windows Defender Firewall on or off, enable Windows Defender Firewall and click OK, as shown in the screenshot.
Minimize the Control Panel window, click windows Search icon (
 ) on the Desktop. Search for wireshark in the search field and click Open to launch it.
The Wireshark Network Analyzer window appears, start capturing packets by double-clicking the available ethernet or interface (here, Ethernet).
If Software Update window appears, click Remind me later.
Click Parrot Security to switch to the Parrot Security machine. Open a Terminal window and execute sudo su to run the programs as a root user (When prompted, enter the password toor).
The password that you type will not be visible.
Now, run cd command to jump to the root directory.
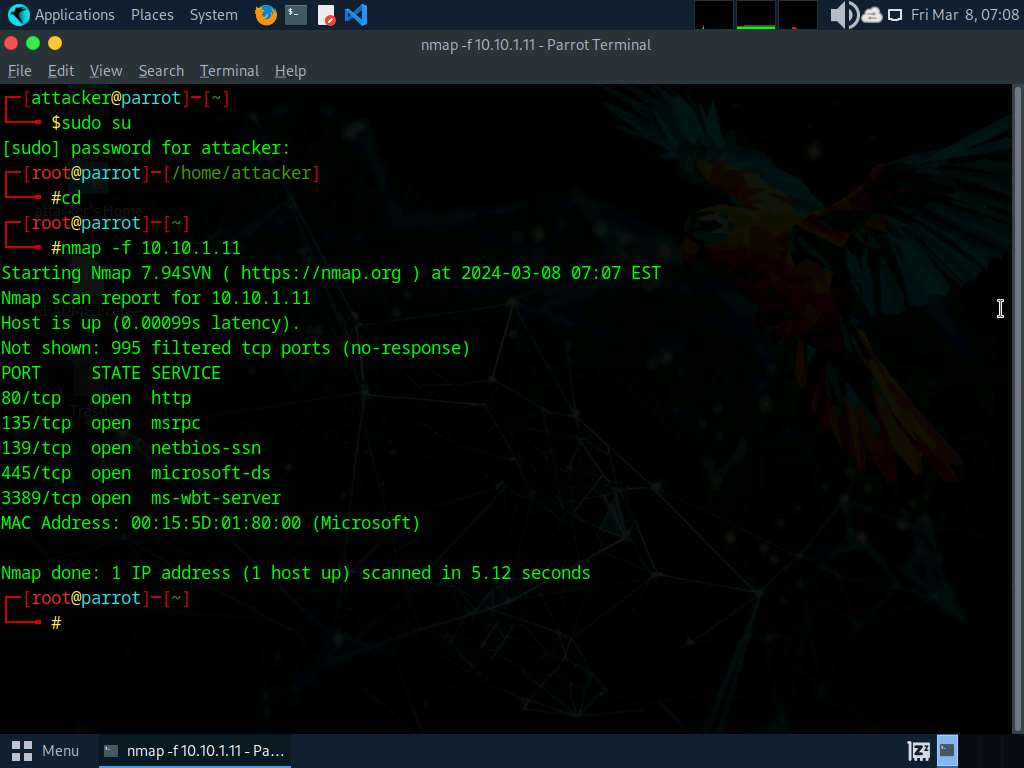
In the terminal window, run nmap -f [Target IP Address] command, (here, the target machine is Windows 11 [10.10.1.11]).
-f switch is used to split the IP packet into tiny fragment packets.
Although Windows Defender Firewall is turned on in the target system (here, Windows 11), you can still obtain the results displaying all open TCP ports along with the name of services running on the ports, as shown in the screenshot.
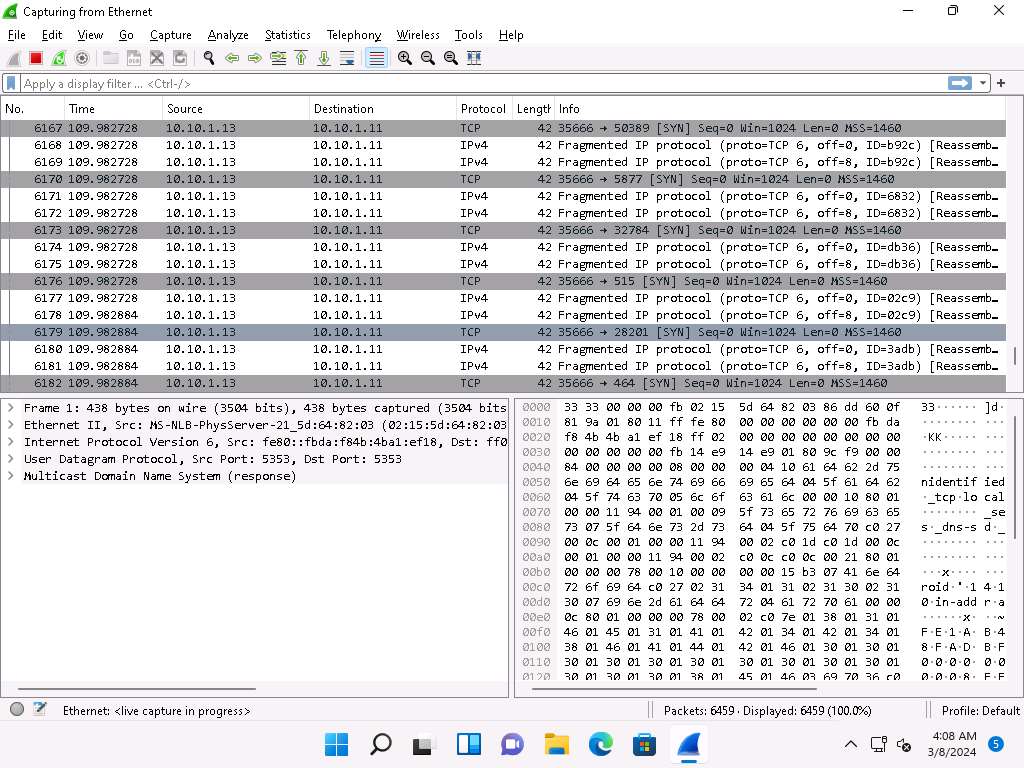
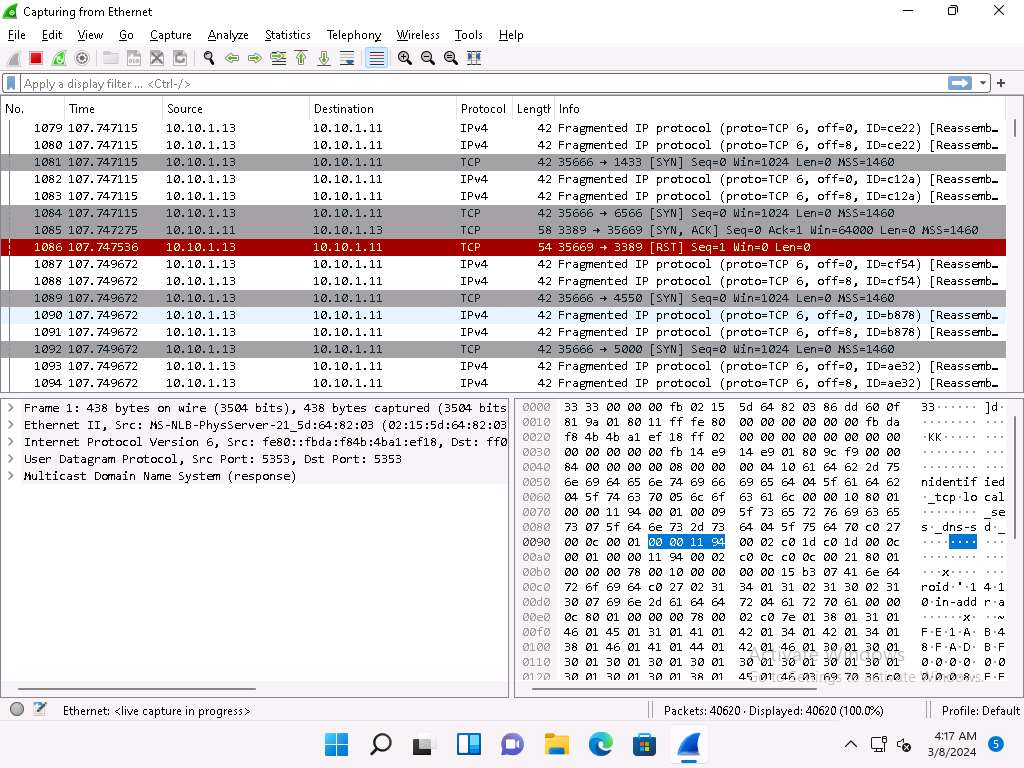
Click Windows 11 to switch to the Windows 11 machine (target machine). You can observe the fragmented packets captured by the Wireshark, as shown in the screenshot.
Click Parrot Security to switch to the Parrot Security machine.
In the Parrot Terminal window, run nmap -g 80 [Target IP Address] command, (here, target IP address is 10.10.1.11).
In this command, you can use the -g or --source-port option to perform source port manipulation.
Source port manipulation refers to manipulating actual port numbers with common port numbers to evade IDS/firewall: this is useful when the firewall is configured to allow packets from well-known ports like HTTP, DNS, FTP, etc.
The results appear, displaying all open TCP ports along with the name of services running on the ports, as shown in the screenshot.

Click Windows 11 to switch to the Windows 11 machine (target machine). In the Wireshark window, scroll-down and you can observe the TCP packets indicating that the port number 80 is used to scan other ports of the target host, as shown in the screenshot.

Click Parrot Security to switch to the Parrot Security machine.
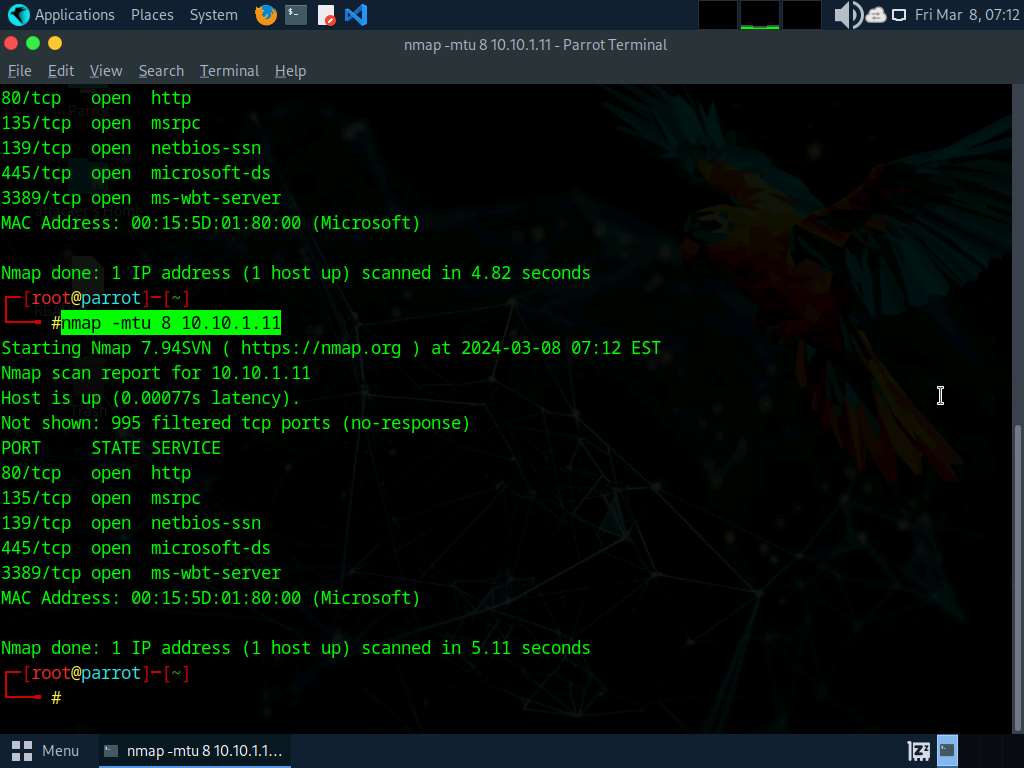
Now, run nmap -mtu 8 [Target IP Address] command (here, target IP address is 10.10.1.11).
In this command, -mtu: specifies the number of Maximum Transmission Unit (MTU) (here, 8 bytes of packets).
Using MTU, smaller packets are transmitted instead of sending one complete packet at a time. This technique evades the filtering and detection mechanism enabled in the target machine.
Click Windows 11 to switch to the Windows 11 machine (target machine). In the Wireshark window, scroll-down and you can observe the fragmented packets having maximum length as 8 bytes, as shown in the screenshot.
Click Parrot Security to switch to the Parrot Security machine.
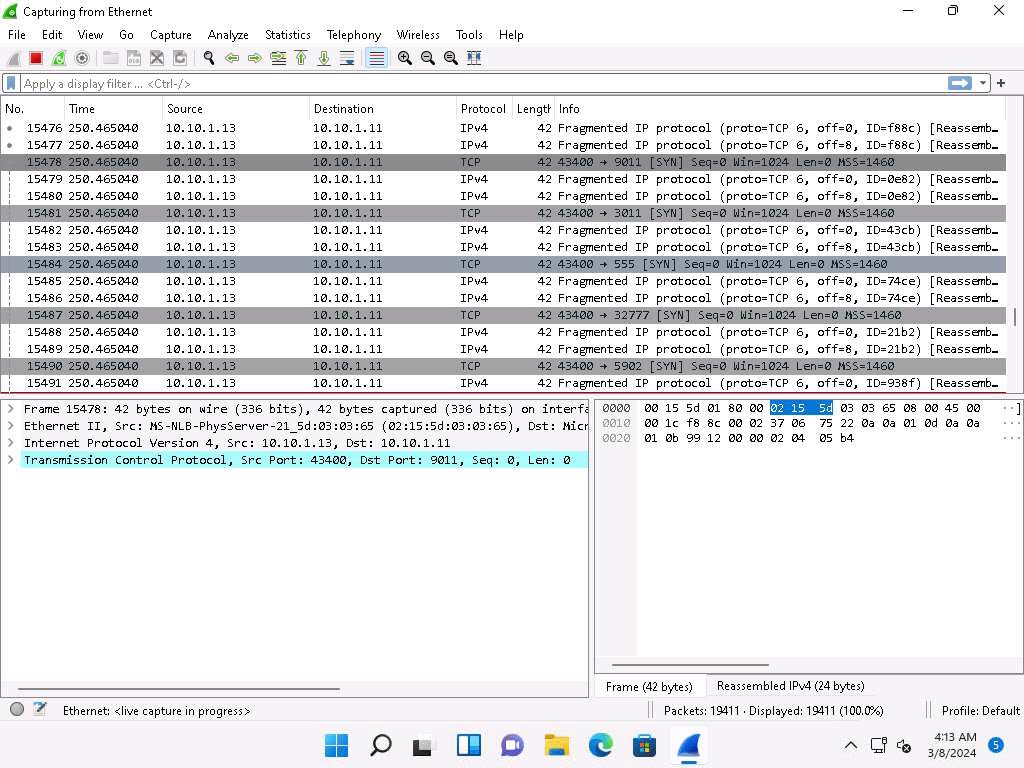
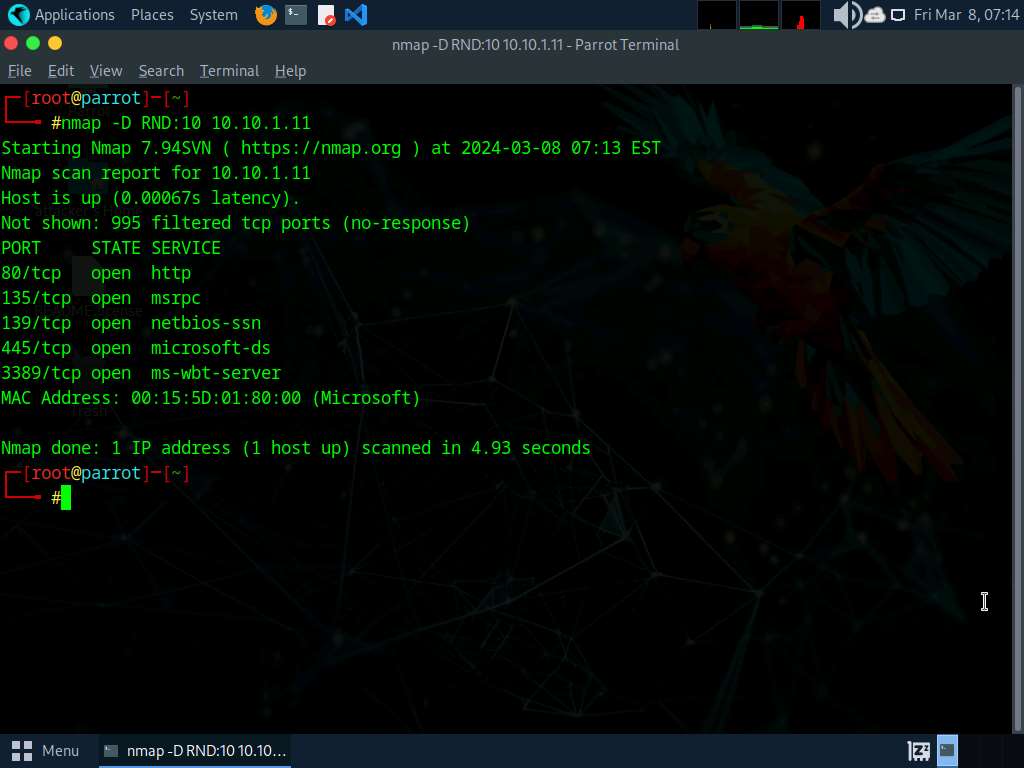
Now, run nmap -D RND:10 [Target IP Address] command (here, target IP address is 10.10.1.11).
In this command, -D: performs a decoy scan and RND: generates a random and non-reserved IP addresses (here, 10).
Now, click Windows 11 to switch to the Windows 11 machine (target machine). In the Wireshark window, scroll-down and you can observe the packets displaying the multiple IP addresses in the source section, as shown in the screenshot.
Click Parrot Security to switch to the Parrot Security machine.
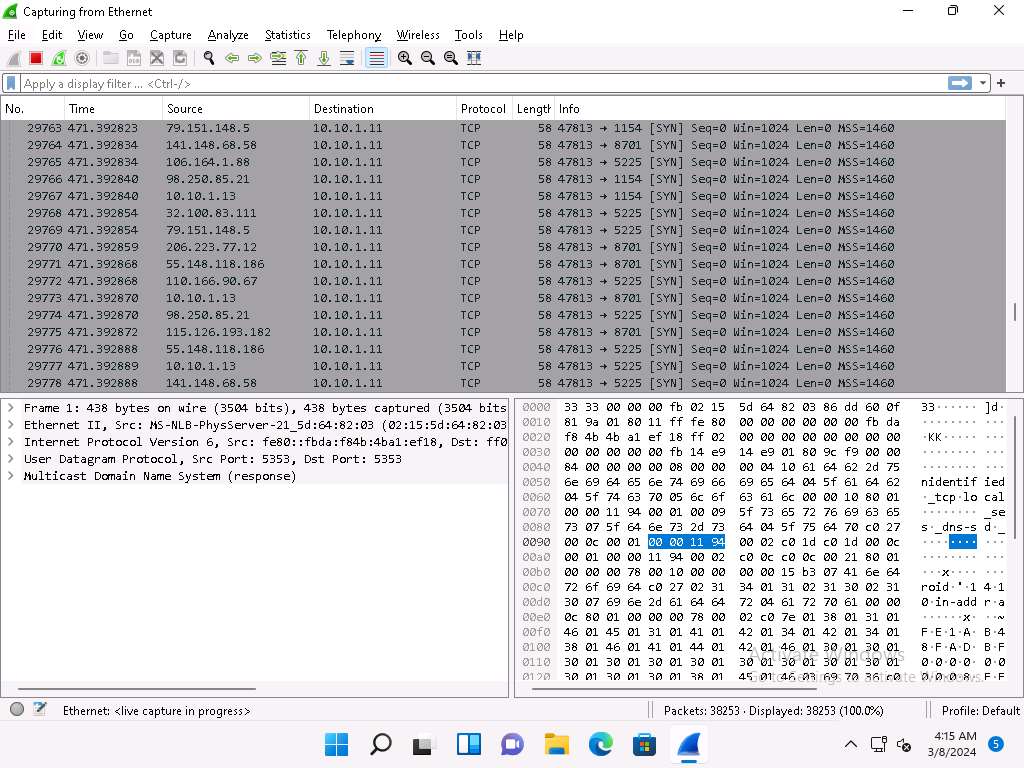
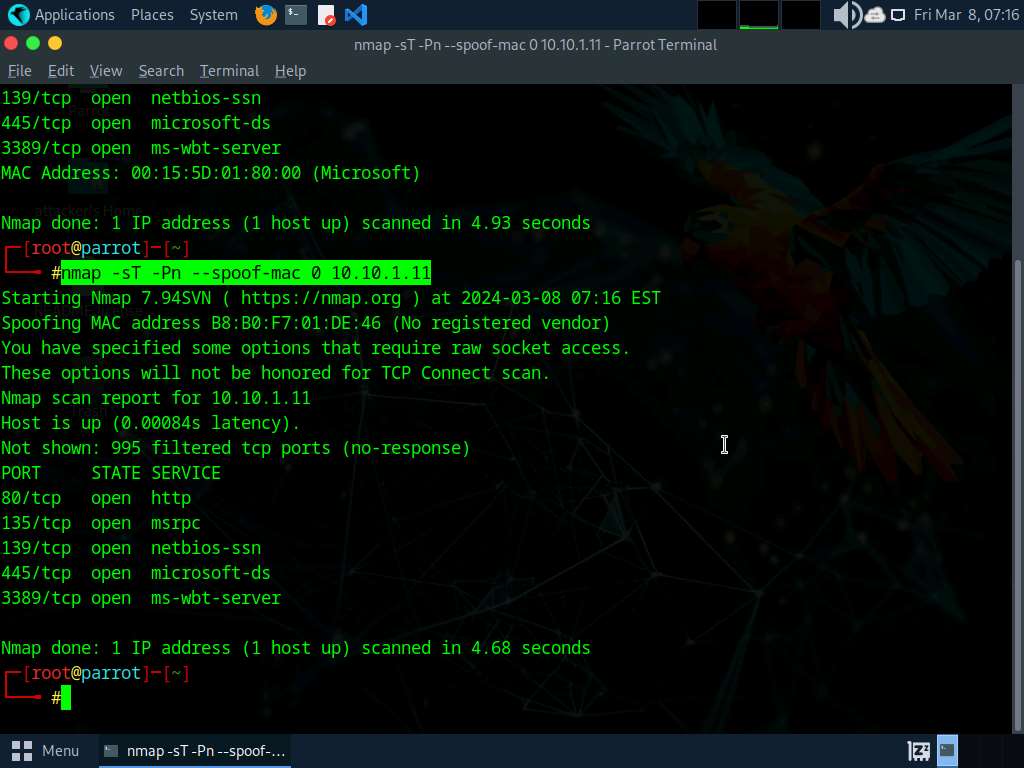
In the terminal window, run nmap -sT -Pn --spoof-mac 0 [Target IP Address] command (here, target IP address is 10.10.1.11).
In this command --spoof-mac 0 represents randomizing the MAC address, -sT: performs the TCP connect/full open scan, -Pn is used to skip the host discovery.
MAC address spoofing technique involves spoofing a MAC address with the MAC address of a legitimate user on the network. This technique allows you to send request packets to the targeted machine/network pretending to be a legitimate host.
Click Windows 11 to switch to the Windows 11 machine (target machine). In the Wireshark window, scroll-down and you can observe the captured TCP, as shown in the screenshot.
This concludes the demonstration of evading IDS and firewall using various evasion techniques in Nmap.
Close all open windows and document all the acquired information.
Question 3.4.1.1
Lab 5: Perform Network Scanning using Various Scanning Tools
Lab Scenario
The information obtained in the previous steps might be insufficient to reveal potential vulnerabilities in the target network: there may be more information available that could help in finding loopholes in the target network. As an ethical hacker and pen tester, you should look for as much information as possible about systems in the target network using various network scanning tools when needed. This lab will demonstrate other techniques/commands/methods that can assist you in extracting information about the systems in the target network using various scanning tools.
Lab Objectives
- Scan a target network using Metasploit
Overview of Network Scanning Tools
Scanning tools are used to scan and identify live hosts, open ports, running services on a target network, location-info, NetBIOS info, and information about all TCP/IP and UDP open ports. Information obtained from these tools will assist an ethical hacker in creating the profile of the target organization and to scan the network for open ports of the devices connected.
Task 1: Scan a Target Network using Metasploit
Metasploit Framework is a tool that provides information about security vulnerabilities in the target organization’s system, and aids in penetration testing and IDS signature development. It facilitates the tasks of attackers, exploit writers, and payload writers. A major advantage of the framework is the modular approach, that is, allowing the combination of any exploit with any payload.
Here, we will use Metasploit to discover active hosts, open ports, services running, and OS details of systems present in the target network.
Click Parrot Security to switch to the Parrot Security machine. Open a Terminal window and execute sudo su to run the programs as a root user (When prompted, enter the password toor).
The password that you type will not be visible.
Execute command msfconsole to launch Metasploit.

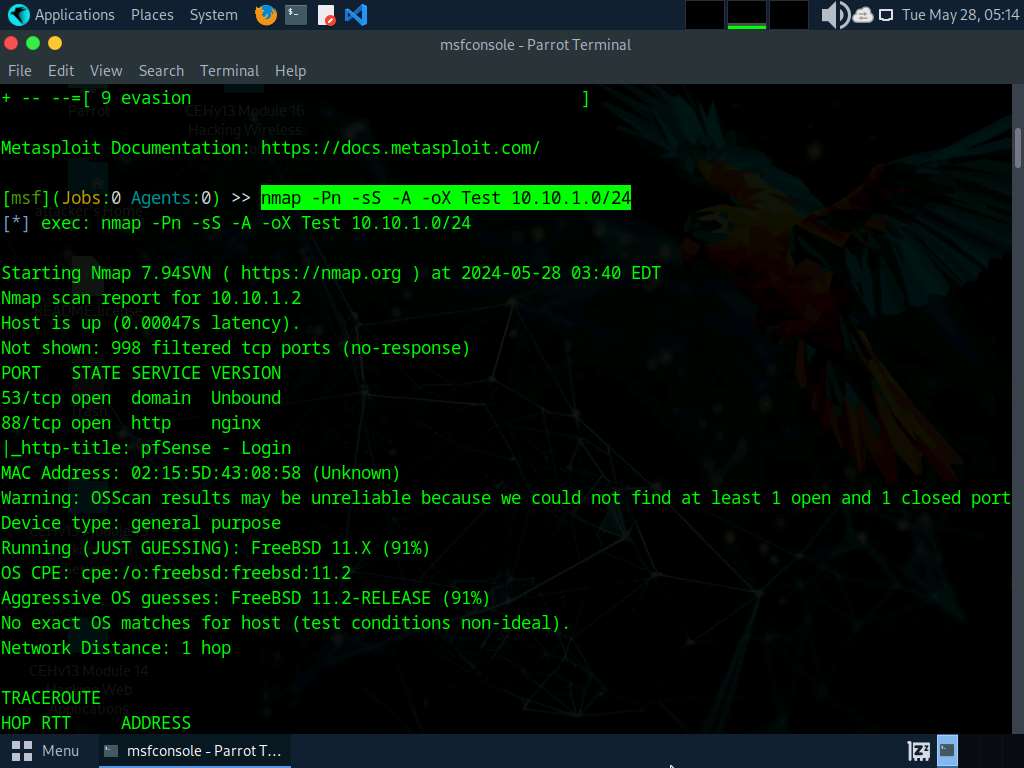
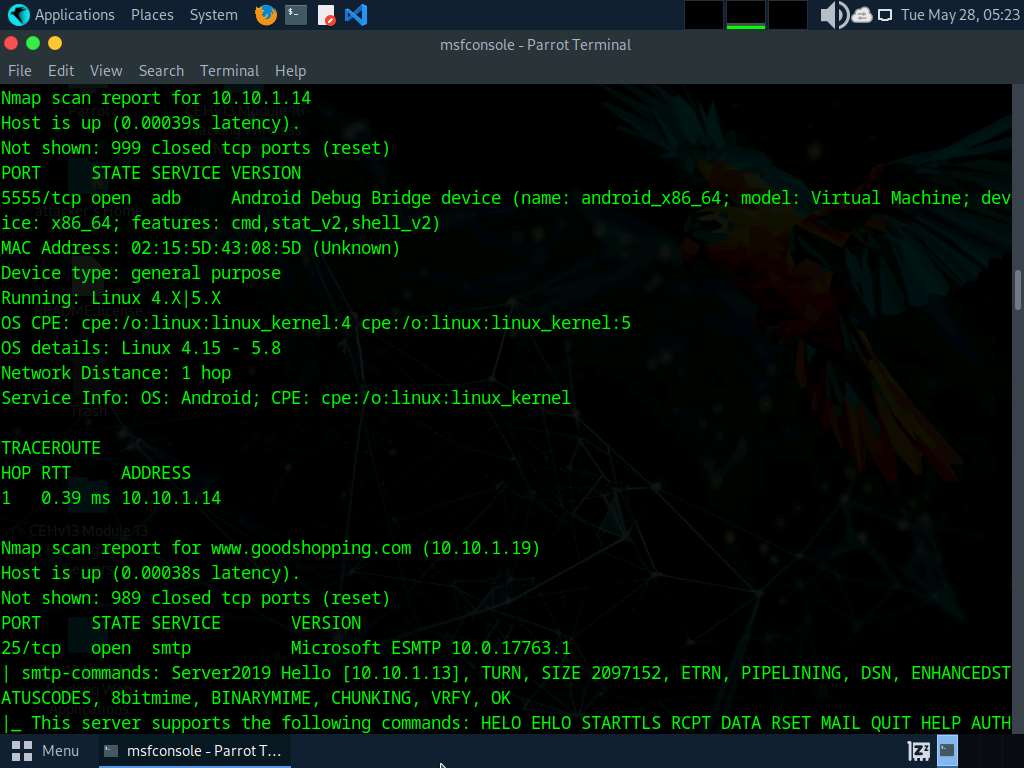
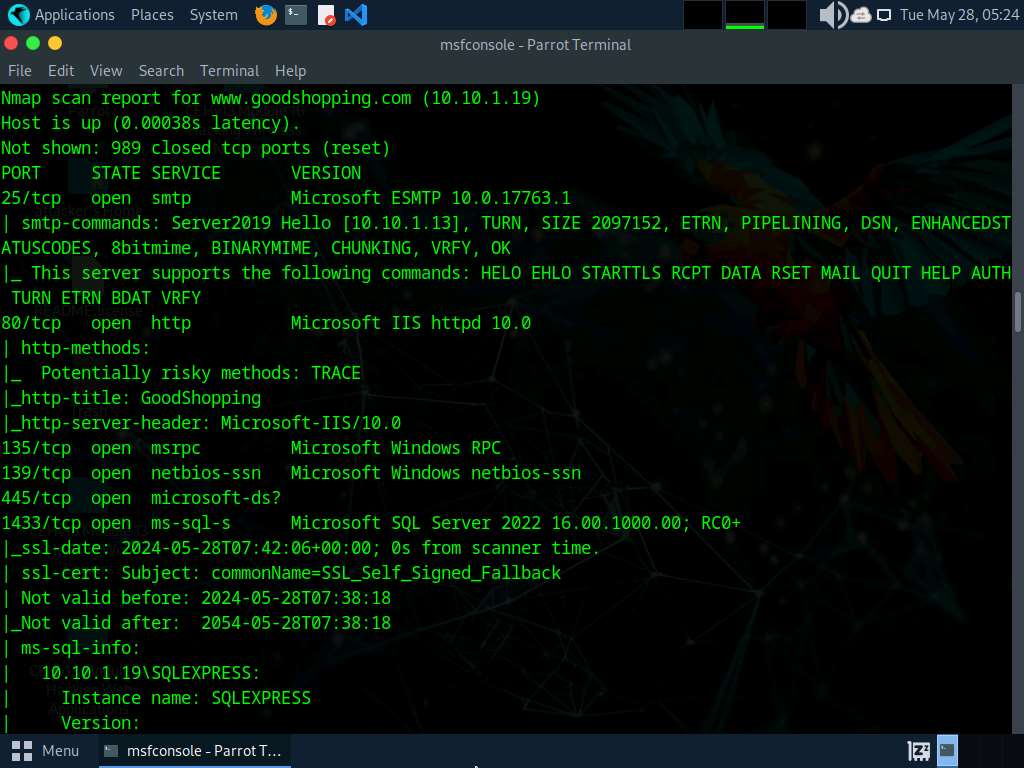
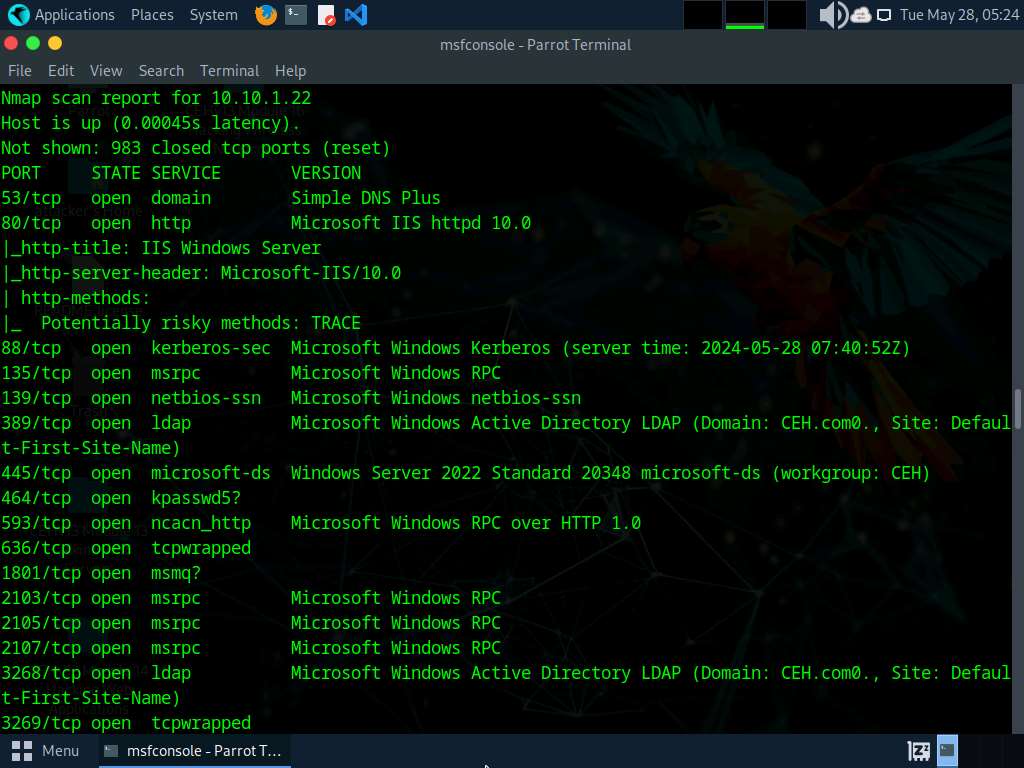
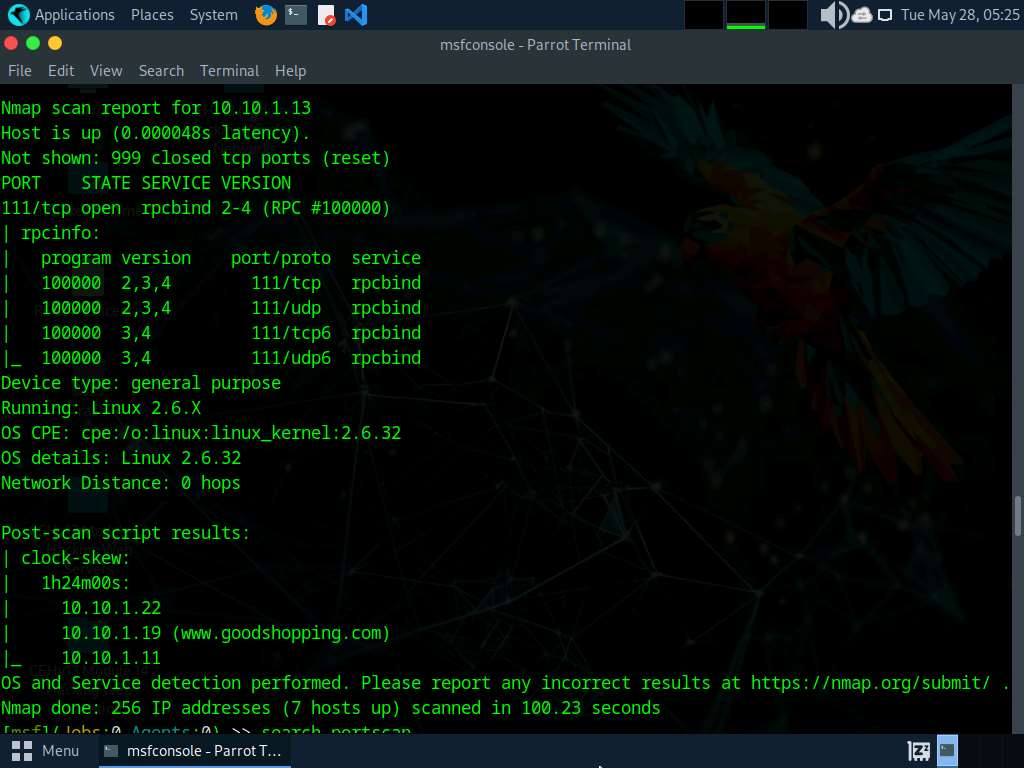
An msf command line appears. Type nmap -Pn -sS -A -oX Test 10.10.1.0/24 and press Enter to scan the subnet, as shown in the screenshot.
Here, we are scanning the whole subnet 10.10.1.0/24 for active hosts.
Nmap begins scanning the subnet and displays the results. It takes approximately 5 minutes for the scan to complete.
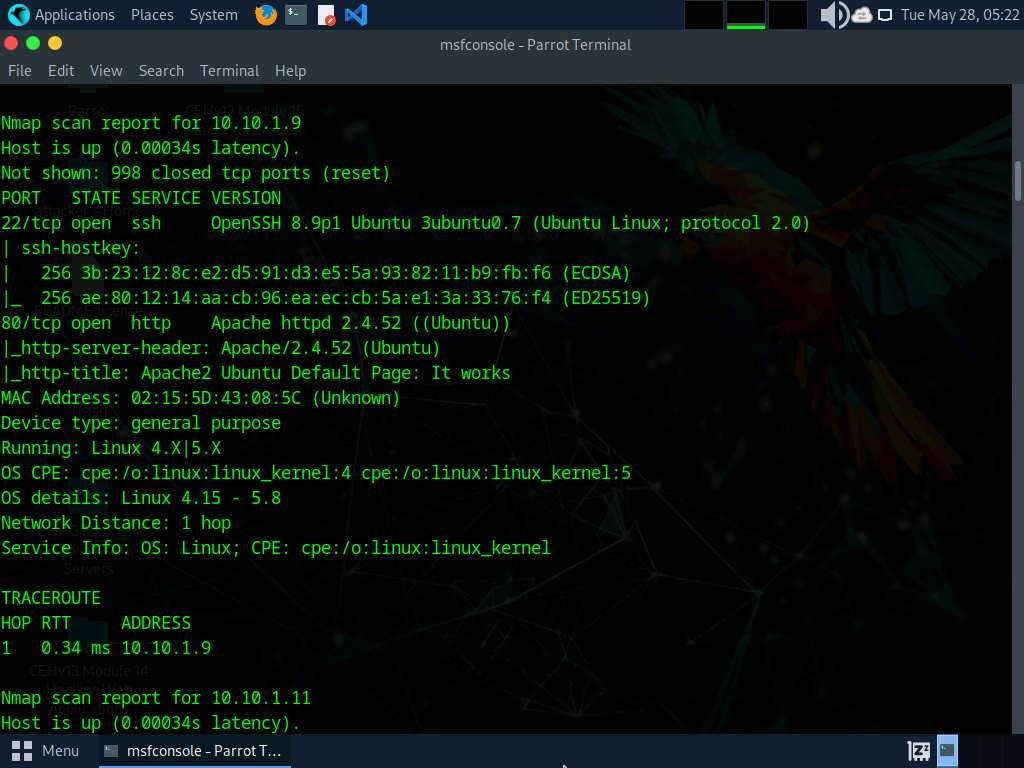
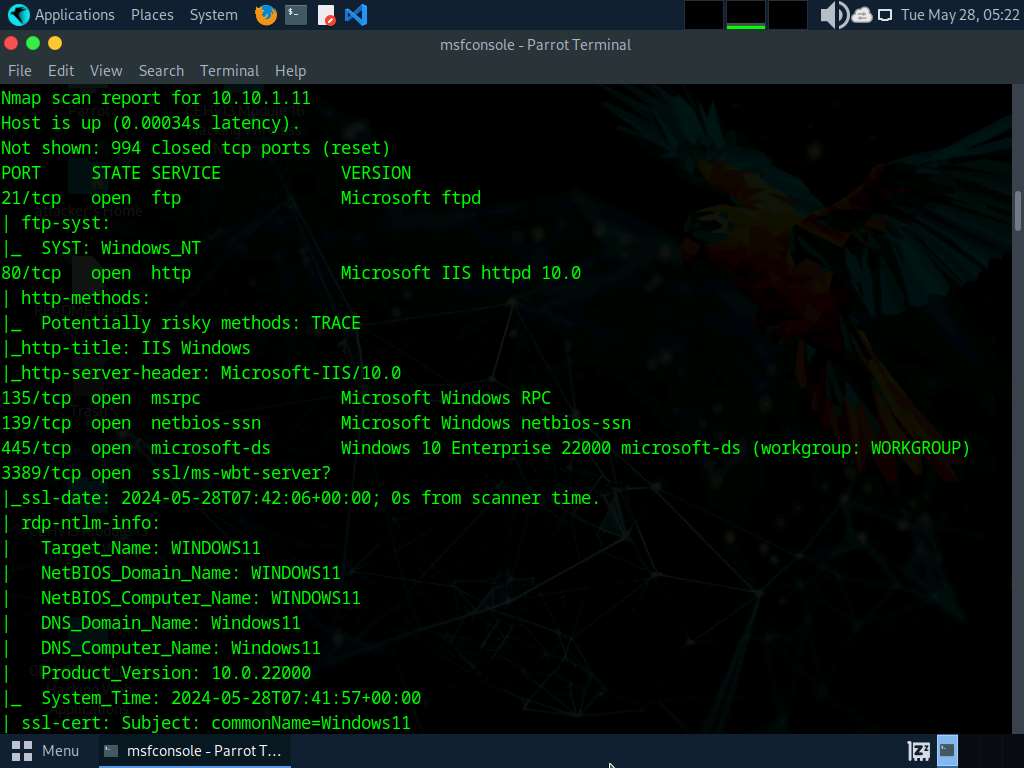
After the scan completes, Nmap displays the host information in the target network along with open ports, service and OS enumeration.
Type search portscan and press Enter. The Metasploit port scanning modules appear, as shown in the screenshot.
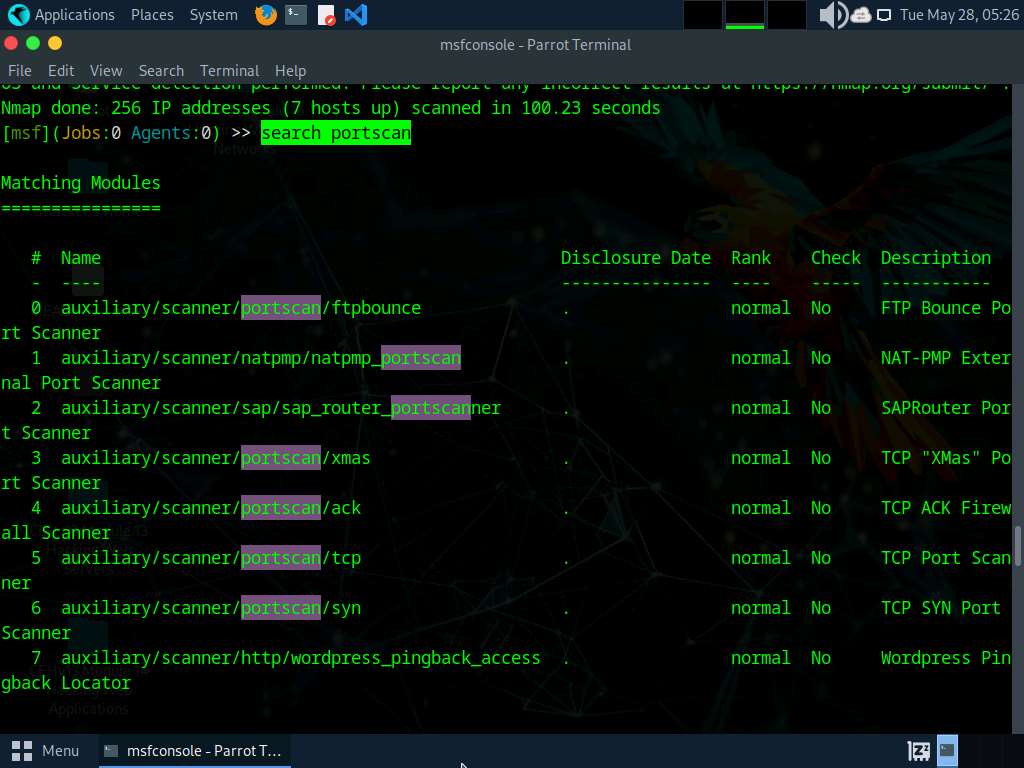
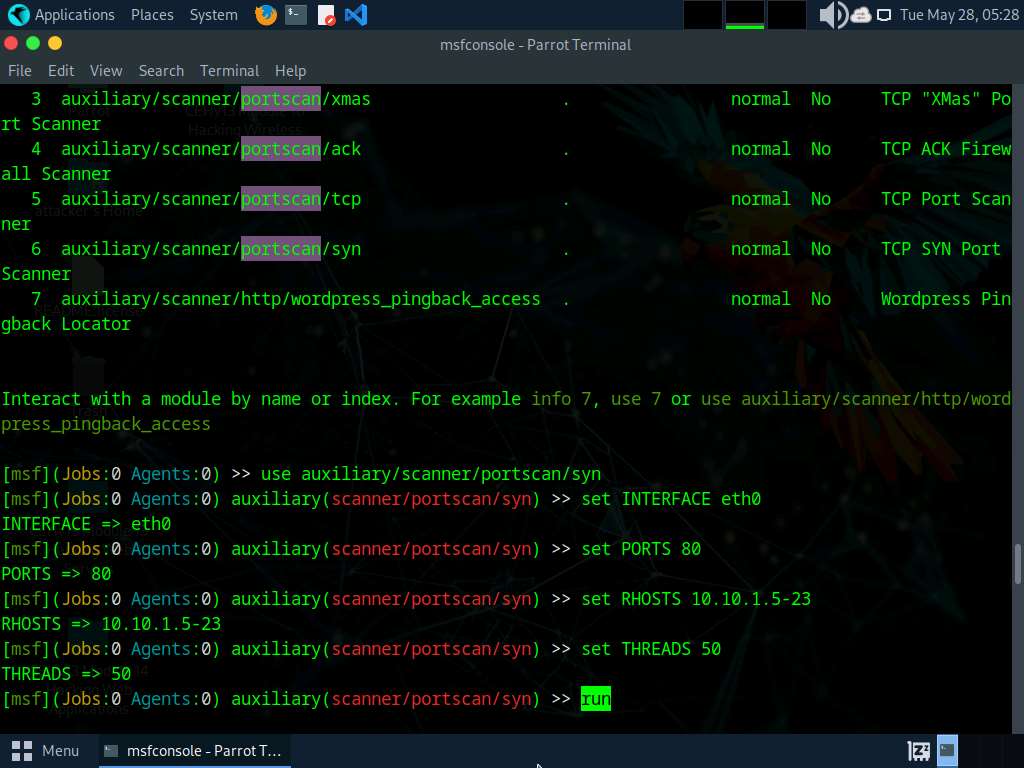
Here, we will use the auxiliary/scanner/portscan/syn module to perform an SYN scan on the target systems. To do so, type use auxiliary/scanner/portscan/syn and hit Enter.
We will use this module to perform an SYN scan against the target IP address range (10.10.1.5-23) to look for open port 80 through the eth0 interface.
To do so, issue the below commands:
- set INTERFACE eth0
- set PORTS 80
- set RHOSTS 10.10.1.5-23
- set THREADS 50
PORTS: specifies the ports to scan (e.g., 22-25, 80, 110-900), RHOSTS: specifies the target address range or CIDR identifier, and THREADS: specifies the number of concurrent threads (default 1).
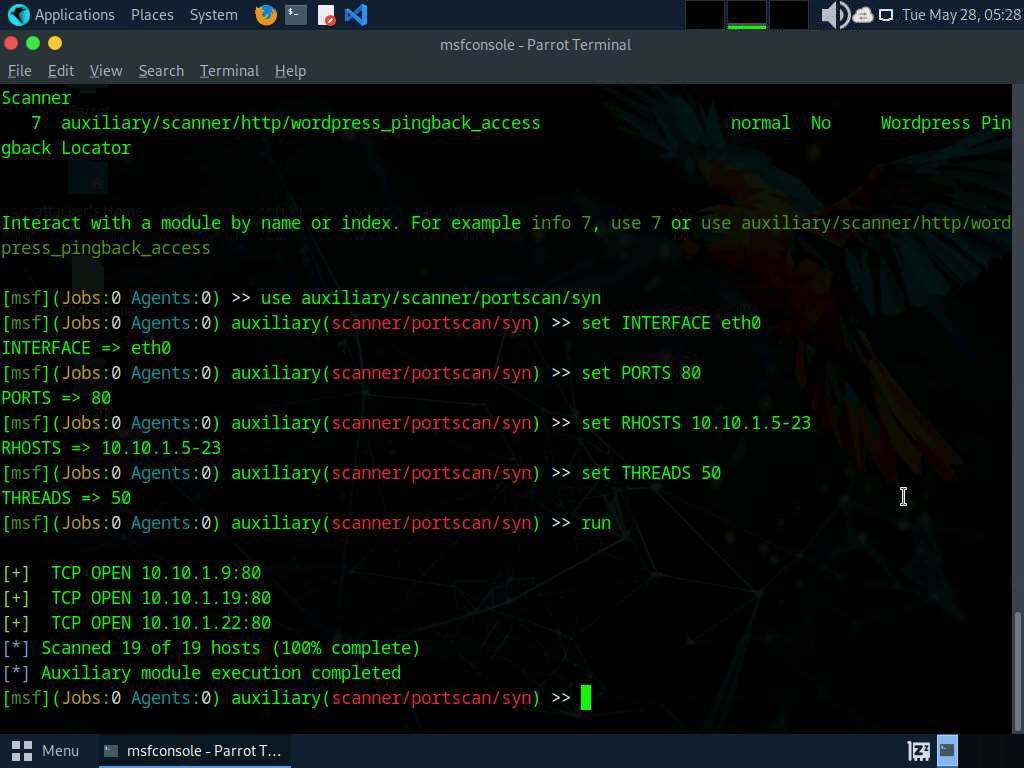
After specifying the above values, type run and press Enter, to initiate the scan against the target IP address range.
Similarly, you can also specify a range of ports to be scanned against the target IP address range.
The result appears, displaying open port 80 in active hosts, as shown in the screenshot.
Now, we will perform a TCP scan for open ports on the target systems.
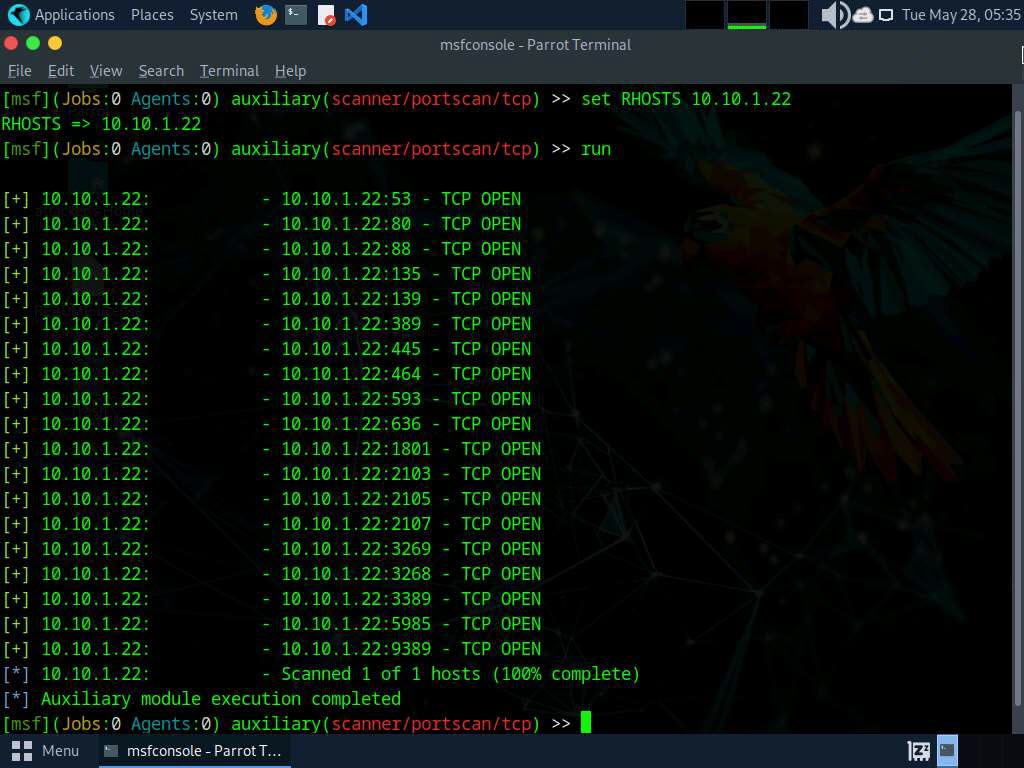
To load the auxiliary/scanner/portscan/tcp module, type use auxiliary/scanner/portscan/tcp and press Enter. Run show options command to view module options.
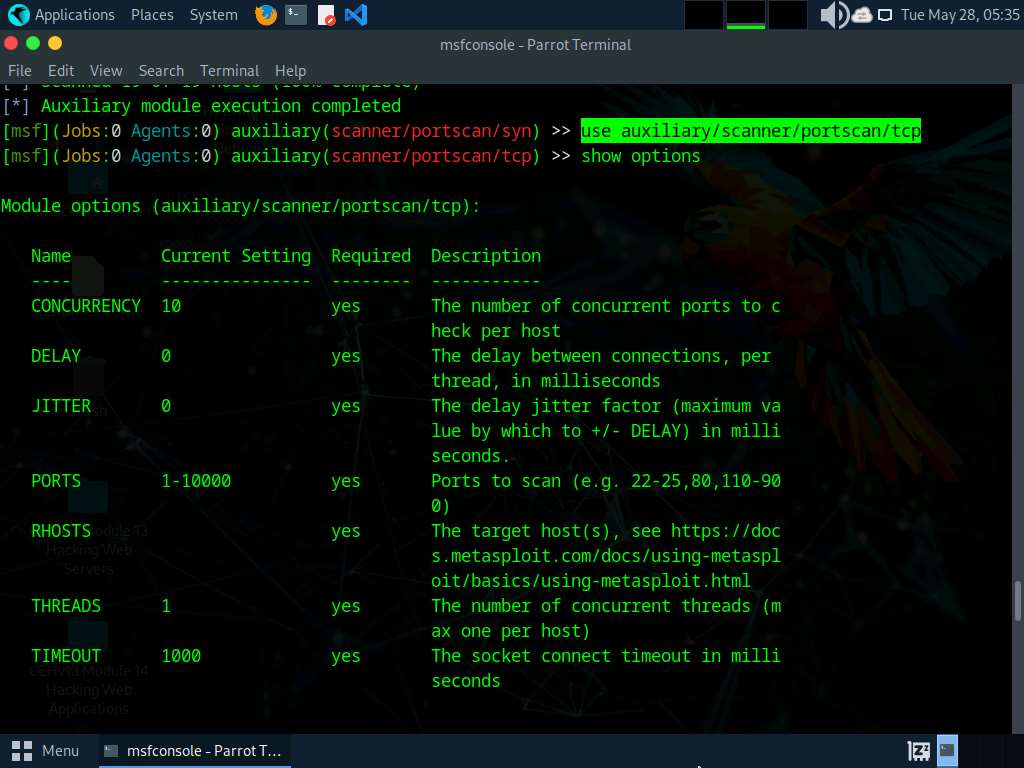
Type set RHOSTS [Target IP Address] and press Enter.
Here, we will perform a TCP scan for open ports on a single IP address (10.10.1.22), as scanning multiple IP addresses consumes much time.
Type run and press Enter to discover open TCP ports in the target system.
It will take approximately 20 minutes for the scan to complete.
The results appear, displaying all open TCP ports in the target IP address (10.10.1.22).
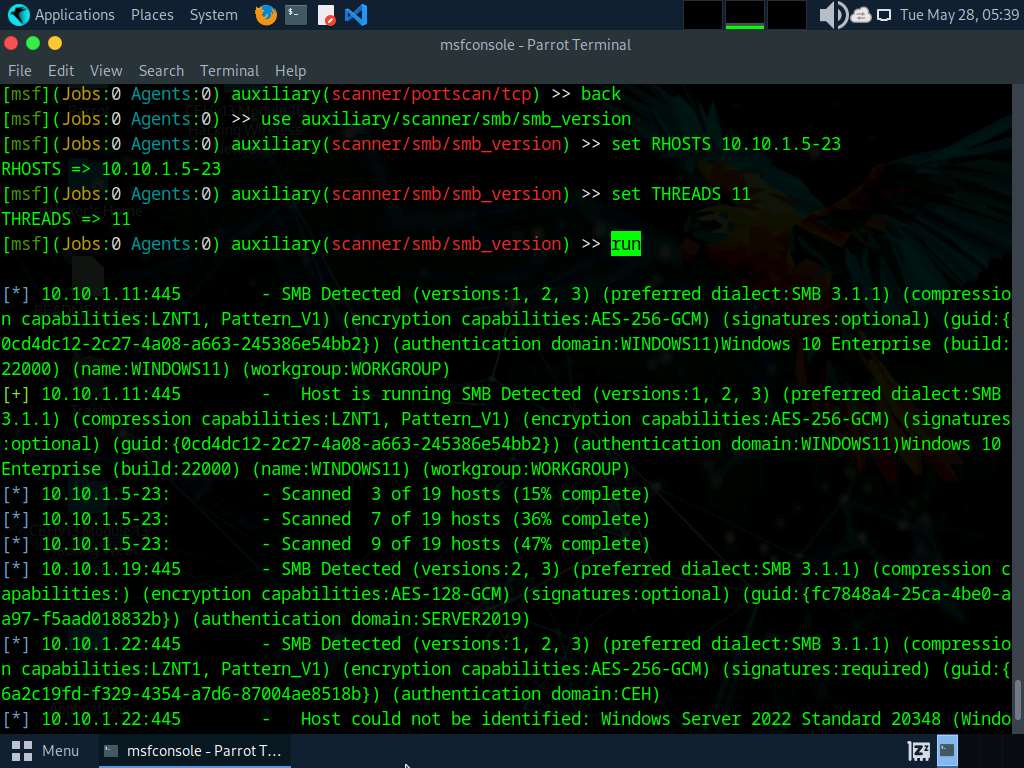
Now that we have determined the active hosts on the target network, we can further attempt to determine the OSes running on the target systems. As there are systems in our scan that have port 445 open, we will use the module scanner/smb/version to determine which version of Windows is running on a target and which Samba version is on a Linux host.
To do so, first type back, to revert to the msf command line. Then, type use auxiliary/scanner/smb/smb_version and hit enter.
We will use this module to run a SMB version scan against the target IP address range (10.10.1.5-23). To do so, issue the below commands:
set RHOSTS 10.10.1.5-23
set THREADS 11
Type run to discover SMB version in the target systems.
The result appears, displaying the OS details of the target hosts.
You can further explore various modules of Metasploit such as FTP module to identify the FTP version running in the target host.
This information can further be used to perform vulnerability analysis on the open services discovered in the target hosts.
This concludes the demonstration of gathering information on open ports, a list of services running on active hosts, and information related to OSes, amongst others.
Close all open windows and document all the acquired information.
Question 3.5.1.1
Lab 6: Perform Network Scanning using AI
Lab Scenario
As ethical hackers and penetration testers, it is crucial to leverage advanced tools and techniques to uncover hidden vulnerabilities in target networks. This lab focuses on utilizing AI-powered network scanning tools like ShellGPT to gather comprehensive information about systems within the target network.
Lab Objectives
- Scan a target using ShellGPT
Overview of Network Scanning using AI
Network scanning using AI enhances cybersecurity by automating the detection of vulnerabilities and threats. AI-driven tools analyze network traffic, identify anomalies, and predict potential attacks with high accuracy, providing proactive defense mechanisms and reducing response times for cybersecurity teams.
Task 1: Scan a Target using ShellGPT
ShellGPT is an AI-powered tool that can assist in scanning networks by automating tasks such as identifying active devices, detecting open ports, and analyzing network vulnerabilities. It leverages advanced algorithms to provide efficient, real-time insights, ensuring network security and performance optimization.
Here, we will use ShellGPT to discover active hosts, open ports, services running, and OS details of systems present in the target network.
The commands generated by ShellGPT may vary depending on the prompt used and the tools available on the machine. Due to these variables, the output generated by ShellGPT might differ from what is shown in the screenshots. These differences arise from the dynamic nature of the AI's processing and the diverse environments in which it operates. As a result, you may observe differences in command syntax, execution, and results while performing this lab task.
Before starting this lab, click Parrot Security to switch to the Parrot Security and login as toor. Open a Terminal window and execute sudo su to run the programs as a root user (When prompted, enter the password toor), machine and incorporate ShellGPT by following steps provided in Integrate ShellGPT in Parrot Security Machine.pdf.
Alternatively, you can follow the steps to integrate ShellGPT provided in Module 00: Integrate ShellGPT in Parrot Security Machine.
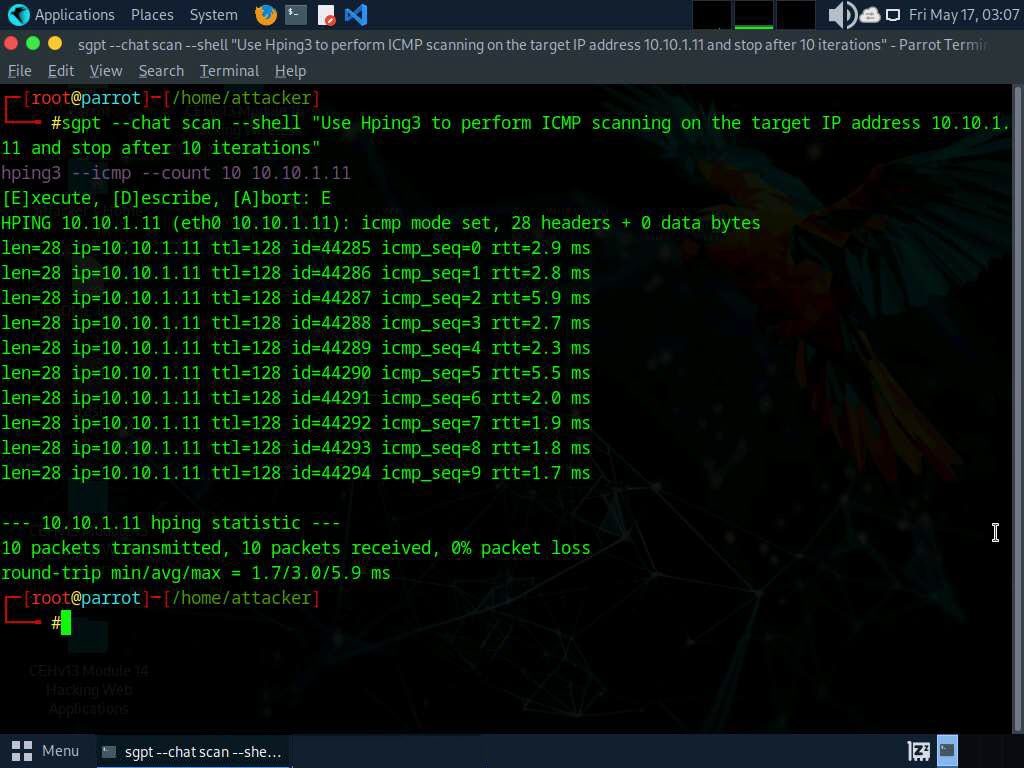
After incorporating the ShellGPT API in Parrot Security Machine, in the terminal window run sgpt --chat scan --shell “Use hping3 to perform ICMP scanning on the target IP address 10.10.1.11 and stop after 10 iterations” to perform ICMP scan on target IP address.
In the prompt type E and press Enter to execute the command.
Now, run sgpt --chat scan --shell “Run a hping3 ACK scan on port 80 of target IP 10.10.1.11” command to perform ACK scan on target IP address.
In the prompt type E and press Enter to execute the command.
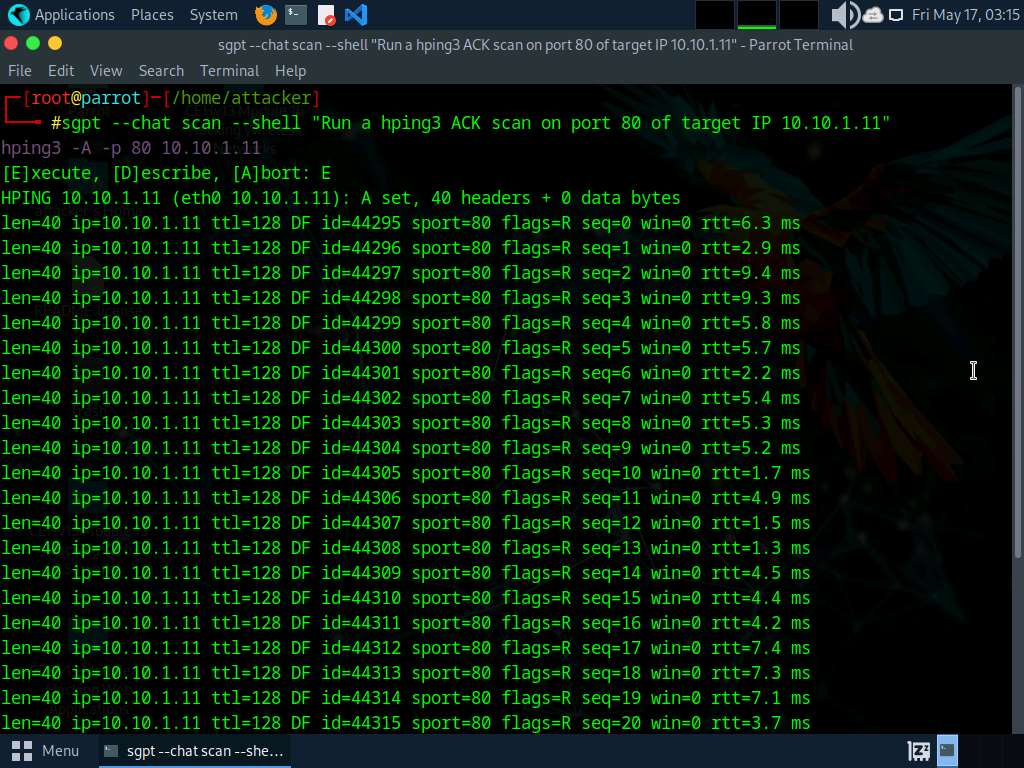
Press Ctrl + C to stop the scan.
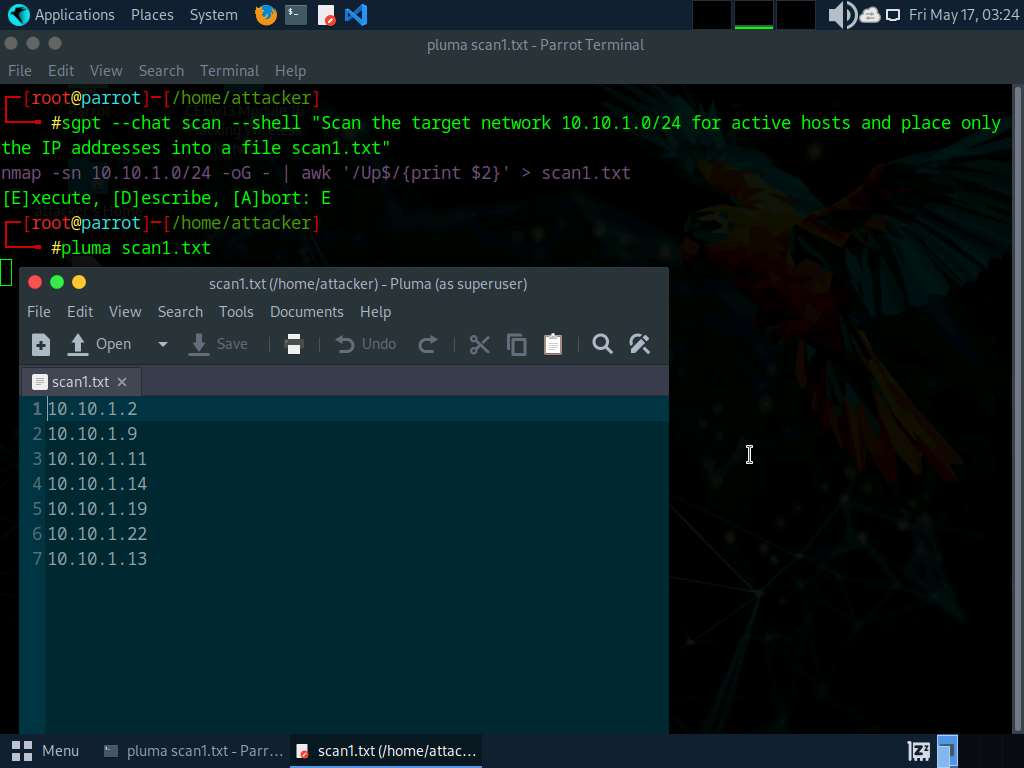
Run sgpt --chat scan --shell "Scan the target network 10.10.1.0/24 for active hosts and place only the IP addresses into a file scan1.txt” to perform host discovery.
In the prompt type E and press Enter to execute the command.
Now run pluma scan1.txt command to open scan1.txt file and view the IP addresses of active hosts in the target subnet.
Close the text editor window.
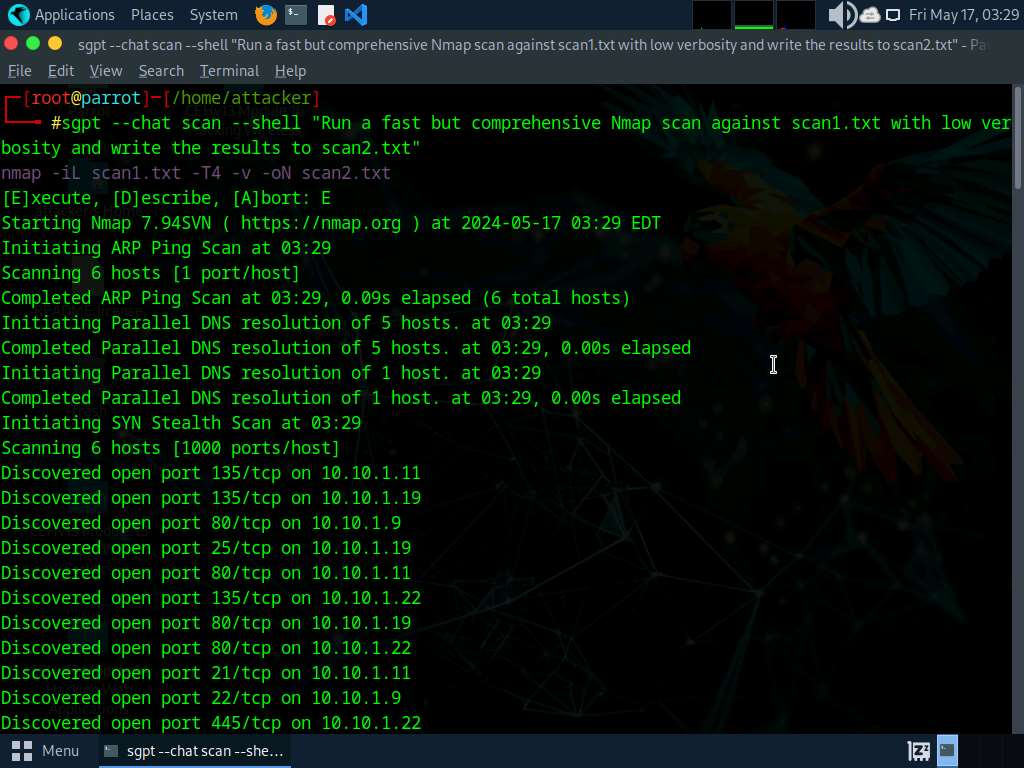
To perform nmap scan against the IP addresses that were gathered in previous step run sgpt --chat scan --shell "Run a fast but comprehensive nmap scan against scan1.txt with low verbosity and write the results to scan2.txt" command.
In the prompt type E and press Enter to execute the command.
After the scan run pluma scan2.txt command to open scan2.txt file and view the scan results.
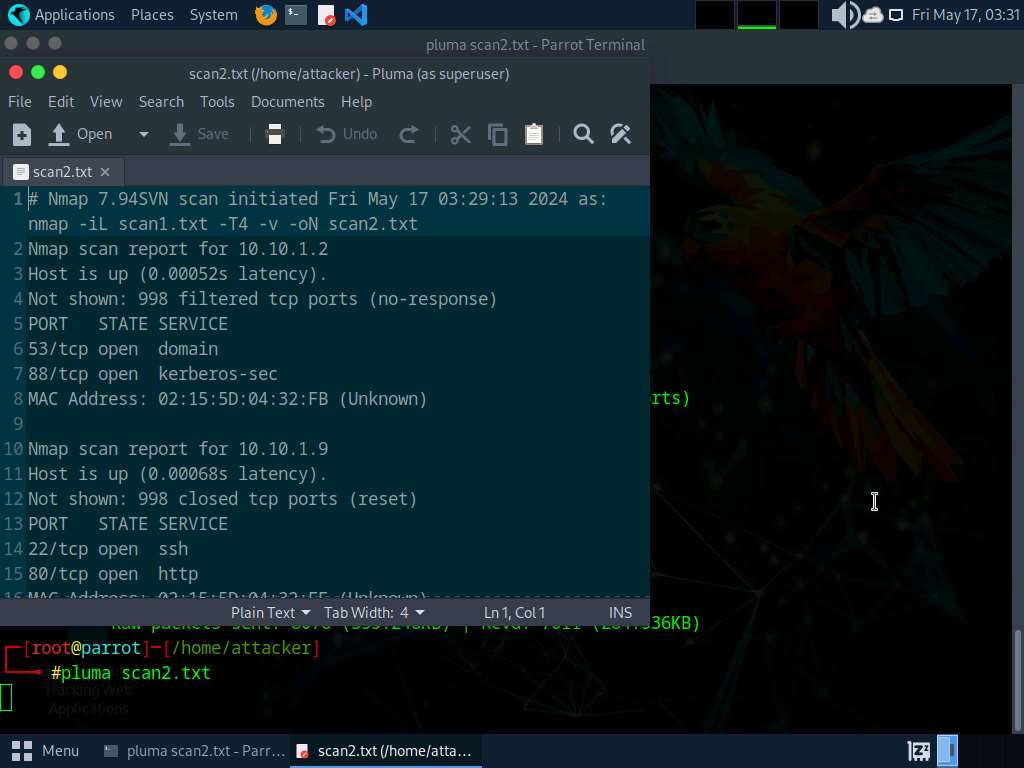
Close the text editor window.
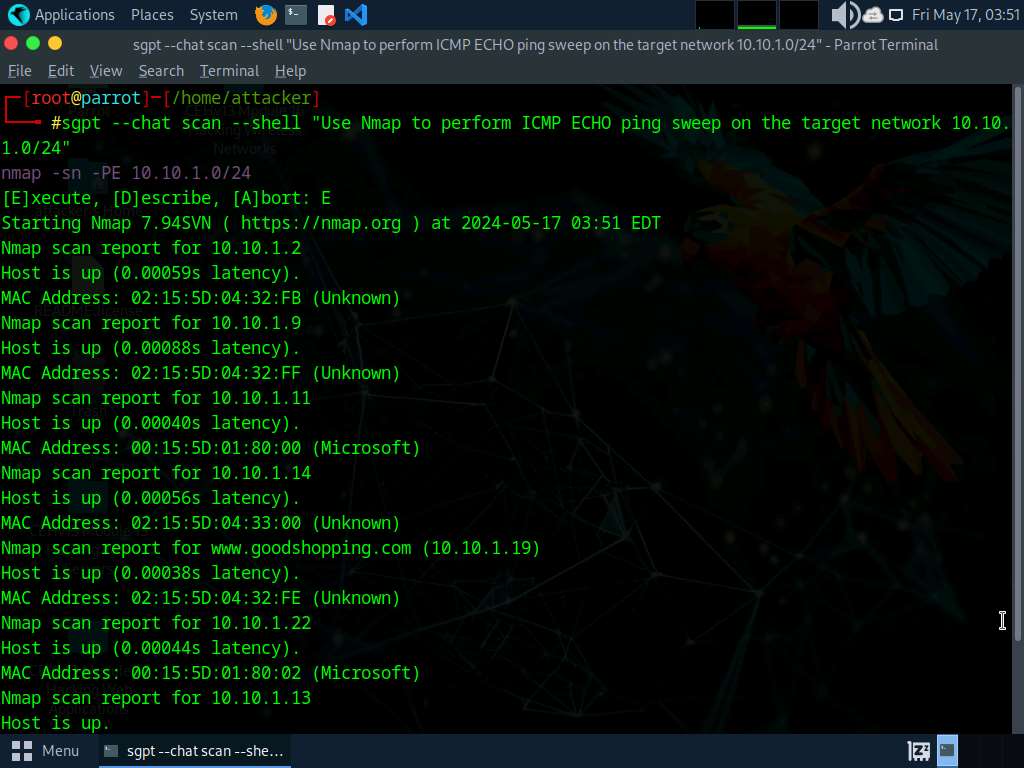
Run sgpt --chat scan --shell “Use nmap to perform ICMP ECHO ping sweep on the target network 10.10.1.0/24” command to perform ICMP ECHO ping sweep on the target network.
In the prompt type E and press Enter to execute the command.
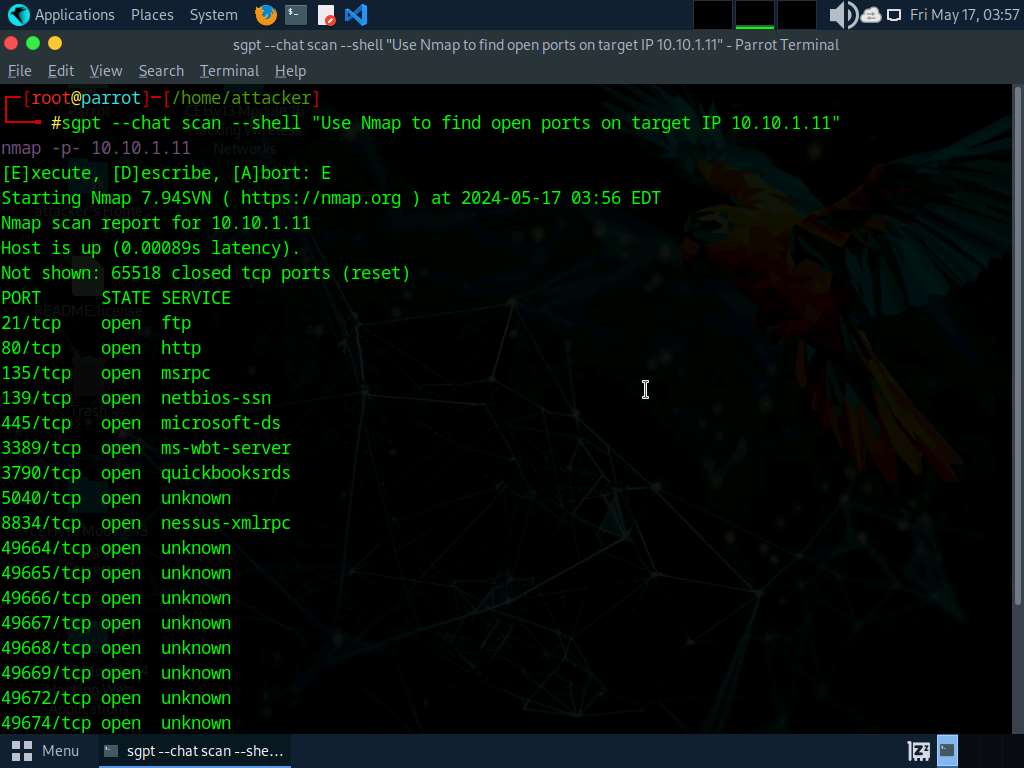
Now, we will perform port scanning using ShellGPT to do so, run sgpt --chat scan --shell “Use nmap to find open ports on target IP 10.10.1.11” command.
In the prompt type E and press Enter to execute the command.
The scan results will appear displaying all the open ports, pertaining to the target IP address.
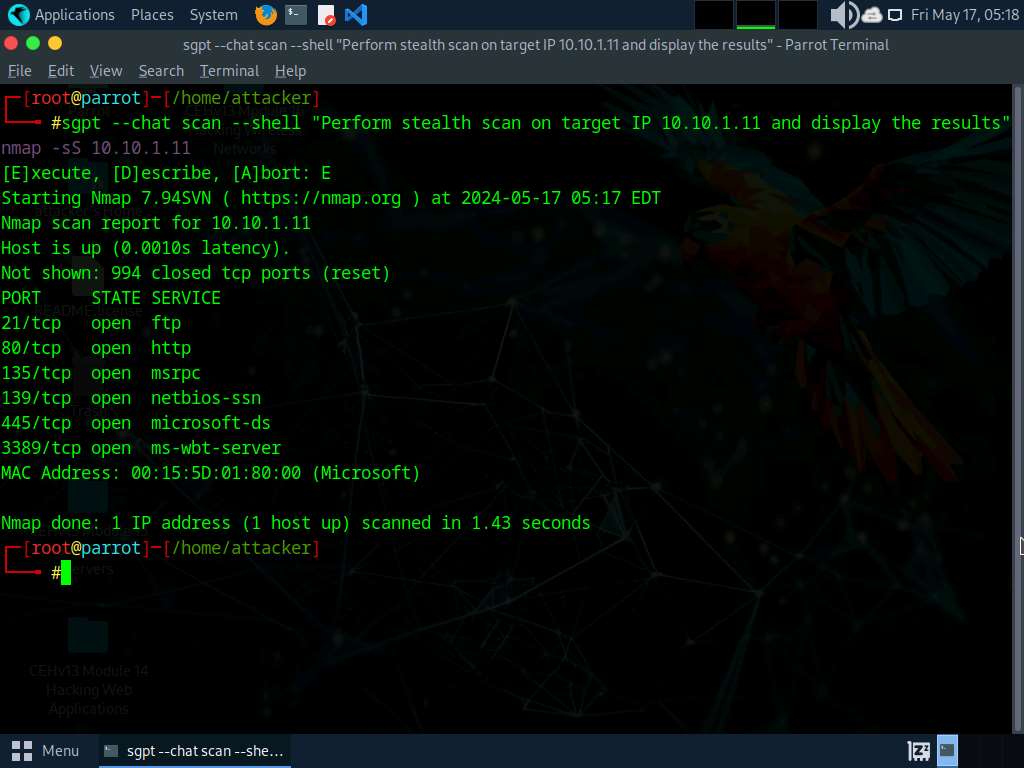
Now, we will perform stealth scan on a target IP, to do so, run sgpt --chat scan --shell "Perform stealth scan on target IP 10.10.1.11 and display the results" command.
In the prompt type E and press Enter to execute the command.
To perform XMAS scan on a target IP address, run sgpt --chat scan --shell “Perform an XMAS scan on target IP 10.10.1.11” command.

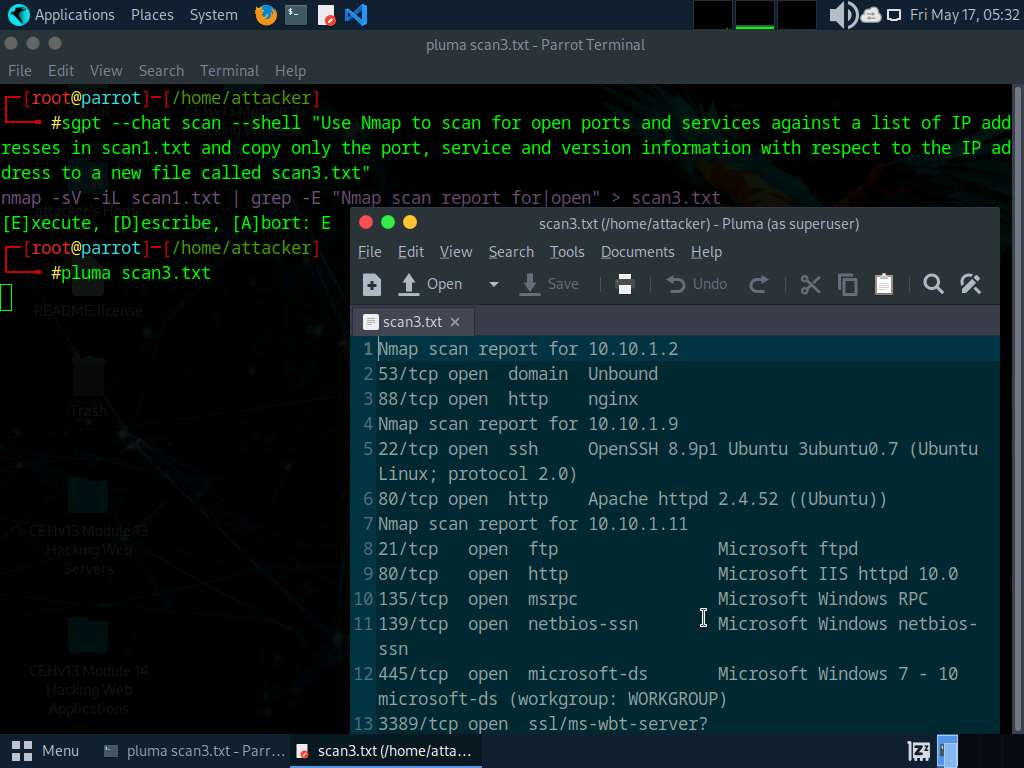
Run sgpt --chat scan --shell “Use Nmap to scan for open ports and services against a list of IP addresses in scan1.txt and copy only the port, service and version information with the respective IP address to a new file called scan3.txt” command to scan for open services and ports against the list of IP addresses acquired in Step#6.
In the prompt type E and press Enter to execute the command.
Once the scan is finished run pluma scan3.txt command to view the scan results.
Close the text editor window.
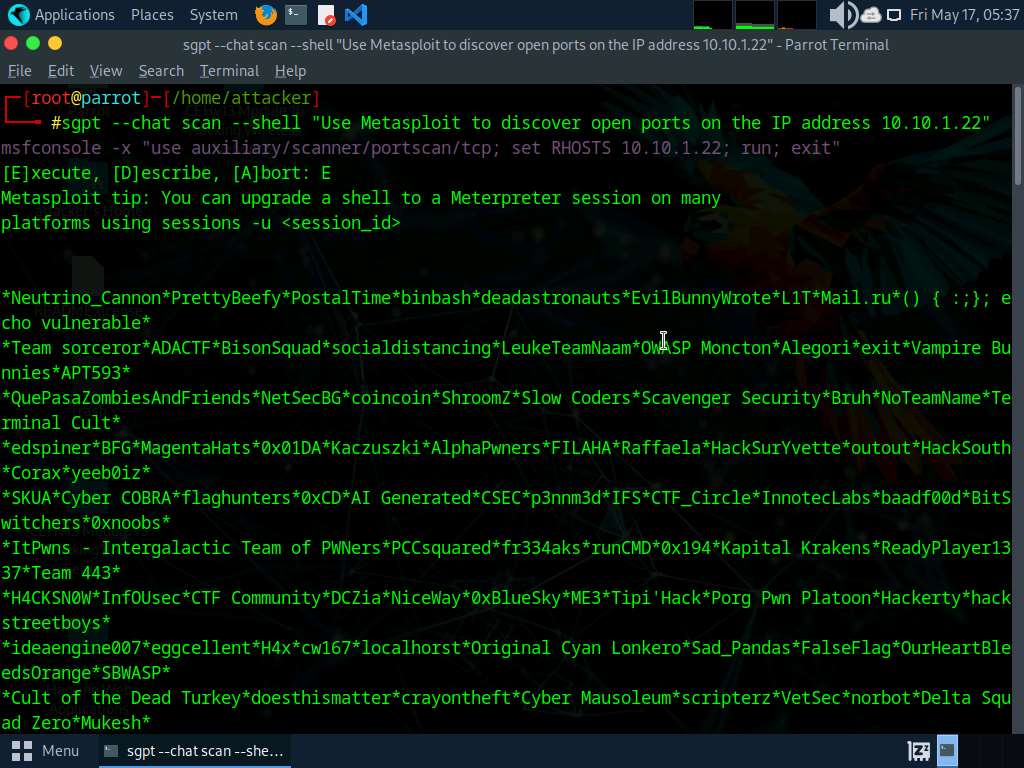
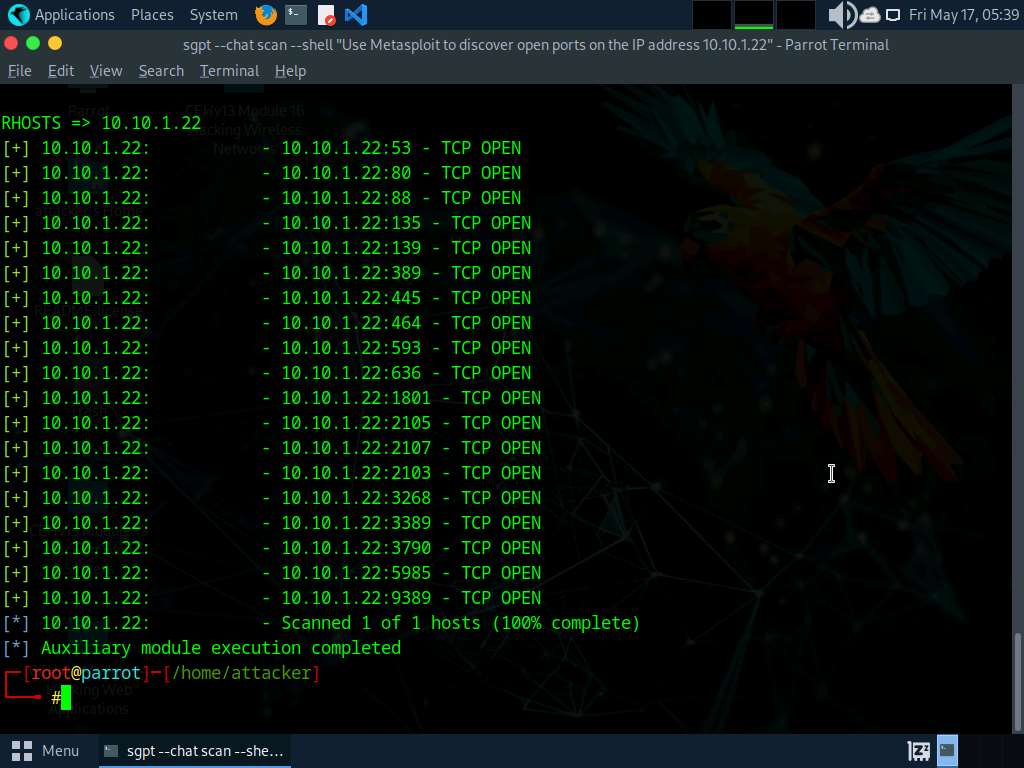
Now we will use Metasploit to discover open ports on a target system, run sgpt --chat scan --shell “Use Metasploit to discover open ports on the IP address 10.10.1.22” command.
In the prompt type E and press Enter to execute the command.
To perform service version discovery on a target system run sgpt --chat scan --shell “Use Nmap to scan open ports, MAC details, services running on open ports with their versions on target IP 10.10.1.11” command.
In the prompt type E and press Enter to execute the command.

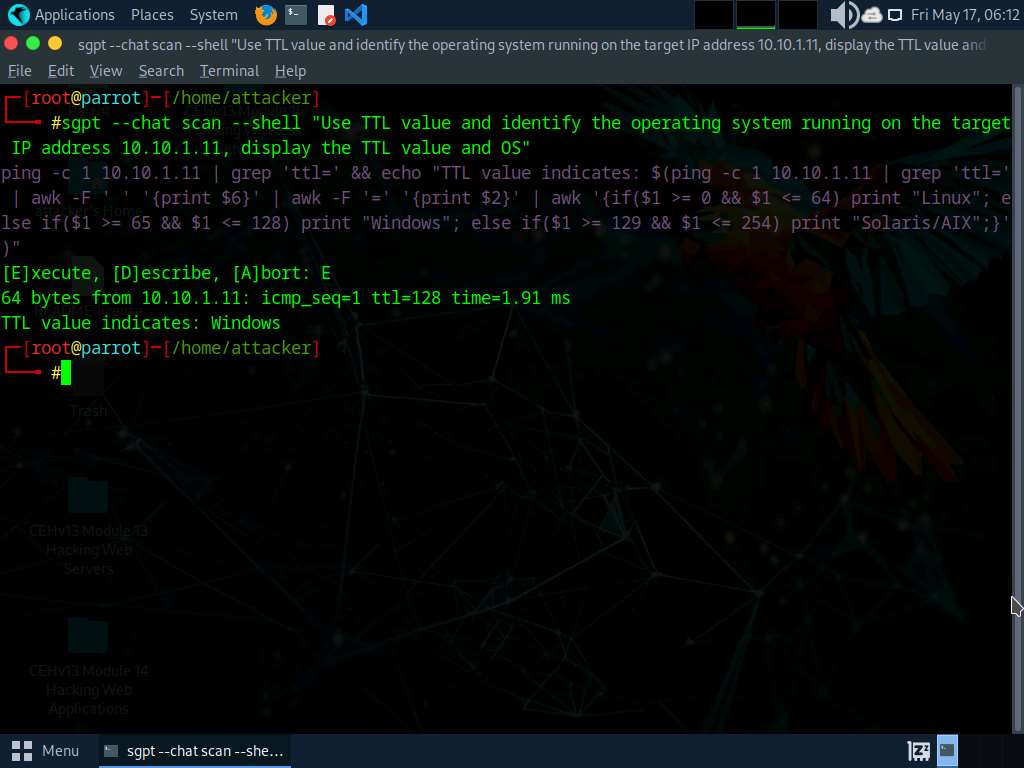
We will now perform OS discovery using ShellGPT, to do so run sgpt --chat scan --shell “Use TTL value and identify the operating system running on the target IP address 10.10.1.11, display the TTL value and OS” command.
In the prompt type E and press Enter to execute the command.
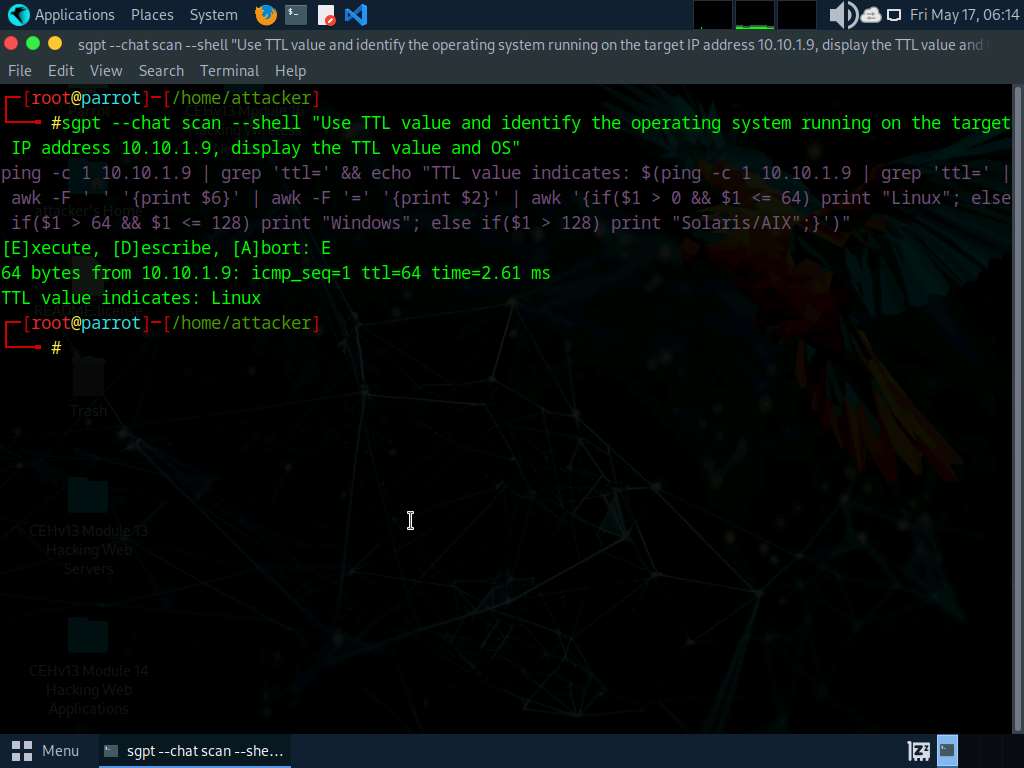
Run sgpt --chat scan --shell “Use TTL value and identify the operating system running on the target IP address 10.10.1.9, display the TTL value and OS”
In the prompt type E and press Enter to execute the command.
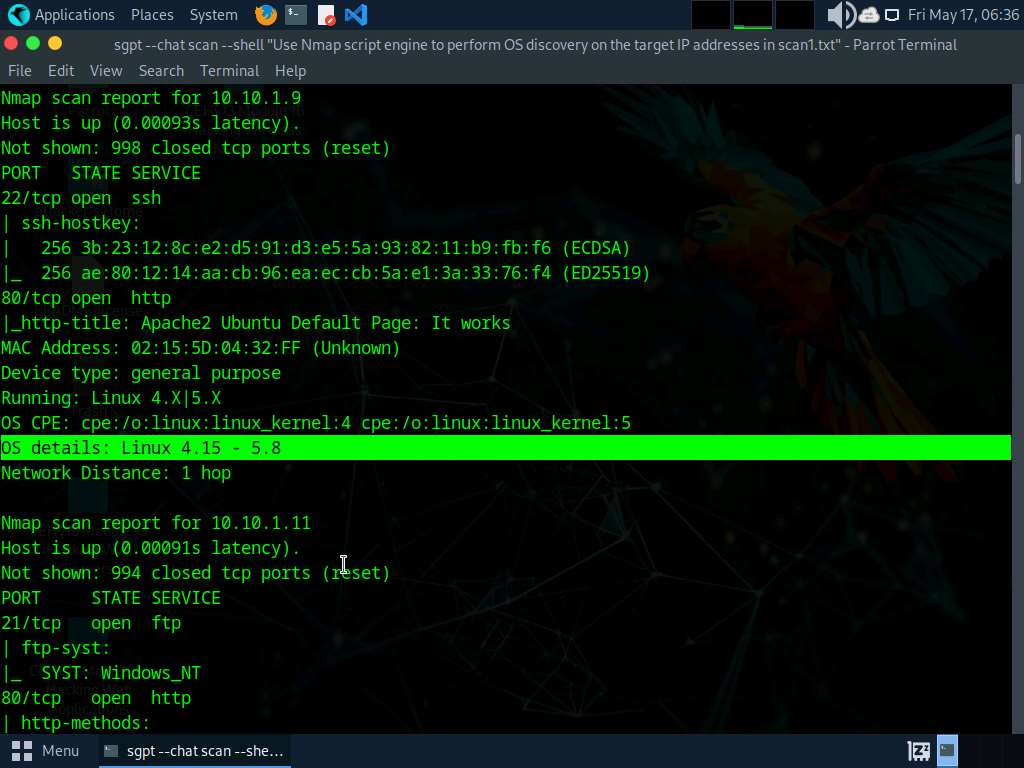
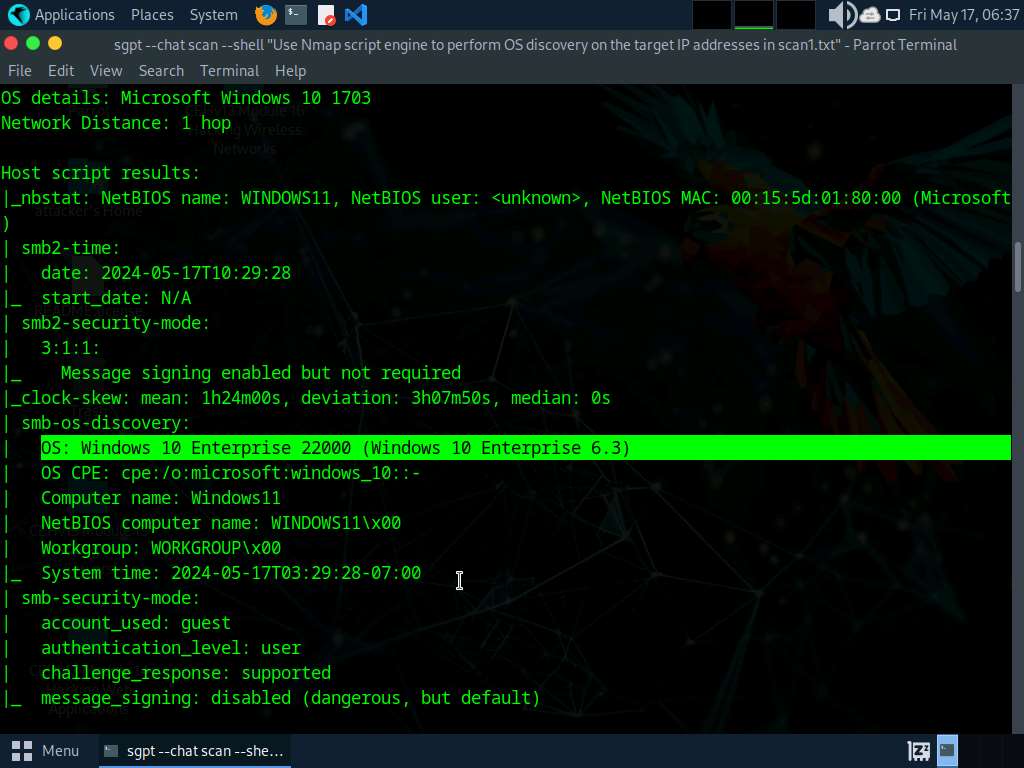
We will now perform OS discovery using Nmap on the list of IP addresses acquired in Step#6, to do so run sgpt --chat scan --shell “Use Nmap script engine to perform OS discovery on the target IP addresses in scan1.txt”
In the prompt type E and press Enter to execute the command.

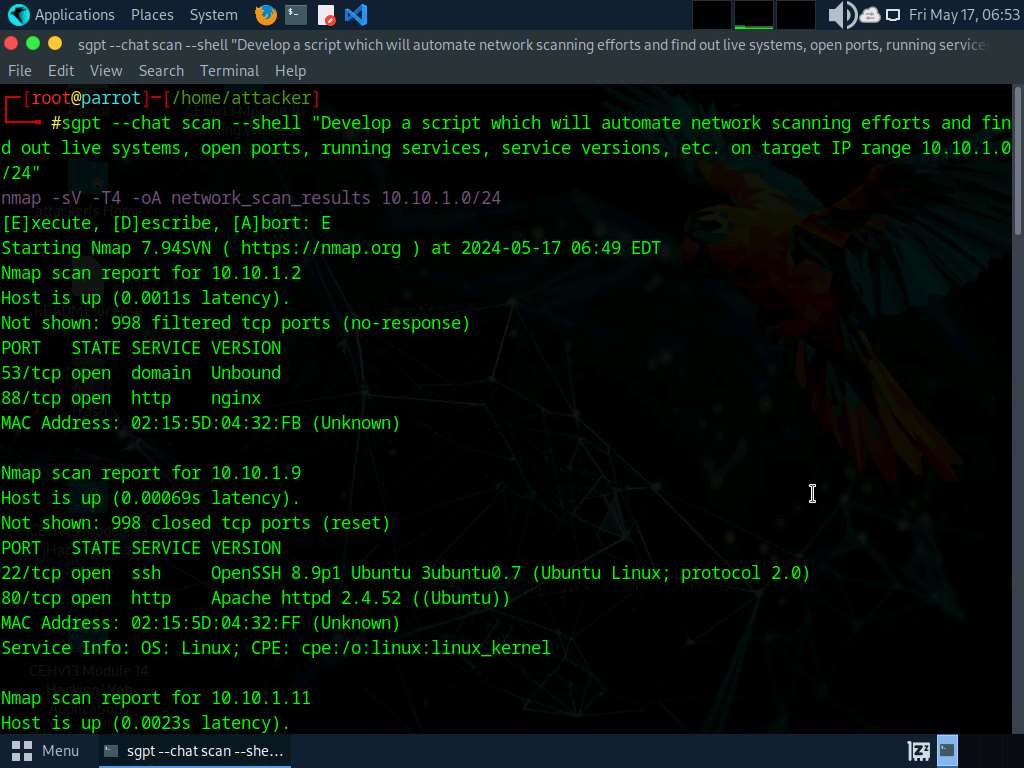
We will automate various network scanning tasks by create custom script that will run automatically and fetch the desired result.
In the terminal window run sgpt --chat scan --shell “Develop a script which will automate network scanning efforts and find out live systems, open ports, running services, service versions, etc. on target IP range 10.10.1.0/24” command.
In the prompt type E and press Enter to execute the command.
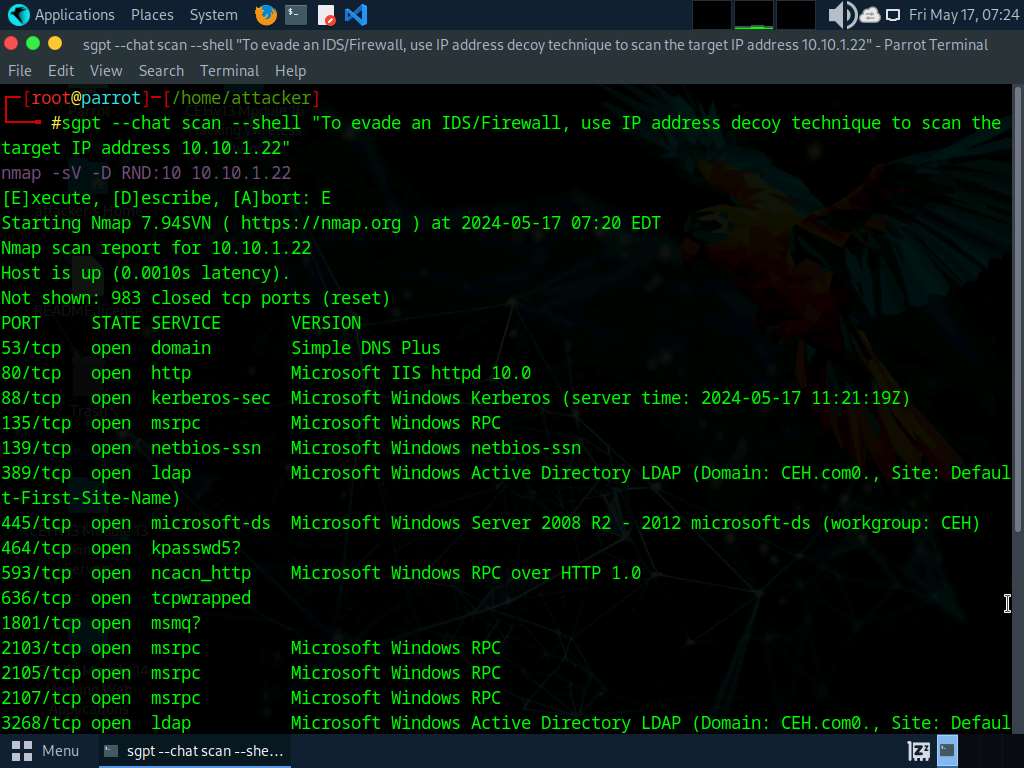
To use the IP Address Decoy technique to scan run sgpt --chat scan --shell “To evade an IDS/Firewall, use IP address decoy technique to scan the target IP address 10.10.1.22” command.
In the prompt type E and press Enter to execute the command.
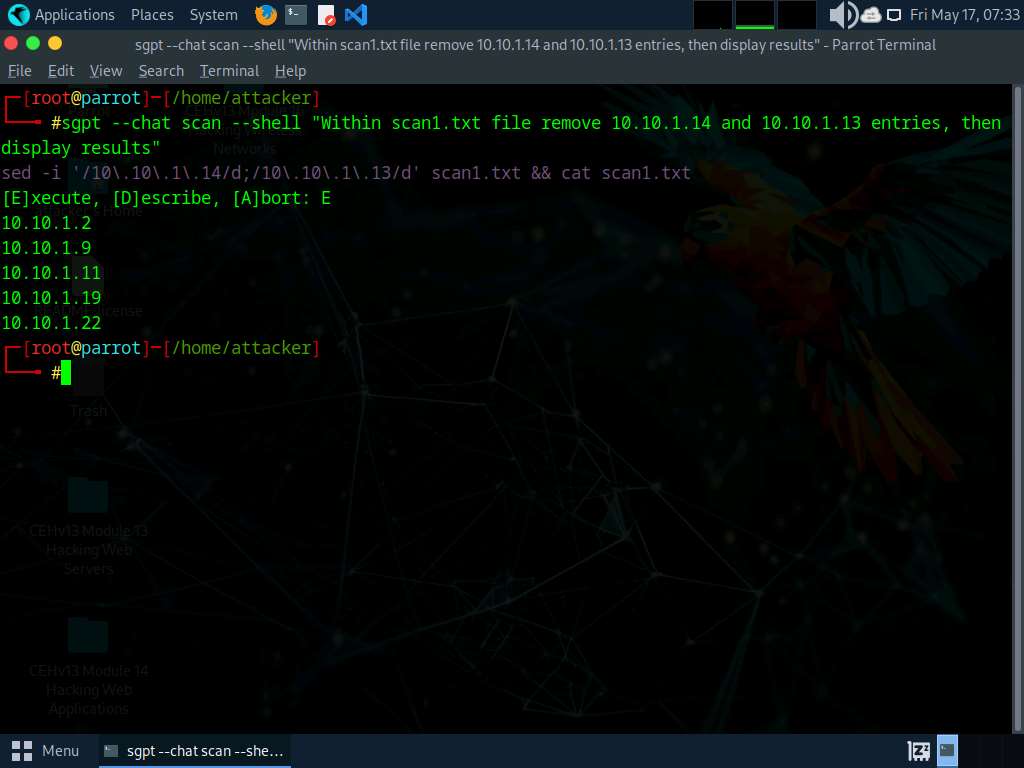
Now, run sgpt --chat scan --shell “Within scan1.txt file remove 10.10.1.14 and 10.10.1.13 entries, then display results” command to remove IP address from scan1.txt file and display result.
In the prompt type E and press Enter to execute the command.
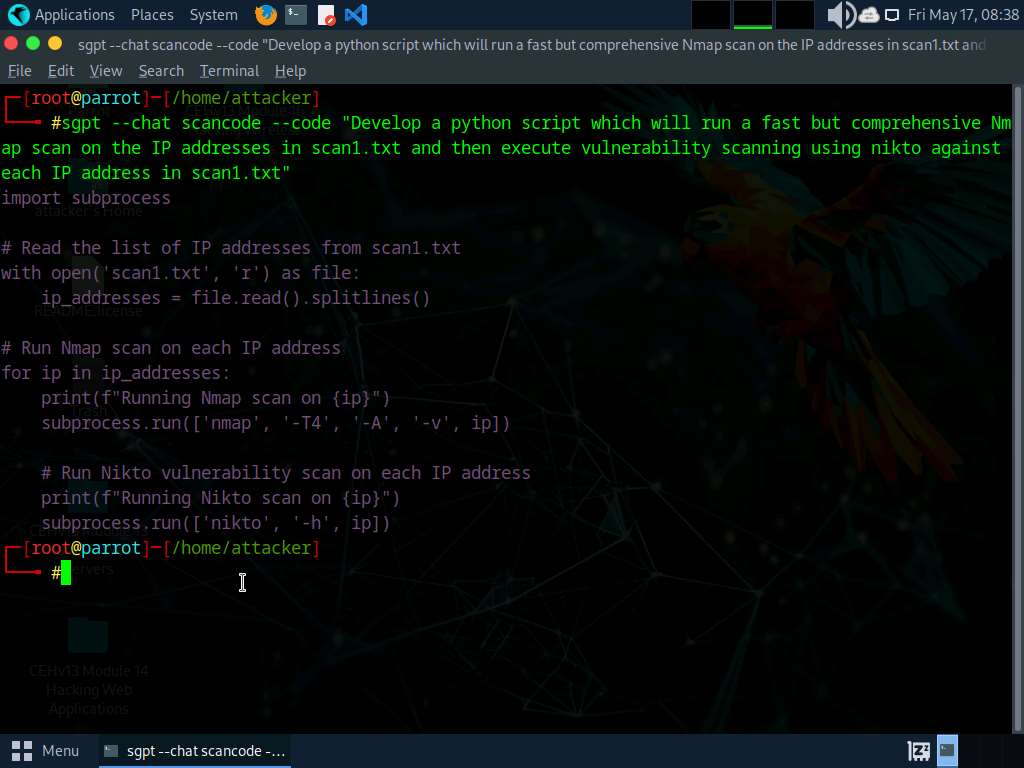
Run sgpt --chat scancode --code “Create a python script to run a fast but comprehensive Nmap scan on the IP addresses in scan1.txt and then execute vulnerability scanning using nikto against each IP address in scan1.txt” command to create a python script which performs Nmap scan.
In the prompt type E and press Enter to execute the command.
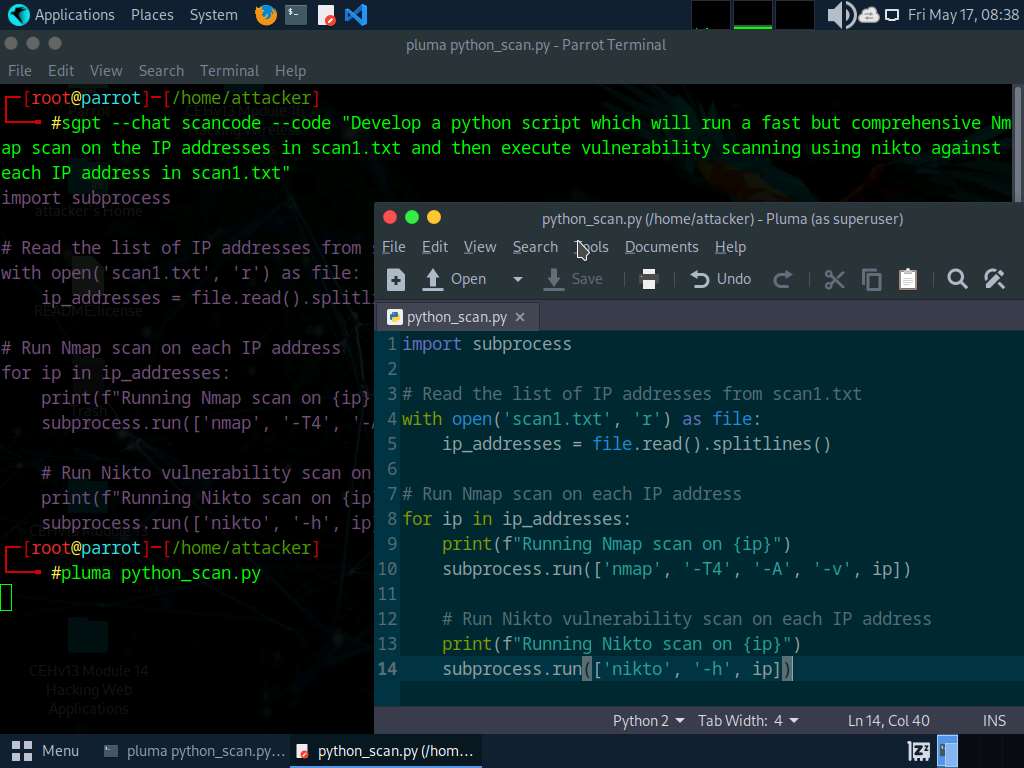
Now, copy the python code and type pluma python_scan.py in the terminal. A Text editor window opens paste the code in the text editor window, save the file and close it.
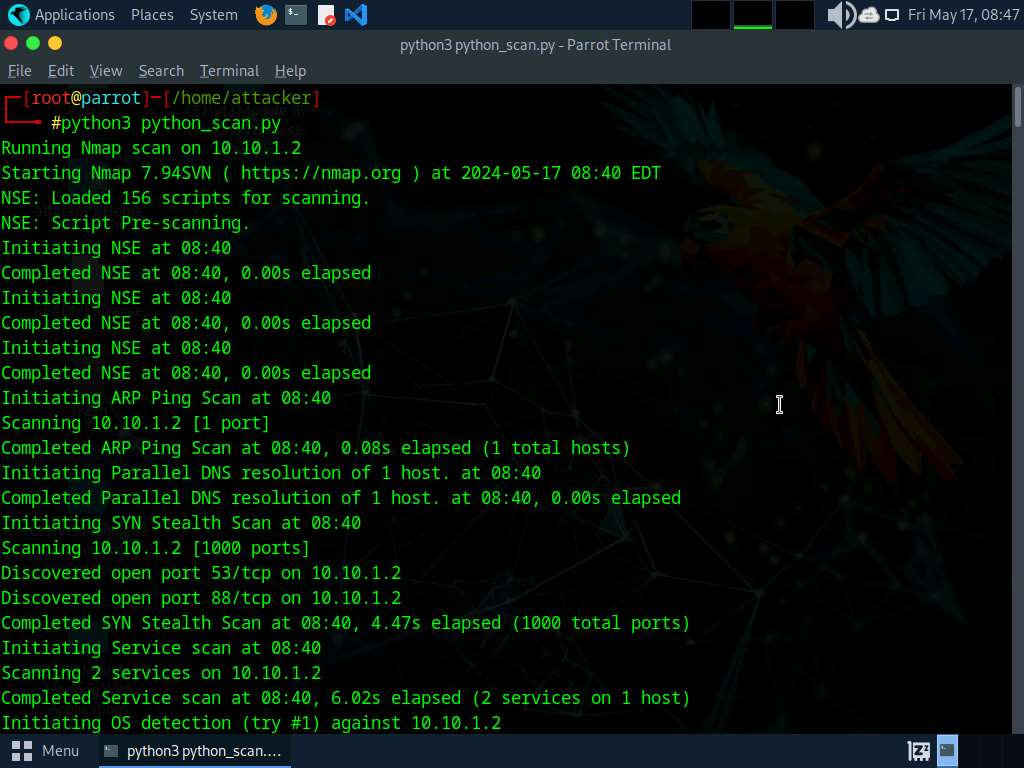
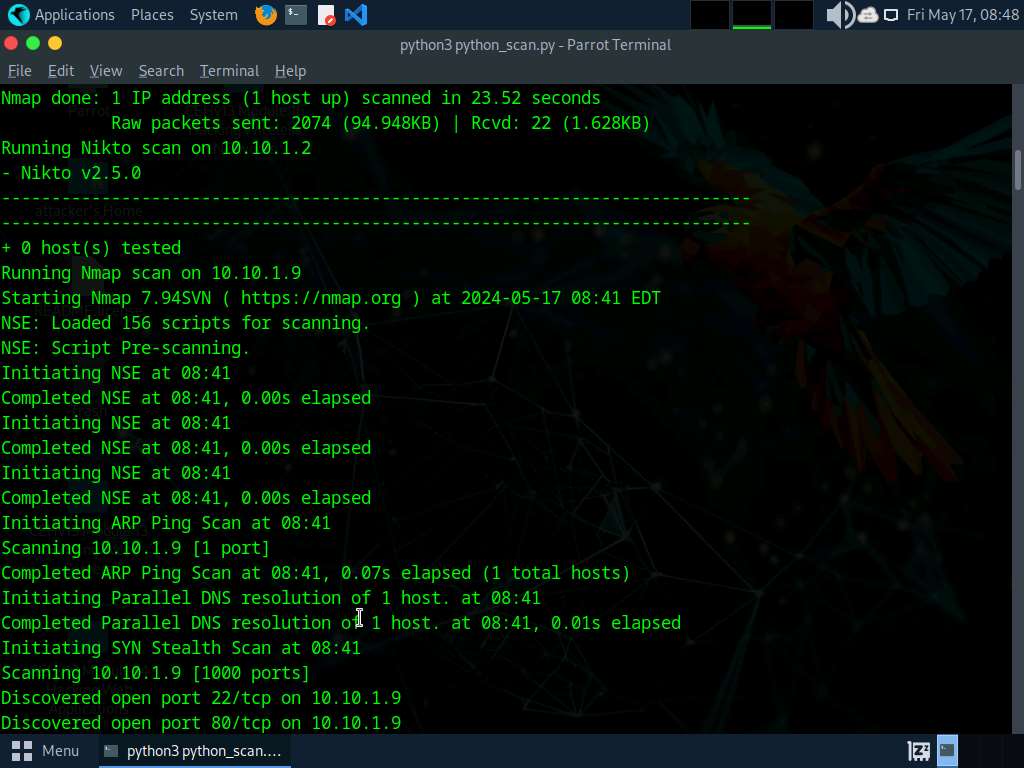
Now, in the terminal window, type python3 python_scan.py to run the script.
Apart from the aforementioned commands, you can further explore additional options within the ShellGPT tool and utilize various other tools to conduct Network Scanning on the target machine.
This concludes the demonstration of using ShellGPT to discover active hosts, open ports, services running, and OS details of systems present in the target network.
Close all open windows and document all the acquired information.
Question 3.6.1.1


No comments:
Post a Comment