There are one related post in this blog:
Add HTML snippet widget to Blog sites
<div id="mydiv"></div>
<script type="application/javascript">
  function getIP(json) {
    document.write("Your public IP address is: ", json.ip);
  }
</script>

<script type="application/javascript" src="https://api.ipify.org?format=jsonp&callback=getIP"></script><div id="mydiv"></div>
<script>
var getIP = function(json) {
document.getElementById("mydiv").innerHTML = json.ip;
}
</script>
<script type="application/javascript" src="https://api.ipify.org?format=jsonp&callback=getIP">
</script>Hide Copyright info from Certain Blogger Template
Blogger Posts Search Results
- label:Blog
- sort:updated
| What you can search by | Search operator | Examples |
|---|---|---|
| Sort the results |
Values: Add a minus sign to reverse order |
|
| Start for a given position |
The default start index position is 0. |
|
| Filter by status |
Values: If you don't include a value in your search, all items will show up. |
|
| Search by author |
|
|
| Search for words in the post title |
|
|
| Search for words in the post body |
|
|
| Search for posts by labels |
|
|
| Search for terms with multiple words |
|
|
| Include multiple terms in a search (available for status, title, body, and label terms) |
|
|
| Filter posts created, published, or updated during a specific time range |
|
|
How to quick and easy to insert a table
If you would like to insert table using HTML code, here is an example:
Table 3x2 Example Code
<table>
<tbody>
    <tr>
        <td>Cell 1.1</td>
        <td>Cell 1.2</td>
    </tr>
    <tr>
        <td>Cell 2.1</td>
        <td>Cell 2.2</td>
    </tr>
    <tr>
        <td>Cell 3.1</td>
        <td>Cell 3.2</td>
    </tr>
</tbody>
</table>
Adjust Right Sidebar margin width
#sidebar-right-1{Add the code to Blogger Them Designer - Advanced - Add CSS section as show below.
position: relative;
left: 40px !important;
}
Add youtube Playlist into blogger
2. Add html code into your Blogger layout
It is best to put code between <center> and </center> to get better center location in your page.
<center><iframe width="560" height="315" src="https://www.youtube.com/embed/videoseries?list=PLg7bL1bMpwPXUwb-BsLKolf42uWa0_nfY" frameborder="0" allowfullscreen></iframe></center>
Add Third Party Domain
 |
| GoDaddy CNAME Setting |
 |
| Blogger Domain Settings |
Redirect Blogspot Site from One to Another
a. This is current way I am using and found it is best so far.
<script>
var oldURL = "51sec.blogspot.com";
var newURL = "blog.51sec.org";
var url = location.href;
var newURL = url.replace(document.domain,newURL);
window.location = newURL
</script>
b. It will only redirect all posts or pages to the homepage site, not passing url parameters.
<meta content='0;url=http://91sec.blogspot.com' http-equiv='refresh'/>
c. The code works on some of URLs but some were got messed up.
<script type='text/javascript'>
var d='<data:blog.url/>';
d=d.replace(/.*\/\/[^\/]*/,'');
location.href='http://91sec.blogspot.com'+d;
</script>
Put images side by side in Blogger's posts without code
- Put both images' size into small format to make editor easier to preview the layout of both images.
- Move any one of your images up or down to align well with anther one side by side.
- If they did not align very well, you can put your cursor in front of the image, press enter to make it align better.
- last step, change image size back to medium if you want them look bigger than small.
Note: If you got three images to align side by side, the process is same as the steps shown above.
Add a code section into your post
<table style="background-color: black; border-collapse: collapse; border-color: rgb(51, 102, 0); border-style: solid; border-width: 0px; font-family: "helvetica neue","arial","helvetica",sans-serif; width: 100%;"> <tbody> <tr> <td><div style="text-align: justify;"> <span style="color: lime;"><br /></span> <span style="color: lime;">test </span></div> <div style="text-align: justify;"> <span style="color: lime;">john </span></div> </td> </tr> </tbody></table>
2 HTML Code 2
<pre class="putty" style="background-color: rgb(0, 0, 0) !important; color: rgb(0, 255, 0) !important; font-family: "Courier New", monospace !important; font-size: 12px; margin: auto; padding: 2px; text-align: justify; white-space: pre-wrap; width: 650px;"> </pre>
Add a drop down menu to Blogspot
Change Collapse Label to Expanded in New Theme
- Click on "Jump To Widget" and select the Label widget
- The Label widget will have code something like this-
<b:widget id='Label1' locked='false' title='Labels' type='Label' visible='true'>
- In the code for the Label Widget, look for "Main" or "collapsible extendable".
<b:includable id='main' var='this'><details class='collapsible extendable'>
- Expand this by clicking on the black arrow on the left
- Now look for <b:attr cond='data:view.isLabelSearch' name='open' value='open'/>
- Remove- cond='data:view.isLabelSearch' from the above line

Add Adsense Code into HTML page
"ADSense Code"
</div></div></td>
Add Table of Contents into Posts - mbtTOC
<script type='text/javascript'>
//<![CDATA[
//*************TOC plugin by MyBloggerTricks.com
function mbtTOC() {var mbtTOC=i=headlength=gethead=0;
headlength = document.getElementById("post-toc").getElementsByTagName("h2").length;for (i = 0; i < headlength; i++)
{gethead = document.getElementById("post-toc").getElementsByTagName("h2")[i].textContent;document.getElementById("post-toc").getElementsByTagName("h2")[i].setAttribute("id", "point"+i);mbtTOC = "<li><a href='#point"+i+"'>"+gethead+"</a></li>";document.getElementById("mbtTOC").innerHTML += mbtTOC;}}function mbtToggle() {var mbt = document.getElementById('mbtTOC');if (mbt .style.display === 'none') {mbt .style.display = 'block';} else {mbt .style.display = 'none';}}
//]]>
</script>/*####Automatic TOC Plugin by MyBloggerTricks designed by Saroj-Tech####*/ .mbtTOC { border: 3px solid #A2A9B1; box-shadow: 1px 1px 0 #EDE396; background-color: #F8F9FA; color: #830000; line-height: 1.4em; margin: 30px auto; padding: 20px 30px 20px 10px; font-family: Open Sans, arial; display: block; width: 70%; border-radius: 5px; } .mbtTOC ol, .mbtTOC ul { margin: 10; padding: 10; } .mbtTOC ul { list-style: none; } .mbtTOC ol li, .mbtTOC ul li { padding: 15px 0 0; margin: 0 0 0 30px; font-size: 15px; } .mbtTOC a { color: #0080ff; text-decoration: none; } .mbtTOC a:hover { text-decoration: underline; } .mbtTOC button { background: none; font-family: Open Sans, arial; font-size: 20px; position: relative; outline: none; cursor: pointer; border: none; color: #707037; padding: 0 0 0 15px; } .mbtTOC button:after { content: "\f022"; font-family: FontAwesome; position: relative; left: 10px; font-size: 20px; }
/*####Automatic TOC Plugin by MyBloggerTricks designed by Saroj-Tech####*/

.mbtTOC{
border:1px solid #000000;
border-style:solid;
border-style:dashed;
background-color:#FFFFE0;
line-height:1.4em;
margin:30px auto;
padding:10px 15px 10px 6px;
 display: block;width: 70%;
 }

 .mbtTOC button{
 background-color:transparent;
 font-family:Acme;
 font-size:20px;
font-weight:bold;
 position:relative;
 outline:none;
 border:none;
 color:#0fb5fc;
 padding:0 0 0 15px;
 }

 .mbtTOC button a {
 color:#3d1818;
 padding:0px 2px;
 cursor:pointer;
 }

.mbtTOC button a:hover{
 text-decoration:underline;
color:#fc0f2b;
 }

.mbtTOC button span {
font-size:12px; margin:0px 8px;
 }

.mbtTOC li{margin:8px 0;  }

.mbtTOC li a {
color:#3d1818;
 text-decoration:none;
 font-size:14px;
 text-transform:capitalize;
font-family:georgia;
 }

.mbtTOC li a:hover {
text-decoration: underline;
color:#fc0f2b;
}
.mbtTOC li li {margin:4px 0px;}

.mbtTOC li li a{
 color:#fc0f2b;
 font-size:12px;
 }
.mbtTOC li li a:hover{
 text-decoration: underline;
color:#fc0f2b;
 }

.mbtTOC ol{counter-reset:section1;list-style:none}
.mbtTOC ol ol{counter-reset:section2}
.mbtTOC ol ol ol{counter-reset:section3}
.mbtTOC ol ol ol ol{counter-reset:section4}
.mbtTOC ol ol ol ol ol{counter-reset:section5}
.mbtTOC li:before{content:counter(section1);counter-increment:section1;position:relative;padding:0 8px 0 0;font-size:18px;color:#fc0f2b;font-family:arial;}
.mbtTOC li li:before{content:counter(section1) "." counter(section2);counter-increment:section2;font-size:14px;color:#fc0f2b;font-family:arial;}
.mbtTOC li li li:before{content:counter(section1) "."counter(section2) "." counter(section3);counter-increment:section3}
.mbtTOC li li li li:before{content:counter(section1) "."counter(section2) "."counter(section3) "." counter(section4);counter-increment:section4}
.mbtTOC li li li li li:before{content:counter(section1) "."counter(section2) "."counter(section3) "." counter(section4)"." counter(section5);counter-increment:section5}
" <div id="post-toc"><data:post.body/></div> " then hit on "save theme" . There are multiple entries for this search. Replace all of them. There are three matches. <div class="mbtTOC">
<button onclick="mbtToggle()">Table of Contents</button>
<ol id="mbtTOC"></ol>
</div><script>mbtTOC();</script>
Add Table of Contents into Posts - toc-pro
<script async='async' defer='defer'>
var head,newLine,el,title,link,ToC="<nav class='table-of-contents' role='navigation'><h4 onclick='toc()'>Contents</h4><ul style='display:none'>";$("article h2, article h3, article h4, article h5").attr("id",function(arr){return "point" + arr;});$("article h2, article h3, article h4, article h5").each(function(){el=$(this),title=el.text(),link="#"+el.attr("id"),ToC+=newLine="<li><a href='"+link+"'>"+title+"</a></li>"}),ToC+="</ul></nav>",$(".toc-pro").prepend(ToC);function toc() {$(".table-of-contents ul").toggle();}
</script>
<script async='async' defer='defer'>
var head,newLine,el,title,link,ToC="<nav class='table-of-contents' role='navigation'><h4 onclick='toc()'>Table of Contents</h4><ul style='display:none'>";$("article h2, article h3, article h4, article h5").attr("id",function(arr){return "point" + arr;});$("article h2, article h3, article h4, article h5").each(function(){el=$(this),title=el.text(),link="#"+el.attr("id"),ToC+=newLine="<li><a href='"+link+"'>"+title+"</a></li>"}),ToC+="</ul></nav>",$(".toc-pro").prepend(ToC);function toc() {$(".table-of-contents ul").toggle();}
</script>
/* TOC by techyleaf */
.table-of-contents{flex:auto;width:fit-content;background:#eee;font-size:14px;padding:11px;margin:8px 0 30px 0}
.table-of-contents li{margin:0 0 0.25em 0}
.table-of-contents a{color:#2a5365}
.table-of-contents h4{margin:0;cursor:pointer}
.table-of-contents h4:before{font-family:FontAwesome;content:"\f0c9";padding-right:7px;}
/* For Fontaweosme 5
.table-of-contents h4:before{font-family:'Font Awesome 5 Free';content:"\f0c9";padding-right:7px;}
*/
<div class='toc-pro'></div>
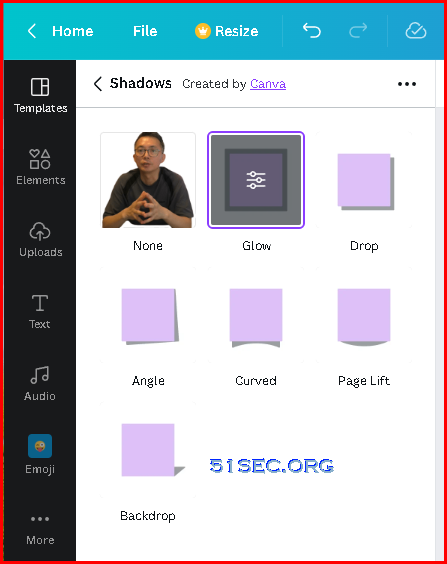
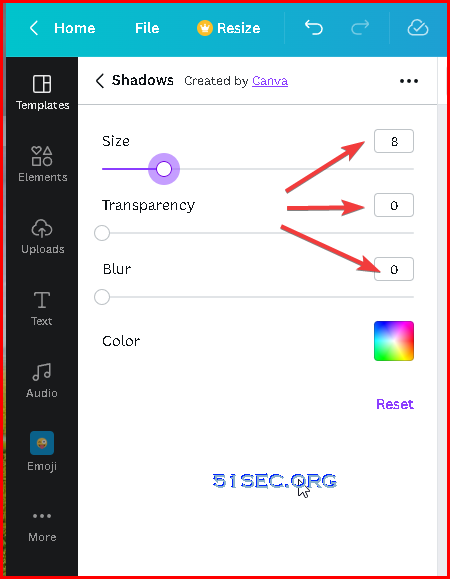
Canva - Add white outline around photos
Click configuration icon in the Glow box:
Site Running Time Counting Scrpt
<!--Site has been running x days x hours x minutes x seconds -->
<center>
        <br />
  </span>
            <span class="nav-item">
                <a class="nav-link" href="https://blog.51sec.org/2022/12/5-minutes-docker-series-deploy-free.html" target="_blank">
             <span id="timeDate">Up Days...</span><span id="times">Up Time...</span> <script language="javascript">
    var now = new Date();
    function createtime(){
        var grt= new Date("12/27/2022 00:00:00");/*---这里是网站的启用时间--*/
        now.setTime(now.getTime()+250);
        days = (now - grt ) / 1000 / 60 / 60 / 24;
        dnum = Math.floor(days);
        hours = (now - grt ) / 1000 / 60 / 60 - (24 * dnum);
        hnum = Math.floor(hours);
        if(String(hnum).length ==1 ){hnum = "0" + hnum;}
        minutes = (now - grt ) / 1000 /60 - (24 * 60 * dnum) - (60 * hnum);
        mnum = Math.floor(minutes);
        if(String(mnum).length ==1 ){mnum = "0" + mnum;}
        seconds = (now - grt ) / 1000 - (24 * 60 * 60 * dnum) - (60 * 60 * hnum) - (60 * mnum);
        snum = Math.round(seconds);
        if(String(snum).length ==1 ){snum = "0" + snum;}
        document.getElementById("timeDate").innerHTML = "This site has been running "+dnum+" days ";
        document.getElementById("times").innerHTML = hnum + " hours " + mnum + " minutes " + snum + " seconds.";
    }
    setInterval("createtime()",250);
</script>
Add a free contact form with less branding
https://dash.elfsight.com/ - 200 form view per month.
https://www.powr.io/ - 25 form submissions / month
References:
- Add a Read More button to Popular Blog Platforms
- Wordpress Attitude Theme Menu Bar Customize
- Add “Related Links” Widgets for Your Websites and Blogs
- Use Godaddy Domain with Openshift Apps
- Create a Sitemap Page or Table of Contents Page for Blogger
- Add Dropdown Menu in Blogger Website
- Collection of Website and Tools for Bloggers (Tips and Tricks)
- How to add Table of content in blogger [ 2 Methods ]


This comment has been removed by a blog administrator.
ReplyDelete