PCI DSS v3.0 Scanning Requirements
Vulnerability scans can be automated or manual, but they should always be performed by qualified individuals who are reasonably independent of the system components being scanned.
PCI Requirement 11.2 – Every 90 days you are required to scan for internal and external vulnerabilities. Also, any time a significant change is made to your environment, you must perform a scan.
Quartely INTERNAL Vulnerabibility scans via ASV:
Quartely EXTERNAL Vulnerabibility scans via ASV:
To comply with PCI Requirement 11.2.2, you must use a PCI SSC Approved Scanning Vendor (ASV). An ASV is defined as, “An organization with a set of security services and tools (‘ASV scan solution’) to conduct external vulnerability scanning services to validate adherence with the external scanning requirements of PCI DSS Requirement 11.2.2. The scanning vendor’s ASV scan solution is tested and approved by PCI SSC before an ASV is added to PCI SSC’s List of Approved Scanning Vendors.”
The second component of PCI Requirement 11.2.2 is quarterly external vulnerability scans. External networks are at such a great risk of being compromised, which is why quarterly external vulnerability scans, and rescans as needed, are vital to scanning programs.
During an assessment, your assessor will follow these testing procedures:
- Examine your four most recent quarters of external vulnerability scans and verify that four quarterly external vulnerability scans occurred in the most recent 12-month period.
- Review the results of each quarterly scan and rescan to verify that the ASV Program Guide requirements for a passing scan have been met.
- Review the scan reports to verify that the scans were completed by an ASV.
PCI Requirement 11.2.2 is very similar in nature to PCI Requirement 11.2.1, but PCI Requirement 11.2.2 requires that you perform external vulnerability scans. Where PCI Requirement 11.2.1 allowed an internal qualified resource to perform that activity, PCI Requirement 11.2.2 is a little different there: you must use an ASV to perform that activity on your behalf. KirkpatrickPrice would be happy to help you with that service, and we provide that service for many of our clients. There are many other organizations that can do that as well.
Nevertheless, effectively anything with the CVSS sore of 4.0 or higher needs to be addressed within that quarterly timeframe. Understand that a lot of organizations might miss a scan or forget to do it for whatever reason, and then ask us to help them define a compensating control. We’ll talk about compensating controls later, but understand that this is one of those controls that is very difficult to define, especially defining a compensating control for a failure in your program. So, understand that it is different if you identify vulnerabilities versus forgetting to scan—those are really two different conversations. Your assessor in both of these cases, for PCI Requirement 11.2.1 and PCI Requirement 11.2.2, is going to be asking for evidence of your quarterly scan and then any remediation scans that you have done to demonstrate that any vulnerabilities identified have been fixed.
Scans of public-facing web applications and review detected vulnerabilities
Per PCI DSS v3.0 requirement 6.6, merchants are required to perform scans of public-facing webapplications and review detected vulnerabilities. Using the PCI module you can meet the web
application scans requirement. Note that web application scanning is available when this option is
turned on for your subscription. Please contact your Account Manager or our Support Team if you
would like to use this option.
Other related PCI Controls
PCI DSS 3.1
- About 394 Controls
- Six Control Objectives
- 12 Subject Areas
PCI Requirement 11 - PCI Readiness Series | PCI Webinars (kirkpatrickprice.com)
The sub-requirements of Requirement 11 include:
PCI Requirement 11.1 – Identify rogue wireless devices that may have been placed in your environment, at least quarterly. You must keep a list of what is authorized so you can define what isn’t authorized. Physical inspection is the best way to meet this objective.
PCI Requirement 11.2 – Every 90 days you are required to scan for internal and external vulnerabilities. Also, any time a significant change is made to your environment, you must perform a scan.
PCI Requirement 11.3 – You must perform a penetration test at least annually and after any time a significant change is made. It must be performed by a qualified individual, cover internal and external, cover the application and network layers, validate if the segmentation is effective, and keep the results of the test and remediation for your audit.
PCI Requirement 11.4 – Install an IPS ISD at the perimeter and at critical locations within the CDE. It needs to be configured and maintained according to the manufacturer standards. It can also be host-based IPS IDS.
PCI Requirement 11.5 – Install a File Integrity Monitoring (FIM) Solution, which needs to monitor critical files and needs to run analysis at least weekly and follow-up on any expectations.
Qualys PCI Compliance Scan
1. Define Your In-Scope Assets Using Asset Wizard
Important! The wizard prompts you to confirm scans can be performed without interference. The service provides multiple scanners for external (perimeter) scanning and lists the scanner IP addresses.Depending on your network, it may be necessary to add the scanner IPs to your list of trusted IPs.
2. Start an External Network Scan
3. Scan a virtual host or a web application
4. View Current Vulnerabilities and Fix, Rescan to Verify Vulnerabilities are Fixed, False Positive Requests
5. Submit Compliance Status
your account matches the number of hosts that are compliant.
generation wizard. Your reports will appear on the submitted reports list.
1) Preview the reports online in PDF format for completeness and accuracy.
2) Request a review from your Approved Scanning Vendor (ASV) using the report wizard or from the
submitted reports list. You will receive an email with the review status (approved or rejected).
3) Once approved by the ASV, the report is considered certified and can be submitted to your acquiring
banks for PCI certification
Using ASV Vulnerability Scan for PCI Audits
Note: https://www.tenable.com/blog/can-i-use-nessus-to-perform-pci-auditsThere is no product solution available on the market today that can be purchased and used to perform accredited PCI vulnerability audits. There are services which can be procured to perform vulnerability audits and some of the technology these services use is available in the form of a product.
For an organization attempting to navigate the requirements of PCI, the differences between buying a service and the product based on that service may not seem great. For example, many scanning services include an appliance which is deployed on a customer's network which gives the feeling of a product.
If an organization governed by the PCI regulation does buy a product solution to perform PCI scanning, that organization will still be required to procure a 3rd party service to perform certified PCI vulnerability scanning. These services must be acquired from an Approved Scanning Vendor.The benefit of buying a product that can perform realistic PCI audits is that when your official quarterly PCI scan is performed, you won't be surprised and you will have had a chance to fix issues before your audit occurs. Also, if your scanning service makes an error or has inaccurate results, being able to compare their results with your own can help expedite any incorrectly reported issues.
Differences between in-house and Remote Scanning
There are also some very stark differences between remote PCI vulnerability assessments and what can be done with an in-house tool.
For example, section 8.5.9 of the PCI Audit Procedures document specifies that user passwords should be changed every 90 days. This sort of setting is something that can be audited with the Nessus Direct Feed and Tenable has even written specific PCI audit polices to look for this setting on UNIX and Windows operating systems. However, section 8.5.9 also gives MSPs some latitude in performing these audits and there are allowances for manual review of polices.
There are many more examples of this sort of discrepancy. Searching for the term "For Service Providers Only" in the audit guidelines will show many examples where a full internal PCI audit can be replaced with manual procedural reviews.
If such a review only occurs manually and quarterly, then when violations are found, fixing them implies not only changing the settings on various servers, but also changing the procedures and policies which allowed these lapses to occur in the first place. Performing in-house automated checks allows for early detection of compliance violations.
Another advantage of in-house scanning is that you may chose to perform a credentialed patch audit with Nessus. Patch audits are very accurate and work for Windows and UNIX operating systems. If your MSP or ASV is not using credentials to audit your systems, it is possible that their scans may be less accurate than ones with credentials. If this is the case, performing these scans in-house with credentials can help expedite any issues reported by your ASV that are not accurate.
11.2.1 Perform quarterly internal vulnerability scans. Address vulnerabilities and perform rescans to verify all “high risk” vulnerabilities are resolved in accordance with the entity’s vulnerability ranking (per Requirement 6.1). Scans must be performed by qualified personnel.
For internal scans you could use Nessus as long as you have documented procedures and the personnel are "qualified."
11.2.2 Perform quarterly external vulnerability scans, via an Approved Scanning Vendor (ASV) approved by the Payment Card Industry Security Standards Council (PCI SSC). Perform rescans as needed, until passing scans are achieved.
For external scans, the scanning must be performed by an approved scanning vendor (ASV). You can find the list of ASVs at https://www.pcisecuritystandards.org/assessors_and_solutions/approved_scanning_vendors. Tenable ( Jus like Qualys or other ASVs) certainly do offer ASV scanning as part of their product set, which seems a fairly straightforward statement that you can use Nessus as part of your PCI testing.
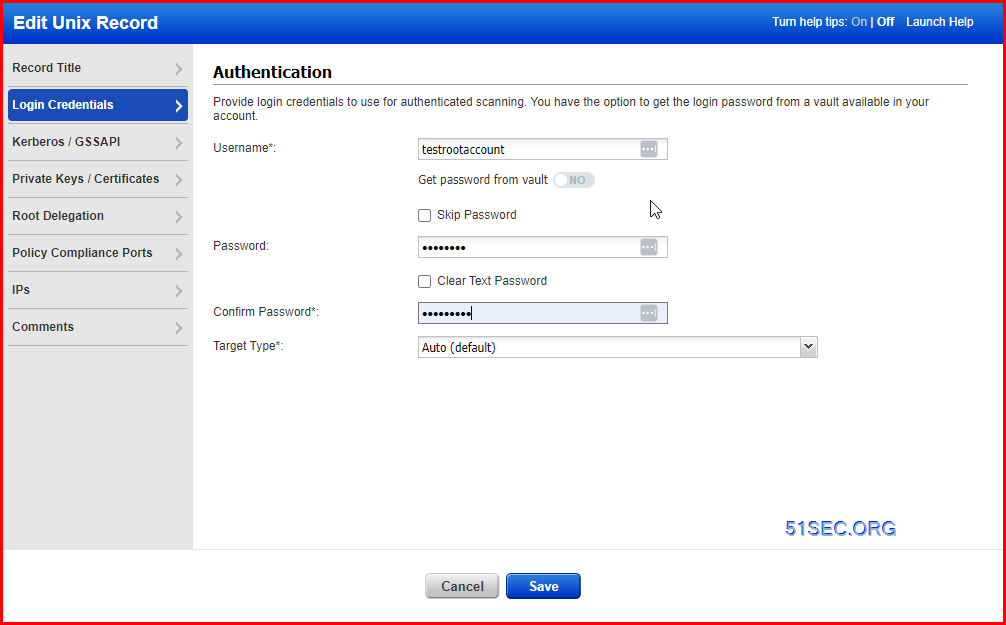
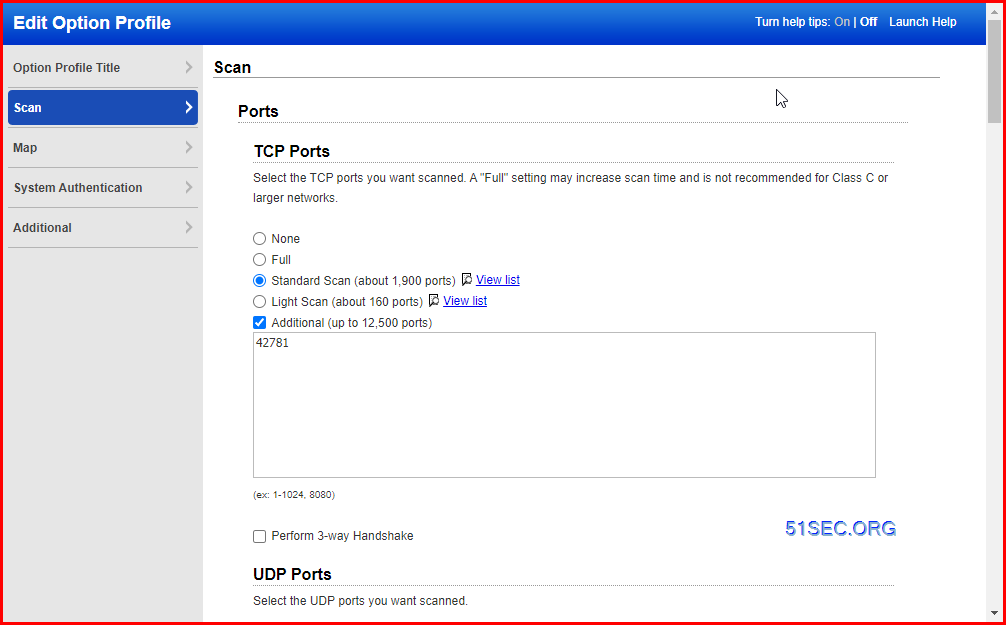
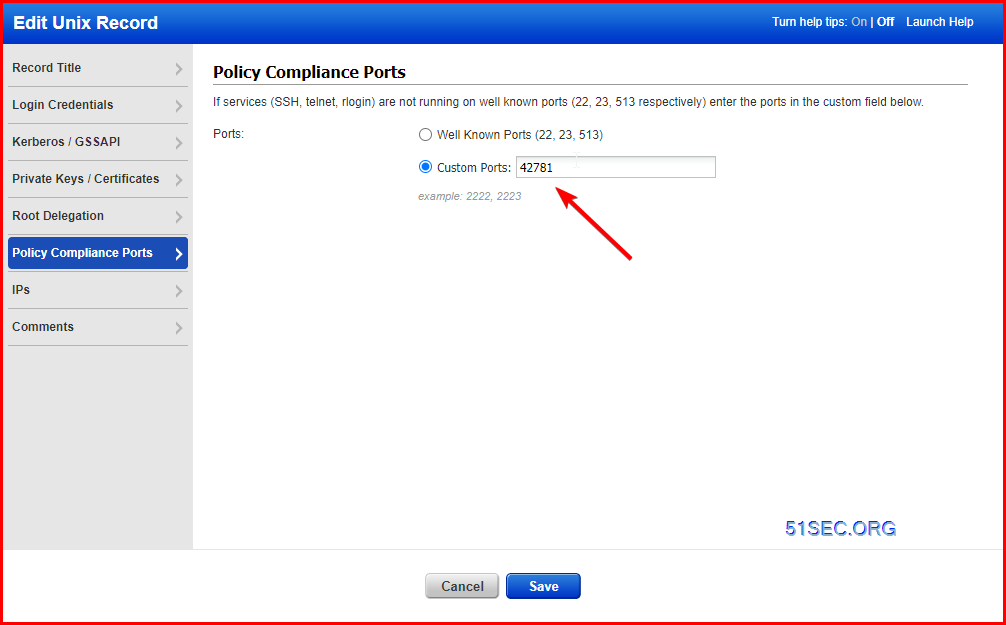
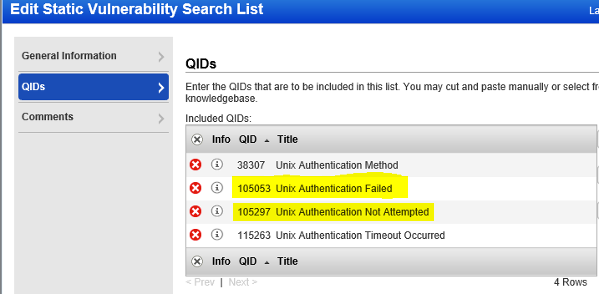
Unix/Linux Auth Scan with Sudo and SSH Port change
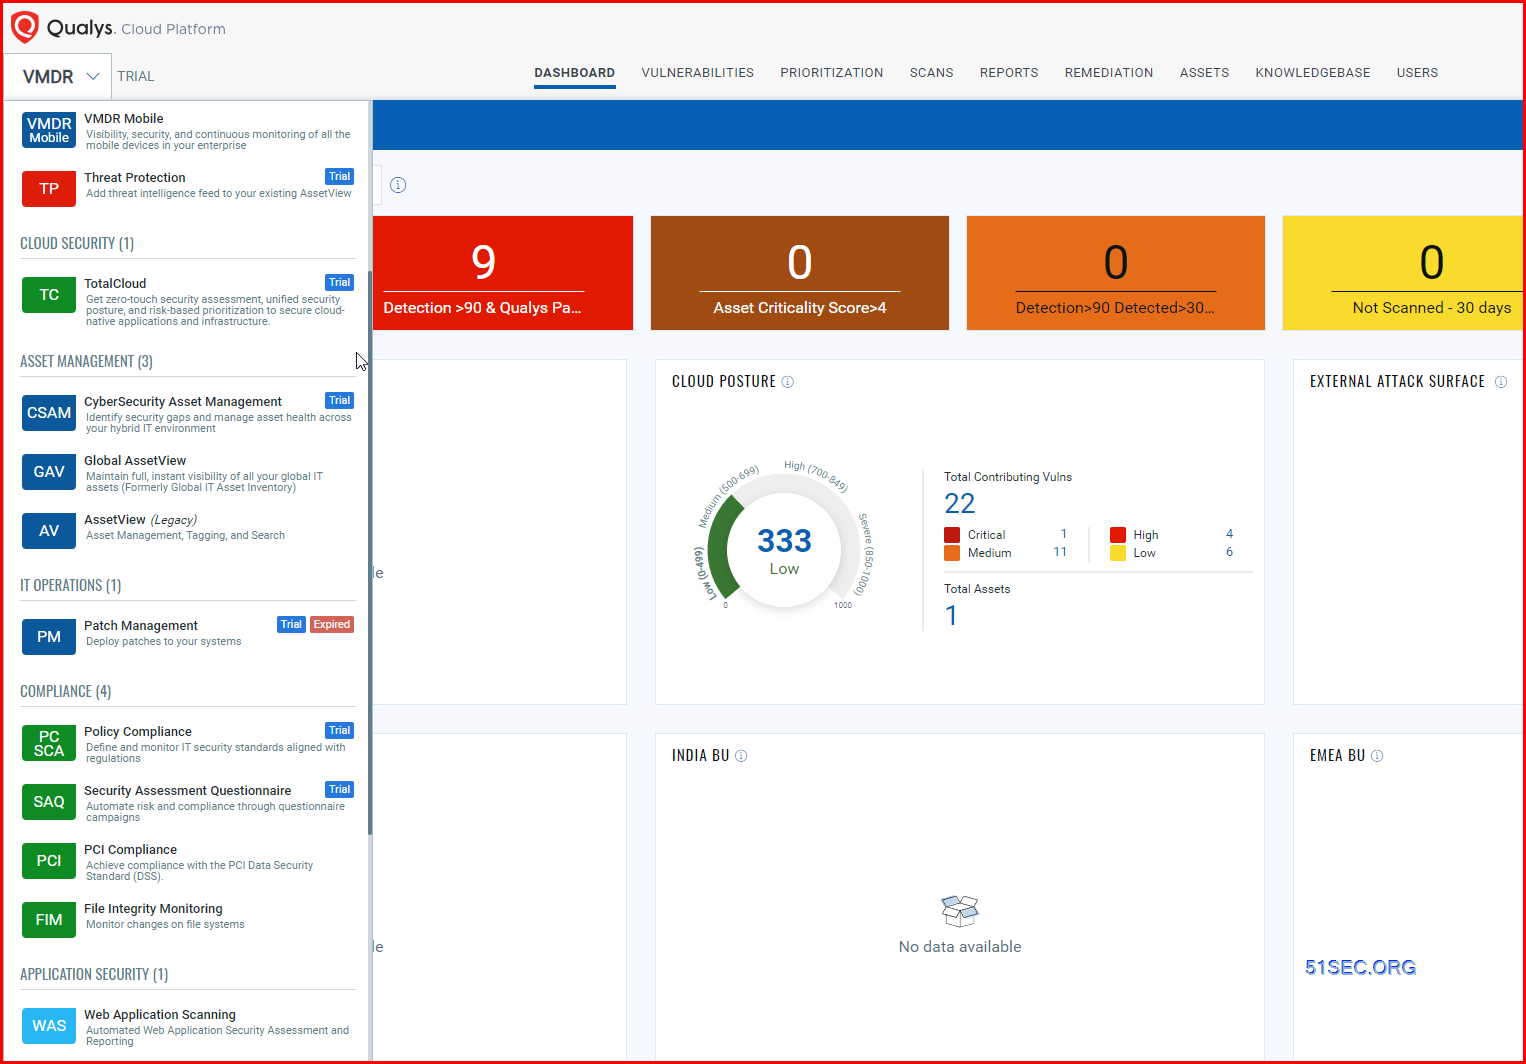
Assetview & Tags
1.1 Dashboard
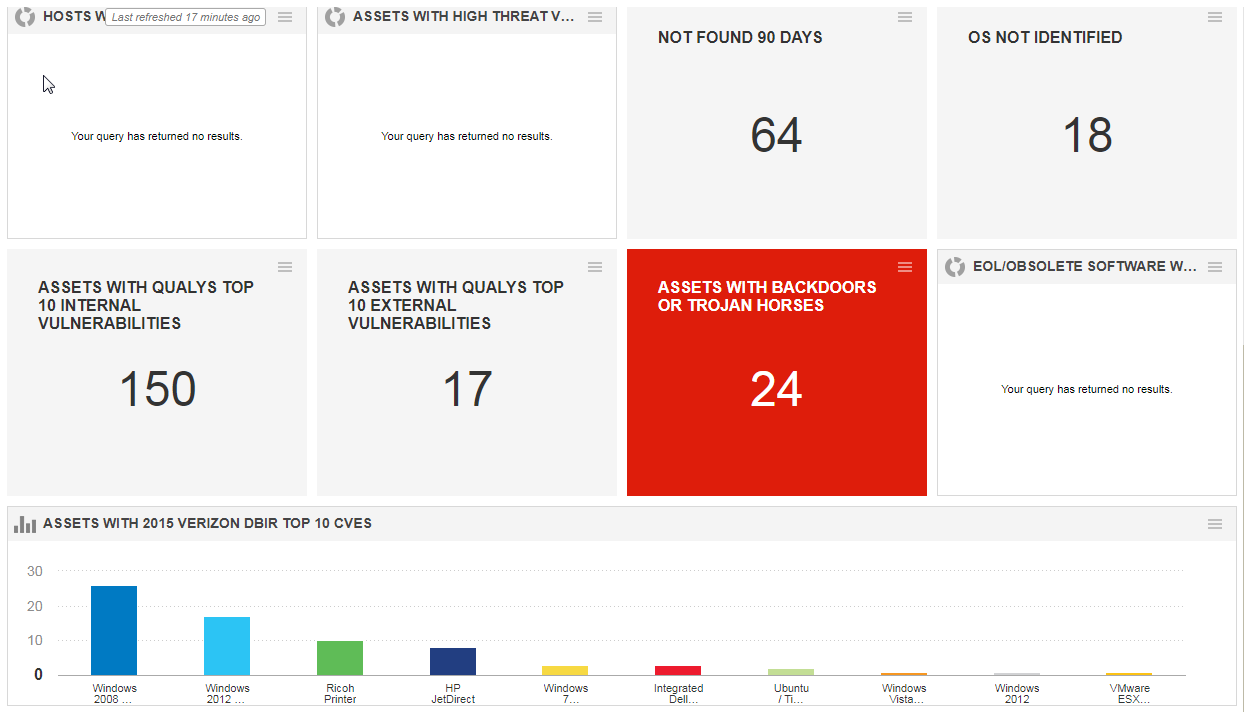
Some customized widgets :
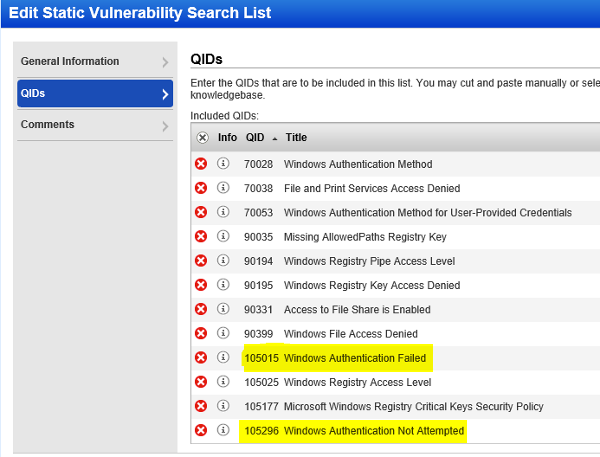
- Authentication Failed Assets : vulnerabilities.vulnerability.qid:105015 or vulnerabilities.vulnerability.qid:105053 or vulnerabilities.vulnerability.qid:105296 or vulnerabilities.vulnerability.qid:105297
- Not Found 90 Days Assets : not tags.name:"Found in 90 days" and activatedForModules:"VM"
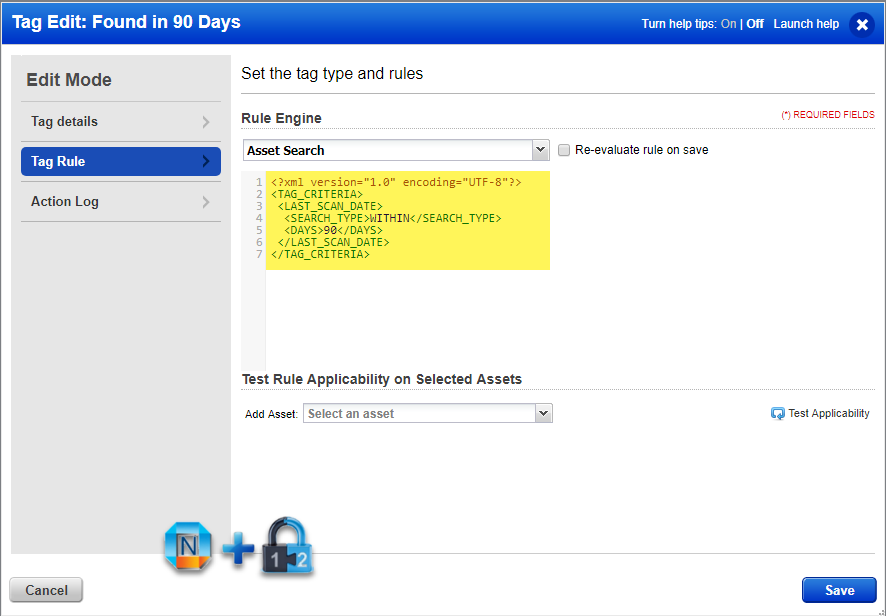
- Tag Rule:
<?xml version="1.0" encoding="UTF-8"?>
<TAG_CRITERIA>
<LAST_SCAN_DATE>
<SEARCH_TYPE>WITHIN</SEARCH_TYPE>
<DAYS>90</DAYS>
</LAST_SCAN_DATE>
</TAG_CRITERIA>
- OS Not Identified Assets: not operatingSystem: "windows" and not operatingSystem: "HP" and not operatingSystem: "Ricoh" and not operatingSystem: "Linux" and not operatingSystem: "VMware" and not operatingSystem: "Xerox" and not operatingSystem: "Cisco" and not operatingSystem: "Power Supply"
YouTube Video: Using Qualys Free Community Edition to Scan Home Network
1.2 Tags
Asset Search - Dynamic Rule
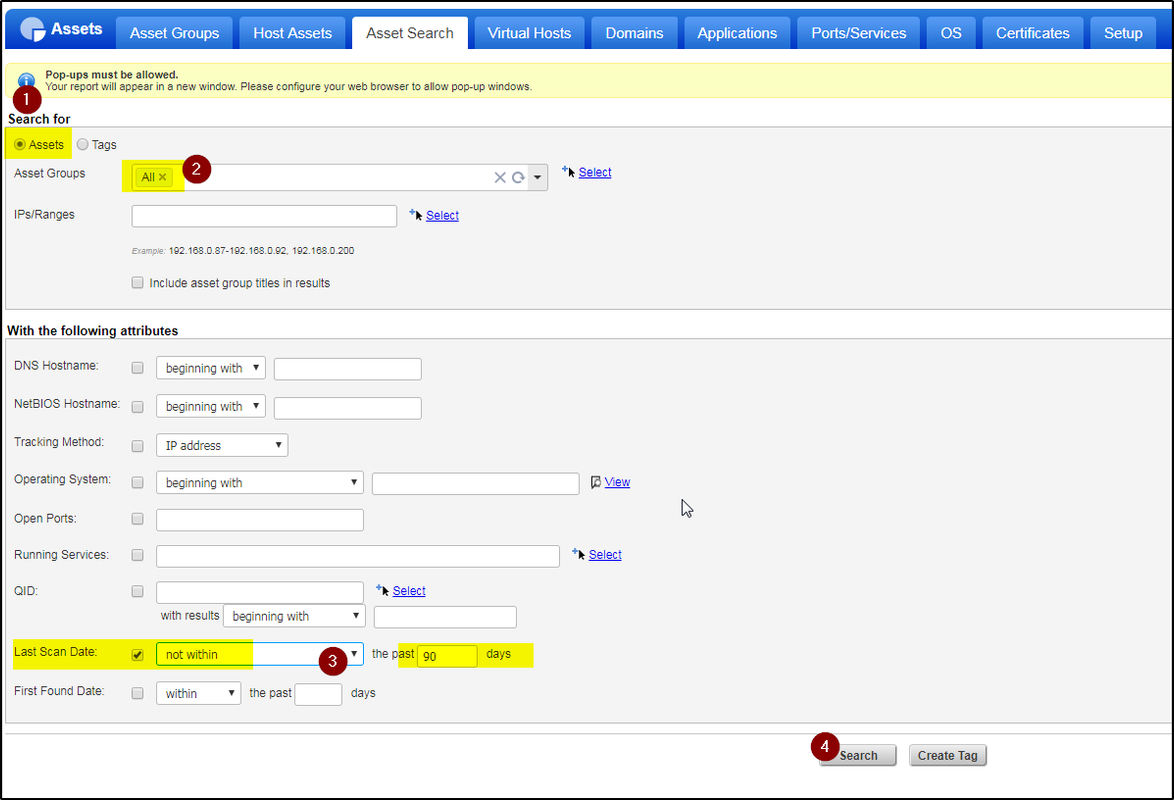
Search all assets found / scanned in last 90 days:
<?xml version="1.0" encoding="UTF-8"?>
<TAG_CRITERIA>
<LAST_SCAN_DATE>
<SEARCH_TYPE>WITHIN</SEARCH_TYPE>
<DAYS>90</DAYS>
</LAST_SCAN_DATE>
</TAG_CRITERIA>
Enable Agentless Tracking
To reduce / suppress the duplicated assets because of dhcp, one of effective methods is to enable agentless tracking.
2.1. VM > Scans > Setup > Agentless Tracking > Accept
2.2. VM > Scans > Authentication > Edit [Your Authentication Record] > Login Credentials > "Enable Agentless Tracking"
2.3. VM > Users > Setup > Cloud Agent Setup > "Show unified view of hosts"
QID 45180 - for failed
Change IP Tracked Host Assets to DNS Tracking
Qualys provides multiple mechanisms for tracking assets in your environment; IP, DNS, NetBIOS, Agent, and EC2. In Qualys IP tracking is the default mechanism. DNS and NetBIOS tracking are most useful for DHCP networks.
Note:
- Qualys Article Number: 000002856
- Understanding IP, DNS, and NetBIOS Tracking and Scan by Hostname
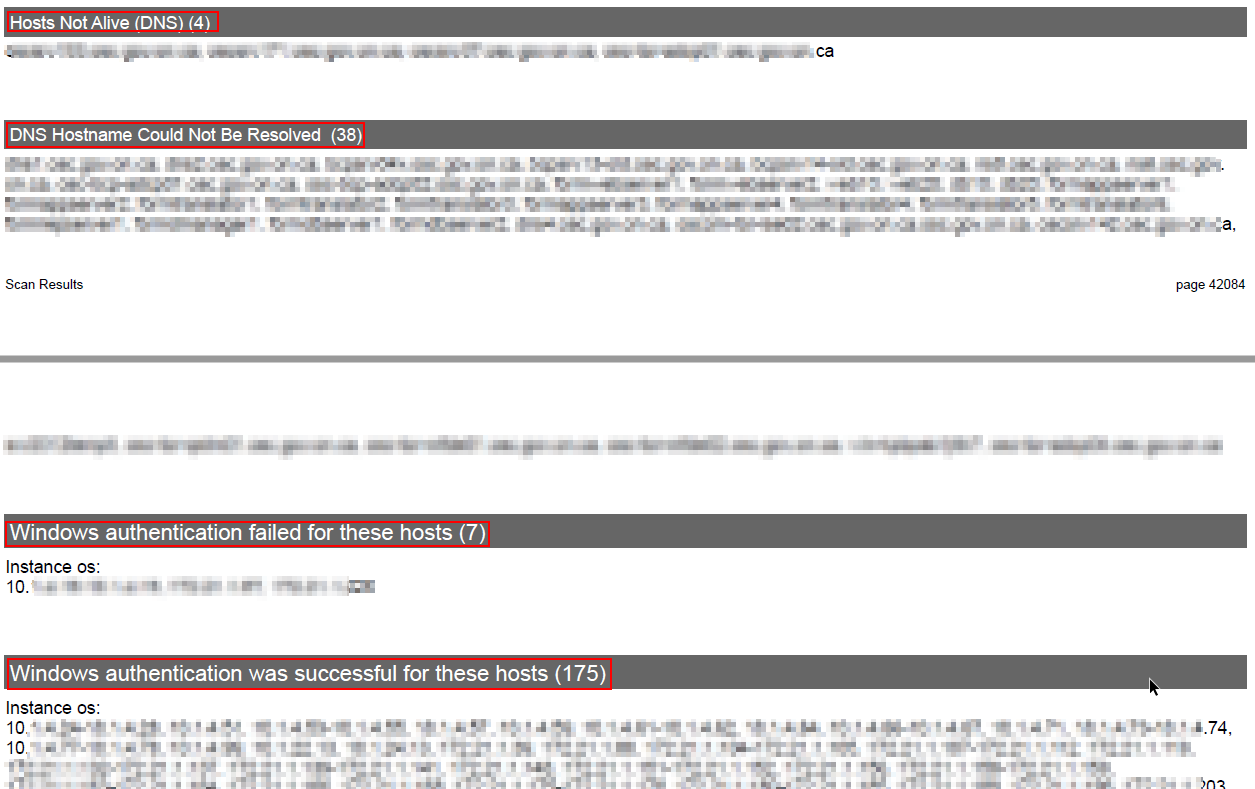
- Change IP tracking method from IP to DNS, it will require to remove all hosts assets. Basically remove all assets then start it from beginning. It will also bring one small issue to those DNS hostname could not be resolved.
If you have some hosts which DNS hostname could not be resolved by your DNS servers, they will not be scanned. Here is a screenshot for those DNS hostname could not be resolved.
Solution:
You will need to manually change them from DNS tracking to IP tracking.
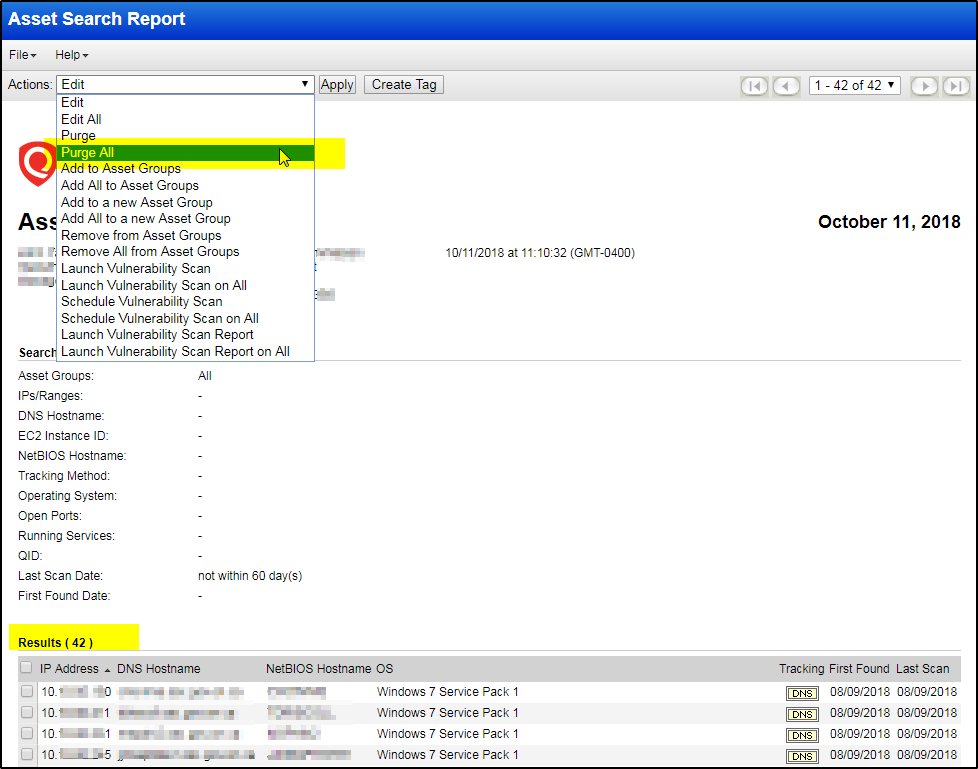
Purge Assets Older than 90 Days
The idea is to find all assets not scanned in last 90 days then purge them all.
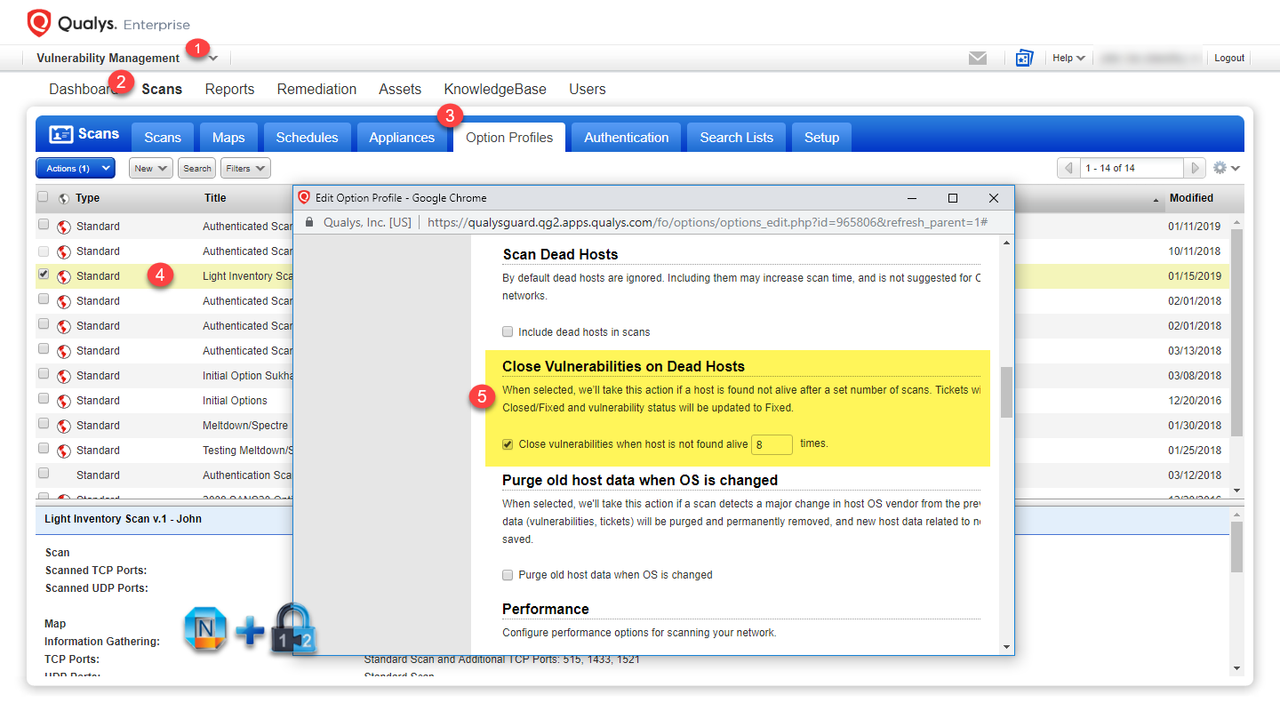
4.2 Automatically Purge
From your Scans -> Option Profiles, enable the option to Close Vulnerabilities on Dead Hosts.
Delete Older / Obsolete Assets
- Create an asset group called “ToBeDeleted”
- Add all available IP’s in your subscription to it and save the AG
- Now go to Asset search
- Run an Asset search on the AG “ToBeDeleted”. Just select the AG and hit search. This returns a list of All IP’s in your subscription that has been scanned at-least once. (If it has been scanned at-least once, it isn't a dead host). You may modify this search to suit your meaning of "Dead host"
- On this asset search result, select all IP’s and select “Launch a scan” (Don't run the scan, just hit launch) option from the action menu
- In the Launch Vulnerability scan window, copy the target IP range
- Now go back to the Asset group tab and select to edit the Asset group you created called the “ToBeDeleted”
- In the Edit AG window, go to the IP’s tab, click Manually.
- In the manual entry IP window, paste the range you have copied and click “Remove"
- Now save your asset group again
- Delete or do whatever you want to do to the list of IP’s now in “ToBeDeleted"
Best Practice to Maintain Timely and Effective Qualys Report
from Qualys Community:Reduce Asset Duplication
- Authenticated scanning
- Agentless tracking (Run scans using Agentless Tracking)
- For our agent-installed assets for servers we created a network scanning job that defaults the agent as the authority. Basically it scans for everything the agent doesn't track (port-related)
- Before this, we were scanning full network scan and agents were reporting in. This caused a lot of fighting between network scans and agent scans. We drank the Qualys Kool-Aid and created this scan and it has been working pretty good since then. It has definitely cut down the QID flapping (scan fighting each other).
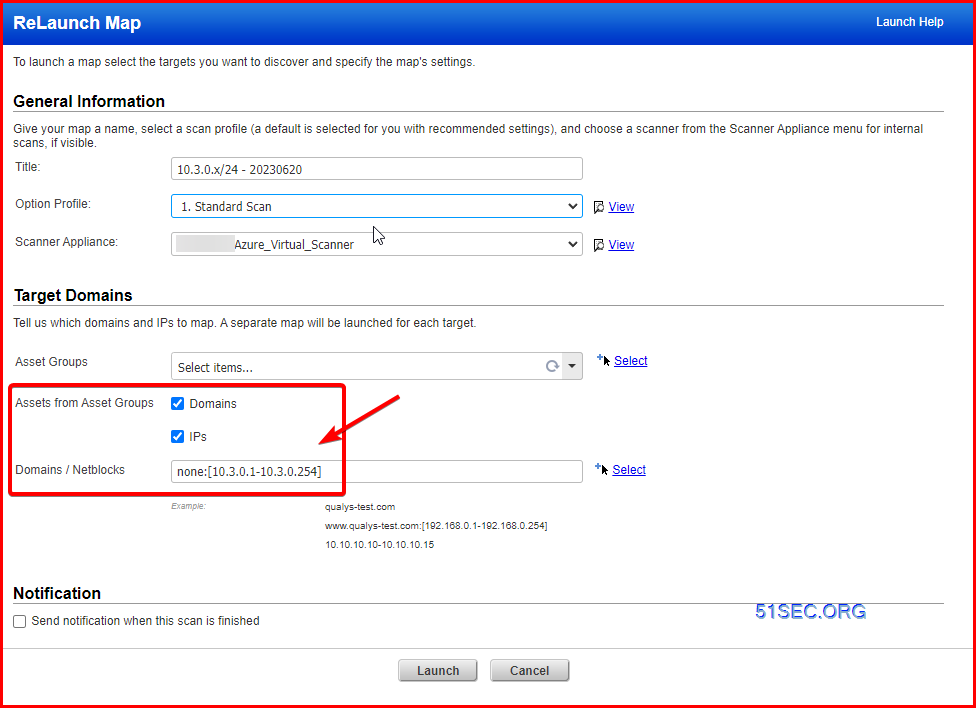
Scan a New Subnet
Lets assume I have a new subnet to scan - 192.168.0.0/24
Step 1 - Add 192.168.0.0/24 to the none domain and approved hosts list
Step 2 - Set up a MAP Scan to map that subnet. (Lets assume the map scan found 30 Windows laptops)
Step 3 - In the MAP Report, select all those assets and "ADD" to my subscription. This adds the asset by IP Tracking.
Step 4 - I perform an authenticated scan (Standard profile, Agentless Tracking enabled, Unified View enabled, Dissolvable agent enabled) using a Domain Admin account for the domain the assets are a member of.
Step 5 - I now have 30 laptops with vulnerability information gathered as relevant to an authenticated scan. They are all tracked by IP at this stage.
Step 6 - I now search for those assets in Assets>Asset Search>IP Range>192.168.0.0/24. I see 30 laptops. IP Tracked, complete with DNS Names and NetBIOS Names
Step 7 - I select all 30 assets. Edit>Tracking>DNS. The report refreshes to show the same assets but now they are tracked by DNS.
The above steps are exactly what I did many months ago for all our subnets and assets (Relevant tracking as per asset).
Use Light Inventory Scan across whole subnets to capture, tag and then full rescan new assets.
Use following method to scan a network: none:[10.3.0.1-10.3.0.254], which it will be added into network first
Videos
Install Qualys Virtual Appliance (Free Scanner) in Azure and Execute All Kinds of Vulnerability Scan:
- https://www.youtube.com/playlist?list=PLxhiP2zZTm-5ZNEIWl3-J0hWeyL3_KJUV


No comments:
Post a Comment