A secure sockets layer VPN (SSL VPN) enables individual users to access an organization's network, client-server applications, and internal network utilities and directories without the need for specialized software. SSL VPNs provide safe, secure communication via an encrypted connection for all types of devices, regardless of whether access to the network is via the public internet or another secure network.
SSL VPN Types
There are two major types of SSL VPNs:SSL Portal VPN
In this type of SSL VPN, a user visits a website and enters credentials to initiate a secure connection. The SSL portal VPN allows for a single SSL connection to a website. Additionally, the user can access a variety of specific applications or private network services as defined by the organization.Users can typically enter the gateway, or the hardware on a network that allows data to flow from one network to another, using any modern web browser, by entering the username and password provided by the VPN gateway service.
SSL Tunnel VPN
An SSL tunnel VPN allows a web browser to securely access multiple network services that are not just web-based via a tunnel that is under SSL. These services could be proprietary networks or software built for corporate use only that cannot be accessed directly via the internet. This VPN tunneling technology may require a browser with additional applications, such as JavaScript or Flash, installed to display active content.In this post, we are using FortiGate VM in Azure to configure a SSL Tunnel VPN and using FortiClient to connect to it in our Test Drive environment.
Diagram
For FortiGate Test Drive:
Related Posts:
- Azure Fortigate VM Test Drive - Outbound Internet, Publish Internal Service, S2S VPN & Remote Access VPN
- Download and Launch Fortigate Virtual Machine in VMWare WorkStation
- Fortigate VPN Lab - IPSec, VTI, BGP
- Enable SSL VPN on FortiGate and Connect SSL VPN Using FortiClient
- FortiOS Configuration for FortiGate Firewalls (Tips and Tricks) 1
- FortiOS Configuration for FortiGate Firewalls (Tips and Tricks) 2
Enable SSL-VPN Feature
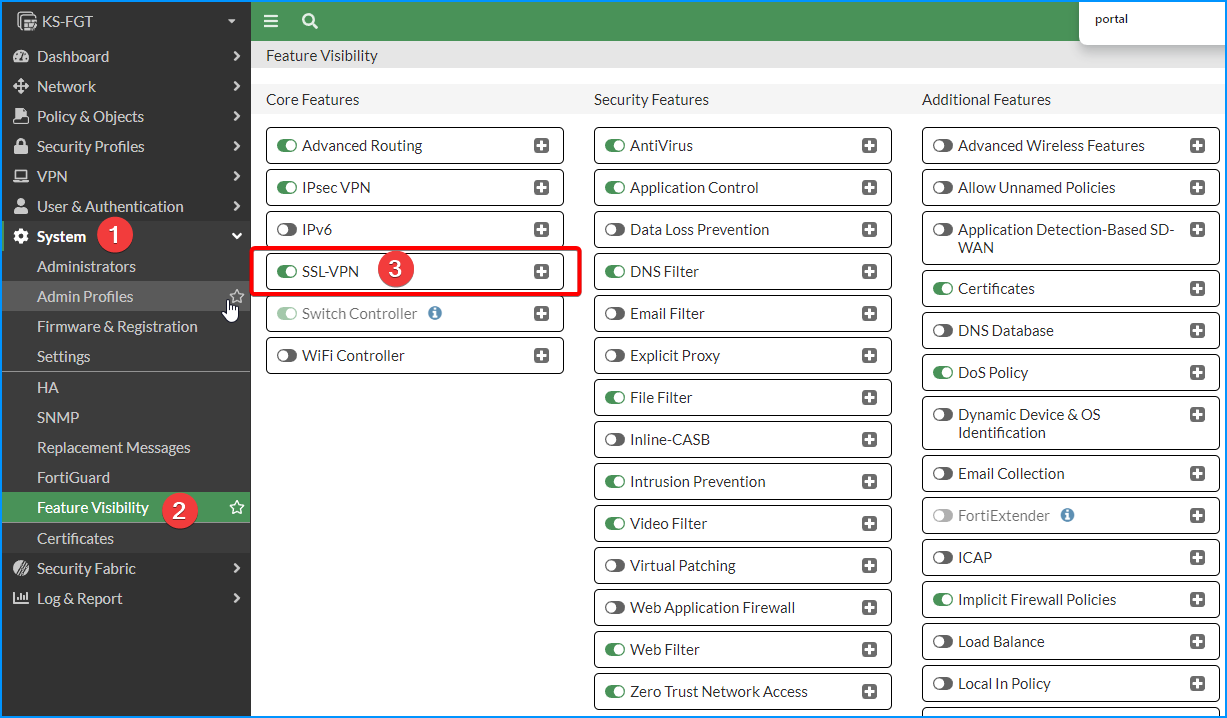
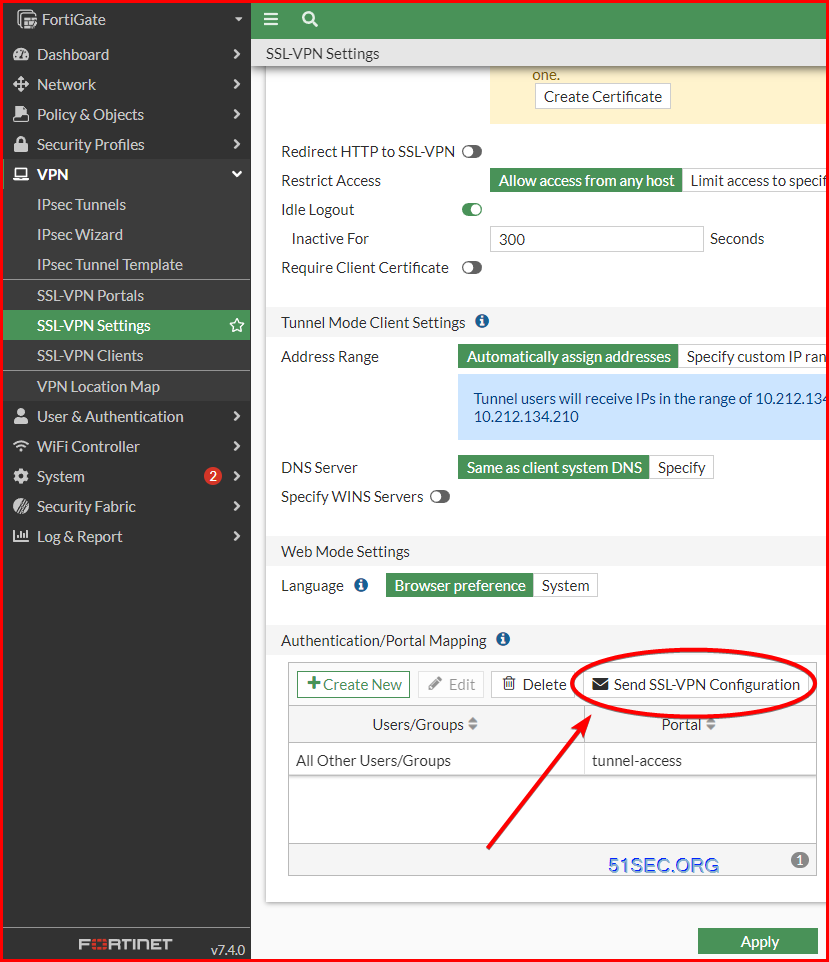
SSL-VPN Settings
1 VPN -> SSL-VPN Settings
Most settings are default. But you will need to add interface on the listen list. Ideally, change Listen on Port to a different port from 443. In this example, I am using 4443.
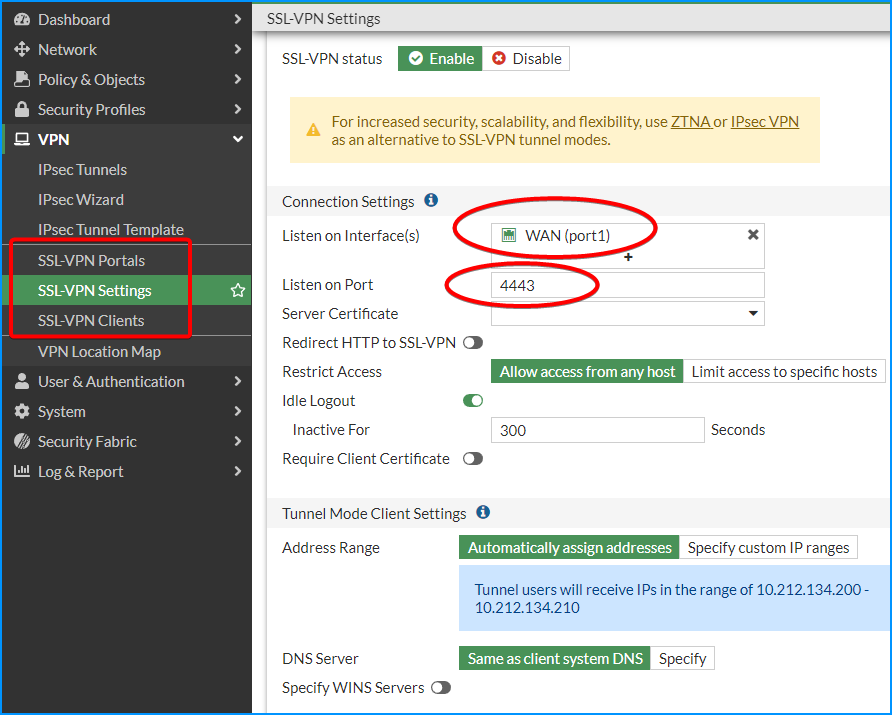
note: Default tunnel user range is only 10 ip addresses. If you have more than 10, you might want to increase it by customizing a larger range there.
2 Autentication/Portal mapping
Change All Other Users/Groups to have tunnel-access to Portal.
You can have an admin group / users to have full-access to Portal.
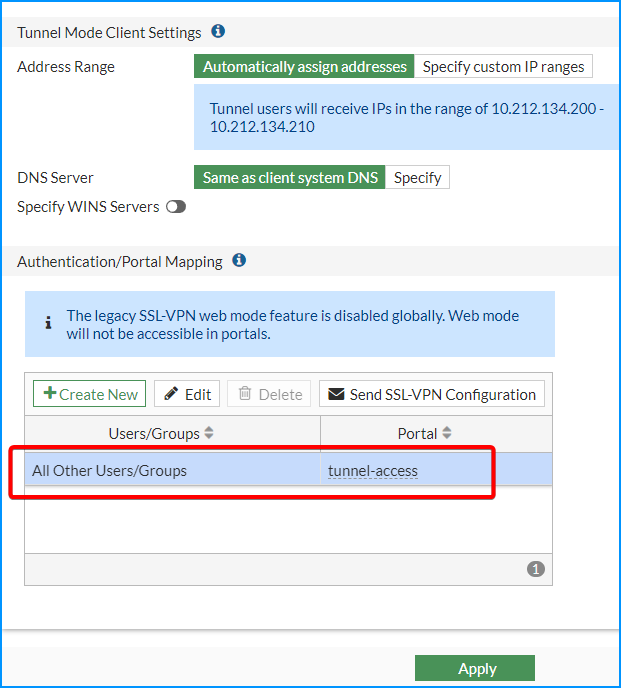
3 SSL VPN Client Address Range
By default, it is automatically assigned by FortiGate.
In the above screenshot, it uses automatically assign range: 10.212.134.200 -10.212.134.210
The range can be customized for larger numbers based on your usage.
Use Fortinet_Factory Server Certificate
To make lab as simple as we can, we are gonna use Fortinet_Factory cert.
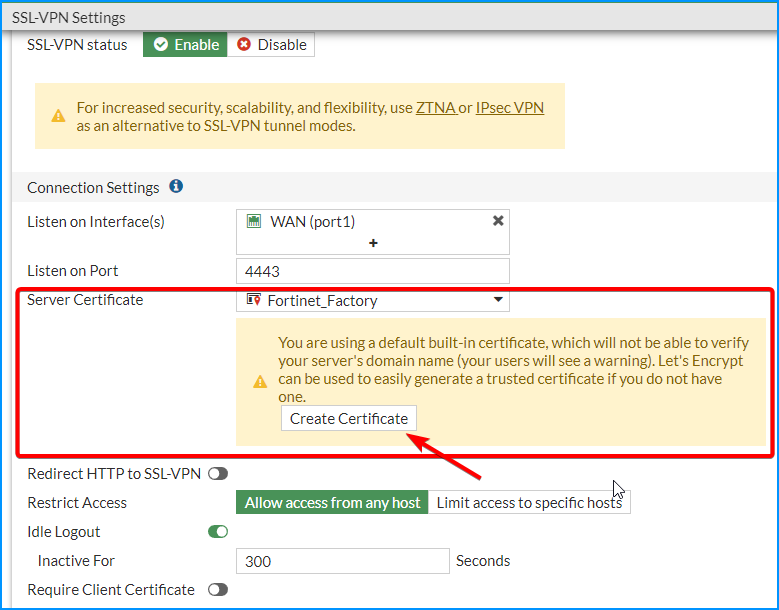
It is possible to directly create your own certificate using Let's Encrypt.
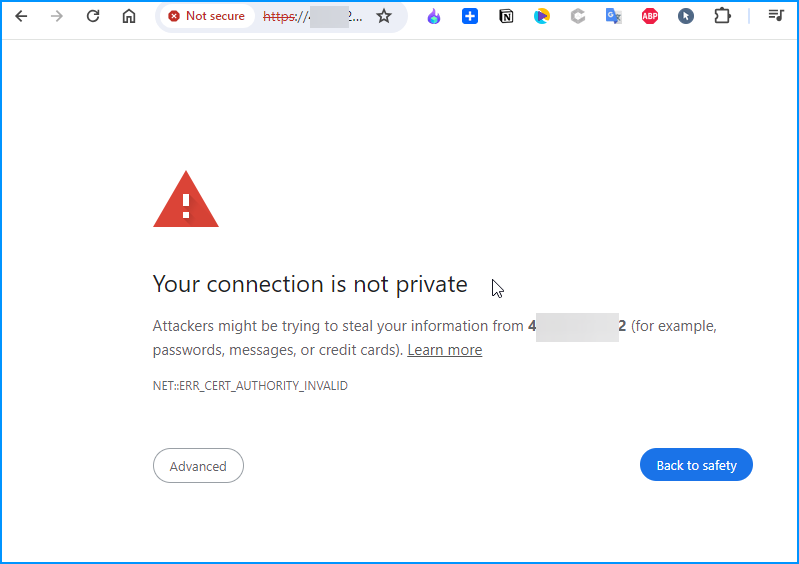
You might get this cert warning message when you access the portal by using default cert since it wont be able verified:
Policies and Users
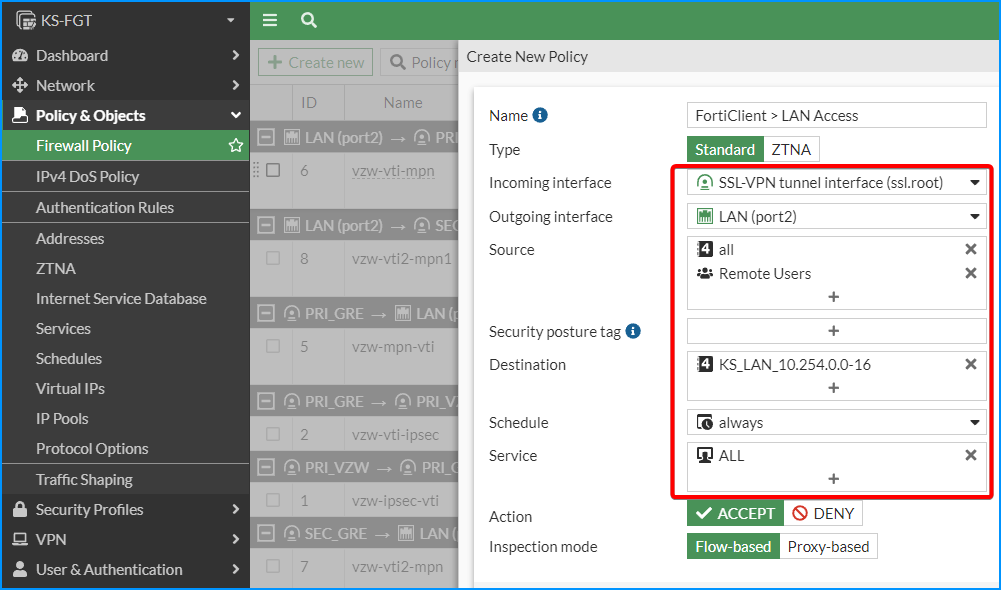
1 SSL VPN > LAN
This firewall rule is to allow SSL VPN network to access LAN (Internal) networks.
You will need to choose incoming interface, outgoing interface, source (including users), destination, and services. Others, you can keep it as default.
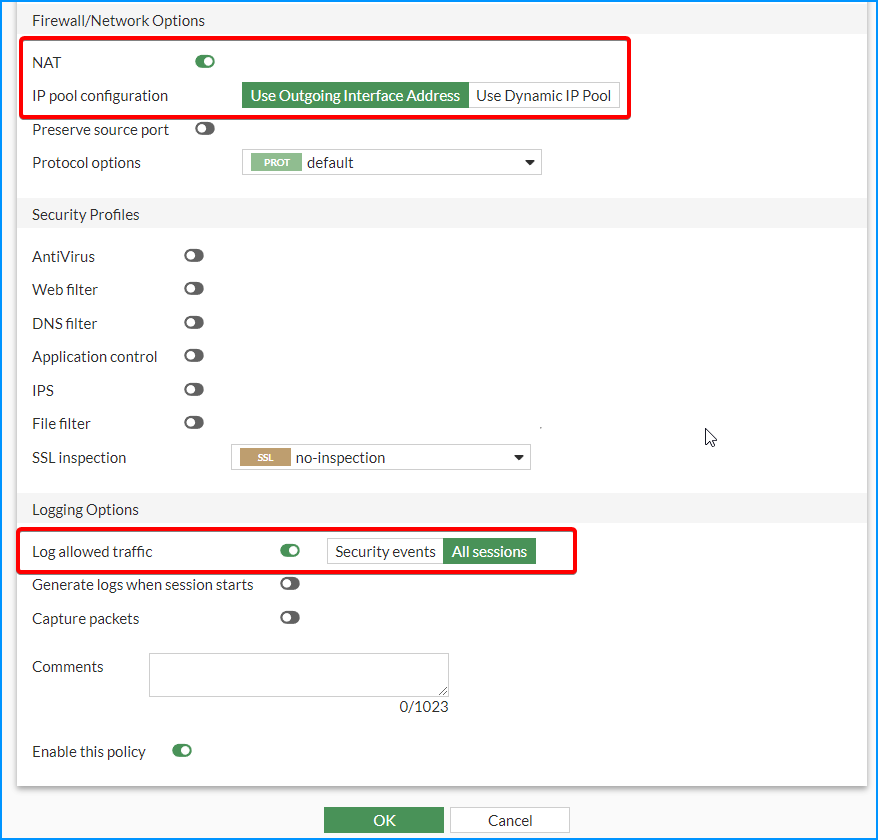
You can use NAT with outgoing interface address, which is your FortiGate LAN interface IP, or you can completely disable NAT.
Logging is also can be enabled for all sessions.

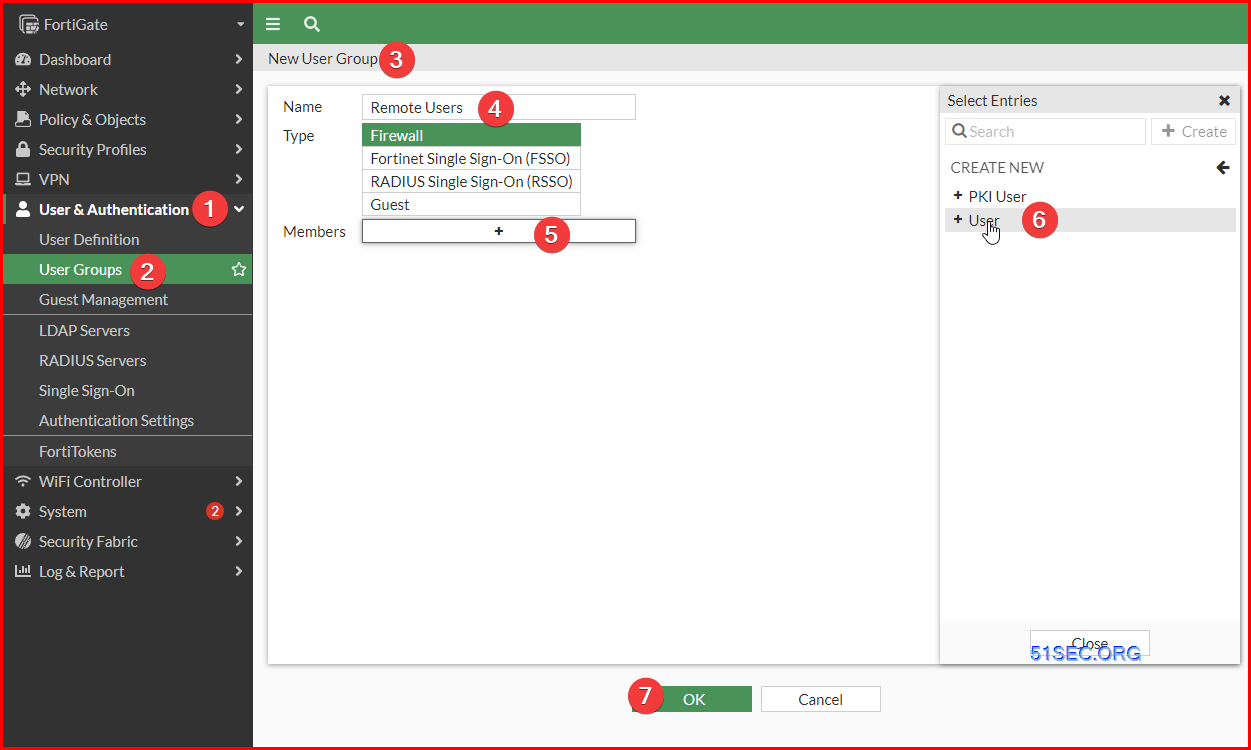
2 Remote Users and Group
Create a Remote Users group. Add a couple of remote users into this group.
FortiClient Configuration and Connect to Remote
Remote Access VPN (IPSec)
Enable SSL VPN Web Portal
SSL VPN web mode gets the error as below when configured with SAML authentication.

- Make sure web-mode is enabled in the SSL VPN portal:
config vpn ssl web portal
edit "full-access"
set web-mode enable
Warning: Please note that the legacy SSL VPN web mode feature is disabled by the global sslvpn-web-mode setting.

As the warning displayed, web mode is disabled globally so can not enable it in the full-access portal directly.Enable the web-mode globally first:config sys globalset sslvpn-web-mode enableend
Now the web mode of SSL VPN should work as expected after enabling web-mode for specific portals. To enable the web mode for specific portals run the command as shown in step 1.
If the issue persists, contact the TAC team.
FortiGate # show vpn ssl web portal
config vpn ssl web portal
    edit "full-access"
        set tunnel-mode enable
        set ipv6-tunnel-mode enable
        set web-mode enable
        set ip-pools "SSLVPN_TUNNEL_ADDR1"
        set ipv6-pools "SSLVPN_TUNNEL_IPv6_ADDR1"
    next
    edit "web-access"
        set web-mode enable
    next
    edit "tunnel-access"
        set tunnel-mode enable
        set ipv6-tunnel-mode enable
        set ip-pools "SSLVPN_TUNNEL_ADDR1"
        set ipv6-pools "SSLVPN_TUNNEL_IPv6_ADDR1"
    next
end

FortiGate #
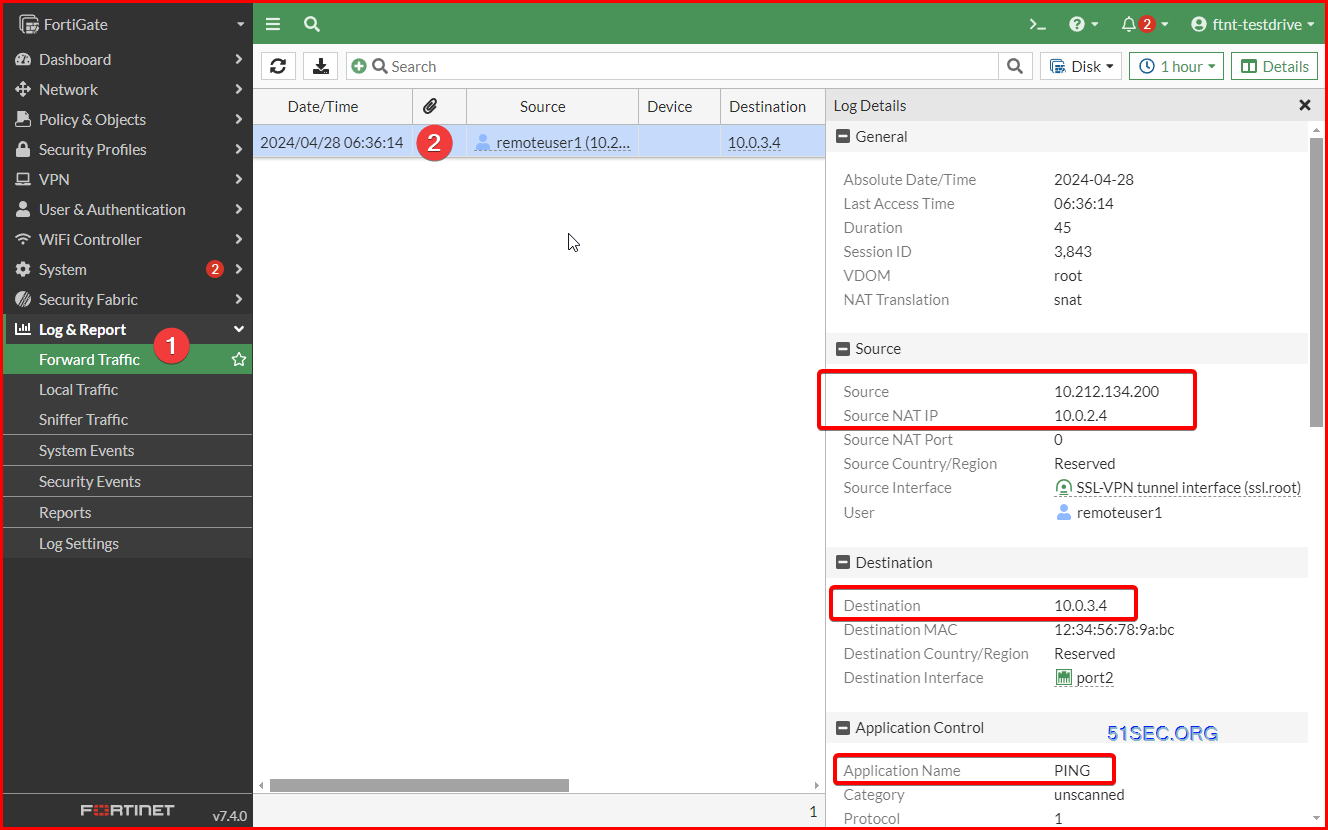
C:\Users\WDAGUtilityAccount>ping 10.0.3.4

Pinging 10.0.3.4 with 32 bytes of data:
Reply from 10.0.3.4: bytes=32 time=39ms TTL=63
Reply from 10.0.3.4: bytes=32 time=47ms TTL=63
Reply from 10.0.3.4: bytes=32 time=38ms TTL=63
Reply from 10.0.3.4: bytes=32 time=38ms TTL=63

Ping statistics for 10.0.3.4:
    Packets: Sent = 4, Received = 4, Lost = 0 (0% loss),
Approximate round trip times in milli-seconds:
    Minimum = 38ms, Maximum = 47ms, Average = 40ms

C:\Users\WDAGUtilityAccount>tracert 10.0.3.4

Tracing route to 10.0.3.4 over a maximum of 30 hops

  1    33 ms    36 ms    37 ms  10.212.134.200
  2    34 ms    35 ms    34 ms  10.0.3.4

Trace complete.
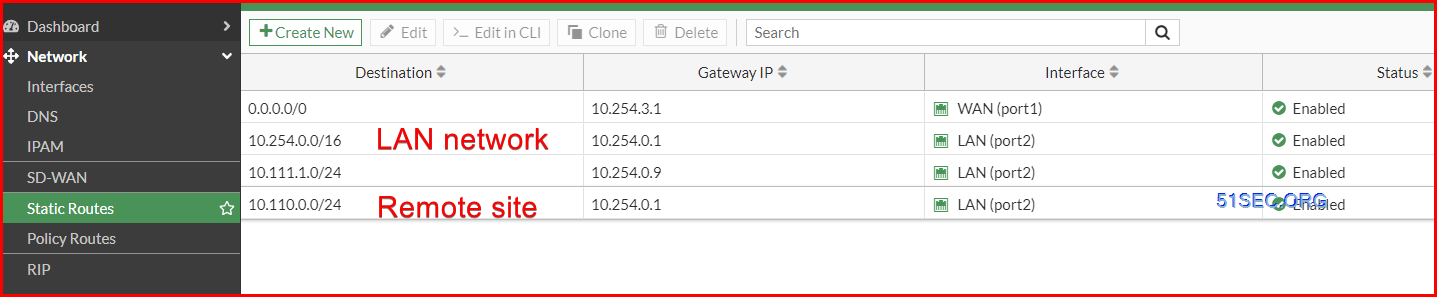
SSL VPN FortiClient Connect to Azure VPN Gateway's Remote site
There is a special use case, which FortiGate firewall is providing SSL VPN connection, but Azure VPN Gateway provides Site to Site connection to remote site. How can we get our FortiClient to connect to remote site through Azure VPN tunnel?
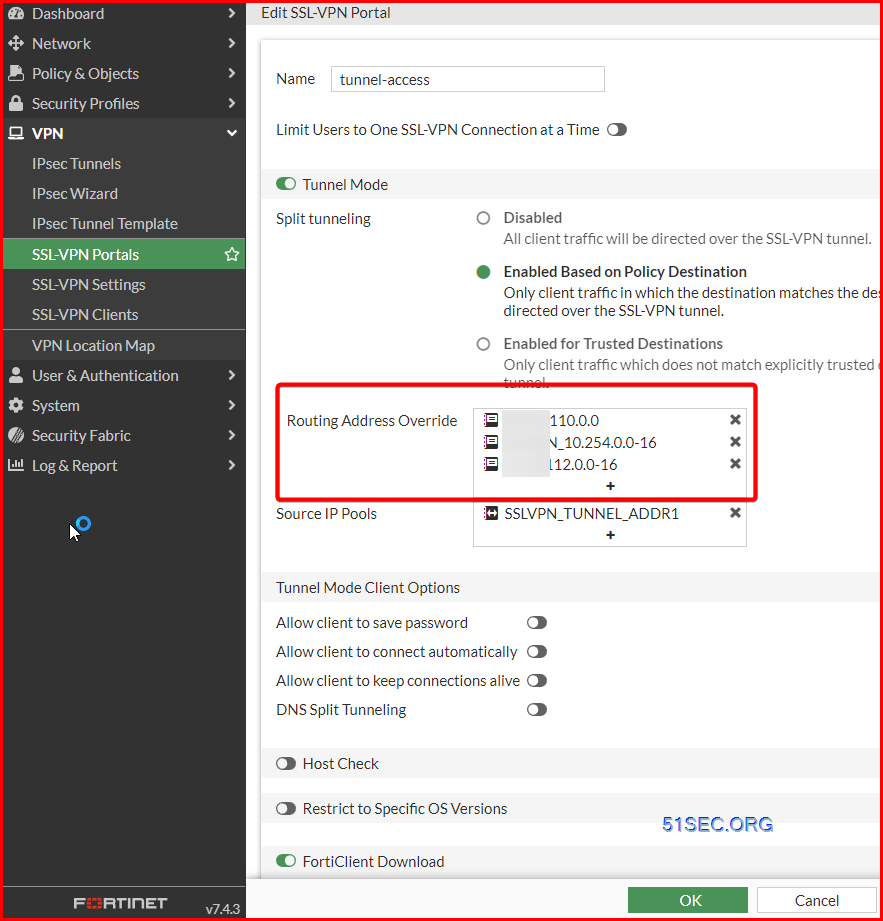
1. SSL VPN Portal
Password expiration policy for SSL VPN local user
Note: https://community.fortinet.com/t5/FortiGate/Technical-Tip-Password-expiration-policy-for-SSL-VPN-local-user/ta-p/192723
To configure SSL VPN users to change their password in the local user database before it expires
The password policy is used to configure the password renewal frequency (every 2 days for instance) and the warning that normally occurs the day before the expiration date. Password policy can be applied to any local user password.
The password policy cannot be applied to a user group or a local remote user such as LDAP/RADIUS/TACACS+.
In FortiOS 7.0, users are warned as per warn-days set and they have to renew their password before it get expire, which is based on the expire-days mentioned in the password policy. The user cannot renew the password and need to contact the FortiGate administrator for assistance.
In FortiOS 6.2, users are warned one day before the expiry date of the password and they have one day to renew it. When the password is expired, the user cannot renew the password and need to contact the FortiGate administrator for assistance.
In FortiOS 6.0/5.6, users are warned one day before the expiry date of the password. Users can still renew the password even after the password has expired.
Configure and assign the password policy using the CLI
The following commands are used to configure a password policy that includes an expiration date and a warning time.
#config user password-policy
edit "pwpolicy1" <- password policy name.
set expire-days 5 <- password expiry.
set warn-days 3 <- warning notification for password going to be expire soon.
set expired-password-renewal disable <- if enable this option is, after the password expires, still end user can renew the password, with no need to depend upon FortiGate Administrator.
next
end
Assign the password policy to the newly created user.
#config user local
edit "sslvpnuser1" <- local username.
set type password
set passwd-policy "pwpolicy1" <- applying password policy.
set passwd-time 2021-11-26 22:46:15 <- the default start time for the password, this is the time when the user was created.
set passwd xyz <- password.
next
end
Once the user is reached warn-days, the user will get the below prompt, while connecting to SSL VPN by entering old username and password. It will redirect to enter a new password for the same.

Once a user changes his password, 'passwd-time' will get changed again.
# config user local
edit "sslvpnuser1"
set type password
set passwd-policy "pwpolicy1"
set passwd-time 2021-11-30 23:34:30 <- passwd-time has been changed.
set passwd ENC +sddai212=
next
end
Note that, currently, the Password renewal for local users when using the Dial IPSec VPN is not supported.
SSL VPN password complexity policy
As to the password complexity policy to apply to SSL VPN Users, here are some documents we can reference to:
- https://docs.fortinet.com/document/fortigate/7.4.4/administration-guide/364729/password-policy
- https://docs.fortinet.com/document/fortigate/6.2.16/cookbook/544195/ssl-vpn-with-local-user-password-policy
- https://community.fortinet.com/t5/FortiGate/Troubleshooting-Tip-Password-renewal-with-password-complexity/ta-p/294773
- Configure password policy:
config user password-policy
edit "pwpolicy1"
set expire-days 5
set warn-days 3
set expired-password-renewal enable
set min-lower-case-letter 1
set min-upper-case-letter 1
set min-non-alphanumeric 1
set min-number 1
set min-change-characters 2
set expire-status enable
set reuse-password disable
next
end
2. password policy on the SSL VPN user.
config user local
edit "pearlangelica"
set type password
set two-factor fortitoken
set fortitoken "FTKMOB35D39832AD"
set email-to "<email address>"
set passwd-policy "pwpolicy1" <----- Apply password policy.
set passwd-time 2024-01-08 11:24:40 <----- Last password change.
set passwd ENC QWp+uKQ7Mk1GOh+864tiS/zOVo/Wsx/4DcVRRMrfe3Ujre1lv0It45yD8S9mgl2BBPKl39hkZHSoto+akR9kIgpnIE9tU73yMdehp7Gq3KWUKeQoYnv8iWFUXQjmLTEp5gJ3Mb221tFtAYd9jumB/YS+v52QrGvWJdg3OQfxb3bdkgtpgGWMagTZojLj5gLv4kyM7A==
next
end
Password policy can also be applied in global settings:
config user setting
set default-user-password-policy 'pwpolicy1'
end
SSL VPN LockOut Policy
To increase or alter the value, configure the desired values using the CLI as below.
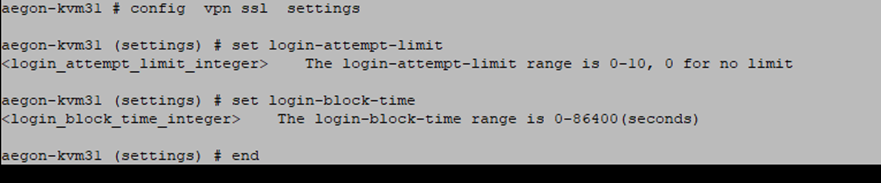
Note: Setting the login-block-time value to 0 does not mean that it will block the connection permanently. It will take it 0 seconds for the block-time and will allow the connection again instantly.
For newer FortiOS versions the command login-attempt-window has been renamed as login-timeout but is still referring to the window of time for which logins are considered consecutive and applicable to the login-attempt-limit.
The above config will help in preventing brute force attacks through SSL VPN.
To view the block listed IP address, use the CLI command:
diagnose vpn ssl blocklist list
Note: The command is available starting FortiOS versions 7.2.6 and above, 7.4.1 and above.
SSL VPN connection logout after 8 hours
The default value is 28800 seconds (8 hours). The value can be between <0> to <259200>
A value of 0 indicates no timeout.
Note:
- https://community.fortinet.com/t5/FortiGate/Technical-Tip-SSL-VPN-connection-logout-after-8-hours/ta-p/191322
- https://community.fortinet.com/t5/FortiGate/Technical-Tip-SSL-VPN-timers-explanation-and-SSL-VPN-Login/ta-p/203615
Troubleshooting
NAT using IP Pool.
Sometimes, using "outgoing interface address" this option, it doesn't work.
If it happens, just specifize your range as show below.

Find out Failed SSL Login
To find failed login events from a FortiGate SSL VPN connection using FortiClient, navigate to "Log & Report" > "System Events" > "VPN Events" within the FortiGate GUI, where you can filter the logs to specifically see events related to failed SSL VPN login attempts, typically identified by an "action" of "ssl-login-fail" in the log entry.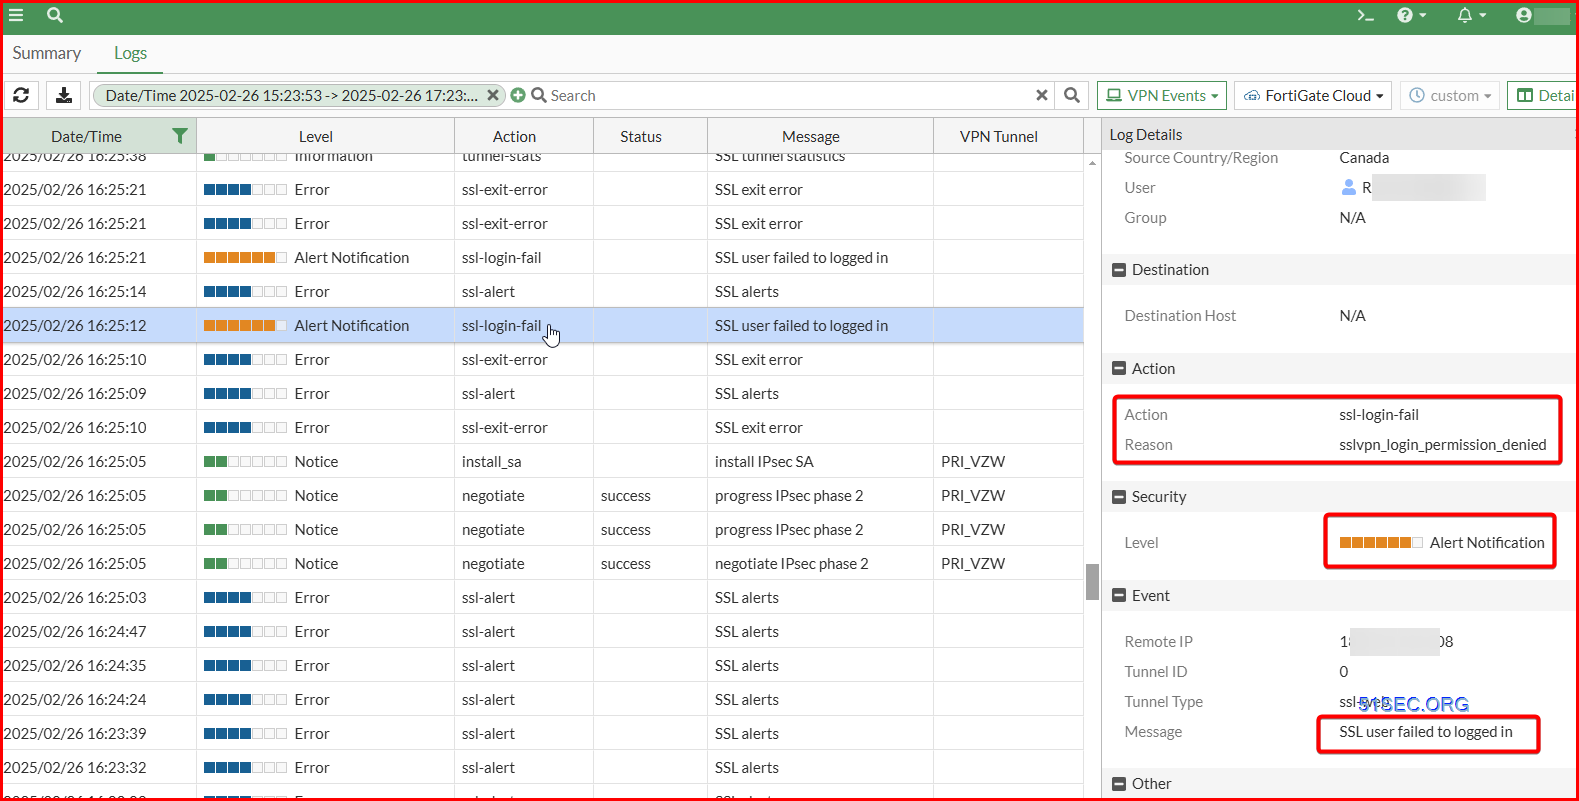
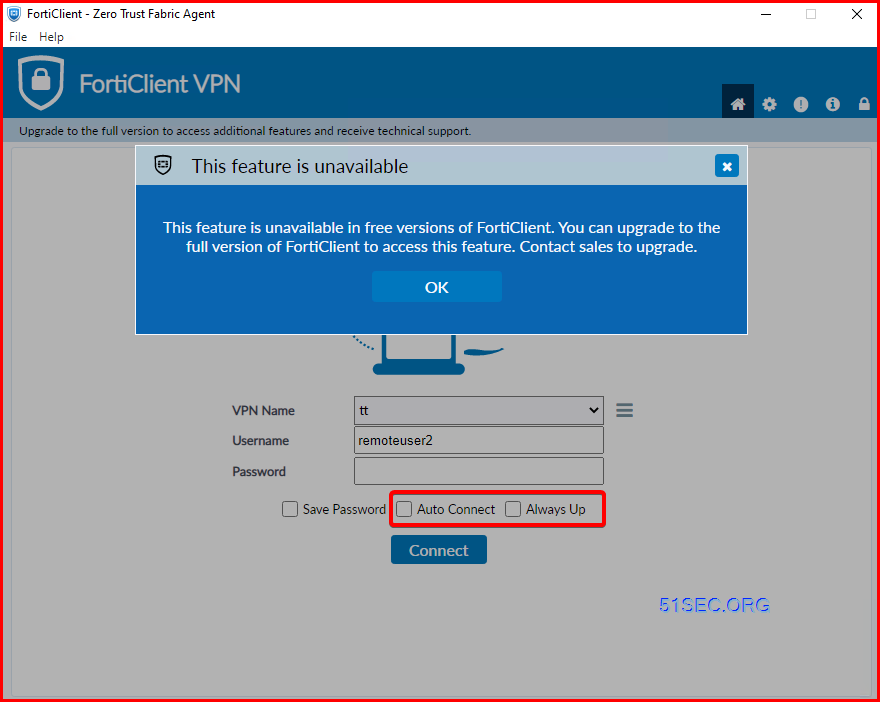
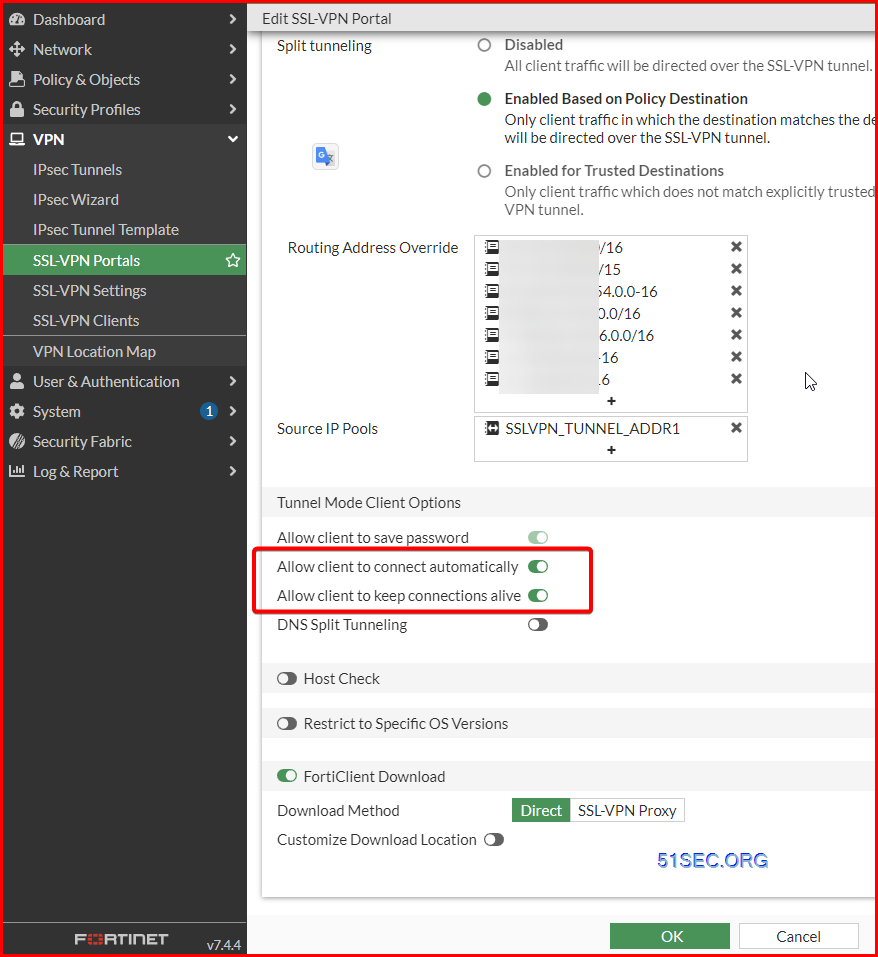
Advanced Features: Auto Connect, Always Up
Feature | Description |
|---|---|
Save Password | Allows the user to save the VPN connection password in FortiClient |
Auto Connect | When FortiClient launches, the VPN connection automatically connects. Automatic connection to the VPN tunnel may fail if the endpoint boots up with a user profile set to automatic logon. See Appendix E - VPN autoconnect for configuration examples. |
Always Up (Keep Alive) | When selected, the VPN connection is always up. If the connection fails, possibly due to network errors, FortiClient attempts to reconnect. If credentials (username and password) are saved, FortiClient attempts to reconnect silently. If credentials are insufficient (for instance, multifactor authentication is required or password is not saved), FortiClient prompts for credentials. |
Note:
The following features are not supported in the FortiClient v6.2.X - v7.0.12, v7.2.X and v7.4.X free versions:
- VPN auto-connect/always-up.
- VPN before logon.
- On-net/off-net.
- Host check features.
- Central management
- No feedback option & no diagnostic tool under help/info page.
- IKEv2 is not supported on FortiClient 6.2.x free version.
- TAC support.
Videos
Configure FortiGate SSL VPN and Connect it Using FortiClient (Free with Test Drive):
References
- Fortinet Product Downloads
- SSL VPN Explained
- https://azuremarketplace.microsoft.com/en-us/home


No comments:
Post a Comment