The program requires a relatively high configuration, see here for details:https://n.eko.moe/#/quick-start
Here are recommended specs:
| Resolution | Cores | Ram | Recommendation |
|---|---|---|---|
| 1024×576@30 | 2 | 2gb | Not Recommended |
| 1280x720@30 | 4 | 3gb | Good Performance |
| 1280x720@30 | 6 | 4gb | Recommended |
| 1280x720@30 | 8 | 4gb+ | Best Performance |
To run it in a low resource VPS, such as only 1GB RAM, 1vCPU, we will have to change SWAP size to make it more stable.
Some other similar solutions:
- hyperbeam provides similar functions, but it has time limitation for free usage.
- Apache Guacamole
- noVNC
Installation Pre-requirements
Free resources you might need to complete this docker project:
- Server: Oracle Free VPS, Azure Free VPS, Google Cloud Free VPS, and others
- Create a Free Tier Windows/Linux Azure VPS VM
- [Free VPS] GCP (Google Cloud Platform) Tips and Tricks (Free 16G RAM, 4 vCPU VPS)
- System: Cloud Vendor Ubuntu, Debian, or DD an original version
- SWAP size increase: wget https://raw.githubusercontent.com/51sec/swap/main/swap.sh && bash swap.sh
- Enable Password ssh login
- Enable BBR
- systemctl restart docker
- Domain: (Optional) EU.ORG to get a free one, free Cloudflare account to manage your domain
- Confirm port has not been used (you might need to install lsof using command : apt install lsof):
- lsof -i:8088
Pre-installed services:
- Docker,
- apt update
- apt install docker.io
- apt install docker-compose
- apt upgrade docker.io
- mkdir /root/data/docker_data/<docker_name>
- Docker-Compose (Using Ubuntu OS for the commands)
- Docker-compose down
- Optional command : use following command to backup your Docker data. You might need to change your folder name based on your docker configuraiton
- cp -r /root/data/docker_data/<docker_name> /root/data/docker_data_backup/<docker_name>
- docker-compose pull
- docker-compose up -d
- docker image prune
- Portainer (Optional)
- docker volume create portainer_data
- docker run -d -p 9000:9000 --name portainer --restart always -v /var/run/docker.sock:/var/run/docker.sock -v portainer_data:/data portainer/portainer-ce:latest
- Install some applications: apt install wget curl sudo vim git (Optional)
- aapanel with Nginx (Optional)
- Nginx Proxy Manager (Optional)
Firewall Ports Open
Please make sure following two firewall rules created on your cloud VPS's firewall.Testing udp port using NC commands:
To validate UDP connection the simplest way, run this on your server:
nc -ul 52101And this on your local client:
nc -u [server ip] 52101Change SWAP Size for Low Memory VPS (< 2GB)
———————————————————————————————————————
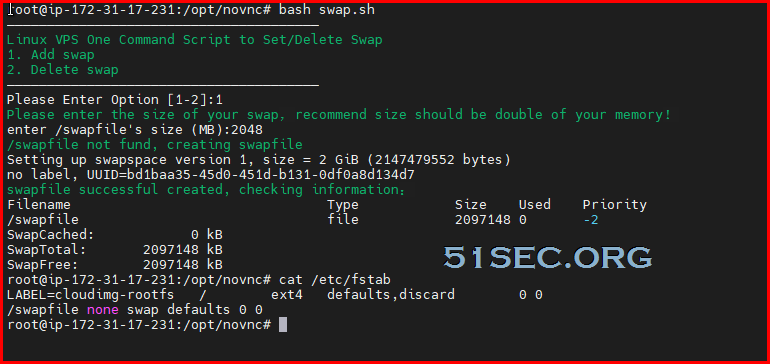
Linux VPS One Command Script to Set/Delete Swap
1. Add swap
2. Delete swap
———————————————————————————————————————
Please Enter Option [1-2]:1
Please enter the size of your swap,recommend size should be double of your memory!
enter /swapfile's size (MB):2048
/swapfile not fund, creating swapfile
Setting up swapspace version 1, size = 2 GiB (2147479552 bytes)
no label, UUID=ab2c0605-631f-4697-bd64-0ff391553573
swapfile successful created, checking information:
Filename Type Size Used Priority
/swapfile file 2097148 0 -2
SwapCached: 0 kB
SwapTotal: 2097148 kB
SwapFree: 2097148 kB
root@instance-1:~/data/docker_data/neko# htop
Install Docker and Docker-Compose
apt -y update
apt -y install curl
curl -sSL https://get.docker.com/ | sh
systemctl start docker
systemctl enable docker
Install docker-compose:
curl -L https://github.com/docker/compose/releases/download/1.27.4/docker-compose-`uname -s`-`uname -m` -o /usr/local/bin/docker-compose
chmod +x /usr/local/bin/docker-compose
You also can create a symbolic link to /usr/bin folder:
ln -s /usr/local/bin/docker-compose /usr/bin/docker-composeCreate docker-compose.yml and bring n.eko docker up
[Warning] Don't try this at https://labs.play-with-docker.com/. The instance will be deleted right away.
Check https://github.com/m1k1o/neko for latest updates.
Create a new docker-compose project directory and edit docker-compose.yml.
cd ~
mkdir neko
cd neko
vi docker-compose.yml
Put following code into docker-compose.yml file based on the browser type.Chrome Image:
version: '3.5'
services:
  neko:
    image: nurdism/neko:chromium
    restart: always
    cap_add:
      - SYS_ADMIN
    ports:
      - "8080:8080"
      - "59000-59100:59000-59100/udp"
    environment:
      DISPLAY: :99.0
      SCREEN_WIDTH: 1024
      SCREEN_HEIGHT: 576
      SCREEN_DEPTH: 24
      NEKO_PASSWORD: neko
      NEKO_ADMIN: admin
      NEKO_BIND: :8080
Firefox Image:
version: '3.5'
services:
  neko:
    image: nurdism/neko:firefox
    restart: always
    shm_size: "1gb"
    ports:
      - "8080:8080"
      - "59000-59100:59000-59100/udp"
    environment:
      DISPLAY: :99.0
      SCREEN_WIDTH: 1024
      SCREEN_HEIGHT: 576
      SCREEN_DEPTH: 24
      NEKO_PASSWORD: neko
      NEKO_ADMIN: admin
      NEKO_BIND: :8080
Notes:
SCREEN_DEPTH can be changed to 16 to save some resource usage on your host VPS.
SCREEN_WIDTH=1280 // Display width
SCREEN_HEIGHT=720 // Display height
SCREEN_DEPTH=24 // Display bit depth
DISPLAY=:99.0 // Display number
NEKO_PASSWORD=neko // Password
NEKO_ADMIN=neko // Admin Password
NEKO_BIND=0.0.0.0:8080 // Bind
NEKO_KEY= // (SSL)Key, needed for clipboard sync
NEKO_CERT= // (SSL)Cert, needed for clipboard syncdocker-compose up -dNow you should be able to browser to your n.eko's web interface with this url : http://<public ip>:8080
Note:
ARM
For ARM-based devices (like Raspberry Pi, with GPU hardware acceleration):
m1k1o/neko:arm-firefox- for Firefox.m1k1o/neko:arm-chromium- for Chromium.m1k1o/neko:arm-base- for custom arm based.
Fix Chinese Font Issue
Enter into docker:
docker exec -it root_neko_1 bash
Install fonts in docker:
apt -y update
apt -y install ttf-wqy-zenhei
exit and restart docker using docker-compose:
exit
docker-compose restart
HTTPS
- DNS sub domain created in your DNS provider, such as this sub domain, neko.51sec.org
- Create your neko.51sec.org Nginx configuration. You can copy other Nginx web app's configuration then modify it.
- run certbot --nginx to get LetsEncrypt certificate and modify neko.conf file to use those certificates.
- test https://<Sub Domain>
Nginx Configuration
If you have Nginx installed on your same box, you can use following configuraiton to enable reverse proxy for your own domain. such as neko.51sec.org:root@3a4767f0c009:/# cd /etc/nginx
root@3a4767f0c009:/etc/nginx# cd conf.d/
root@3a4767f0c009:/etc/nginx/conf.d# cat neko.conf
server {
listen 80;
server_name neko.51sec.org;
location / {
proxy_pass http://3.3.2.1:8080;
proxy_redirect off;
proxy_http_version 1.1;
proxy_set_header Upgrade $http_upgrade;
proxy_set_header Connection "upgrade";
proxy_set_header Host $host;
proxy_set_header X-Real-IP $remote_addr;
proxy_set_header X-Forwarded-For $proxy_add_x_forwarded_for;
}
listen 443 ssl; # managed by Certbot
ssl_certificate /etc/letsencrypt/live/neko.51sec.org/fullchain.pem; # managed by Certbot
ssl_certificate_key /etc/letsencrypt/live/neko.51sec.org/privkey.pem; # managed by Certbot
include /etc/letsencrypt/options-ssl-nginx.conf; # managed by Certbot
ssl_dhparam /etc/letsencrypt/ssl-dhparams.pem; # managed by Certbot
}
root@3a4767f0c009:/etc/nginx/conf.d#
Other projects who run Firefox in Cloud
- https://replit.com/@BenisBest/Firefox?v=1&outputonly=1&lite=true#main.sh
- https://replit.com/@cooleddie001/Firefox-Legacy?v=1


![[5 Mins Docker] Deploy FreshRSS Using Docker Run Command and Deploy To Fly.io](https://lh3.googleusercontent.com/blogger_img_proxy/AEn0k_vVGZxOoGLXdJNxtEi4chJk3E7sitnssj3kLV9AJxblQhVLnHjwTs-IPGITXys7THwd3y-eBY-u3FFf7LPOxDMxfWVAAWuwcp1mJjmOuYRlbg)


No comments:
Post a Comment