Nessus is Tenable's entry level product and is intended for vulnerability assessment – not vulnerability management. It provides ad-hoc scanning, suitable for small organizations that need to do infrequent scans, penetration testers, consultants and even developers who are scanning clients on a one to one type basis.
- It is a single user solution. It can be shared but only one user at a time.
- Nessus provides unlimited IP scanning – no bands or limits. You just point it at your network and it can scan as many IPs as you want.
- It is for on-premise deployment - It is not a cloud hosted SaaS solution.
This post summarizes the tips and tricks I found useful during working on Tenable Nessus. For Cloud version Tenable Vulnerability Managenet solution : Tenable Vulnerability Management Tips and Tricks, Performance Tuning, Agent, Troubleshooting
- Tenable Web Application Cerdential Scans For Web Appications and APIs
- Tenable Lab Steps and Notes - Part 1 (Discovery, NNM, Assessment, Plugins, Compliance, VPR, Analysis)
- Tenable Lab Steps and Notes - Part 2 (Dashboards, Reports, Core, Nessus, NNM, Agent, Scanner Groups)
- Tenable Vulnerability Management Specialist - Discovery, Assessment, Analysis, Compliance, Dashboard, Reports, Core, Nessus, Agent, NNM, Access Control
- Tenable PCI Scans (Internal and External)
- Tenable Vulnerability Management Tips and Tricks, Performance Tuning, Agent, Troubleshooting
- Tenable Nessus Tips and Tricks (+Script Auto-Installation)
- Tenable Nessus Auto Installation Special Scripts on Linux and How to Install on Windows
- Tenable Nessus Professional / Expert Installation (Web Application Scanning, Special Version in Linux etc)
- Tenable Vulnerability Management (Tenable.io) Basics Including Sensor and Agent Installation
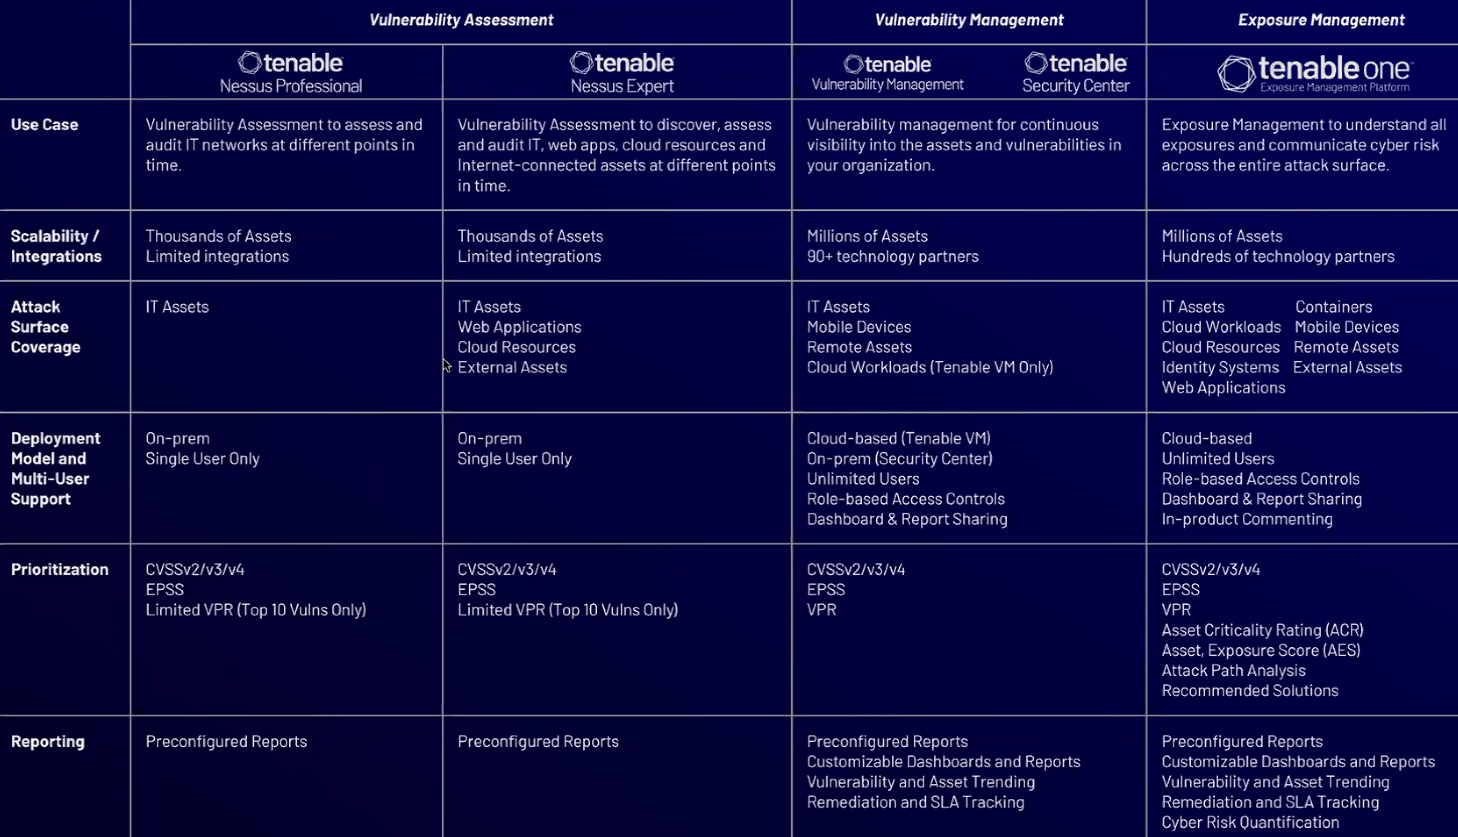
Feature Comparism among Nessus (Pro, Expert), TVM, TSC, Tenable One
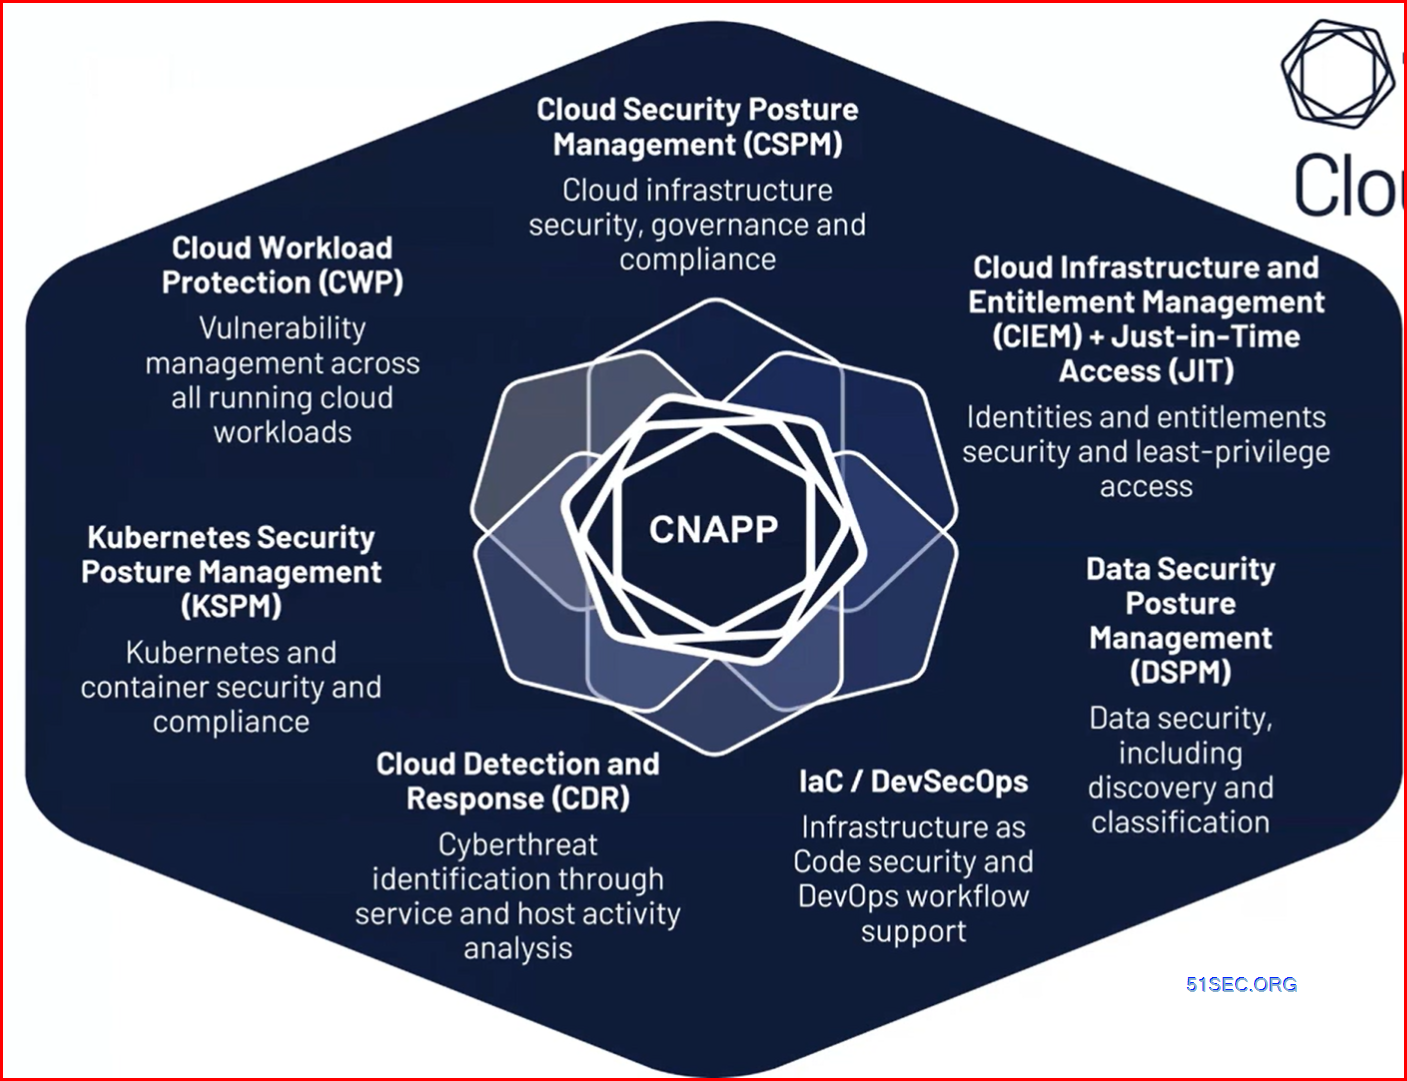
CNAPP
- - CWP
- - CSPM
- - CIEM + JIT
- - KSPM
- - DSPM
- - CDR
- - IaC / DevSecOps
Nessus Product Feature Comparism
| NESSUS PROFESSIONAL | NESSUS EXPERT | |
|---|---|---|
| Designed for | Pentesters, Consultants, and Small and Medium-sized Business (SMB's) | Pentesters, Consultants, Developers and Small and Medium-sized Business (SMB's) |
| Real-Time Vulnerability Updates | Yes | Yes |
| Vulnerability Scanning | Yes | Yes |
| Prebuilt policies used for scanning | Yes | Yes. Also has an additional 500 prebuilt policies for cloud infrastructure scanning |
| Scan Cloud Infrastructure | Yes, through the CLI* (*Command Line Interface) | Yes |
| External Attack Surface Scanning | No | Yes |
Disable Certain Plugins Using nessusd.rules
The nessusd.rules file is an editable, text-based file used to configure Nessus scans to allow and reject ports, IP addresses, IP ranges, plugins, and targets. Please note that if the scans are launching from Tenable.sc or Tenable.io, all scans that use this Nessus scanner will be subject to the nessusd.rules file.By default, based on your operating system, the nessusd.rules file can be found in the following locations:
- Linux
/opt/nessus/etc/nessus/nessusd.rules
- Windows (default location)
C:\ProgramData\Tenable\Nessus\conf\nessusd.rules
Note: The ProgramData folder is by default a hidden folder in Windows. In addition, the path specified is the default but can vary if Nessus was installed on another drive (i.e. E:\Programdata\...\). For more information, see the Microsoft article Show hidden files.
root@az-h-22ub:/opt/nessus_agent/etc/nessus# cat nessusd.rules
#
# Nessus rules
#
#
# Target Syntax: accept|reject address/netmask:port[-port_max]
#
# Reject any target on 10.42.123.x
# reject 10.42.123.0/24
# Reject connecting to port 80 for 10.0.0.1
# reject 10.0.0.1:80
# Reject connecting to ports 8000 - 10000 (inclusive) for any host in the 192.168.0.0/24 subnet
# reject 192.168.0.0/24:8000-10000
# Reject connecting to ports 1 - 1024 (inclusive) for the host 2001:db8::abcd
# reject [2001:db8::abcd]:1-1024
#
#
# Plugin Syntax: plugin-accept|plugin-reject id[-id_max]
#
# Reject plugin #10335
# plugin-reject 10335
# Allow plugins #10000 through #40000 (inclusive)
# plugin-accept 10000-40000
#
#
# Default Rule Syntax (if no other rules apply): default accept|reject
#
# Accept everything else
# default accept
# Reject everything else
# default reject
default accept
How to backup / restore Configuration and Scan Results
Export / Import .nessus or .db file
You can also import .nessus files as policies. For more information, see Import a Policy.
Backup
- /nessus/var/nessus/users/admin/auth/admin
- /nessus/var/nessus/users/admin/auth/rules
- /nessus/var/nessus/users/admin/policies.db
Change Nessus Pro Session Timeout
Set Group Severity to Highest Severity in Group
Set the advanced setting scans_vulnerability_groups_mixed to no.
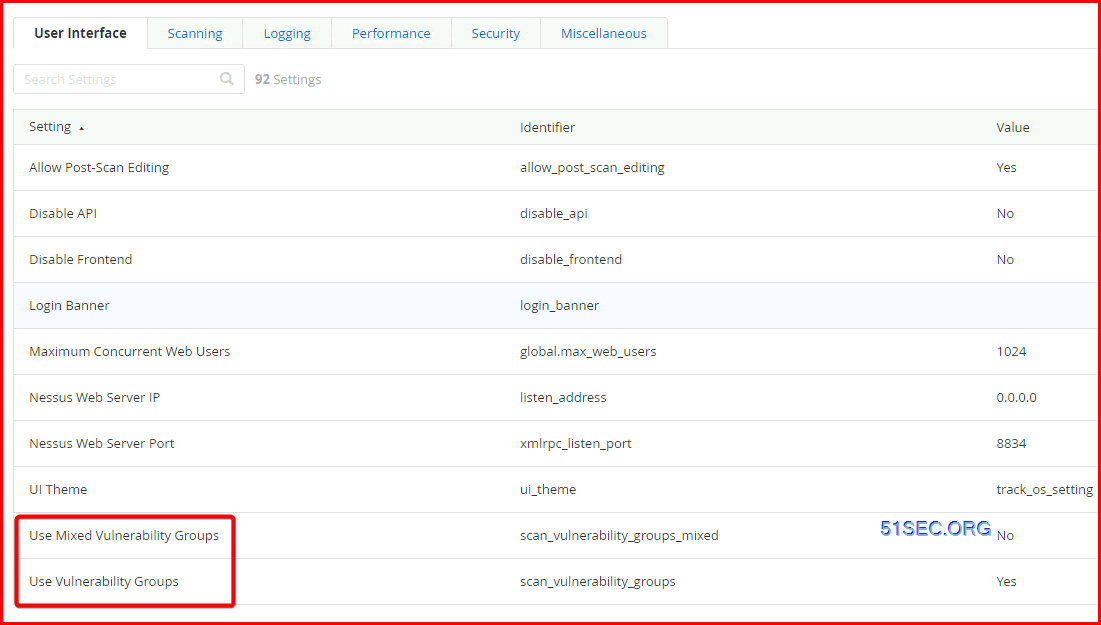
scans_vulnerability_groups_mixed = no : set group severity to the highest severity in the group
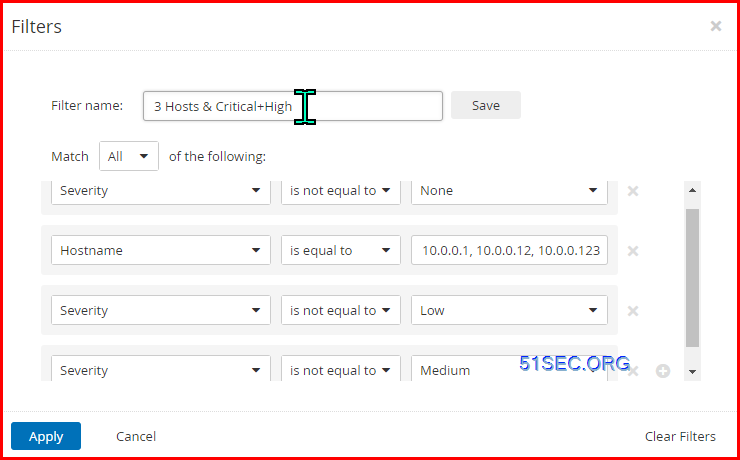
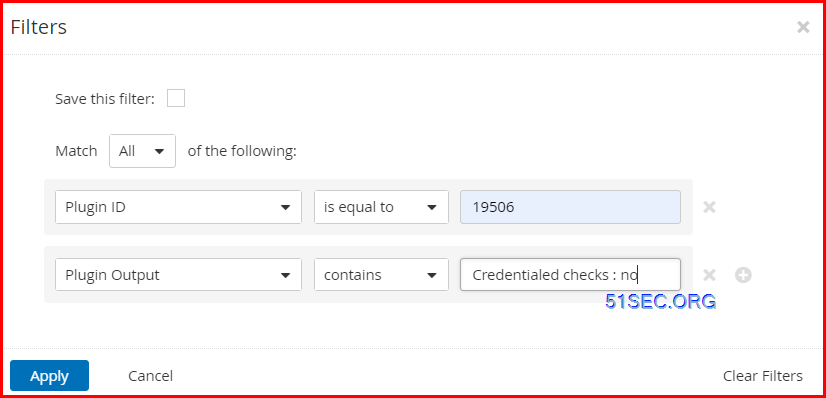
Filter For Vulnerabilities
You have to play All / Any, is equale to, is not equale to , those options to create your customized filters.
How to find out failed login hosts
- Plugin 19506 Nessus Scan information : Along with other information, this give you a quick summary of CREDENTIALS YES/NO
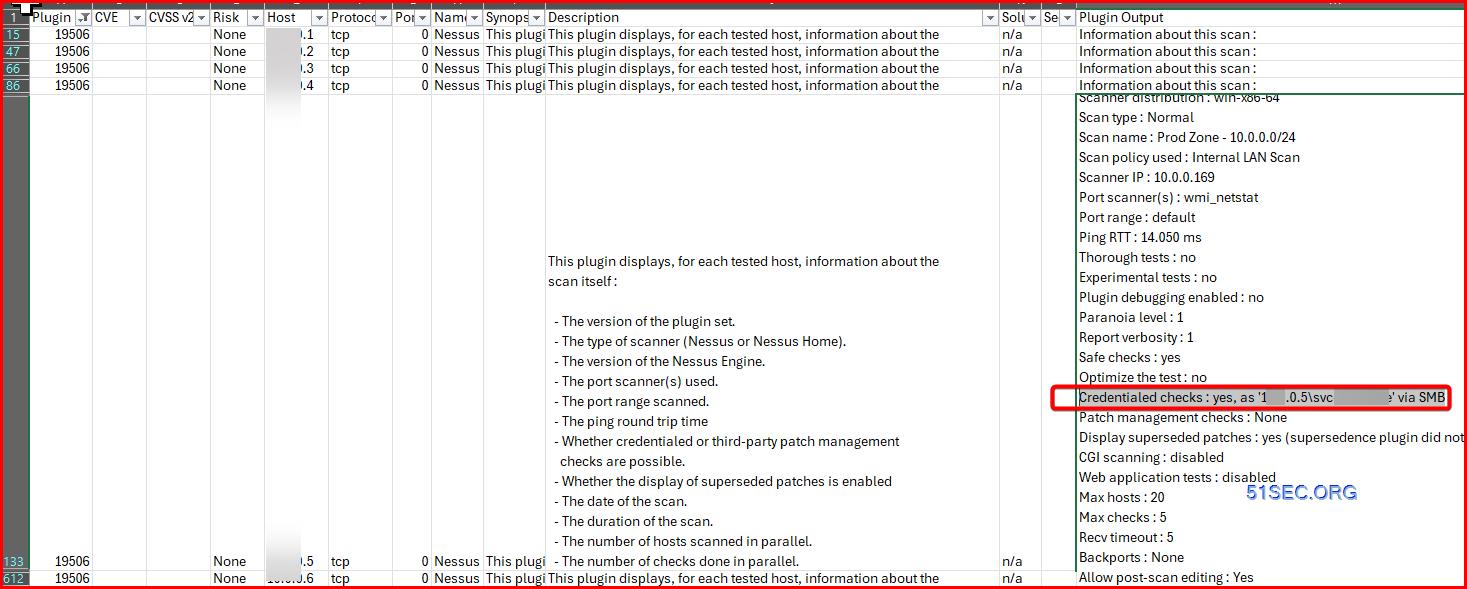
If you have a failure, then review other Plugins to find out the cause, Here are some Plugins worth looking at
- 110723 No Credentials Provided
- 110095 Authentication Success
- 104410 Authentication Failure(s) for Provided Credentials
- 110385 Authentication Success Insufficient Access
- 21745 Authentication Failure - Local Checks Not Run
- 117885 Authentication Success with Intermittent Failure
- 10394 Microsoft Windows SMB Log In Possible
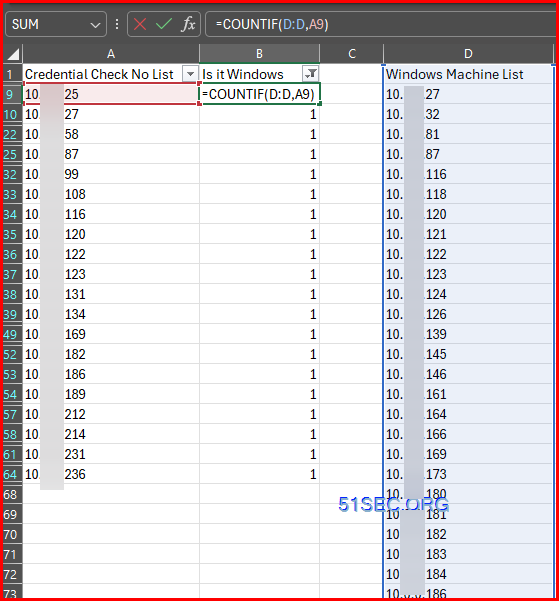
How to Quickly Find Out Machines OS and Those Failed Credential Check
Plugin ID: 11936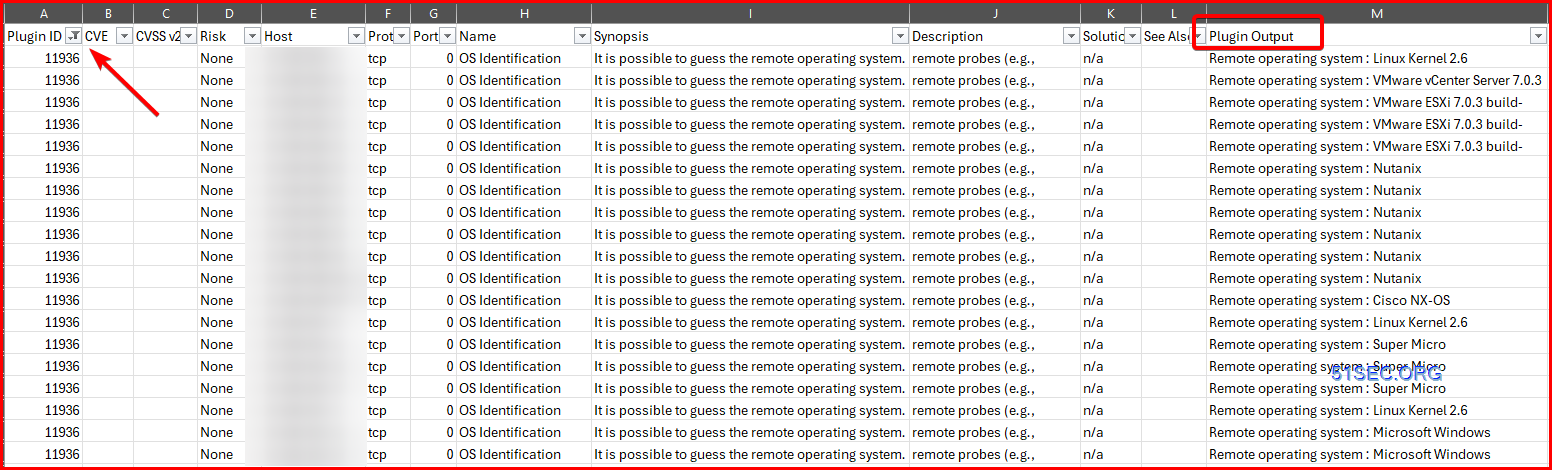

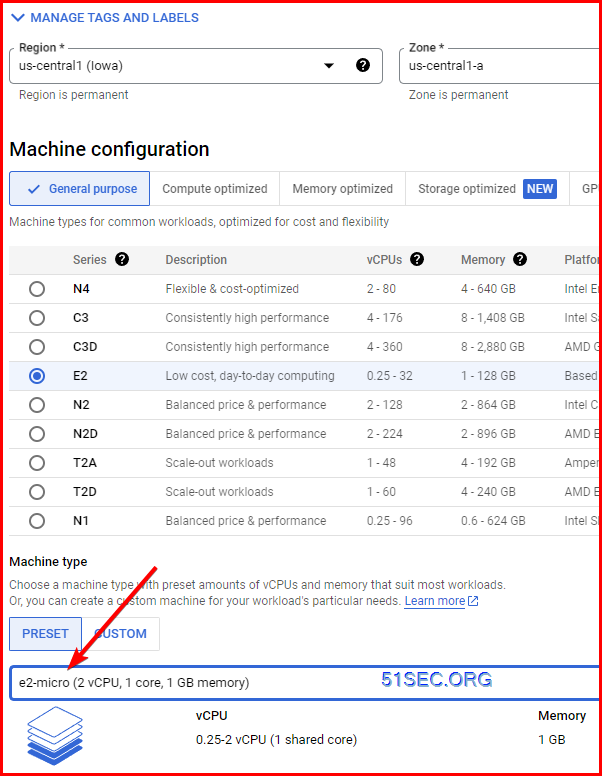
Create Nessus Instance in Low End VPS
GCP Free tier:
- 1 non-preemptible
e2-microVM instance per month in one of the following US regions:- Oregon:
us-west1 - Iowa:
us-central1 - South Carolina:
us-east1
- Oregon:
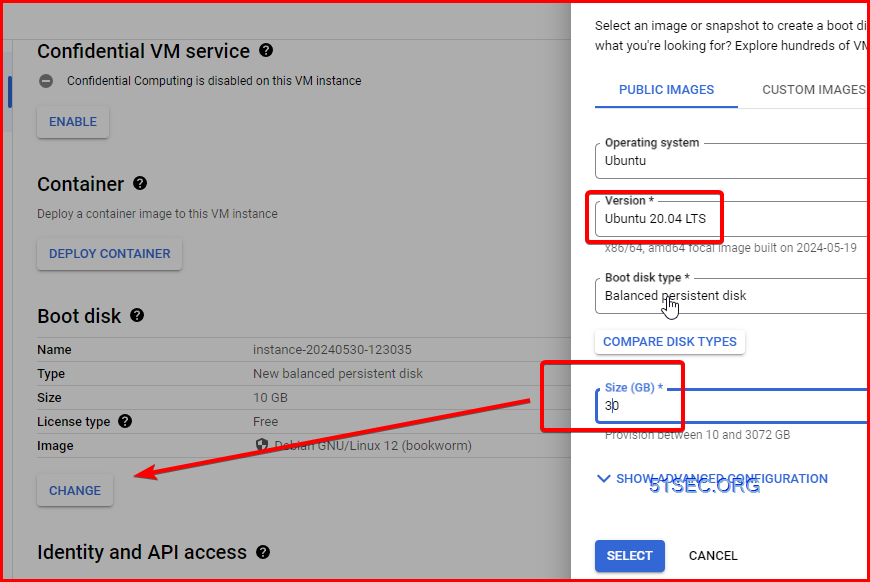
- 30 GB-months standard persistent disk
- 1 GB of outbound data transfer from North America to all region destinations (excluding China and Australia) per month
- Compute Engine free tier does not charge for an external IP address.
Installation steps
1 Create your GCP VM
2 Connect to VM
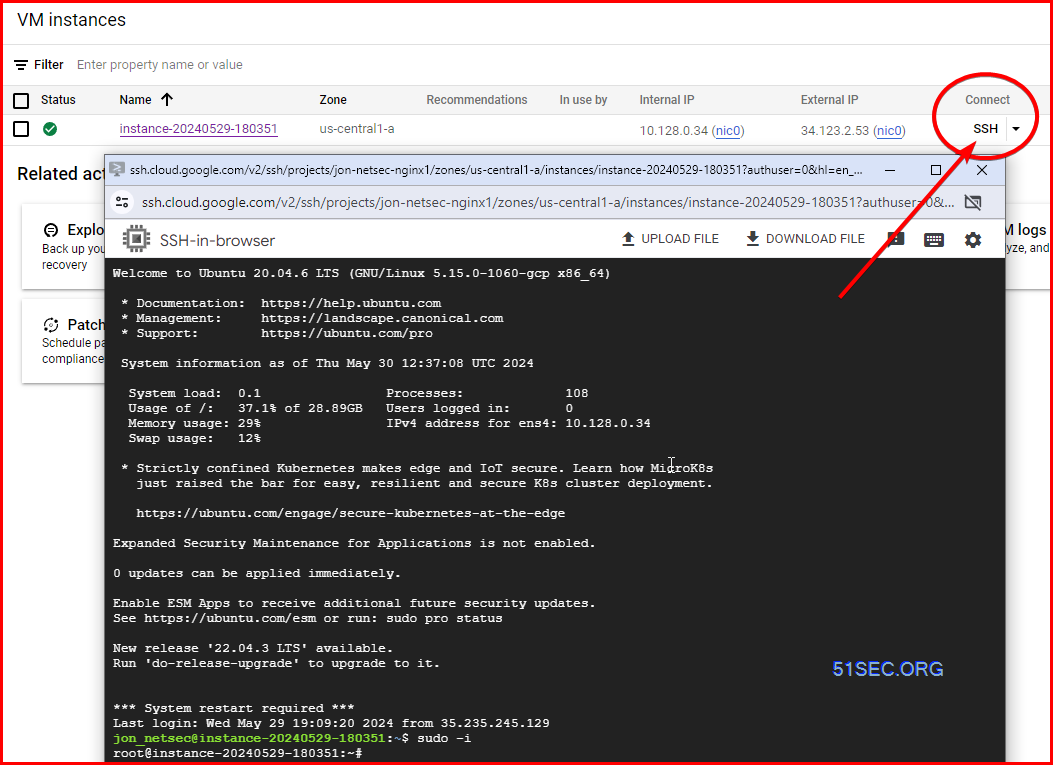
- apt update -y && apt upgrade -y
- wget https://raw.githubusercontent.com/51sec/swap/main/swap.sh && bash swap.sh
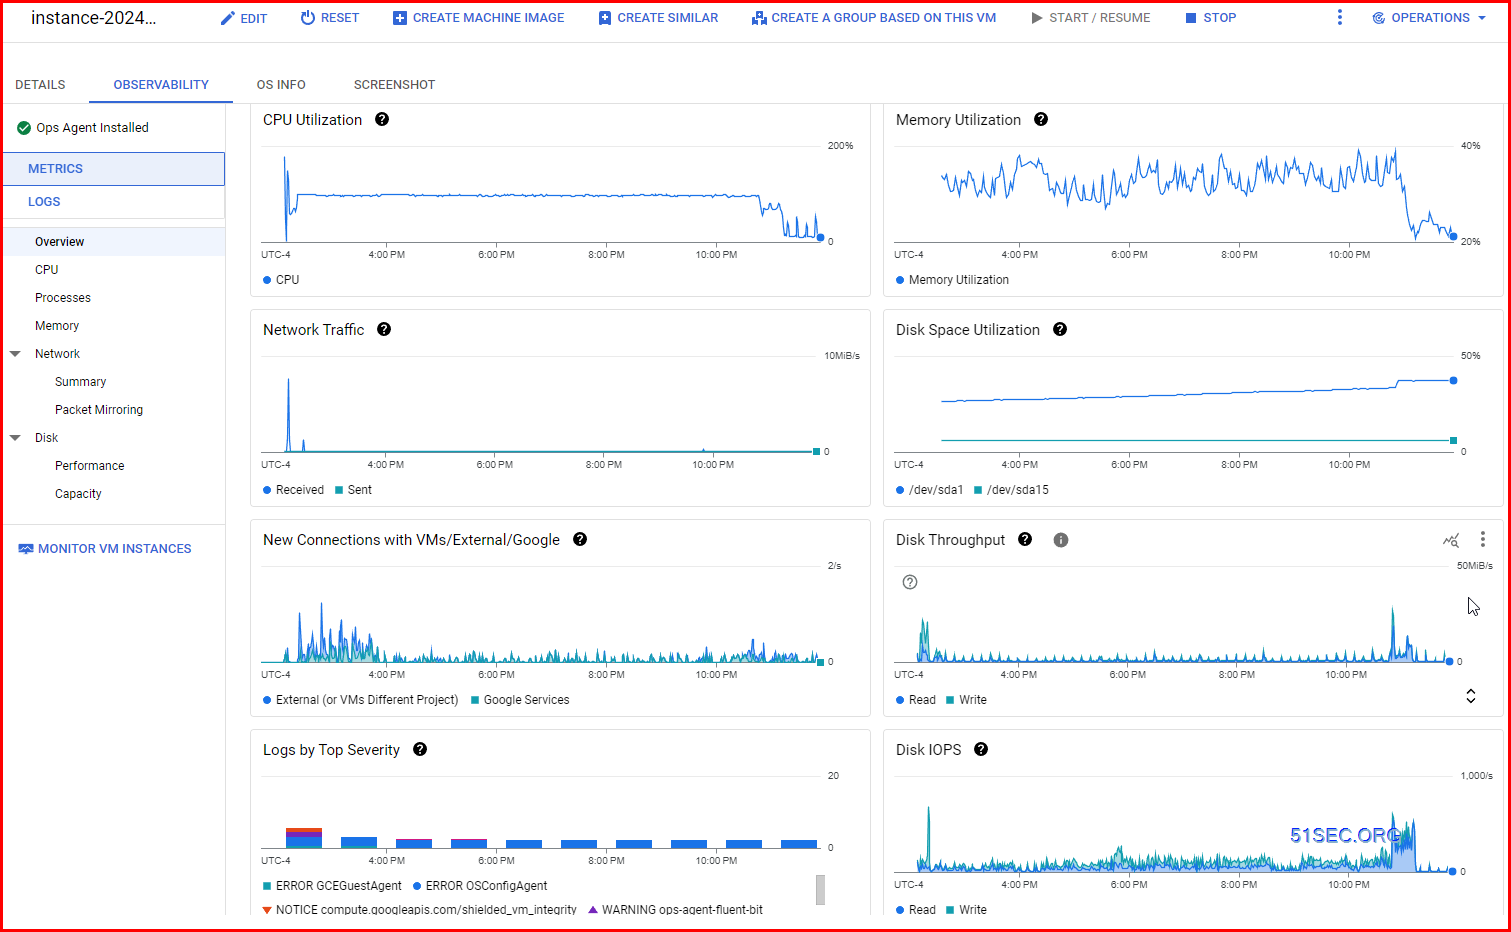
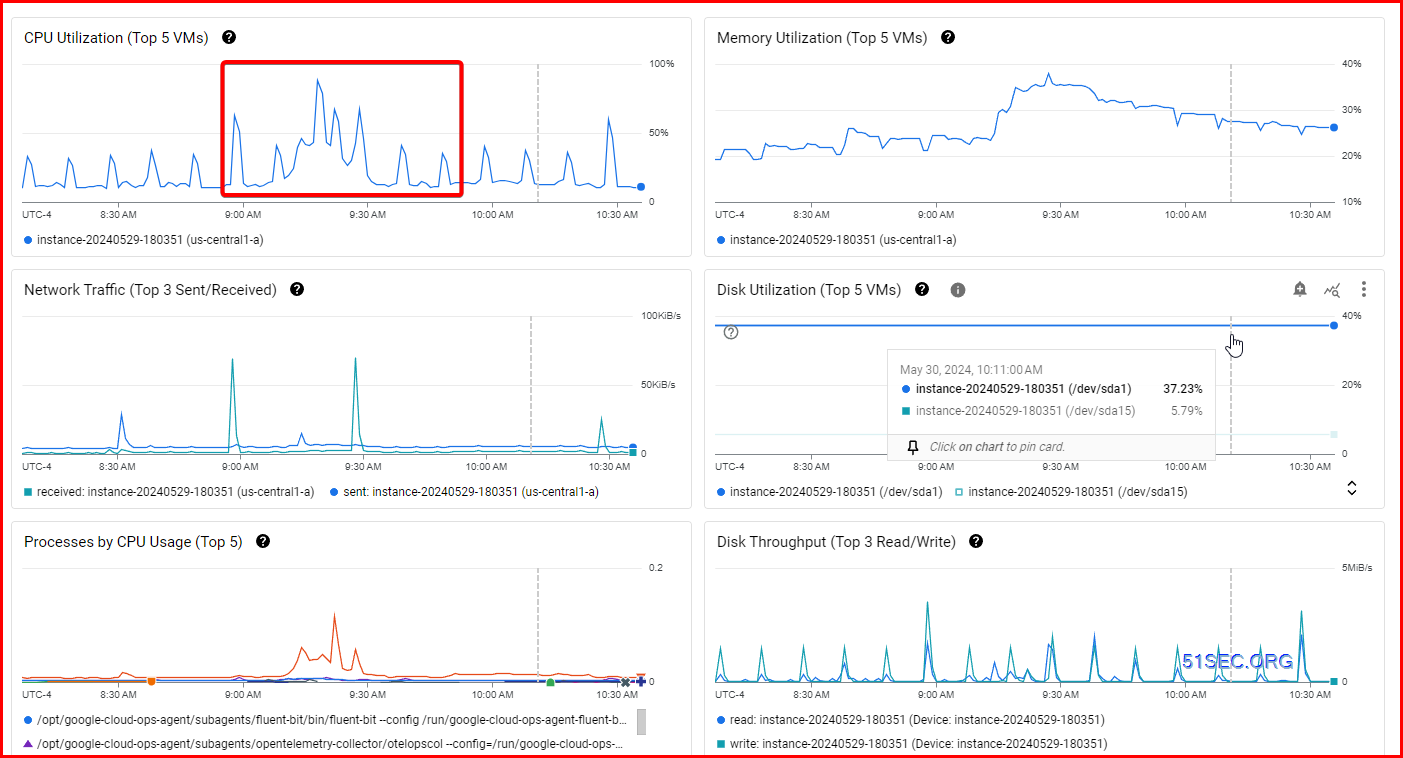
3 Install Observability - Ops Agent (Optional)
You will be able to see much more metrics from your VPS, such as memory usage.
4 Install Nessus using an auto-installation script from Github
Three commands from the cli session:
- curl https://raw.githubusercontent.com/51sec/nessus-special/main/ubuntu.sh -o ubuntu.sh
- chmod +x ubuntu.sh
- ./ubuntu.sh
One line command:
- curl https://raw.githubusercontent.com/51sec/nessus-special/main/ubuntu.sh -o ubuntu.sh && chmod +x ubuntu.sh && ./ubuntu.sh
Access Tenable Nessus Web GUI:
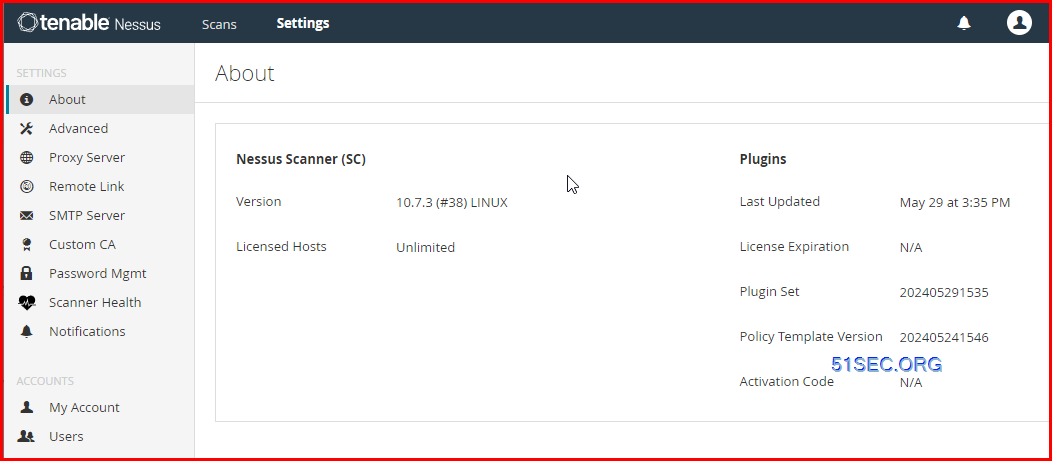
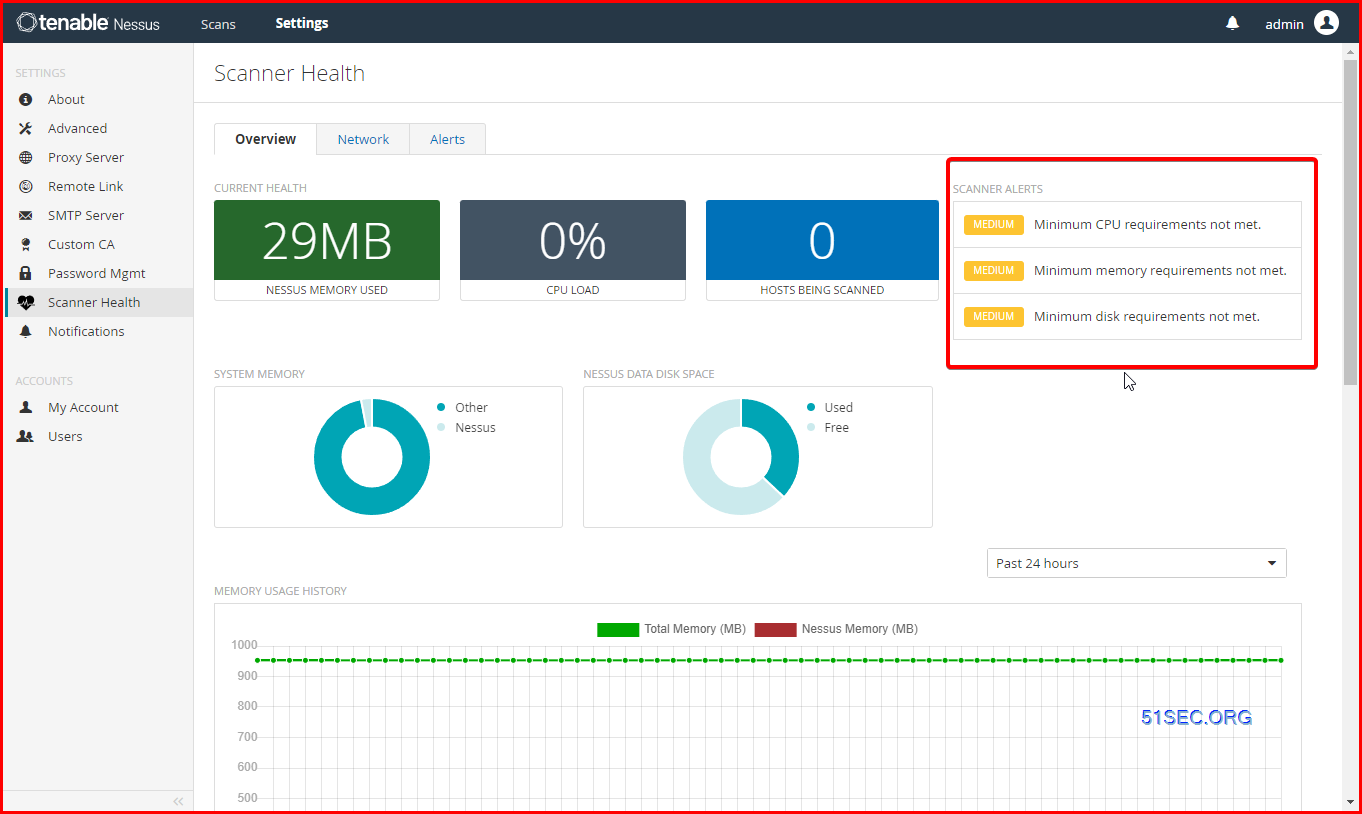
Screenshots for oberability tab and settings page:
Total hours until all plug-ins compiled in a low end VPS (GCP E2-Micro, 1vCPU/1G RAM/30G Standard Disk): about 9 hours (from 2pm - 11pm)

Auto-installation Script Issue:
How to Update Plugin-set:
- re-run the installation scrip.
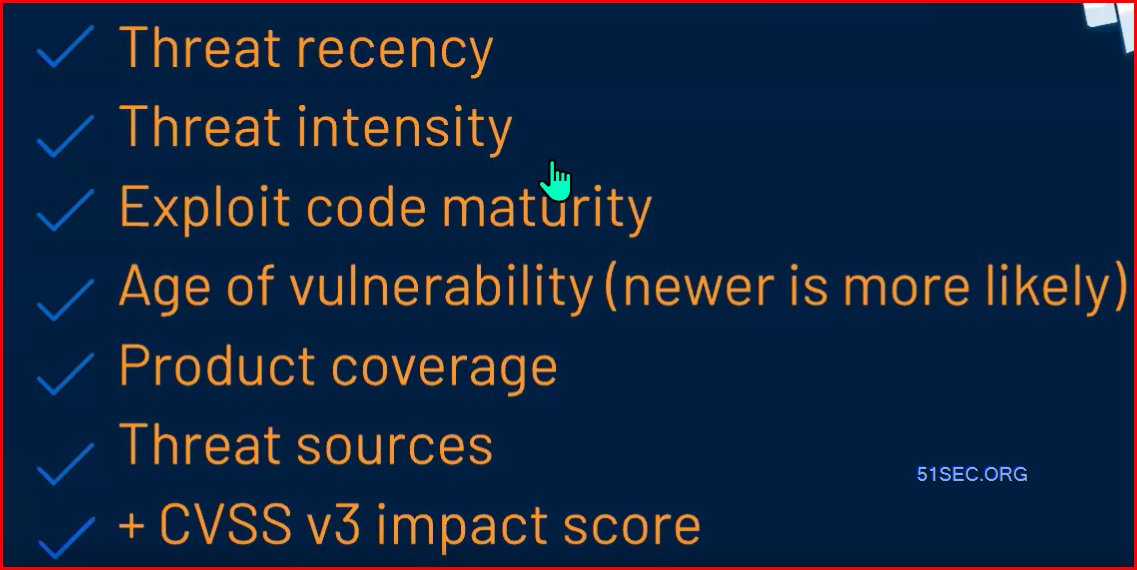
VPR (Vulnerability Priority Rating)
Difference Between CVSS Severity and Vulnerability Priority Rating (VPR) in Nessus
Software Inventory
Videos
References
- https://www.tenable.com/webinars
- https://www.tenable.com/education


No comments:
Post a Comment